


MyBatis
简介:
1. 什么是MyBatis?
1.是一款持久层的框架,用于简化 JDBC开发
2. MyBatis 本是 Apache 的一个开源项目iBatis, 2010年这个项目由apache software foundation 迁移到了google code,并且改名为MyBatis 。2013年11月迁移到Github
3. MyBatis 官网:mybatis – MyBatis 3 | 简介
持久层
1. JavaEE 三层结构:表现层、业务层、持久层
2. 负责将数据保存到数据库的那一层代码,操作数据库的 Java 代码作为持久层;
框架
1. 就是软件的半成品,软件的模板
2. 编写更快,规范、通用、可扩展
2. MYBatis快速入门
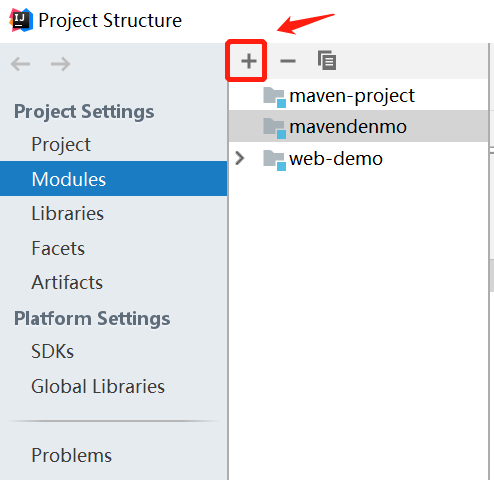
1. 创建IDEA mybatis 一个模块
1. 1 ctrl+Shift+Ait+s 快捷键,出现如下
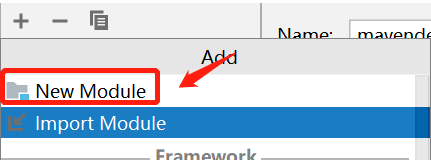
1.2 点击New Module
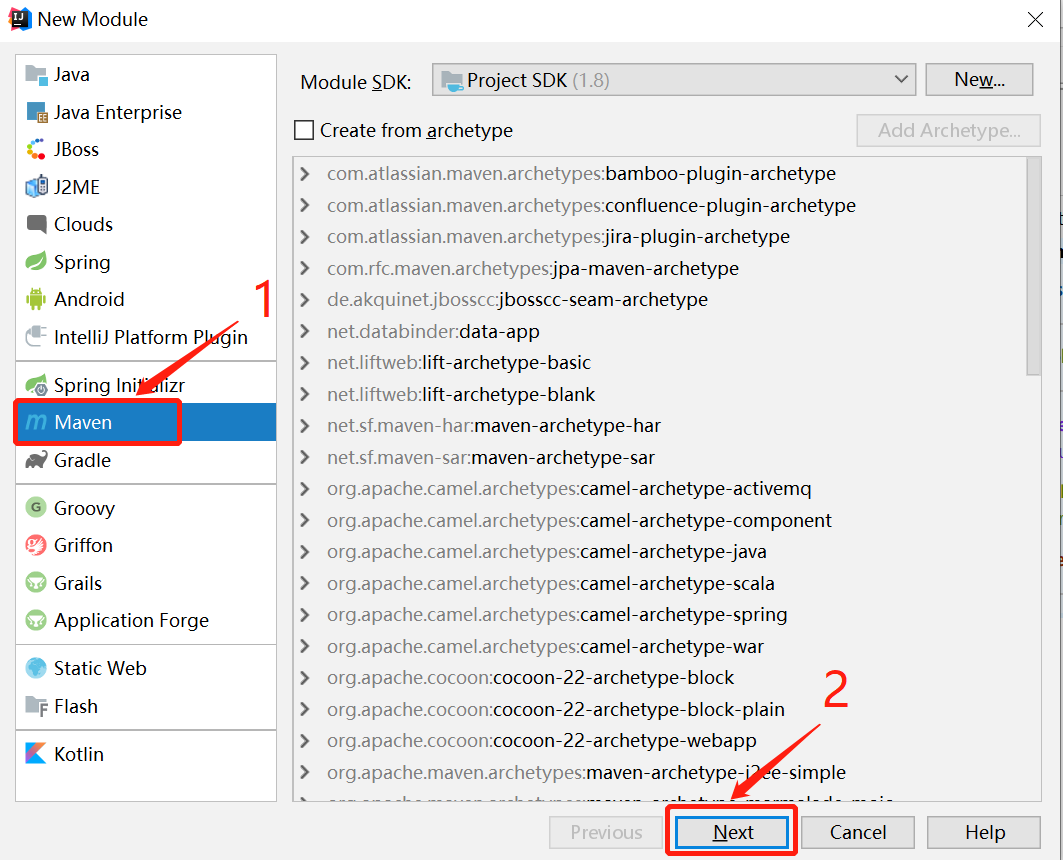
1.3 点击Maven 然后 Next
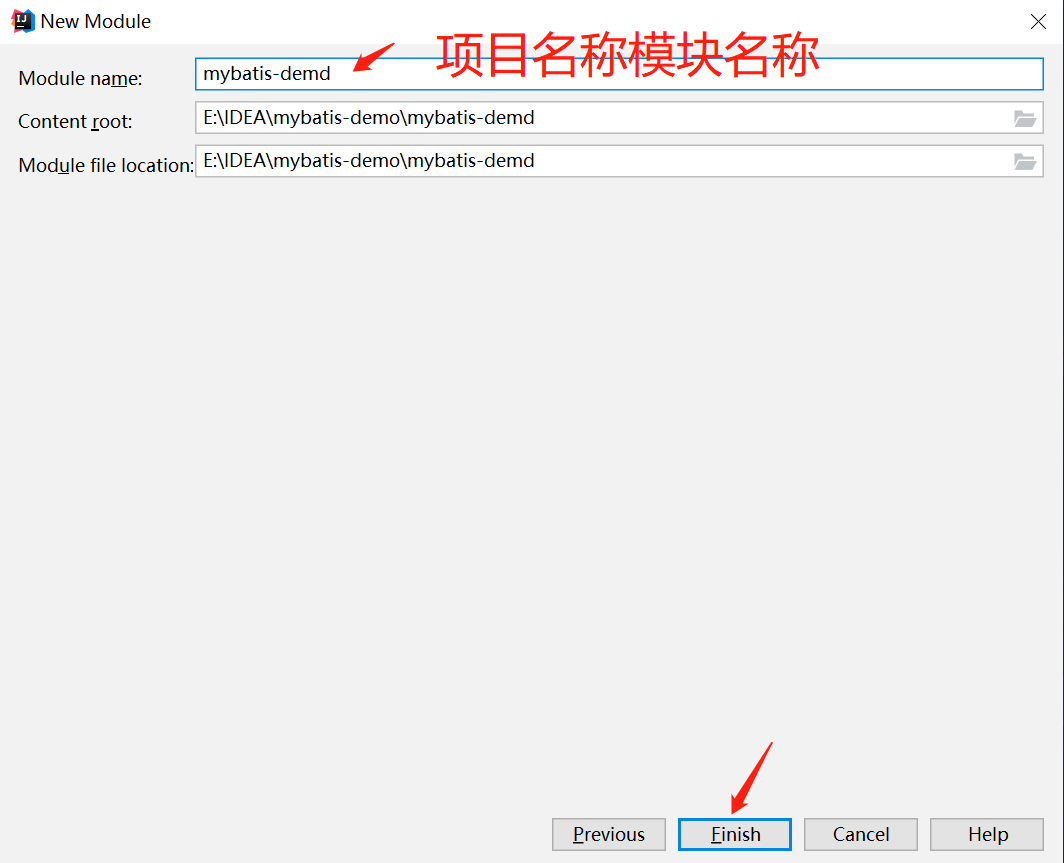
1.4 设置

1.5 Finish
1.6 Appiy + ok
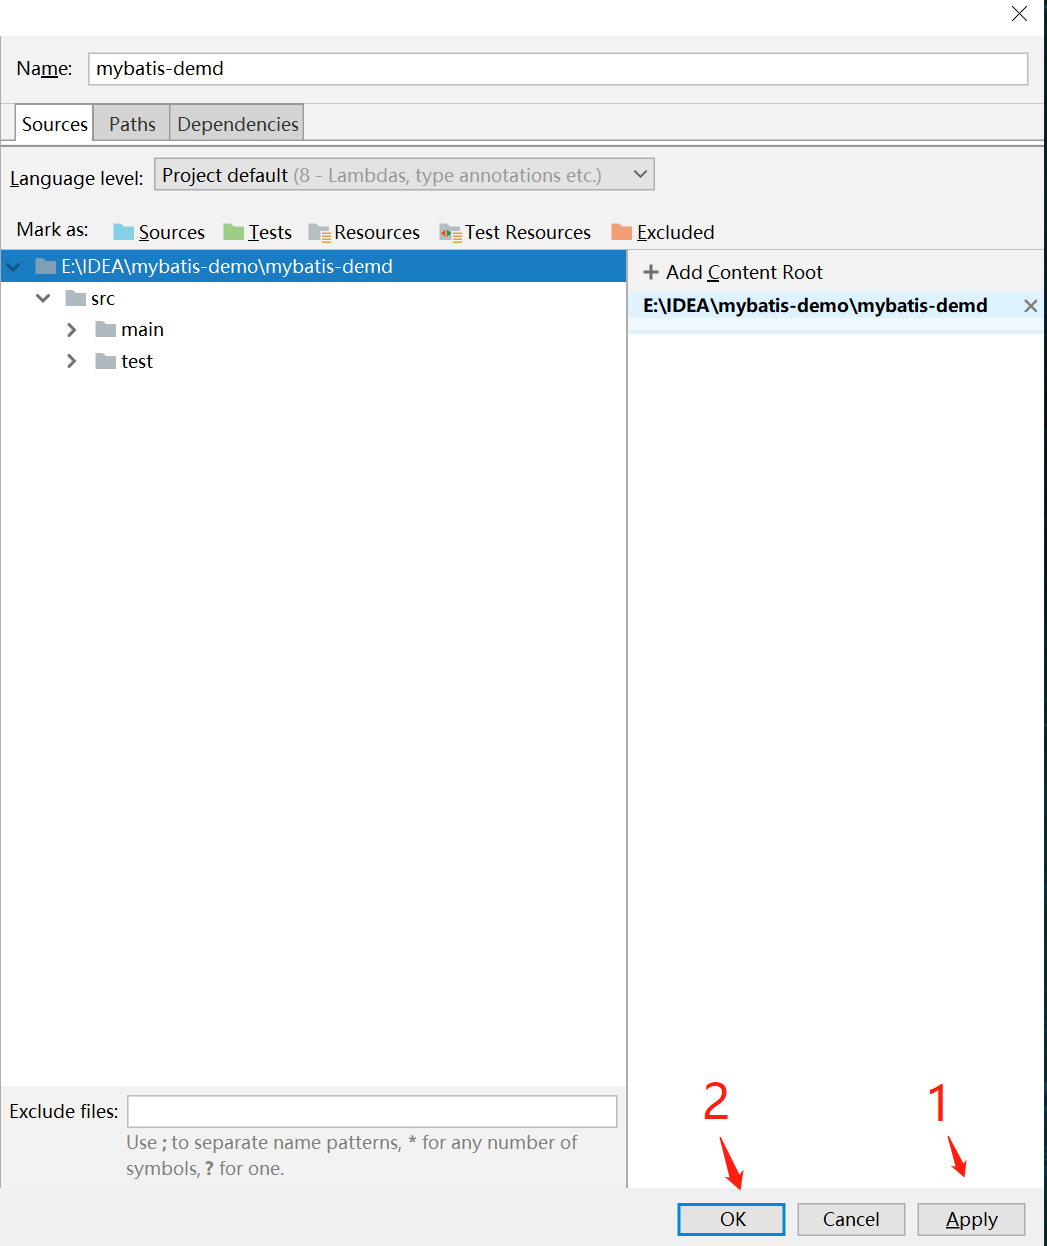
1.7 出现下面的项目就完成项目了

2. 导入 MyBatis 需要的依赖 Jar 包
2.1 去官网找 mybatis 依赖
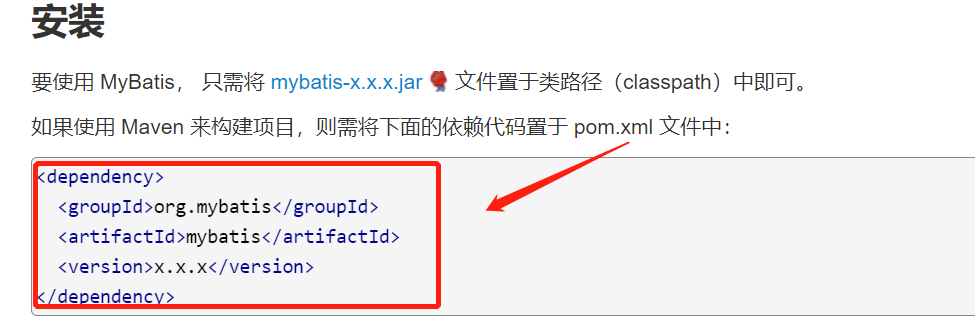
2.2 复制到 pom.xml 里面?

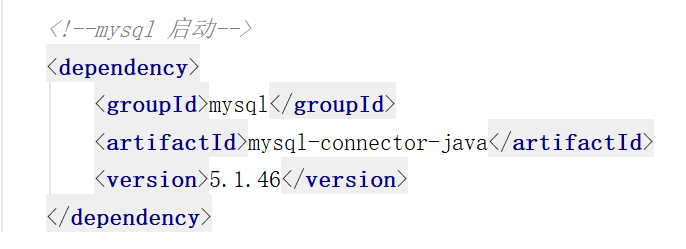
2.3 添加 mysql 启动 Jar
2.4 添加一个单元测试的坐标

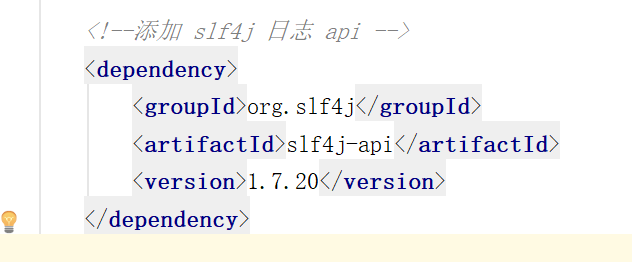
2.5 添加 slf4j 日志 api
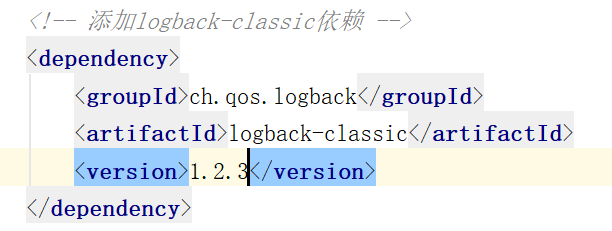
2.6 添加logback-classic依赖
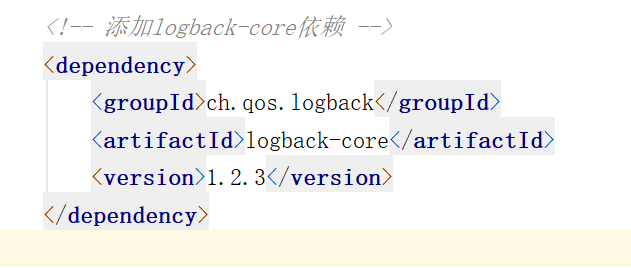
2.7 添加logback-core依赖
3. 配置文件
1. 配置文件下载链接:百度网盘 请输入提取码
复制配置文件到模块src/main/java/resources里面

代码块
<?xml version="1.0" encoding="UTF-8"?>
<configuration>
<!--
CONSOLE :表示当前的日志信息是可以输出到控制台的。
-->
<appender name="Console" class="ch.qos.logback.core.ConsoleAppender">
<encoder>
<pattern>[%level] %blue(%d{HH:mm:ss.SSS}) %cyan([%thread]) %boldGreen(%logger{15}) - %msg %n</pattern>
</encoder>
</appender>
<logger name="com.itheima" level="DEBUG" additivity="false">
<appender-ref ref="Console"/>
</logger>
<!--
level:用来设置打印级别,大小写无关:TRACE, DEBUG, INFO, WARN, ERROR, ALL 和 OFF
, 默认debug
<root>可以包含零个或多个<appender-ref>元素,标识这个输出位置将会被本日志级别控制。
-->
<root level="DEBUG">
<appender-ref ref="Console"/>
</root>
</configuration>
从 XML 中构建 SqlSessionFactory
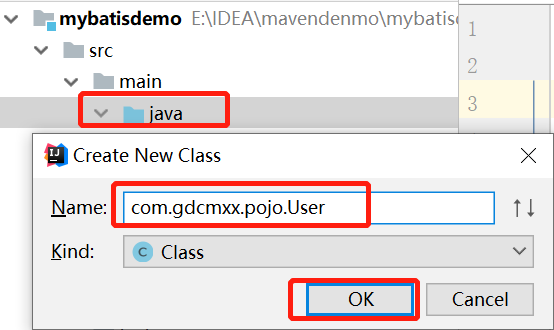
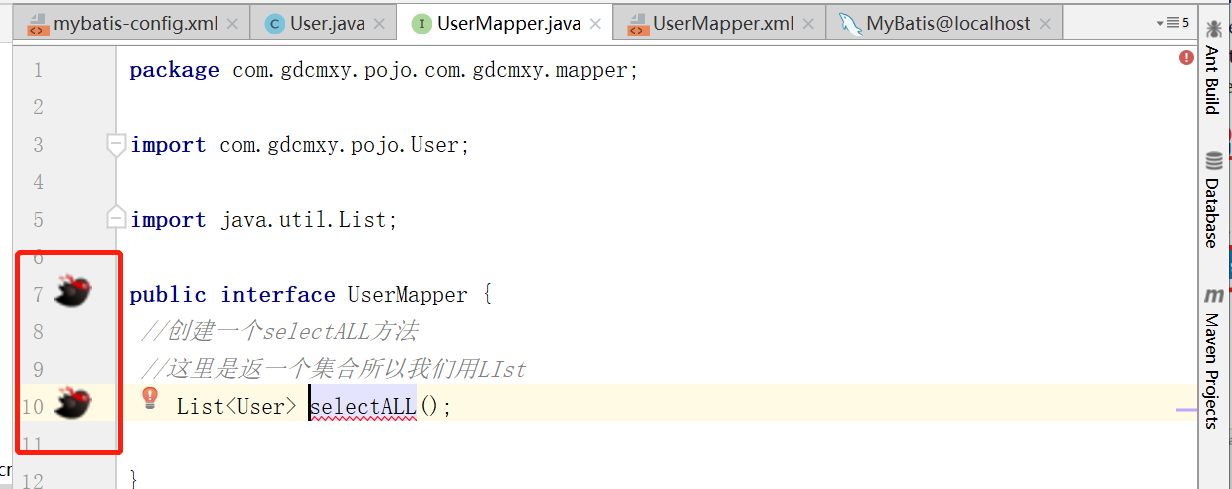
1. 在模块下 New 一个 Java类 (com.gdcmxy.pojo.User)
2. 配置映射文件 从IDEA配置文件夹New File (UserMapper.xml)

配置UserMapper.xml文件

代码如下:
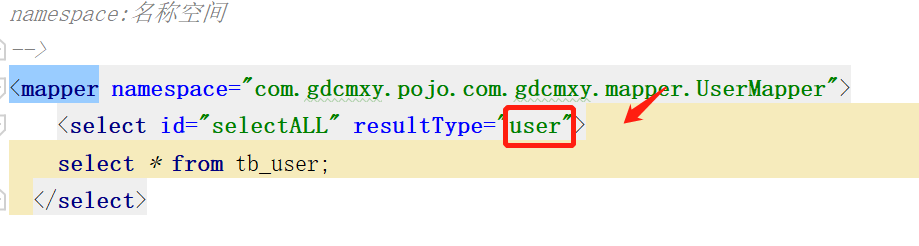
<?xml version="1.0" encoding="UTF-8" ?> <!DOCTYPE mapper PUBLIC "-//mybatis.org//DTD Mapper 3.0//EN" "http://mybatis.org/dtd/mybatis-3-mapper.dtd"> <!-- namespace:名称空间 --> <mapper namespace="test"> <select id="selectAll" resultType="com.gdcmxy.pojo.User"> select * from tb_user; </select> </mapper>
4. 从官网上复制名称,如下图

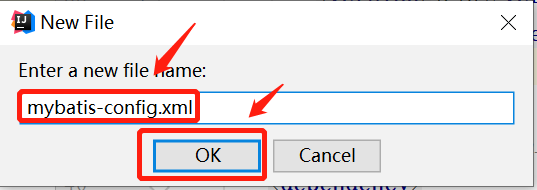
从IDEA配置文件夹New File (mybatis-config.xml)
配置mybatis-config.xml文件

代码如下:
<?xml version="1.0" encoding="UTF-8" ?> <!DOCTYPE configuration PUBLIC "-//mybatis.org//DTD Config 3.0//EN" "http://mybatis.org/dtd/mybatis-3-config.dtd"> <configuration> <typeAliases> <package name="com.itheima.pojo"/> </typeAliases> <!-- environments:配置数据库连接环境信息。可以配置多个environment,通过default属性切换不同的environment --> <environments default="development"> <environment id="development"> <transactionManager type="JDBC"/> <dataSource type="POOLED"> <!--数据库连接信息--> <property name="driver" value="com.mysql.jdbc.Driver"/> <property name="url" value="jdbc:mysql:///mybatis?useSSL=false"/> <property name="username" value="root"/> <property name="password" value="123456"/> </dataSource> </environment> <environment id="test"> <transactionManager type="JDBC"/> <dataSource type="POOLED"> <!--数据库连接信息--> <property name="driver" value="com.mysql.jdbc.Driver"/> <property name="url" value="jdbc:mysql:///mybatis?useSSL=false"/> <property name="username" value="root"/> <property name="password" value="123456"/> </dataSource> </environment> </environments> <mappers> <!--加载sql映射文件--> <mapper resource="UserMapper.xml"/> <!--Mapper代理方式--> <package name="com.itheima.mapper"/> </mappers> </configuration>
4. 创建一个实体类
在User.java下编数据库的类,然后格式化,然后to String
package com.gdcmxx.pojo;
//Ait + 鼠标左键 可以整列编辑
public class User {
private Integer id;
private String username;
private String password;
private String gender;
private String addr;
//Ait+lnsert 选第四个 (格式化)
public Integer getId() {
return id;
}
public void setId(Integer id) {
this.id = id;
}
public String getUsername() {
return username;
}
public void setUsername(String username) {
this.username = username;
}
public String getPassword() {
return password;
}
public void setPassword(String password) {
this.password = password;
}
public String getGender() {
return gender;
}
public void setGender(String gender) {
this.gender = gender;
}
public String getAddr() {
return addr;
}
public void setAddr(String addr) {
this.addr = addr;
}
//Ait + insert 选择toString
@Override
public String toString() {
return "User{" +
"id=" + id +
", username='" + username + '\'' +
", password='" + password + '\'' +
", gender='" + gender + '\'' +
", addr='" + addr + '\'' +
'}';
}
}
5. 在java下创建一个MyBatis测试类
代码如下
package com.gdcmxy.pojo.com.gdcmxy;
import com.gdcmxy.pojo.User;
import org.apache.ibatis.io.Resources;
import org.apache.ibatis.session.SqlSession;
import org.apache.ibatis.session.SqlSessionFactory;
import org.apache.ibatis.session.SqlSessionFactoryBuilder;
import java.io.IOException;
import java.io.InputStream;
import java.util.List;
/**
* Mybatis 快速入门代码
*/
public class MyBatisDemo {
public static void main(String[] args) throws IOException {
//1. 加载mybatis的核心配置文件,获取 SqlSessionFactory
String resource = "mybatis-config.xml";
InputStream inputStream = Resources.getResourceAsStream(resource);
SqlSessionFactory sqlSessionFactory = new SqlSessionFactoryBuilder().build(inputStream);
//2. 获取SqlSession对象,用它来执行sql
SqlSession sqlSession = sqlSessionFactory.openSession();
//3. 执行sql
List<User> users = sqlSession.selectList("test.selectAll");
System.out.println(users);
//4. 释放资源
sqlSession.close();
}
}
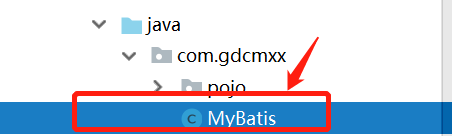
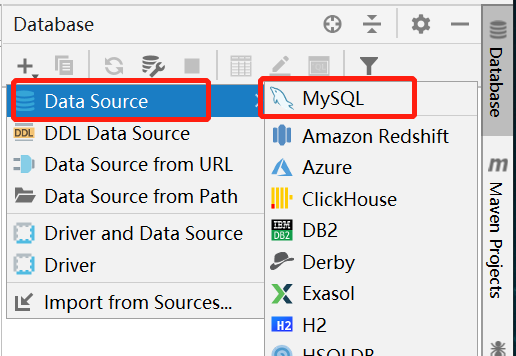
6.在IDEA 里添加使用Mysql
1. 在Database里面点击+号

2. 在DAta Sourc 里点击MYsql
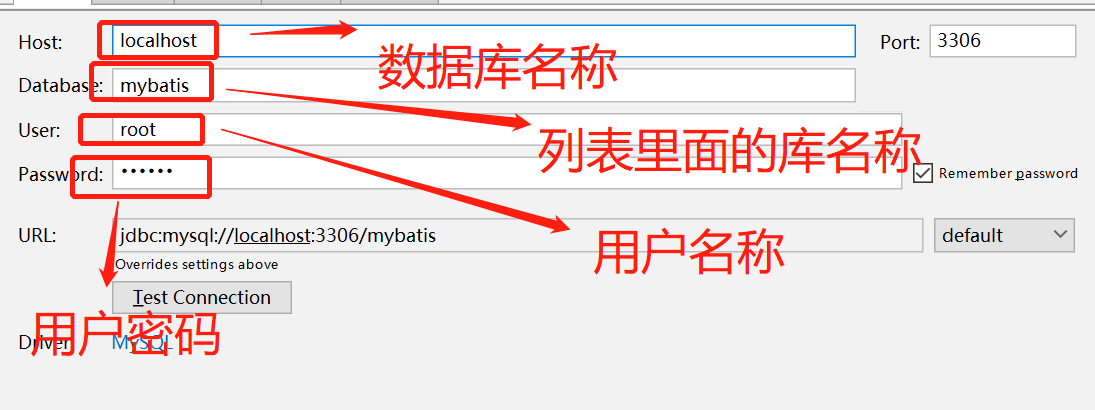
3. 填写信息
4. 添加成功点击那个笔可以编写数据库(打差不多一直回车可以 快速生成)

3. Mapper代理开发
1. 为什么要Mapper代理开发?
1.解决原生方式中的硬编码
2.简化后期执行SQL
2. 部署Mapper代理开发
1. 定义与SQL映射文件同名的Mapper接口,并且将Mapper接口和SQL映射文件放置在同一目录下。
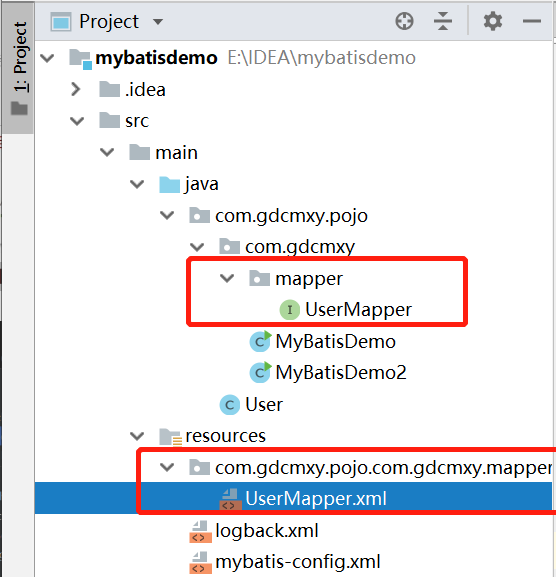
检查是否在一个目录下

2. 设置SQL映射文件的namespace属性为Mapper接口全限定名。

3. 在 Mapper 接口中定义方法,方法名就是SQL映射文件中sql语句的id,并保持参数类型和返回值类型一致
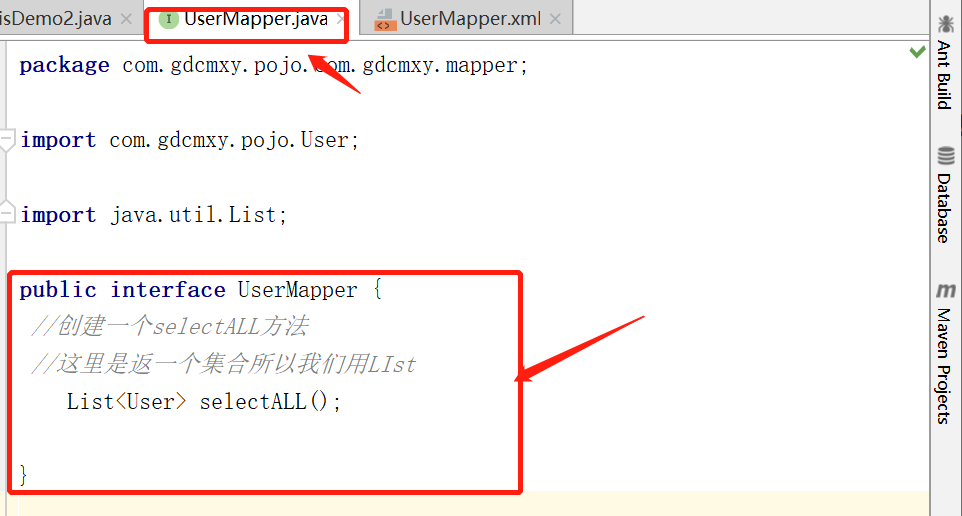
保持参数类型和返回值类型一致
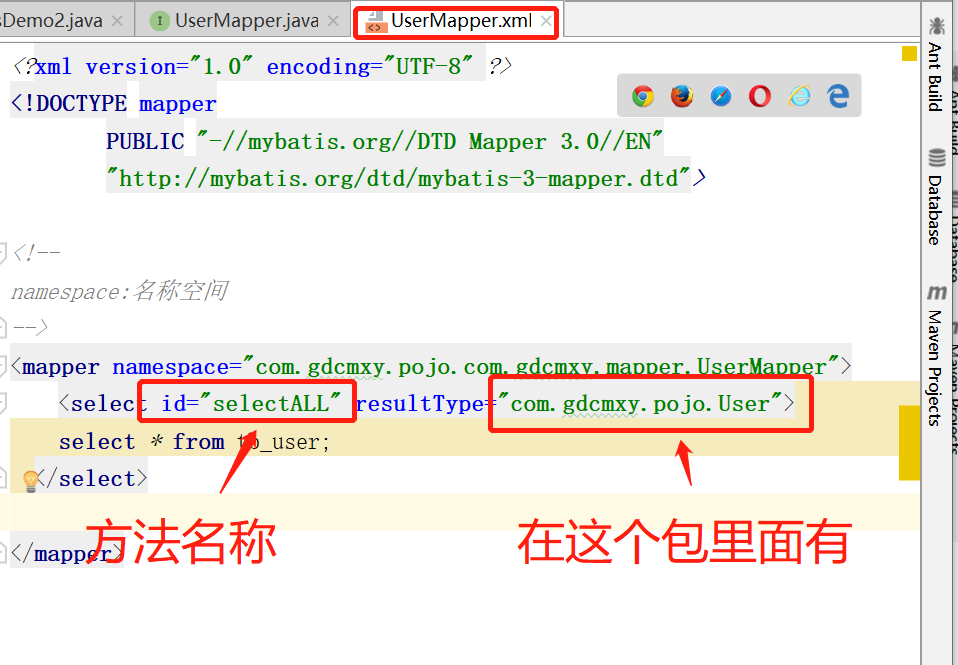
4. 修改UserMapper.xml配置中mapper
6. 测试编码
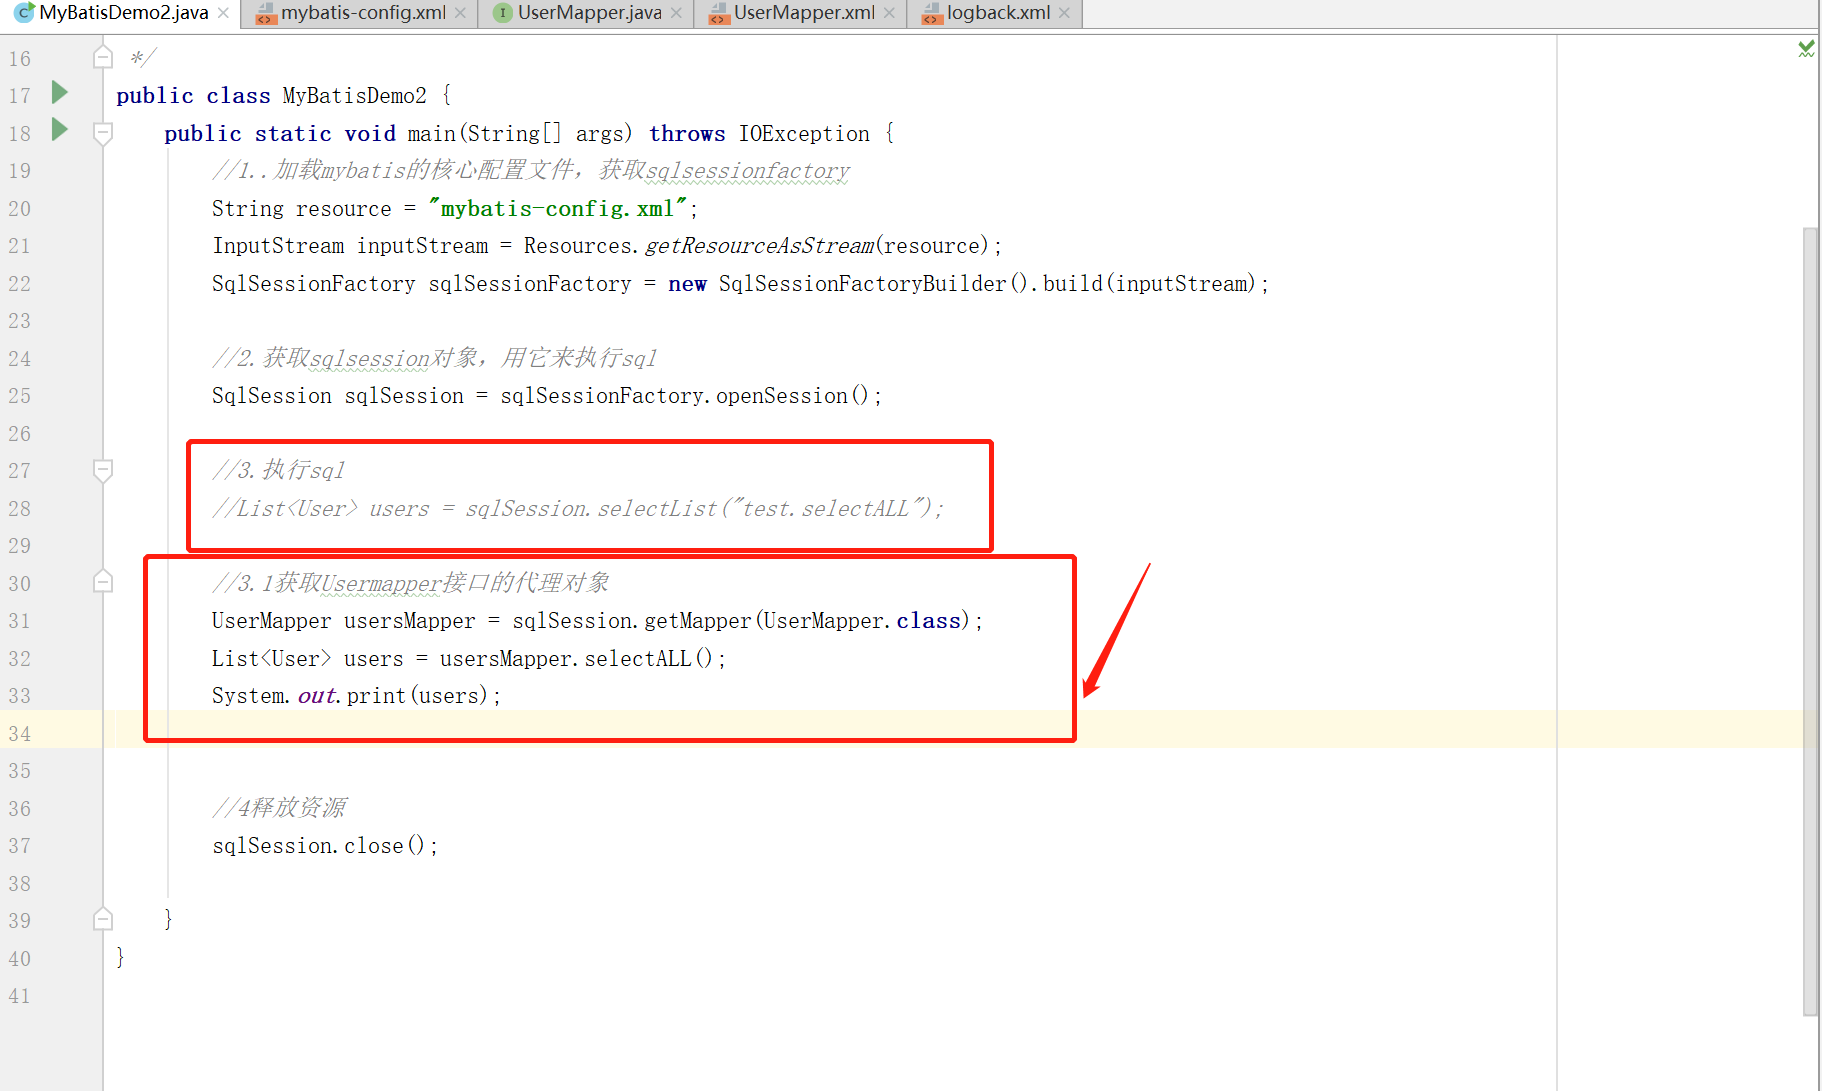
测试

注意:Mapper接口名称和SQL映射文件名称相同,所以要放同一目录下,使用包扫描的方式简化SQL映射文件的加载。将核心配置文件的加载映射配置文件的配置修改为在哪个包下就行

4. MyBatis核心配置文件
1. environments 配置信息

代码
<!--environments 配置Mysql数据库连接的环境信息,可以配置多个environments,通过defoult属性切换不同的environments--> <!--开发环境--> <environments default="development"> <!--开发环境下要配置事务管理设置了一个JDBC方法--> <environment id="development"> <transactionManager type="JDBC"/> <!--dateSourue数据库连接池 MyBatis默认是POOLEO--> <dataSource type="POOLED"> <!--连接数据库信息--> <property name="driver" value="com.mysql.jdbc.Driver"/> <property name="url" value="jdbc:mysql:///mybatis?useSSL=false"/> <property name="username" value="root"/> <property name="password" value="123456"/> </dataSource> </environment> </environments>
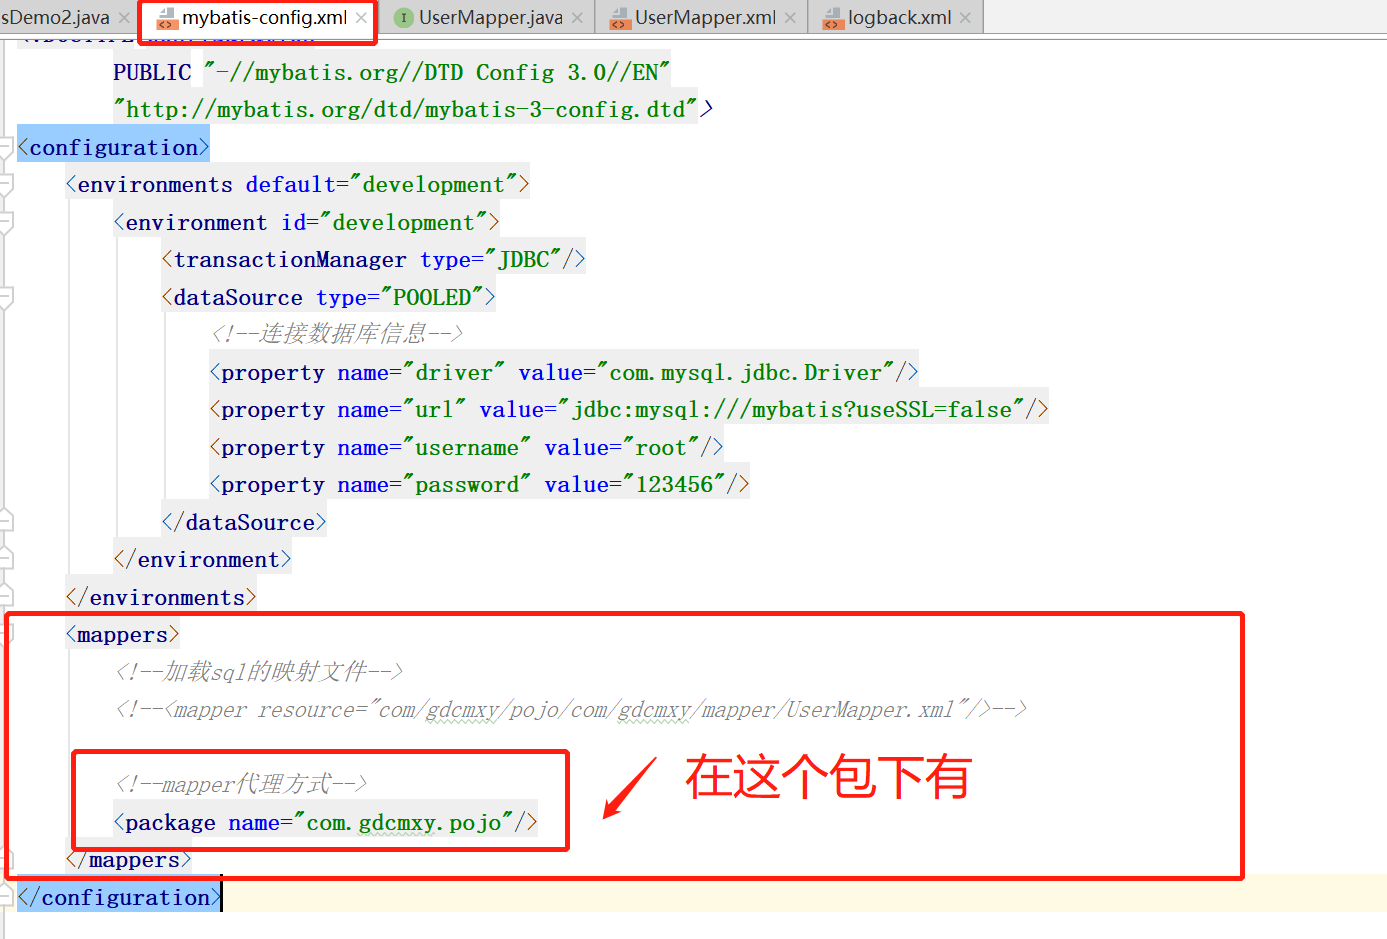
2. mapper配置信息(映射器定义完SQl语句,通过映射器找到语句)

代码:
    <mappers>
        <!--加载sql的映射文件-->
        <!--<mapper resource="com/gdcmxy/pojo/com/gdcmxy/mapper/UserMapper.xml"/>-->

        <!--mapper代理方式-->
        <package name="com.gdcmxy.pojo"/>
    </mappers>
typeAlice 配置信息 别名(配置完不区分大小写)
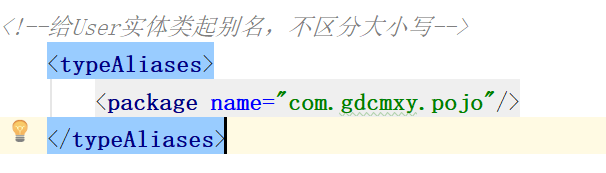
不区分大小写
注意:配置文件一定要按照顺序来要不然报错

5. 安装MyBatisX插件
1.MyBatisX作用:
MybatisX 是一款基于 IDEA 的快速开发插件,为效率而生。
2.主要功能
XML映射配置文件 和 接口方法 间相互跳转
根据接口方法生成 statement
安装
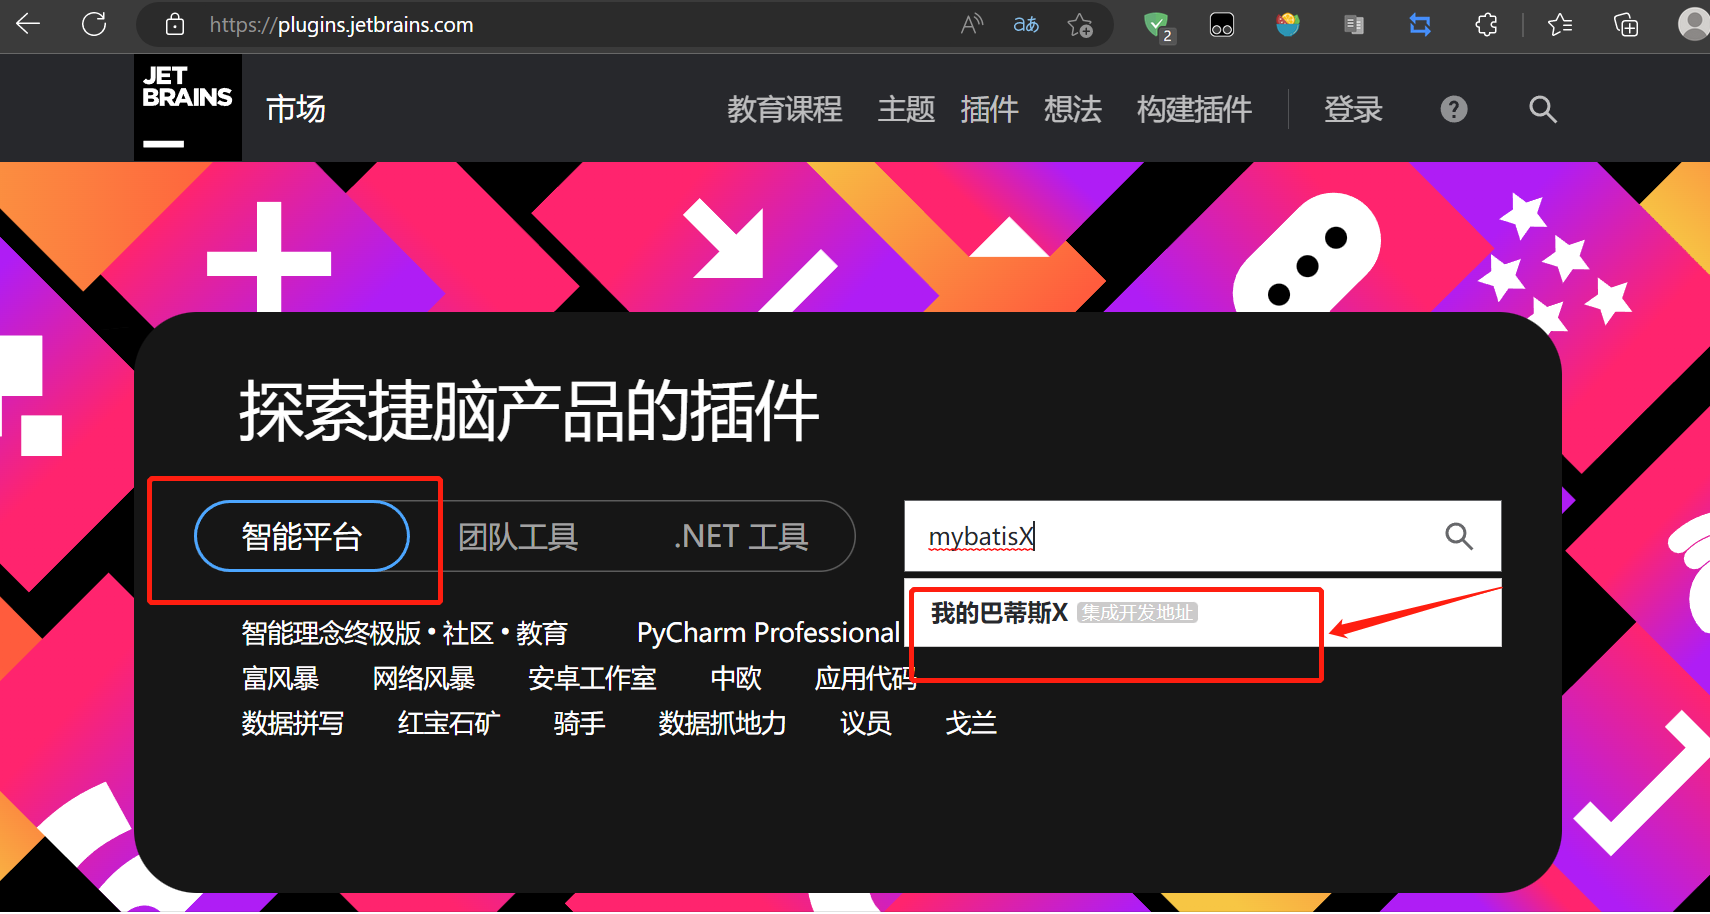
1. 官网下载插件的zip压缩包:JetBrains Marketplace
2. 然后下载

3. 把压缩包放到E:\IDEA\IntelliJ IDEA 2018.2.2\plugins\zkm下

4. 打开idea,file ->setting->plugins
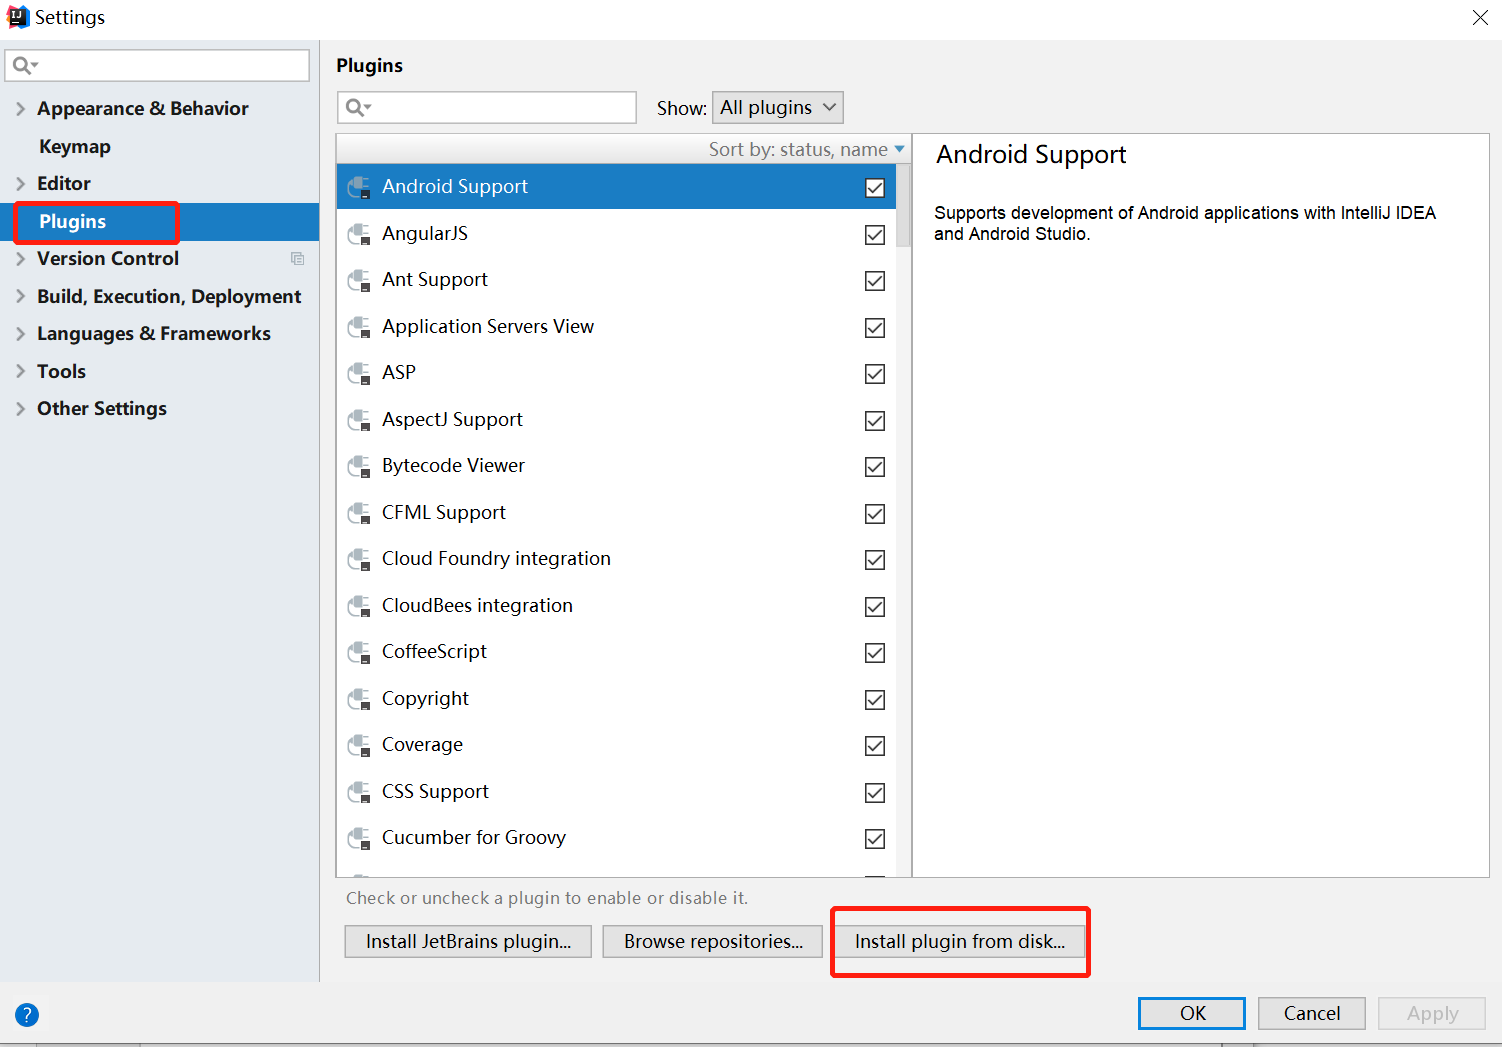
选择下载好的插件然后OK再点击apply 然后点击ok
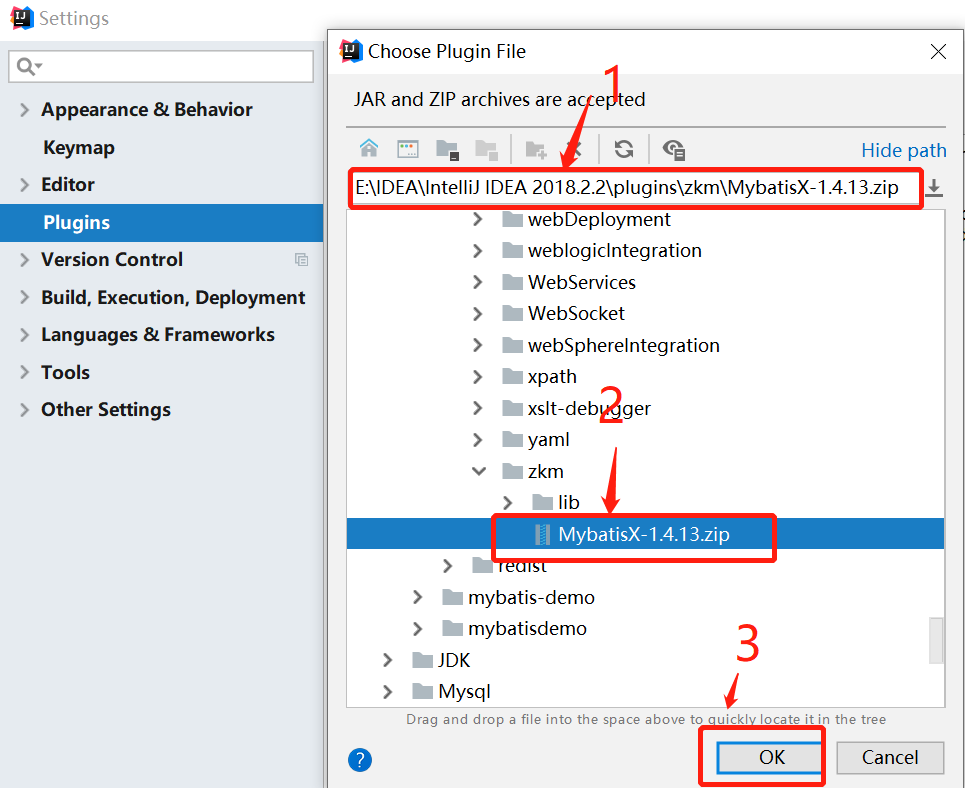
重新启动安装完成
6. 使用mybatis步骤
1. 编写接口方法:Mapper接口
参数:无
结果:List <brand>
2. 编写sql语句:sql映射文件:
3. 执行方法;测试
4. resulMap可以把MySQL查询得到的数据封装,然后不会返回一个null
id 唯一标识
type:映射的类型,支持别名(可以小写)
resulMap步骤:
1.定义<resultMap>
2.在<select>标签中,使用resultmap属性替换 resultType属性
id:完成主建字段的映射
column:表的列名
property:实体类属性名
result:完成一般字段的映射
column:表列名
proprty:实体类属性名
在BrandMapper.xml映射文件下创建

7. 增删改查
1. 查
1. 查询详情
1. 创建一个brand对象的方法后面加属性比如查询int id()
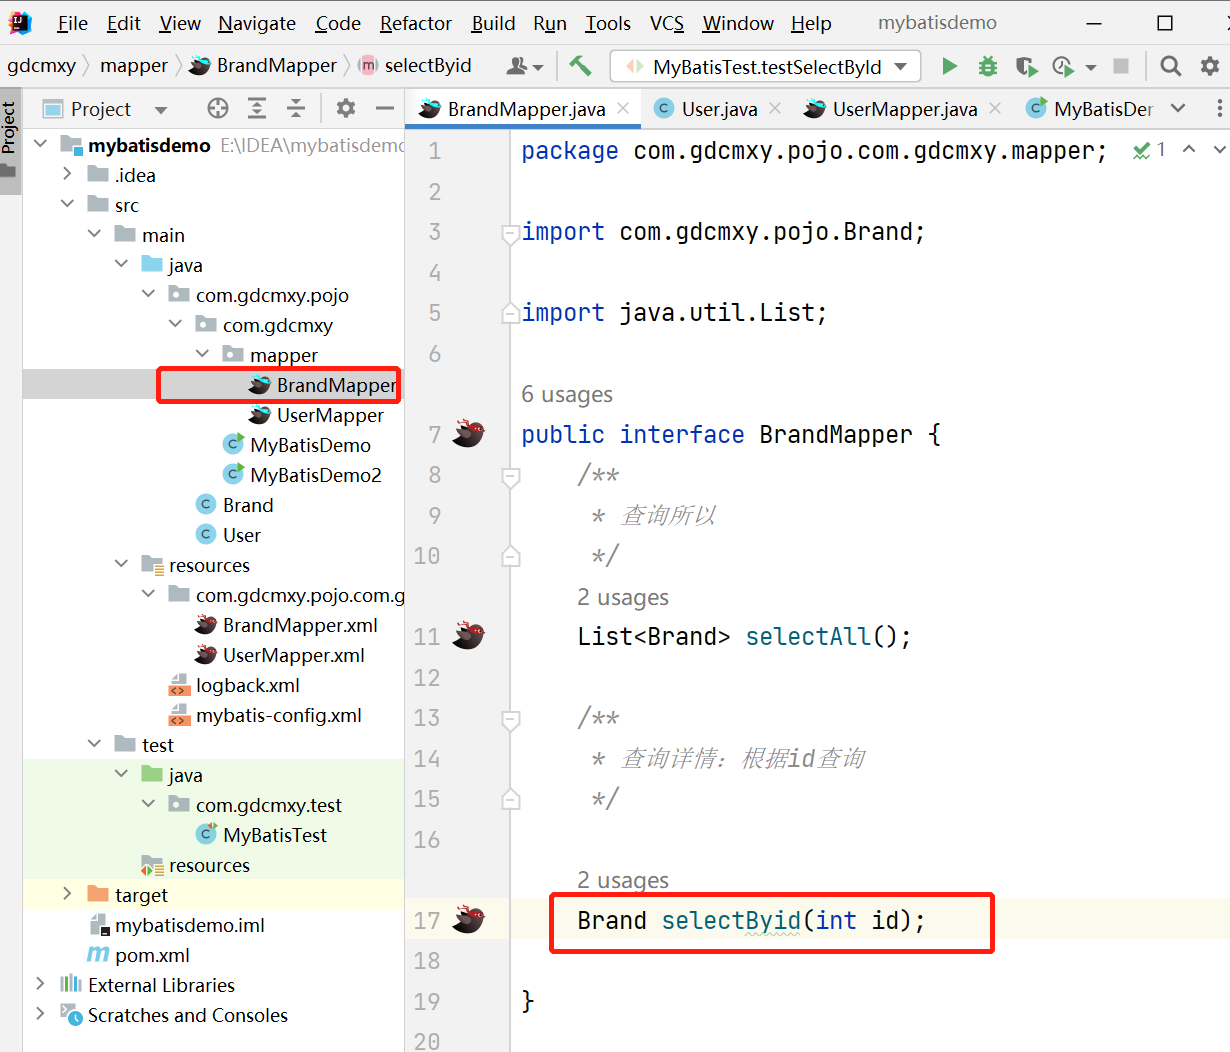
2. Ait+Enter快捷键生成对应的select如下
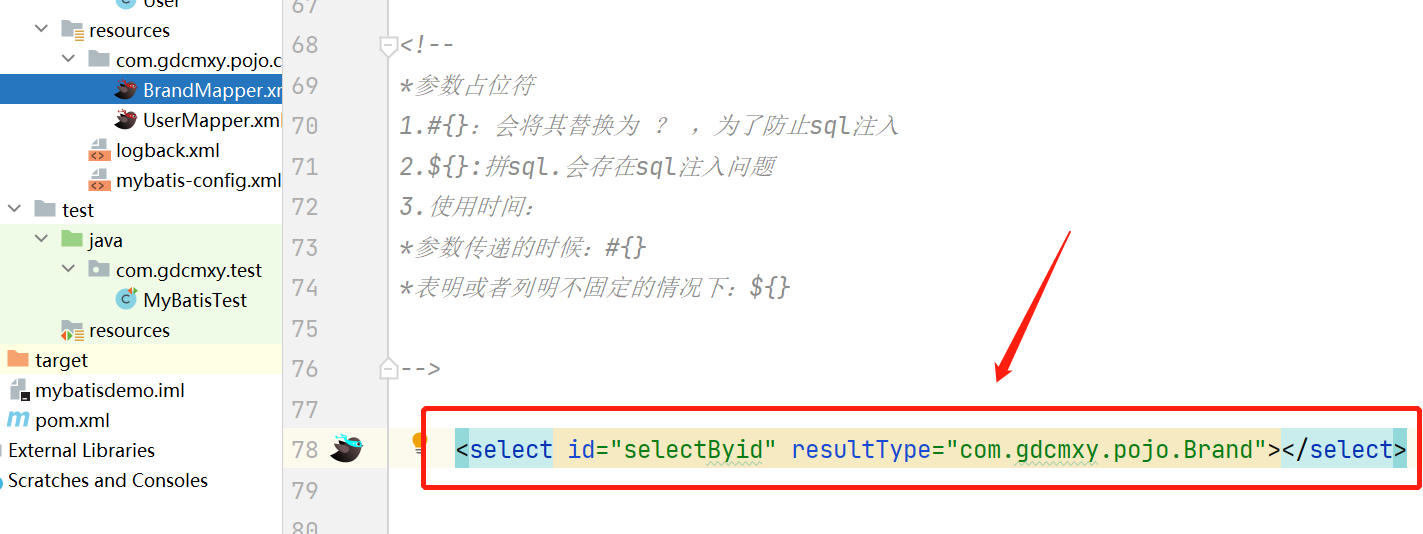
3. 把resultType属性修改成resultMap然后里面写sql语句

4. 创建一个测试类
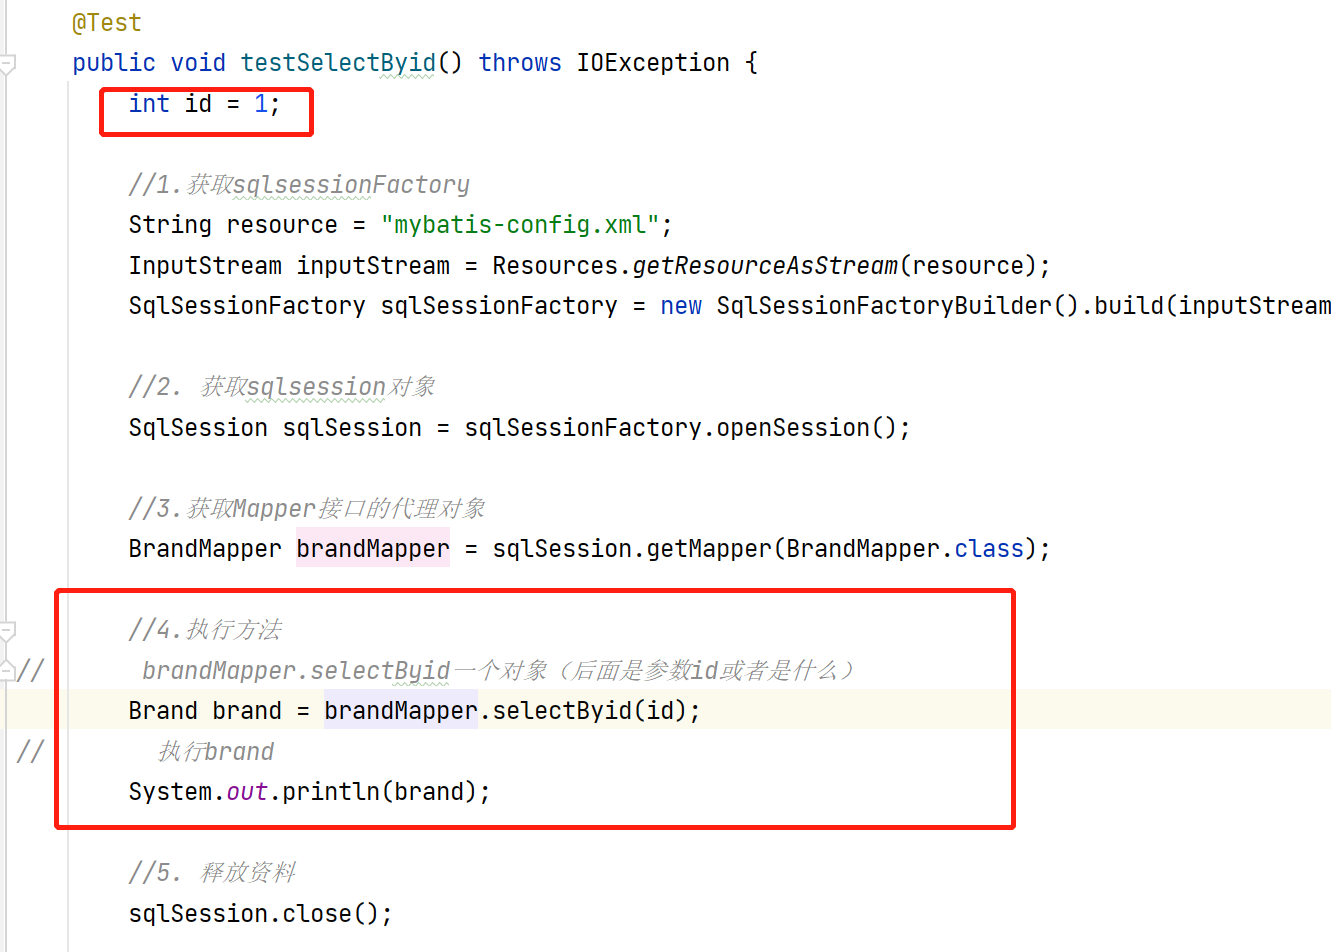
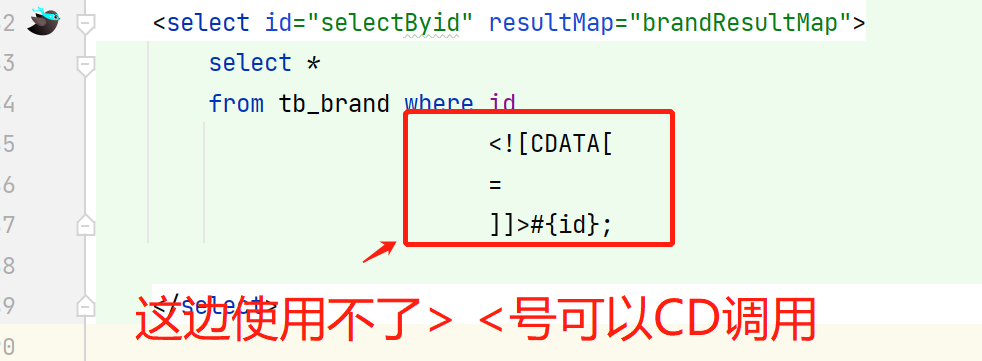
5. 测试成功

6.转义符一般在SQL写语句里面用不了可以DC回车,可以在里面使用如下
条件查询步骤
1.编写接口方法:Mapper接口
2.参数:所以查询条件
3.结果LIst<Brand>
4.编写sql语句:sql映射文件
5.执行方法,测试
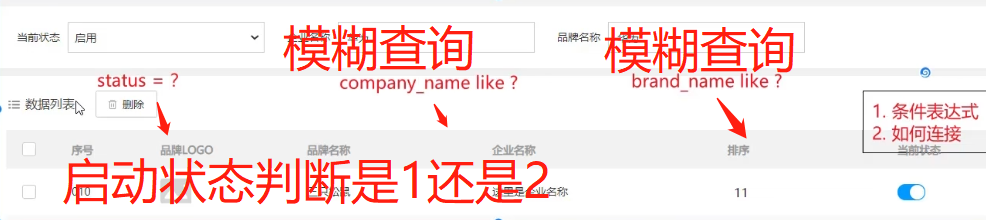
2. 多条件查询
用户在实际使用的时候,不会根据你有几个input而去填写,也许只填写一个,或者两个,就执行操作了(防止出错)
明白需求
用where staus =?and compan_name like ?and compan_name like ?连接
3. 动态查询
可以判断用户输入多个来条件判断然后输出
1.创建一个brand的selectByCondition方法(创建对象方法)比如Map map或者是Brand brand

2.Ait+Enter快捷键修改resultType为resultMap="brandResultMap",然后编写sql语句

代码:
这里的where标签,如果条件都没有满足就直接全部输出
if标签相当于if判断语句
test是判断语句如果不等于null或者是不等于空' '
注:
where 关键后直接跟 and 关键字,这就是一条错误的SQL语句。这个就可以使用 where 标签解决
where 标签
作用:
替换where关键字
会动态的去掉第一个条件前的 and
如果所有的参数没有值则不加where关键字
<!--动态条件查询sql语句-->
    <select id="selectByCondition" resultMap="brandResultMap">
        select *
        from tb_brand
#       //这里条件已经成了,然后这个变成第一个然后后面就可以and
#         where 1 =1 ;
          <where>
            <if test="status !=null">
                and status =#{status}
            </if>
            <if test="companyName != null and companyName != '' ">
                and company_name like #{companyName}
            </if>
            <if test="brandName != null and brandName != '' ">
                and brand_name like #{brandName}
            </if>
          </where>
    </select>
创建一个测试类型
代码:
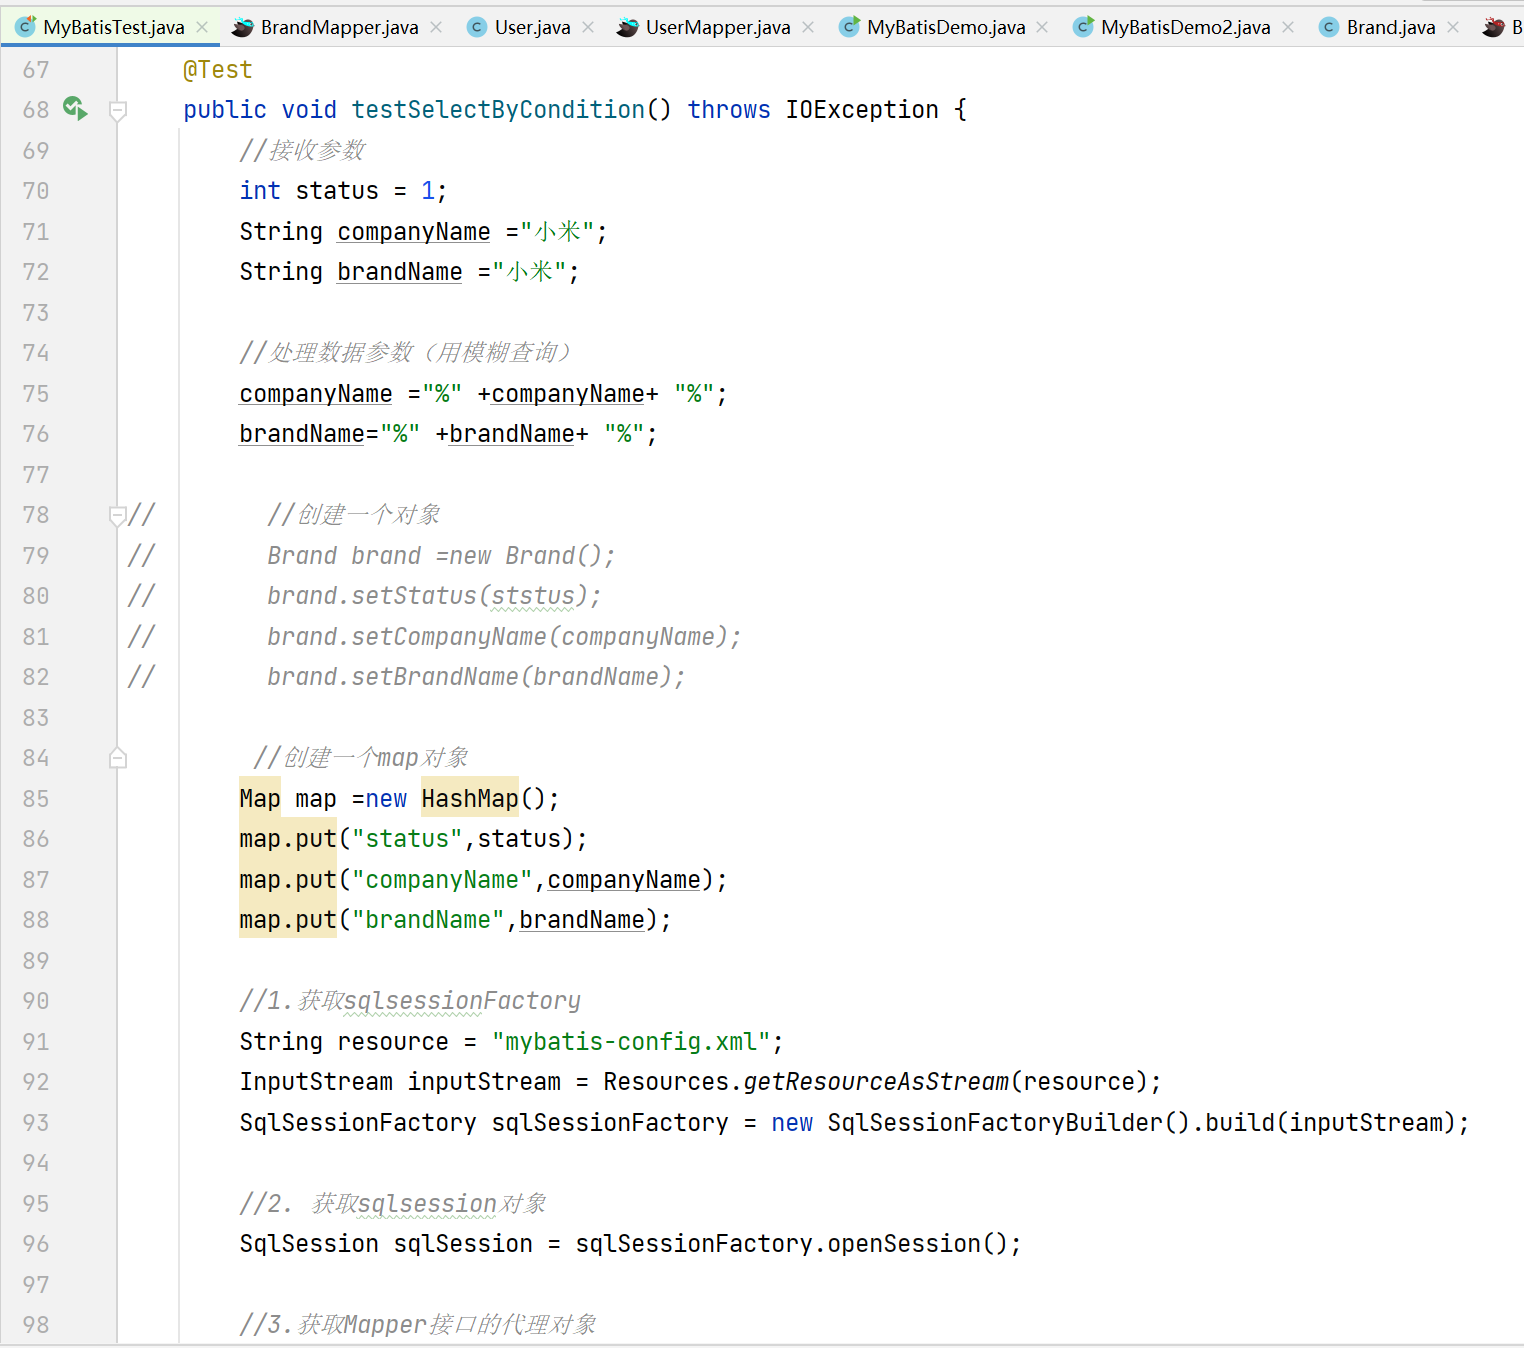
@Test
public void testSelectByCondition() throws IOException {
//接收参数
int status = 1;
String companyName ="小米";
String brandName ="小米";
//处理数据参数(用模糊查询)
companyName ="%" +companyName+ "%";
brandName="%" +brandName+ "%";
//创建一个map对象
Map map =new HashMap();
map.put("status",status);
map.put("companyName",companyName);
map.put("brandName",brandName);
//1.获取sqlsessionFactory
String resource = "mybatis-config.xml";
InputStream inputStream = Resources.getResourceAsStream(resource);
SqlSessionFactory sqlSessionFactory = new SqlSessionFactoryBuilder().build(inputStream);
//2. 获取sqlsession对象
SqlSession sqlSession = sqlSessionFactory.openSession();
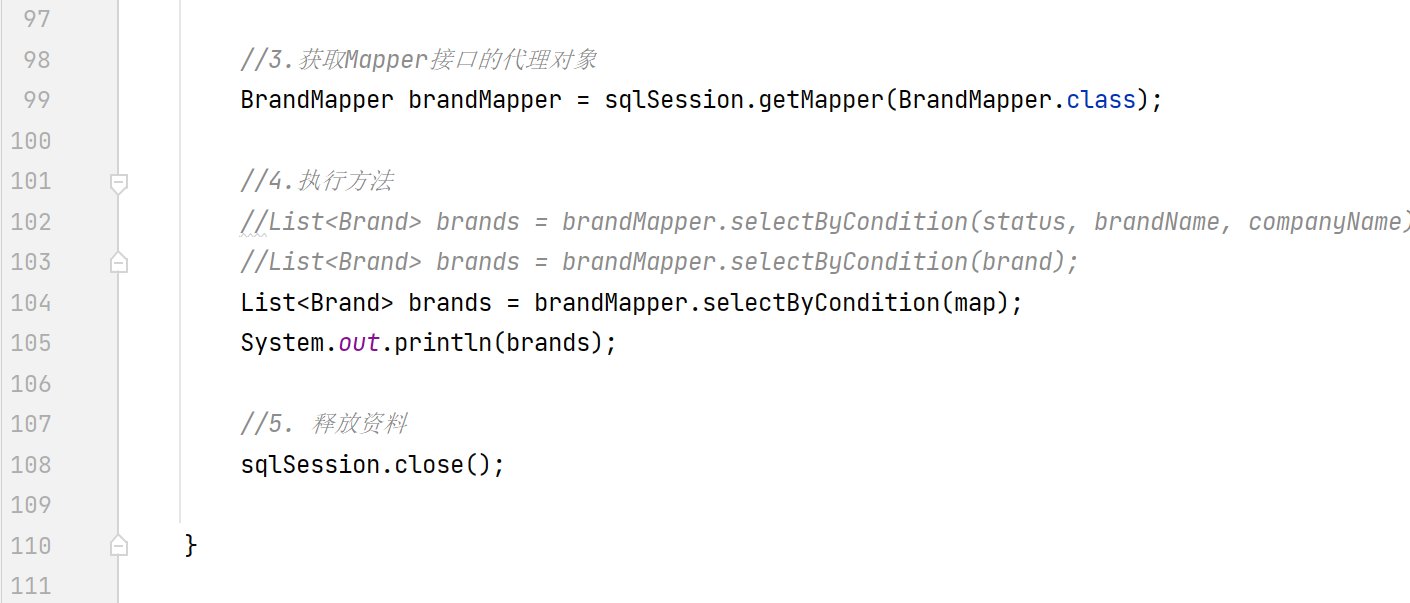
//3.获取Mapper接口的代理对象
BrandMapper brandMapper = sqlSession.getMapper(BrandMapper.class);
//4.执行方法
List<Brand> brands = brandMapper.selectByCondition(map);
System.out.println(brands);
//5. 释放资料
sqlSession.close();
}
4.单个条件查询(动态sql)
条件是不固定的,也就是在多个条件中选择一个
1. 创建一个brand的selectByConditionSingle方法(创建对象的方法Brand brand)

2. Ait+Enter快捷键修改resultType为resultMap="brandResultMap",然后编写sql语句
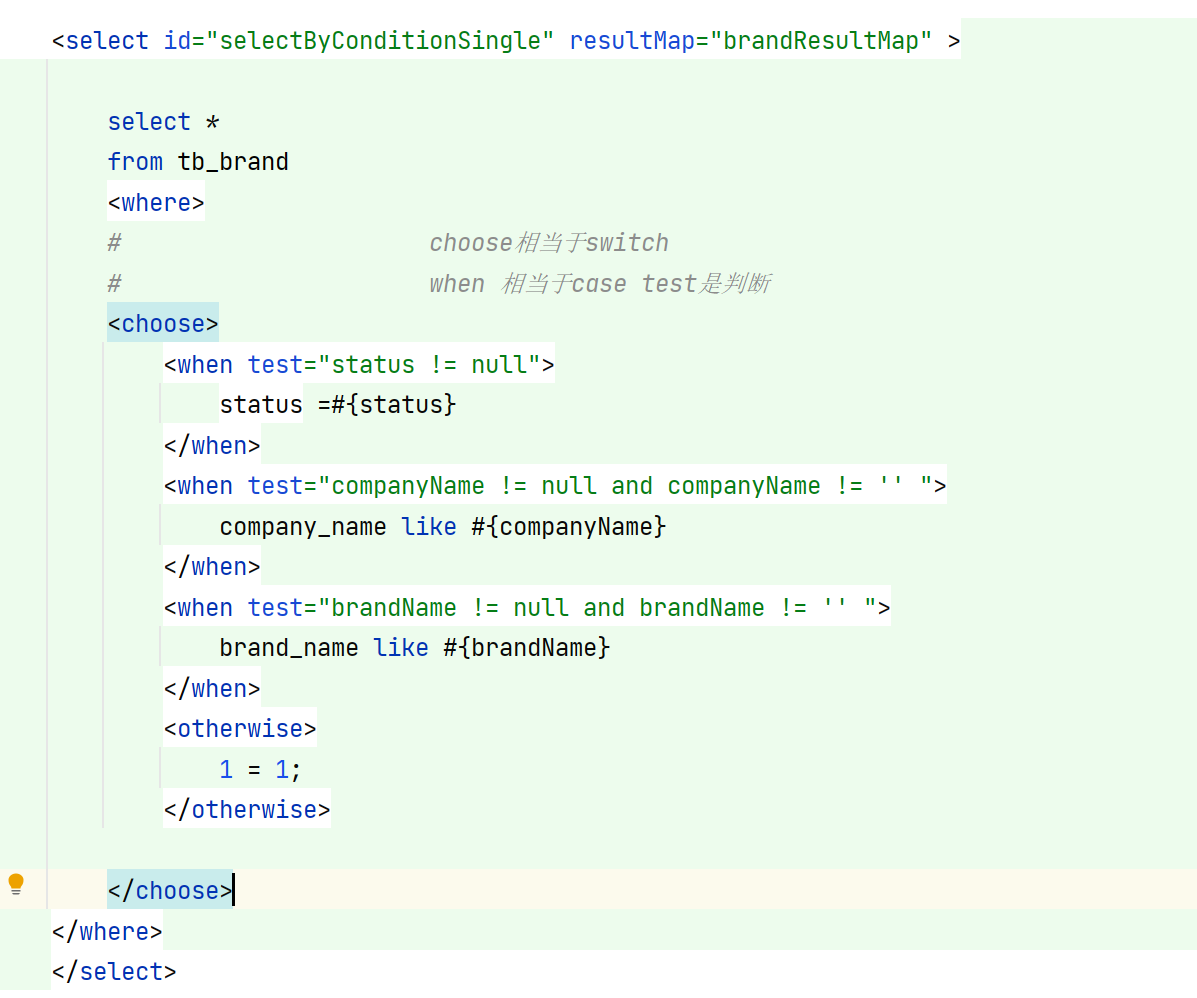
代码:
    <select id="selectByConditionSingle" resultMap="brandResultMap" >

        select *
        from tb_brand
        <where>
        #                      choose相当于switch
        #                      when 相当于case test是判断
        <choose>
            <when test="status != null">
                status =#{status}
            </when>
            <when test="companyName != null and companyName != '' ">
                company_name like #{companyName}
            </when>
            <when test="brandName != null and brandName != '' ">
                brand_name like #{brandName}
            </when>
            <otherwise>
                1 = 1;
            </otherwise>

        </choose>
    </where>
    </select>
3. 创建一个测试类


代码:
    @Test
    public void testSelectByConditionSingle() throws IOException {
        //接收参数
        int status = 1;
        String companyName ="小米";
        String brandName ="小米";

        //处理数据参数(用模糊查询)
        companyName ="%" +companyName+ "%";
        brandName="%" +brandName+ "%";

        //创建一个对象
        Brand brand =new Brand();
        brand.setStatus(status);
        brand.setCompanyName(companyName);
        brand.setBrandName(brandName);

        //1.获取sqlsessionFactory
        String resource = "mybatis-config.xml";
        InputStream inputStream = Resources.getResourceAsStream(resource);
        SqlSessionFactory sqlSessionFactory = new SqlSessionFactoryBuilder().build(inputStream);

        //2. 获取sqlsession对象
        SqlSession sqlSession = sqlSessionFactory.openSession();

        //3.获取Mapper接口的代理对象
        BrandMapper brandMapper = sqlSession.getMapper(BrandMapper.class);

        //4.执行方法
    List<Brand> brands =brandMapper.selectByConditionSingle(brand);
        System.out.println(brands);

        //5. 释放资料
        sqlSession.close();

    }
}
3. 添加
1. 添加mysql数据
1. 创建一个方法返回是viod 名是add (创建参数是Band band)的方法

2. Ait+Enter快捷键然后添加mysql语句

3. 创建一个测试类然后里面创建参数,对象然后执行,手动事务

代码:
@Test
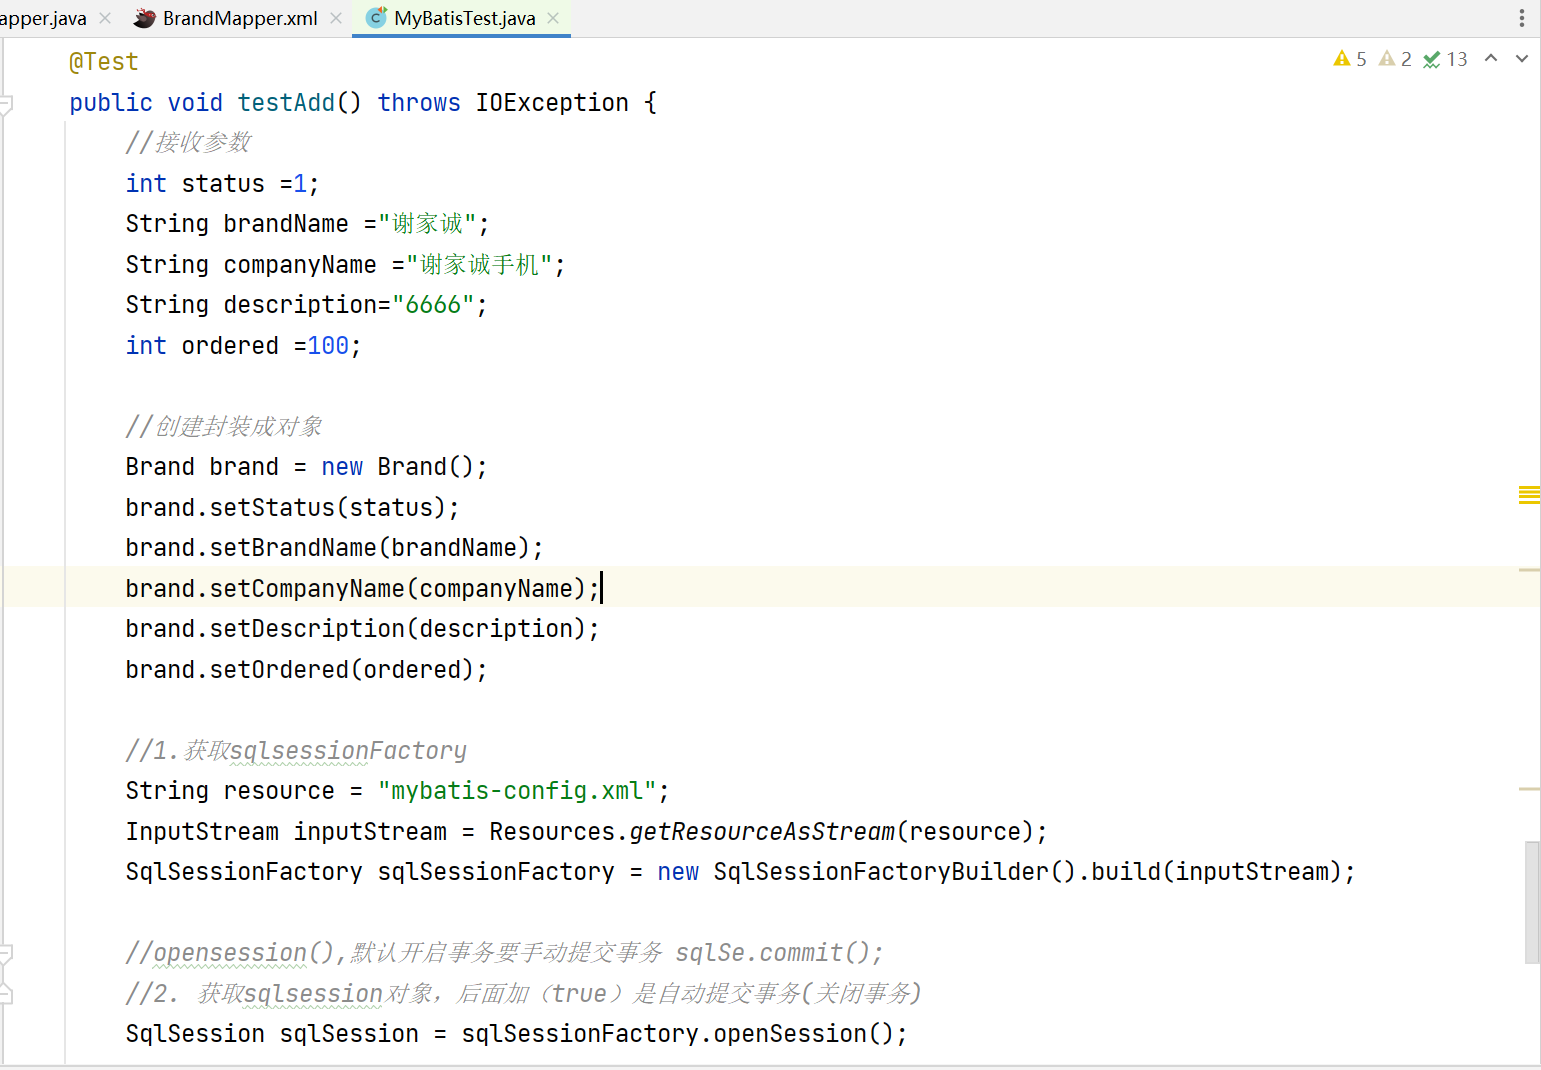
public void testAdd() throws IOException {
//接收参数
int status =1;
String brandName ="菠萝";
String companyName ="菠萝手机";
String description="美国有苹果中国有菠萝,菠萝手机";
int ordered =100;
//创建封装成对象
Brand brand = new Brand();
brand.setStatus(status);
brand.setBrandName(brandName);
brand.setCompanyName(companyName);
brand.setDescription(description);
brand.setOrdered(ordered);
//1.获取sqlsessionFactory
String resource = "mybatis-config.xml";
InputStream inputStream = Resources.getResourceAsStream(resource);
SqlSessionFactory sqlSessionFactory = new SqlSessionFactoryBuilder().build(inputStream);
//opensession(),默认开启事务要手动提交事务 sqlSe.commit();
//2. 获取sqlsession对象,后面加(true)是自动提交事务(关闭事务)
SqlSession sqlSession = sqlSessionFactory.openSession();
//3.获取Mapper接口的代理对象
BrandMapper brandMapper = sqlSession.getMapper(BrandMapper.class);
//4.执行方法
brandMapper.add(brand);
//事务
sqlSession.commit();
//5. 释放资料
sqlSession.close();
}
2. 添加—主建返回
1.其他都跟添加一样,在写mysql语句上添加useGeneratedKeys="true" keyProperty="id";

2. 在测试类执行里面获取一下id

4. 修改
1. 修改全部字段
创建一个返回值void 名update 创建参数为(Brand brand)的方法

然后Ait+Engter快捷键 然后编写sql语句

创建一个测试类
2. 修改 - 修改动态字段
创建一个返回值void 名update 创建参数为(Brand brand)的方法
然后Ait+Engter快捷键 然后编写sql语句(也set标签 给它判断)

创建一个测试类

代码:
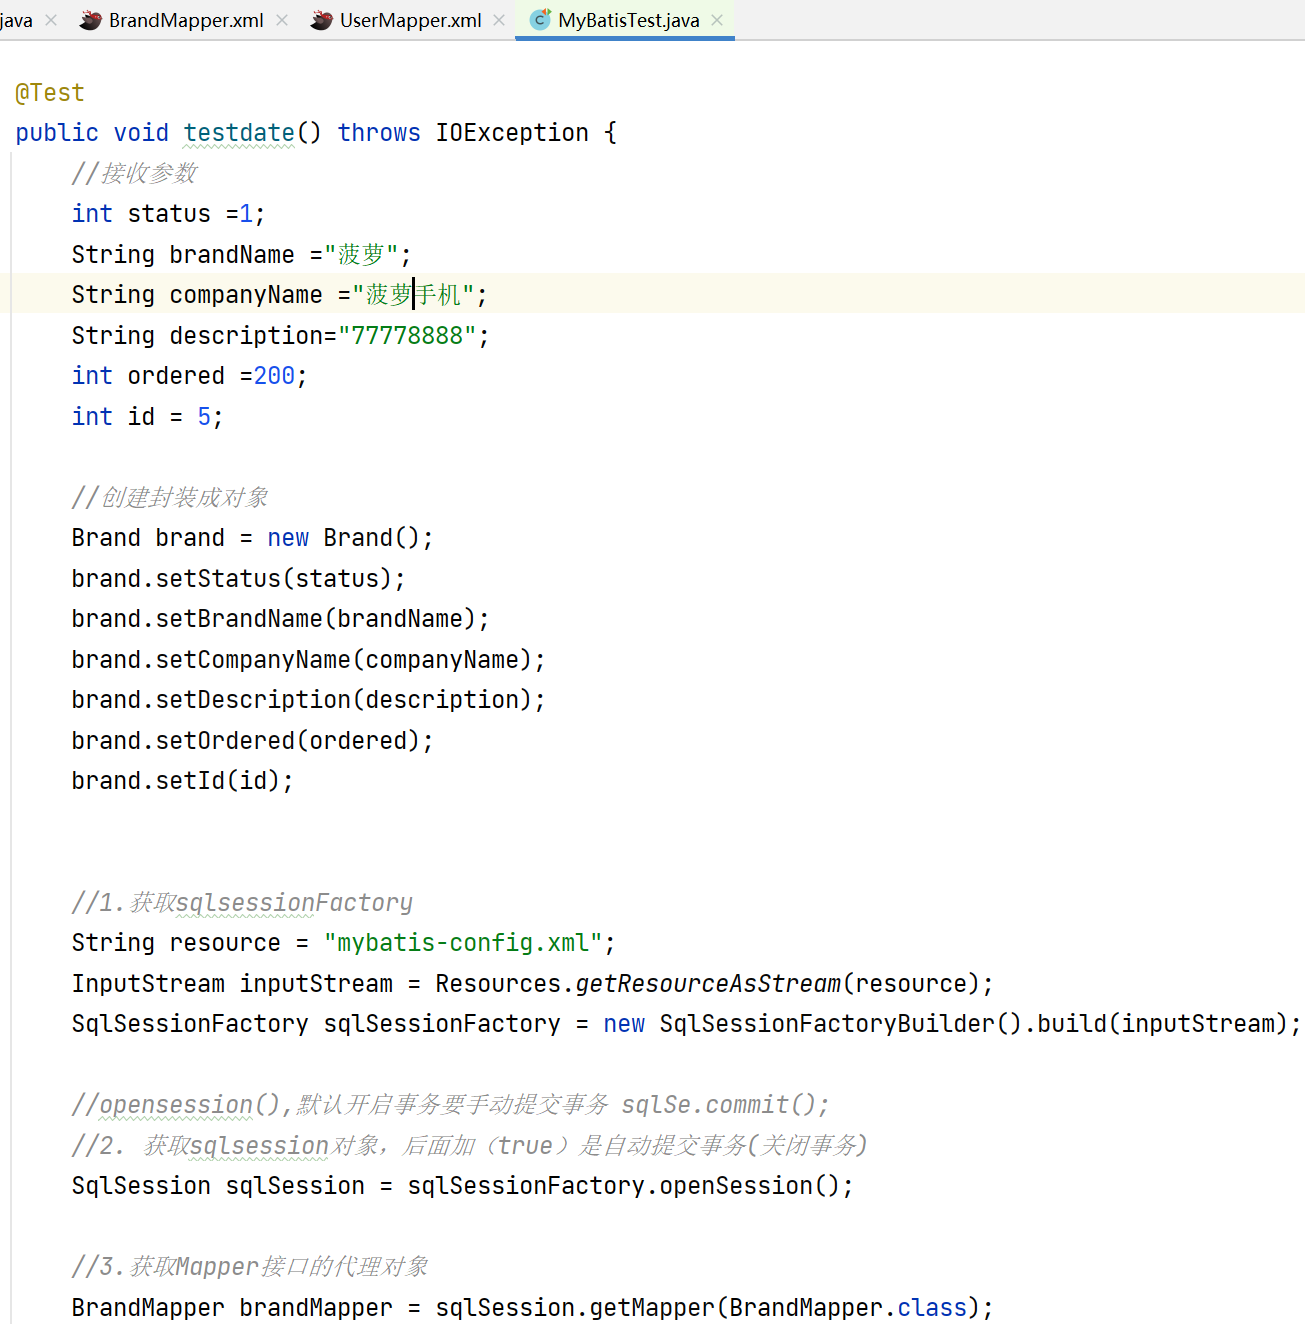
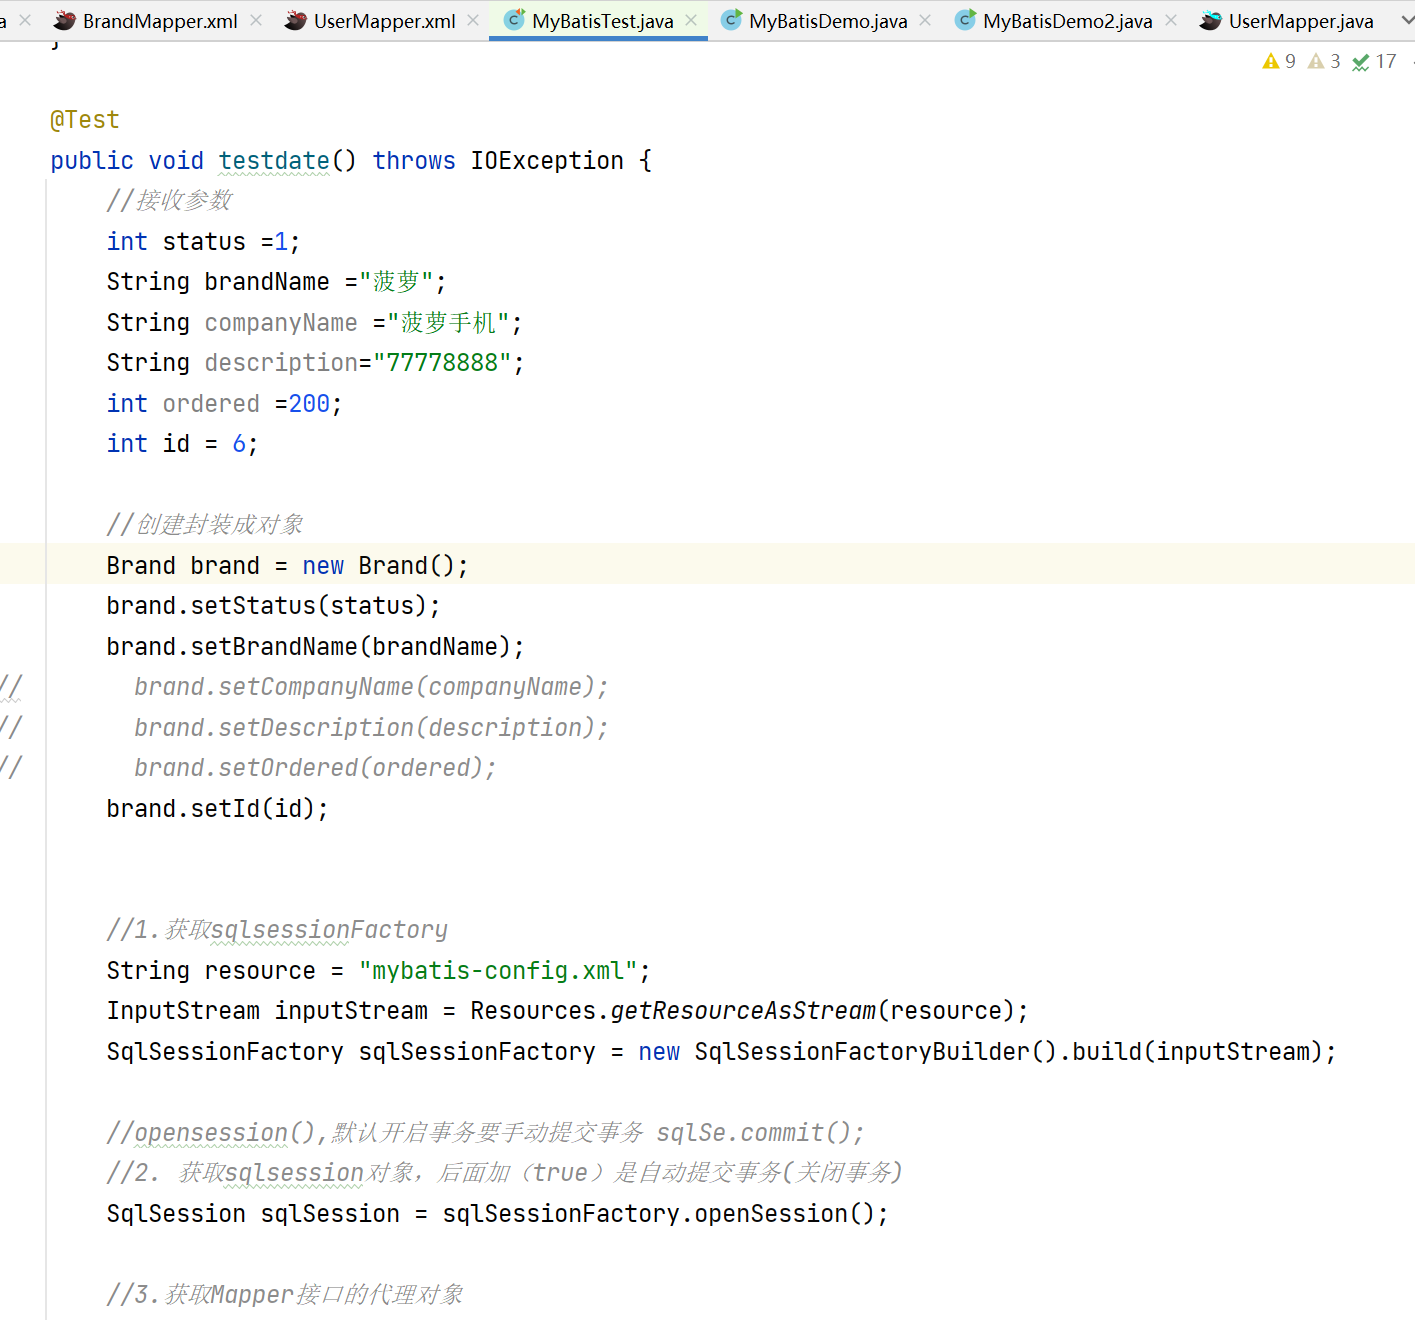
@Test
public void testdate() throws IOException {
//接收参数
int status =1;
String brandName ="菠萝";
String companyName ="菠萝手机";
String description="77778888";
int ordered =200;
int id = 6;
//创建封装成对象
Brand brand = new Brand();
brand.setStatus(status);
brand.setBrandName(brandName);
// brand.setCompanyName(companyName);
// brand.setDescription(description);
// brand.setOrdered(ordered);
brand.setId(id);
//1.获取sqlsessionFactory
String resource = "mybatis-config.xml";
InputStream inputStream = Resources.getResourceAsStream(resource);
SqlSessionFactory sqlSessionFactory = new SqlSessionFactoryBuilder().build(inputStream);
//opensession(),默认开启事务要手动提交事务 sqlSe.commit();
//2. 获取sqlsession对象,后面加(true)是自动提交事务(关闭事务)
SqlSession sqlSession = sqlSessionFactory.openSession();
//3.获取Mapper接口的代理对象
BrandMapper brandMapper = sqlSession.getMapper(BrandMapper.class);
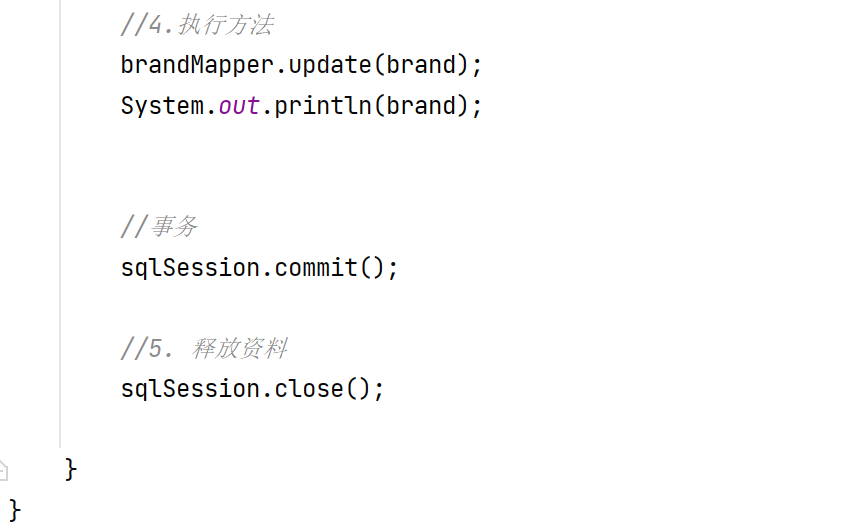
//4.执行方法
brandMapper.update(brand);
System.out.println(brand);
//事务
sqlSession.commit();
//5. 释放资料
sqlSession.close();
}
}
5. 删除
1. 删除一个数据
创建一个返回值void 名为delByBrid (参数是in id的)方法

Alt+Enter快捷键然后添加SQL语句
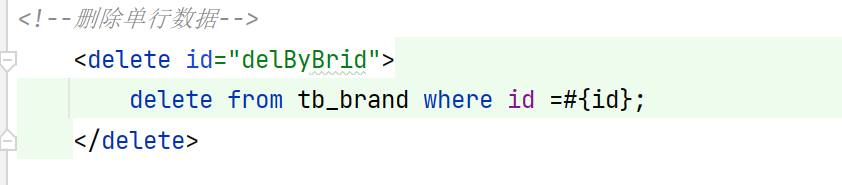
创建测试类参数只有一个id 不用对象

代码:
    @Test
    public void testDelByBrid() throws IOException {
        //接收参数

        int id =10 ;

        //1.获取sqlsessionFactory
        String resource = "mybatis-config.xml";
        InputStream inputStream = Resources.getResourceAsStream(resource);
        SqlSessionFactory sqlSessionFactory = new SqlSessionFactoryBuilder().build(inputStream);

        //opensession(),默认开启事务要手动提交事务 sqlSe.commit();
        //2. 获取sqlsession对象,后面加(true)是自动提交事务(关闭事务)
        SqlSession sqlSession = sqlSessionFactory.openSession();

        //3.获取Mapper接口的代理对象
        BrandMapper brandMapper = sqlSession.getMapper(BrandMapper.class);

        //4.执行方法
        brandMapper.delByBrid(id);


        //事务
        sqlSession.commit();

        //5. 释放资料
        sqlSession.close();

    }
}
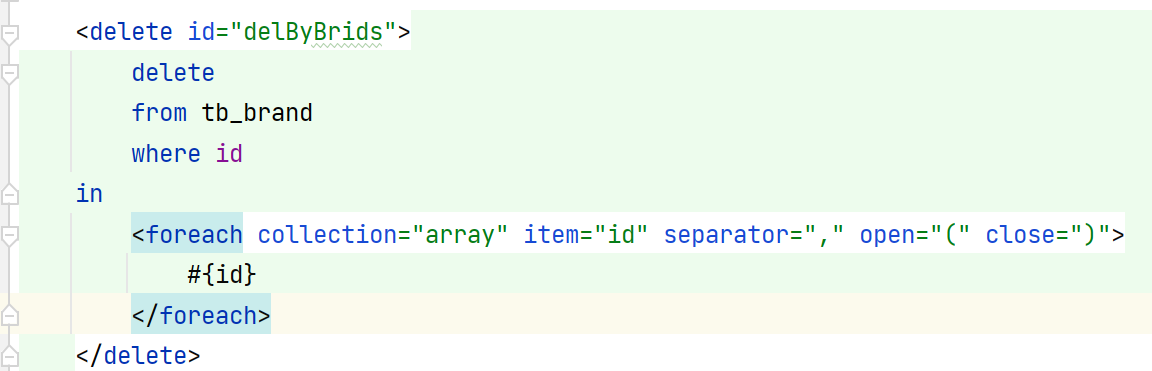
2. 批量删除
创建一个以void 返回值 名delByBrids 参数是(int[]ids)方法

然后Ait+Enter快捷键创建SQL语句
<!-- 批量删除方法
 mybatis会将数组参数,封装一个Map集合
  *默认:array =数组
  *使用@Param注解改变map集合的默认的名称

<foreach collection="ids"></foreach>
是遍的意思 ids是数组

separator=","是分隔符
item="id"是遍历id
open="(" close=")"是括号
创建一个测试类
代码:
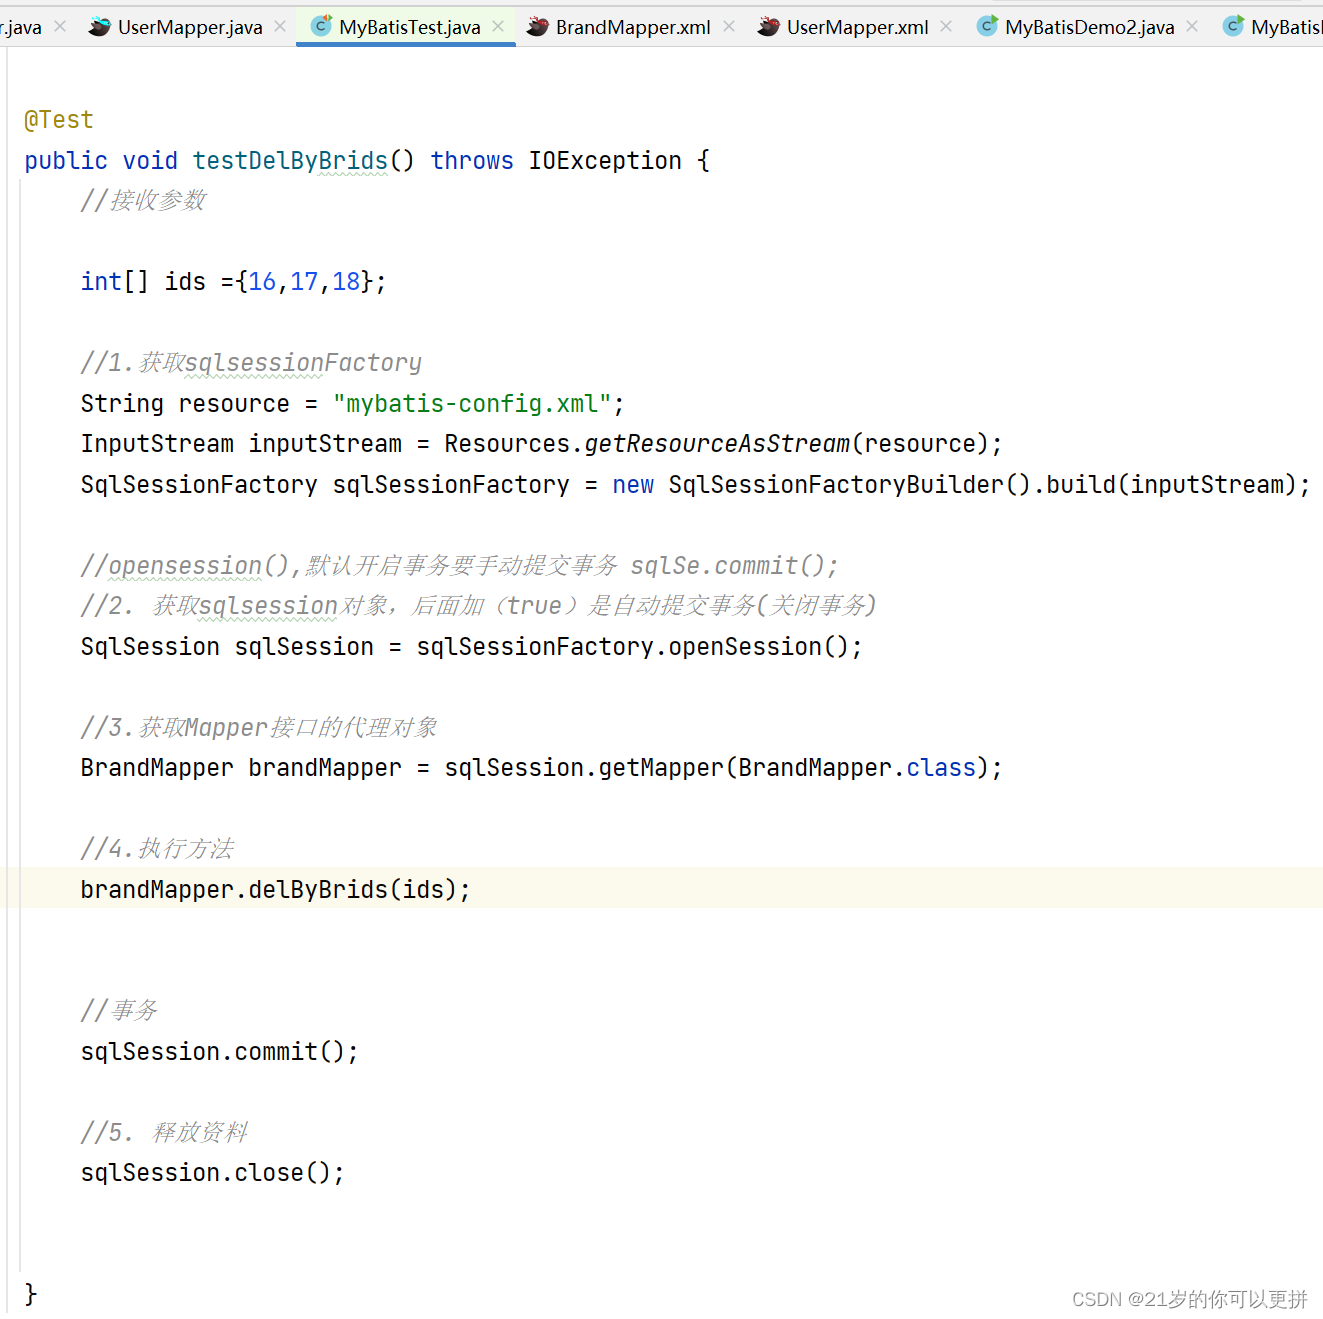
 @Test
    public void testDelByBrids() throws IOException {
        //接收参数
        //有删的数据
        int[] ids ={16,17,18};

        //1.获取sqlsessionFactory
        String resource = "mybatis-config.xml";
        InputStream inputStream = Resources.getResourceAsStream(resource);
        SqlSessionFactory sqlSessionFactory = new SqlSessionFactoryBuilder().build(inputStream);

        //opensession(),默认开启事务要手动提交事务 sqlSe.commit();
        //2. 获取sqlsession对象,后面加(true)是自动提交事务(关闭事务)
        SqlSession sqlSession = sqlSessionFactory.openSession();

        //3.获取Mapper接口的代理对象
        BrandMapper brandMapper = sqlSession.getMapper(BrandMapper.class);

        //4.执行方法
        brandMapper.delByBrids(ids);


        //事务
        sqlSession.commit();

        //5. 释放资料
        sqlSession.close();


    }
}
8. 注解完成增删改查
1. 为什么用注解完成增删改查
1.注解完成简单的功能
2.配置文件完成复杂功能
注解可以通过xml文件
2. 注解有
查询:@Select
添加:@lnsert
修改:@Update
删除:@Delete


 2465
2465


 被折叠的 条评论
为什么被折叠?
被折叠的 条评论
为什么被折叠?
 到【灌水乐园】发言


