


1、Base_Line_V1_Aug
2、条件预设
A、数据使用情况
1、完全使用labeled的数据集,没有采用unlabeled的数据集,数据量为train_set:3080,valid_set:660
2、 添加了Augment策略,增加图片的多样性
# It is important to do data augmentation in training.
train_tfm = transforms.Compose([
    transforms.Resize((224, 224)),
    transforms.RandomChoice(
        [transforms.AutoAugment(),
        transforms.AutoAugment(transforms.AutoAugmentPolicy.CIFAR10),
        transforms.AutoAugment(transforms.AutoAugmentPolicy.SVHN)]
    ),
    # 随机水平翻转
    transforms.RandomHorizontalFlip(p=0.5),
    # 对图像执行随机仿射变换。
    transforms.RandomAffine(degrees=20, translate=(0.2, 0.2), scale=(0.7, 1.3)),
    transforms.ToTensor(),
    transforms.Normalize([0.485, 0.456, 0.406], [0.229, 0.224, 0.225]),
])

# We don't need augmentations in testing and validation.
# All we need here is to resize the PIL image and transform it into Tensor.

test_tfm = transforms.Compose([
    transforms.Resize((224, 224)),
    transforms.ToTensor(),
    transforms.Normalize([0.485, 0.456, 0.406], [0.229, 0.224, 0.225]),
])
B、模型架构
1、三个卷积层
class CNN(nn.Module):
    def __init__(self):
        super(CNN, self).__init__()
        # input image [b, 3, 128, 128]
        self.cnn_layer = nn.Sequential(
            nn.Conv2d(3, 64, 3, 1, 1),
            nn.BatchNorm2d(64),
            nn.ReLU(),
            nn.MaxPool2d(2, 2, 0),

            nn.Conv2d(64, 128, 3, 1, 1),
            nn.BatchNorm2d(128),
            nn.ReLU(),
            nn.MaxPool2d(2, 2, 0),

            nn.Conv2d(128, 256, 3, 1, 1),
            nn.BatchNorm2d(256),
            nn.ReLU(),
            nn.MaxPool2d(4, 4, 0),
        )

        self.fc_layers = nn.Sequential(
            nn.Linear(256 * 8 * 8, 256),
            nn.ReLU(),
            nn.Linear(256, 256),
            nn.ReLU(),
            nn.Linear(256, 11)
        )
    def forward(self, x):
        # input image [b, 3, 128, 128]
        x = self.cnn_layer(x)
        # 转为全链接层
        x = x.flatten(1)

        x = self.fc_layers(x)

        return x
C、训练参数设置
Batch_size_Data = 32

criterion = nn.CrossEntropyLoss()

optimizer = torch.optim.Adam(model.parameters(), lr=0.0003, weight_decay=1e-5)
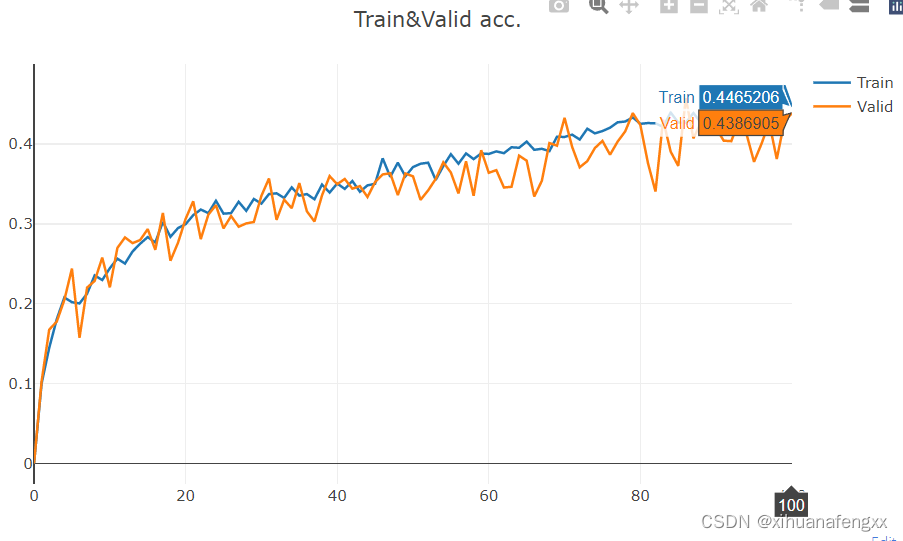
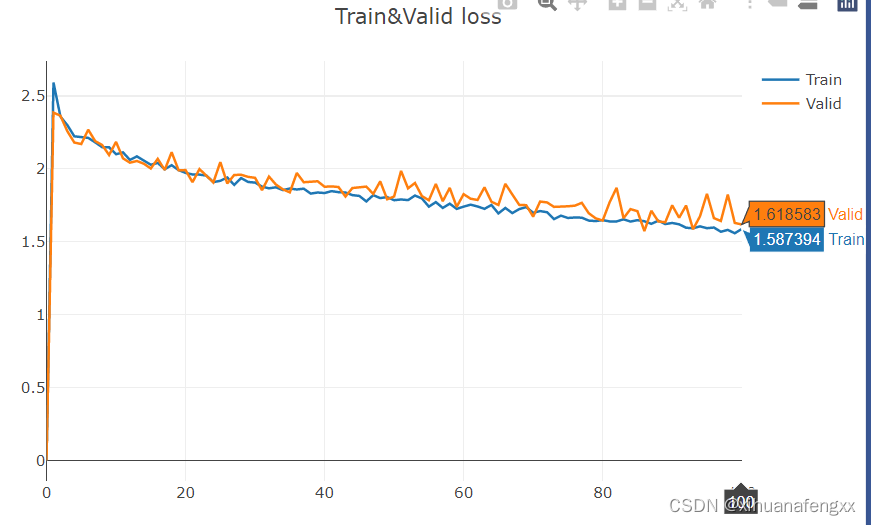
3、总结

添加了图像处理手段,学出来的参数更好了,基本还可以,感觉网络模型太简单了,学不出其他啥了,下一步加深模型。
希望各位大佬能够提点简易,最近才接触到炼丹,啥也不会,也不知道该怎么去分析这些结果,调参也不行,就知道莽数据集和模型结构。希望各位大佬能够教教我如何去更加可视化的看训练出来的数据,如何去分析数据集及训练出来的结果。


 4197
4197


 被折叠的 条评论
为什么被折叠?
被折叠的 条评论
为什么被折叠?
 到【灌水乐园】发言


