日常开发中我们总会需要封装各种各样的函数,有的函数在项目中用到多次,有的甚至在很多项目中都要用到 这就需要我们将封装的函数打包成库,方便下次使用 本文将是使用 JavaScript 开发函数,并上传到 npm 在自己平常放置项目代码的文件夹下创建一个项目文件夹(建议别使用中文名称) 然后在新创建的项目文件夹下分别创建两个文件,一个用于测试的 html,一个用于开发的 js(就是正常开发项目时的样子) 然后就可以正常开发了
function ajax ( { method, url, params, data } ) {
method = method. toUpperCase ( )
return new Promise ( ( resolve, reject) = > {
let xhr = null
if ( window. XMLHttpRequest) {
xhr = new XMLHttpRequest ( ) ;
} else {
xhr = new ActiveObject ( "Microsoft.XMLHTTP" ) ;
}
let str = ""
for ( let k in params) {
str += `${ k} = ${ params[ k] } & `
}
str = str. slice ( 0 , - 1 )
xhr. open ( method, url + '?' + str)
if ( method == = 'POST' || method == = 'PUT' || method == = 'DELETE' || method == = 'PATCH' ) {
xhr. setRequestHeader ( 'Content-type' , 'application/json' )
xhr. send ( JSON. stringify ( data) )
} else {
xhr. send ( )
}
xhr. responseType = 'json'
xhr. onreadystatechange = function ( ) {
if ( xhr. readyState == 4 ) {
if ( xhr. status >= 200 && xhr. status < 300 ) {
resolve ( {
status: xhr. status,
message: xhr. statusText,
data: xhr. response
} )
} else {
reject ( new Error ( '请求失败,失败的状态码为:' + xhr. status) )
}
}
}
} )
}
ajax. get = function ( url, options) {
let config = Object. assign ( options, { method: 'GET' , url: url } )
return ajax ( config)
}
ajax. post = function ( url, options) {
let config = Object. assign ( options, { method: 'POST' , url: url } )
return ajax ( config)
}
ajax. put = function ( url, options) {
let config = Object. assign ( options, { method: 'PUT' , url: url } )
return ajax ( config)
}
ajax. delete = function ( url, options) {
let config = Object. assign ( options, { method: 'DELETE' , url: url } )
return ajax ( config)
}
ajax. patch = function ( url, options) {
let config = Object. assign ( options, { method: 'PATCH' , url: url } )
return ajax ( config)
}
< ! DOCTYPE html>
< html lang= "en" >
< head>
< meta charset= "UTF-8" >
< meta http- equiv= "X-UA-Compatible" content= "IE=edge" >
< meta name= "viewport" content= "width=device-width, initial-scale=1.0" >
< title> Document< / title>
< link rel= "stylesheet" href= "./index.css" >
< / head>
< body>
< div id= "date-picker" >
< / div>
< script src= "./index.js" > < / script>
< script>
calender. init ( {
el: document. getElementById ( 'date-picker' ) ,
getDate: function ( date) {
console. log ( "回调=>" , date)
}
} )
< / script>
< / body>
< / html>
. picker- input {
position: relative;
}
. picker- input input {
display: inline - block;
height: 40 px;
line- height: 40 px;
color: #606266 ;
padding: 0 30 px;
border: 1 px solid #dcdef6;
border- radius: 4 px;
outline: none;
}
. picker- input . picker- prefix {
position: absolute;
left: 5 px;
display: inline - block;
width: 25 px;
height: 40 px;
background- color: red;
}
. calender {
width: 322 px;
height: 329 px;
border: 1 px solid #e4e4e4;
border- radius: 4 px;
box- shadow: 0 2 px 12 px 0 rgba ( 0 , 0 , 0 , 0.1 ) ;
margin- top: 5 px;
user- select: none;
}
. calender . header {
padding: 15 px 0 10 px;
text- align: center;
}
. calender . picker- btn {
display: inline - block;
width: 12 px;
height: 12 px;
margin: 0 5 px;
cursor: pointer;
}
. calender . picker- btn. picker- prev- year {
color: #606266 ;
font- size: 14 px;
}
. calender . picker- btn. picker- prev- month {
color: #606266 ;
font- size: 14 px;
}
. calender . picker- btn. picker- next- month {
color: #606266 ;
font- size: 14 px;
}
. calender . picker- btn. picker- next- year {
color: #606266 ;
font- size: 14 px;
}
. calender . picker- date {
color: #606266 ;
font- size: 15 px;
font- weight: 500 ;
margin: 0 50 px;
}
. calender . content {
padding: 0 10 px 10 px 10 px;
color: #606266 ;
}
. calender . picker- weeks {
height: 40 px;
line- height: 40 px;
font- size: 14 px;
border- bottom: 1 px solid #ebeef5;
}
. calender . picker- weeks div,
. calender . picker- days div {
float : left;
width: 30 px;
height: 30 px;
line- height: 30 px;
text- align: center;
margin: 4 px 6 px;
}
. calender . picker- days div {
font- size: 13 px;
cursor: pointer;
}
. calender . picker- days div: hover {
color: #409 eff;
}
. calender . picker- days div. is- today {
color: #409 eff;
font- weight: 700 ;
}
. calender . picker- days div. other- month {
color: #c0c4cc;
}
. calender . picker- days div. is- select {
color: #fff;
background: #409 eff;
border- radius: 50 % ;
}
var calender = {
date: new Date ( ) ,
weeks: [ '日' , '一' , '二' , '三' , '四' , '五' , '六' ] ,
showDate: {
year: 0 ,
month: 0 ,
day: 0
} ,
showDays: [ ] ,
showCalender: false,
init: function ( options) {
this. initData ( options)
this. render ( )
this. handler ( )
} ,
initData: function ( options) {
this. el = options. el
this. getDate = options. getDate
this. showDate = this. getCalender ( this. date)
this. showDays = this. getDays ( )
this. selectDay = this. getSelectDay ( this. showDate)
} ,
getCalender: function ( date) {
var year = date. getFullYear ( )
var month = date. getMonth ( )
var day = date. getDate ( )
return {
year: year,
month: month,
day: day
}
} ,
getDays: function ( ) {
var arr = [ ]
var firstDay = new Date ( this. showDate. year, this. showDate. month, 1 )
let weekIndex = firstDay. getDay ( )
let startDay = firstDay - weekIndex * 24 * 60 * 60 * 1000
for ( let i = 0 ; i < 42 ; i++ ) {
arr[ i] = new Date ( startDay + i * 24 * 60 * 60 * 1000 )
}
return arr
} ,
getSelectDay: function ( date) {
if ( date instanceof Date) {
return `${ date. getFullYear ( ) } - ${ date. getMonth ( ) + 1 } - ${ date. getDate ( ) } `
}
return `${ date. year} - ${ date. month + 1 } - ${ date. day} `
} ,
render: function ( ) {
this. el. innerHTML = this. renderInput ( ) + this. renderCalender ( )
} ,
renderInput: function ( ) {
return `< div class= "picker-input" >
< span class= "picker-prefix" > < / span>
< input type= "text" value= "${this.selectDay}" >
< / div> `
} ,
renderCalender: function ( ) {
return `< div class= "calender" style= "display: ${this.showCalender ? 'block' : 'none'}" >
${ this. renderHeader ( ) }
${ this. renderContent ( ) }
< / div> `
} ,
renderHeader: function ( ) {
return `< div class= "header" >
< span class= "picker-btn picker-prev-year" > & lt; & lt; < / span>
< span class= "picker-btn picker-prev-month" > & lt; < / span>
< span class= "picker-date" > ${ this. showDate. year} 年 ${ this. showDate. month + 1 } 月< / span>
< span class= "picker-btn picker-next-month" > & gt; < / span>
< span class= "picker-btn picker-next-year" > & gt; & gt; < / span>
< / div> `
} ,
renderContent: function ( ) {
return `
< div class= "picker-weeks" > ${ this. renderWeeks ( ) } < / div>
< div class= "picker-days" > ${ this. renderDays ( ) } < / div> `
} ,
renderWeeks: function ( ) {
var template = ''
for ( var i = 0 ; i < this. weeks. length; i++ ) {
template += `< div> ${ this. weeks[ i] } < / div> `
}
return template
} ,
renderDays: function ( ) {
var template = ''
for ( var i = 0 ; i < 42 ; i++ ) {
var date = this. showDays[ i]
var isCurMonth = this. isCurrentMonth ( date)
template += `
< div
class= "
${ isCurMonth. month ? '' : 'other-month' }
${ isCurMonth. today ? 'is-today' : '' }
${ isCurMonth. select ? 'is-select' : '' } "
data- index= ${ i}
> ${ date. getDate ( ) } < / div> `
}
return template
} ,
isCurrentMonth: function ( date) {
var year = this. getCalender ( date) . year
var month = this. getCalender ( date) . month
var day = this. getCalender ( date) . day
var showDate = this. showDate
var curYear = showDate. year
var curMonth = showDate. month
var todayDate = this. getCalender ( this. date)
var todayYear = todayDate. year
var todayMonth = todayDate. month
var todayDay = todayDate. day
var selectDate = this. getCalender ( new Date ( this. selectDay) )
var selectYear = selectDate. year
var selectMonth = selectDate. month
var chooseDay = selectDate. day
return {
month: year == = curYear && month == = curMonth,
today: year == = todayYear && month == = todayMonth && day == = todayDay,
select: year == = selectYear && month == = selectMonth && day == = chooseDay
}
} ,
handler: function ( ) {
var that = this
document. onclick = function ( e) {
var dom = e. target
var isElChild = that. el. contains ( dom) && dom != = that. el
if ( isElChild && ! that. showCalender) {
that. changeCalender ( true)
} else if ( ! isElChild && that. showCalender) {
that. changeCalender ( false)
}
if ( isElChild) {
var isDay = dom. parentNode. classList. contains ( 'picker-days' )
var isBtn = dom. classList. contains ( 'picker-btn' )
var isYearBtn = isBtn && dom. getAttribute ( 'class' ) . includes ( '-year' )
var isMonthBtn = isBtn && dom. getAttribute ( 'class' ) . includes ( '-month' )
if ( isDay) {
that. handleDay ( dom)
} else if ( isYearBtn) {
that. handleYear ( dom)
} else if ( isMonthBtn) {
that. handleMonth ( dom)
}
}
}
} ,
changeCalender: function ( isShowCalender) {
this. showCalender = isShowCalender
var calenderDom = this. el. getElementsByClassName ( 'calender' ) [ 0 ]
calenderDom. style. display = isShowCalender ? 'block' : 'none'
} ,
handleDay: function ( dom) {
var index = dom. dataset. index
var date = this. showDays[ index]
var selectMonth = date. getMonth ( )
this. selectDay = this. getSelectDay ( date)
if ( selectMonth != = this. showDate. month) {
this. showDate. month = selectMonth
this. showDays = this. getDays ( )
}
this. showCalender = false
this. getDate ( this. selectDay)
this. render ( )
} ,
handleMonth: function ( dom) {
var isPrev = dom. getAttribute ( 'class' ) . includes ( 'prev' )
var moveMonth = isPrev ? - 1 : + 1
var showDate = new Date ( this. showDate. year, this. showDate. month, this. showDate. day)
showDate. setMonth ( this. showDate. month + moveMonth)
this. showDate. month = showDate. getMonth ( )
this. showDate. year = showDate. getFullYear ( )
this. showDays = this. getDays ( )
this. render ( )
} ,
handleYear: function ( dom) {
var isPrev = dom. getAttribute ( 'class' ) . includes ( 'prev' )
var moveYear = isPrev ? - 1 : + 1
this. showDate. year += moveYear
this. showDays = this. getDays ( )
this. render ( )
}
}
import docxtemplater from 'docxtemplater' ;
import { saveAs } from 'file-saver' ;
import JSZipUtils from 'jszip-utils' ;
import PizZip from 'pizzip' ;
export const exportWord = ( templateDocxPath, exportWordData, outFileName) = > {
JSZipUtils. getBinaryContent ( templateDocxPath, function ( error, content) {
if ( error) {
throw error;
}
let zip = new PizZip ( content) ;
let doc = new docxtemplater ( ) ;
doc. loadZip ( zip) ;
doc. setData ( exportWordData) ;
try {
doc. render ( ) ;
} catch ( error) {
let e = {
message: error. message,
name: error. name,
stack: error. stack,
properties: error. properties
} ;
console. log ( JSON. stringify ( {
error: e
} ) ) ;
throw error;
}
let out = doc. getZip ( ) . generate ( {
type: "blob" ,
mimeType: "application/vnd.openxmlformats-officedocument.wordprocessingml.document"
} ) ;
saveAs ( out, outFileName) ;
} ) ;
}
npm init - y
下载 webpack 和 webpack-cli 的依赖 如果你对别的打包工具比较熟的话,也可以换成其他打包工具 npm install webpack webpack- cli
需要在项目目录下创建一个 webpack.config.js 文件 const path = require ( 'path' )
module. exports = {
mode: 'production' ,
entry: './src/index.js' ,
output: {
path: path. resolve ( __dirname, 'dist' ) ,
filename: 'lgk-js-tools.js' ,
library: 'Utils' ,
libraryTarget: 'umd'
}
}
在 package.json 文件中的 scripts 属性添加 打包命令 “build”: “webpack --watch” "scripts" : {
"test" : "echo \"Error: no test specified\" && exit 1" ,
"build" : "webpack --watch"
} ,
npm run build
export function test ( ) {
console. log ( "这是一个测试方法!!" )
}
在 test/index.html 文件中测试使用 < ! DOCTYPE html>
< html lang= "en" >
< head>
< meta charset= "UTF-8" >
< meta http- equiv= "X-UA-Compatible" content= "IE=edge" >
< meta name= "viewport" content= "width=device-width, initial-scale=1.0" >
< title> Document< / title>
< / head>
< body>
< ! -- 引入打包后的 JS 文件 -- >
< script src= "./../dist/lgk-js-tools.js" > < / script>
< script>
console. log ( Utils. test ( ) )
< / script>
< / body>
< / html>
export function ajax ( { method, url, params, data } ) {
method = method. toUpperCase ( )
return new Promise ( ( resolve, reject) = > {
let xhr = null
if ( window. XMLHttpRequest) {
xhr = new XMLHttpRequest ( ) ;
} else {
xhr = new ActiveObject ( "Microsoft.XMLHTTP" ) ;
}
let str = ""
for ( let k in params) {
str += `${ k} = ${ params[ k] } & `
}
str = str. slice ( 0 , - 1 )
xhr. open ( method, url + '?' + str)
if ( method == = 'POST' || method == = 'PUT' || method == = 'DELETE' || method == = 'PATCH' ) {
xhr. setRequestHeader ( 'Content-type' , 'application/json' )
xhr. send ( JSON. stringify ( data) )
} else {
xhr. send ( )
}
xhr. responseType = 'json'
xhr. onreadystatechange = function ( ) {
if ( xhr. readyState == 4 ) {
if ( xhr. status >= 200 && xhr. status < 300 ) {
resolve ( {
status: xhr. status,
message: xhr. statusText,
data: xhr. response
} )
} else {
reject ( new Error ( '请求失败,失败的状态码为:' + xhr. status) )
}
}
}
} )
}
ajax. get = function ( url, options) {
let config = Object. assign ( options, { method: 'GET' , url: url } )
return ajax ( config)
}
ajax. post = function ( url, options) {
let config = Object. assign ( options, { method: 'POST' , url: url } )
return ajax ( config)
}
ajax. put = function ( url, options) {
let config = Object. assign ( options, { method: 'PUT' , url: url } )
return ajax ( config)
}
ajax. delete = function ( url, options) {
let config = Object. assign ( options, { method: 'DELETE' , url: url } )
return ajax ( config)
}
ajax. patch = function ( url, options) {
let config = Object. assign ( options, { method: 'PATCH' , url: url } )
return ajax ( config)
}
export { ajax } from "./ajax/index.js"
npm install lgk- js- tools
import * as Utils from "lgk-js-tools"
在 test/index.html 文件中直接引入测试使用 < ! DOCTYPE html>
< html lang= "en" >
< head>
< meta charset= "UTF-8" >
< meta http- equiv= "X-UA-Compatible" content= "IE=edge" >
< meta name= "viewport" content= "width=device-width, initial-scale=1.0" >
< title> Document< / title>
< / head>
< body>
< ! -- 引入 -- >
< script src= "./../dist/lgk-js-tools.js" > < / script>
< script>
Utils. ajax. get ( '这里填URL' , {
params: {
a: 100
} ,
} )
. then ( res = > {
console. log ( "res=>" , res)
} ) . catch ( err = > {
console. log ( "err=>" , err)
} )
< / script>
< / body>
< / html>
name 属性值必须唯一 ,在发布之前将想发布的名称到 npm 仓库搜一下看有没有version 版本号每次发布必须与之前发布的不相同 ,否则会报错main 属性值必须指定为打包生成的 js 文件 author 属性用于指定作者(可以不添加) description 属性用于描述这个工具库的作用(可以不添加) keywords 属性用于填写关键词,方便别人检索(可以不添加) {
"name" : "lgk-js-tools" ,
"version" : "1.0.1" ,
"main" : "./dist/lgk-js-tools.js" ,
"description" : "" ,
"author" : {
"name" : "lgk"
} ,
"keywords" : [
"ajax" ,
"js" ,
"lgk" ,
"utils"
] ,
"scripts" : {
"test" : "echo \"Error: no test specified\" && exit 1" ,
"build" : "webpack --watch"
} ,
"license" : "ISC" ,
"dependencies" : {
"webpack" : "^5.71.0" ,
"webpack-cli" : "^4.9.2"
}
}
npm get registry
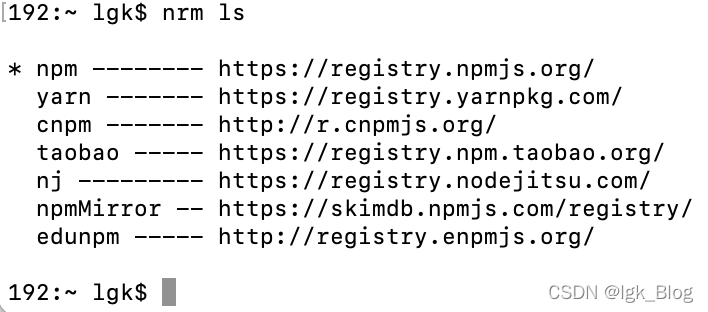
检查现在所使用的 npm 源,如果不是 npm 源,需要切换回来 nrm ls
切换 npm 源为 https://registry.npmjs.org/
npm config set registry https:
npm config set registry http:
cd lgk- js- tools
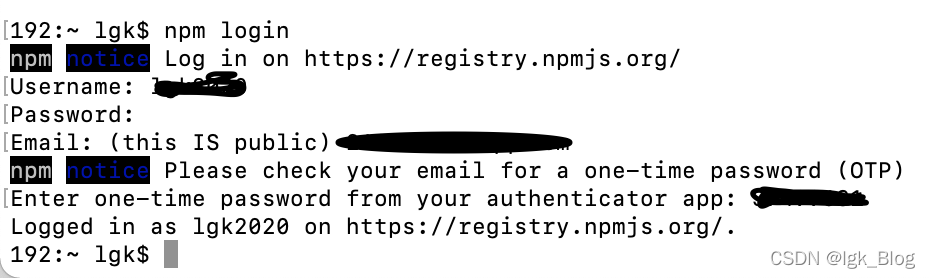
npm login
npm addUser
填写登录信息:用户名、密码、邮箱、验证码 发布 npm publish
需要等几分钟后就可以在 npm 查看了 ⚠️注意:必须在 72 小时之内,否则不能再被删除 执行删除命令 npm unpublish -- force


 1101
1101

 被折叠的 条评论
为什么被折叠?
被折叠的 条评论
为什么被折叠?
 到【灌水乐园】发言


