


9、Web原生组件注入(Servlet、Filter、Listener)
1、使用Servlet API
@ServletComponentScan(basePackages = “com.atguigu.admin”) :指定原生Servlet组件都放在那里
@WebServlet(urlPatterns = “/my”):效果:直接响应,没有经过Spring的拦截器?
@WebFilter(urlPatterns={“/css/*”,“/images/*”})
@WebListener
推荐可以这种方式;
扩展:DispatchServlet 如何注册进来
- 容器中自动配置了 DispatcherServlet 属性绑定到 WebMvcProperties;对应的配置文件配置项是 spring.mvc。
- 通过
**ServletRegistrationBean**<DispatcherServlet>把 DispatcherServlet 配置进来。 - 默认映射的是 / 路径。
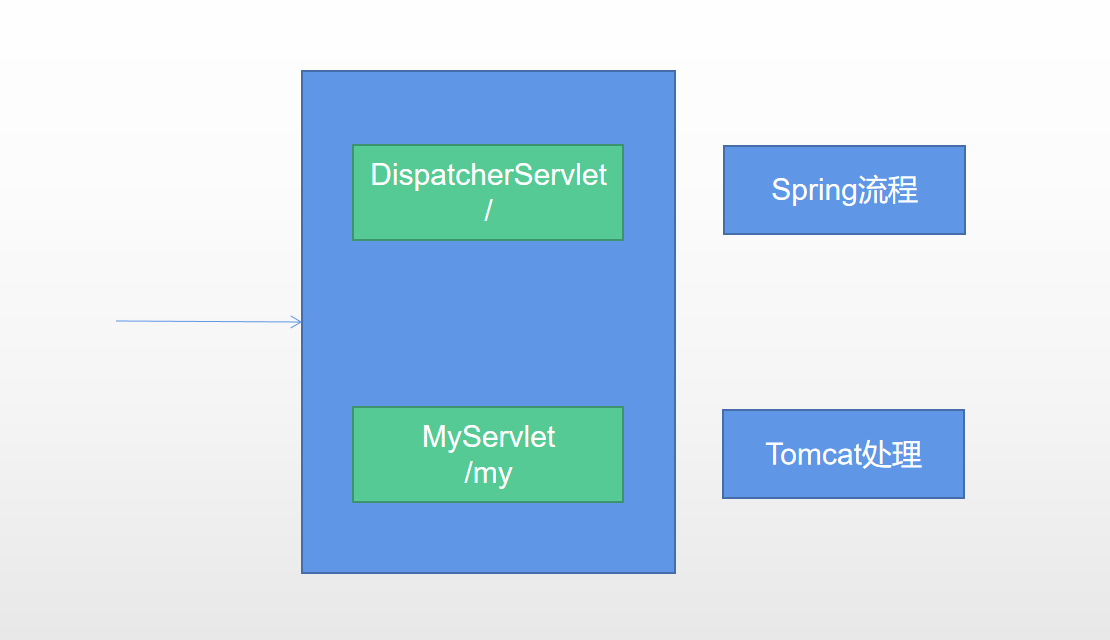
Tomcat-Servlet;
多个Servlet都能处理到同一层路径,精确优选原则
A: /my/
B: /my/1
2、使用RegistrationBean
ServletRegistrationBean`, `FilterRegistrationBean`, and `ServletListenerRegistrationBean
@Configuration
public class MyRegistConfig {

    @Bean
    public ServletRegistrationBean myServlet(){
        MyServlet myServlet = new MyServlet();

        return new ServletRegistrationBean(myServlet,"/my","/my02");
    }


    @Bean
    public FilterRegistrationBean myFilter(){

        MyFilter myFilter = new MyFilter();
//        return new FilterRegistrationBean(myFilter,myServlet());
        FilterRegistrationBean filterRegistrationBean = new FilterRegistrationBean(myFilter);
        filterRegistrationBean.setUrlPatterns(Arrays.asList("/my","/css/*"));
        return filterRegistrationBean;
    }

    @Bean
    public ServletListenerRegistrationBean myListener(){
        MySwervletContextListener mySwervletContextListener = new MySwervletContextListener();
        return new ServletListenerRegistrationBean(mySwervletContextListener);
    }
}
10、嵌入式Servlet容器
1、切换嵌入式Servlet容器
-
默认支持的webServer
-
Tomcat,Jetty, orUndertowServletWebServerApplicationContext 容器启动寻找ServletWebServerFactory 并引导创建服务器
-
切换服务器

<dependency>
    <groupId>org.springframework.boot</groupId>
    <artifactId>spring-boot-starter-web</artifactId>
    <exclusions>
        <exclusion>
            <groupId>org.springframework.boot</groupId>
            <artifactId>spring-boot-starter-tomcat</artifactId>
        </exclusion>
    </exclusions>
</dependency>
-
原理
-
- SpringBoot应用启动发现当前是Web应用。web场景包-导入tomcat
- web应用会创建一个web版的ioc容器
ServletWebServerApplicationContext ServletWebServerApplicationContext启动的时候寻找**ServletWebServerFactory**``(Servlet 的web服务器工厂---> Servlet 的web服务器)- SpringBoot底层默认有很多的WebServer工厂;
TomcatServletWebServerFactory,JettyServletWebServerFactory, orUndertowServletWebServerFactory 底层直接会有一个自动配置类。ServletWebServerFactoryAutoConfigurationServletWebServerFactoryAutoConfiguration导入了ServletWebServerFactoryConfiguration(配置类)ServletWebServerFactoryConfiguration 配置类 根据动态判断系统中到底导入了那个Web服务器的包。(默认是web-starter导入tomcat包),容器中就有 TomcatServletWebServerFactoryTomcatServletWebServerFactory 创建出Tomcat服务器并启动;TomcatWebServer 的构造器拥有初始化方法initialize---this.tomcat.start();内嵌服务器,就是手动把启动服务器的代码调用(tomcat核心jar包存在)
-
``
2、定制Servlet容器
-
实现
**WebServerFactoryCu**stomizer<ConfigurableServletWebServerFactory> -
- 把配置文件的值和
**ServletWebServerFactory 进行绑定**
- 把配置文件的值和
-
修改配置文件 server.xxx
-
直接自定义 ConfigurableServletWebServerFactory
xxxxxCustomizer:定制化器,可以改变xxxx的默认规则
import org.springframework.boot.web.server.WebServerFactoryCustomizer;
import org.springframework.boot.web.servlet.server.ConfigurableServletWebServerFactory;
import org.springframework.stereotype.Component;

@Component
public class CustomizationBean implements WebServerFactoryCustomizer<ConfigurableServletWebServerFactory> {

    @Override
    public void customize(ConfigurableServletWebServerFactory server) {
        server.setPort(9000);
    }

}
11、定制化原理
1、定制化的常见方式
- 修改配置文件;
- xxxxxCustomizer;
- 编写自定义的配置类 xxxConfiguration;+ @Bean替换、增加容器中默认组件;视图解析器
- Web应用 编写一个配置类实现 WebMvcConfigurer 即可定制化web功能;+ @Bean给容器中再扩展一些组件
@Configuration
public class AdminWebConfig implements WebMvcConfigurer
-
@EnableWebMvc + WebMvcConfigurer —— @Bean 可以全面接管SpringMVC,所有规则全部自己重新配置; 实现定制和扩展功能
-
-
原理
-
1、WebMvcAutoConfiguration 默认的SpringMVC的自动配置功能类。静态资源、欢迎页…
-
2、一旦使用 @EnableWebMvc 、。会 @Import(DelegatingWebMvcConfiguration.class)
-
3、DelegatingWebMvcConfiguration 的 作用,只保证SpringMVC最基本的使用
-
-
- 把所有系统中的 WebMvcConfigurer 拿过来。所有功能的定制都是这些 WebMvcConfigurer 合起来一起生效
- 自动配置了一些非常底层的组件。RequestMappingHandlerMapping、这些组件依赖的组件都是从容器中获取
- public class DelegatingWebMvcConfiguration extends WebMvcConfigurationSupport
-
-
-
-
- 4、WebMvcAutoConfiguration 里面的配置要能生效 必须 @ConditionalOnMissingBean(WebMvcConfigurationSupport.class)
- 5、@EnableWebMvc 导致了 WebMvcAutoConfiguration 没有生效。
-
… …
2、原理分析套路
场景starter - xxxxAutoConfiguration - 导入xxx组件 - 绑定xxxProperties – 绑定配置文件项


 339
339


 被折叠的 条评论
为什么被折叠?
被折叠的 条评论
为什么被折叠?
 到【灌水乐园】发言


