


内核下载与编译
1.内核下载
可以直接在官网下载:https://www.kernel.org
~/Desktop/kernel_pwn_environment$ curl -O -L <https://mirrors.tuna.tsinghua.edu.cn/kernel/v5.x/linux-5.4.98.tar.xz>
  % Total    % Received % Xferd  Average Speed   Time    Time     Time  Current
                                 Dload  Upload   Total   Spent    Left  Speed
100  104M  100  104M    0     0   376k      0  0:04:42  0:04:42 --:--:--  333k

下载完后直接解压:
~# unxz linux-5.4.98.tar.xz
2.验证kernel签名
内核签名的作用:
为了防止内核被恶意修改,在发布内核时,发布者会对内核进行签名。这里我们也对内核的签名进行校验。
rencvn@ubuntu:~/Desktop/kernel_pwn_environment$ curl -O -L <https://mirrors.tuna.tsinghua.edu.cn/kernel/v5.x/linux-5.4.98.tar.sign>
  % Total    % Received % Xferd  Average Speed   Time    Time     Time  Current
                                 Dload  Upload   Total   Spent    Left  Speed
100   989  100   989    0     0   2491      0 --:--:-- --:--:-- --:--:--  2491
rencvn@ubuntu:~/Desktop/kernel_pwn_environment$ gpg --verify linux-5.4.98.tar.sign
gpg: assuming signed data in 'linux-5.4.98.tar'
gpg: Signature made Sat 13 Feb 2021 04:54:47 AM PST
gpg:                using RSA key 647F28654894E3BD457199BE38DBBDC86092693E
gpg: Can't check signature: No public key
同样也是遇到了ctfwiki上出现的问题,“can’t check signature: No public key”
这主要是因为我们没有相应的公钥来验证签名。此时我们可以下载相应内核版本发布者的公钥
我在下载公钥时报错,猜测应该是网速的问题,换成热点后直接下载下来了:
rencvn@ubuntu:~/Desktop/kernel_pwn_environment$ gpg --locate-keys torvalds@kernel.org gregkh@kernel.org
gpg: error retrieving 'gregkh@kernel.org' via WKD: Server indicated a failure
gpg: error reading key: Server indicated a failure
gpg: error retrieving 'torvalds@kernel.org' via WKD: Server indicated a failure
gpg: error reading key: Server indicated a failure
rencvn@ubuntu:~/Desktop/kernel_pwn_environment$ gpg --locate-keys torvalds@kernel.org gregkh@kernel.org
gpg: key 38DBBDC86092693E: public key "Greg Kroah-Hartman <gregkh@kernel.org>" imported
gpg: Total number processed: 1
gpg:               imported: 1
gpg: key 79BE3E4300411886: public key "Linus Torvalds <torvalds@kernel.org>" imported
gpg: Total number processed: 1
gpg:               imported: 1
pub   rsa4096 2011-09-23 [SC]
      647F28654894E3BD457199BE38DBBDC86092693E
uid           [ unknown] Greg Kroah-Hartman <gregkh@kernel.org>
sub   rsa4096 2011-09-23 [E]

pub   rsa2048 2011-09-20 [SC]
      ABAF11C65A2970B130ABE3C479BE3E4300411886
uid           [ unknown] Linus Torvalds <torvalds@kernel.org>
sub   rsa2048 2011-09-20 [E]
为了方便,我们也导入了 torvalds 的公钥。下面验证内核的签名
rencvn@ubuntu:~/Desktop/kernel_pwn_environment$ gpg --verify linux-5.4.98.tar.sign
gpg: assuming signed data in 'linux-5.4.98.tar'
gpg: Signature made Sat 13 Feb 2021 04:54:47 AM PST
gpg:                using RSA key 647F28654894E3BD457199BE38DBBDC86092693E
gpg: Good signature from "Greg Kroah-Hartman <gregkh@kernel.org>" [unknown]
gpg: WARNING: This key is not certified with a trusted signature!
gpg:          There is no indication that the signature belongs to the owner.
Primary key fingerprint: 647F 2865 4894 E3BD 4571  99BE 38DB BDC8 6092 693E
这里报了一个 WARNING。为了消除这个问题,我们可以选择使用 TOFU 信任对应的密钥
警告这里显示:公钥没有被信任的签名认证
rencvn@ubuntu:~/Desktop/kernel_pwn_environment$ gpg --tofu-policy good 647F28654894E3BD457199BE38DBBDC86092693E
gpg: Setting TOFU trust policy for new binding <key: 647F28654894E3BD457199BE38DBBDC86092693E, user id: Greg Kroah-Hartman <gregkh@kernel.org>> to good.
rencvn@ubuntu:~/Desktop/kernel_pwn_environment$ gpg --trust-model tofu --verify linux-5.4.98.tar.sign
gpg: assuming signed data in 'linux-5.4.98.tar'
gpg: Signature made Sat 13 Feb 2021 04:54:47 AM PST
gpg:                using RSA key 647F28654894E3BD457199BE38DBBDC86092693E
gpg: checking the trustdb
gpg: no ultimately trusted keys found
gpg: Good signature from "Greg Kroah-Hartman <gregkh@kernel.org>" [full]
gpg: gregkh@kernel.org: Verified 1 signature in the past 0 seconds.  Encrypted
     0 messages.
信任过后没有再报错,已验证成功.
在验证成功后,我们就可以解压缩压缩包得到内核源码。
tar -xf linux-5.4.98.tar
3.编译选项配置
在正式编译之前,我们可以配置内核的编译选项。
通过 make menuconfig来配置,但我输入后直接报错,上网查阅资料后,得知缺少了libncurses-dev库,flex,bison,安装后即可:
sudo apt-get install libncurses5-dev
apt-get install flex
apt-get install bison
安装后再次输入make menuconfig,
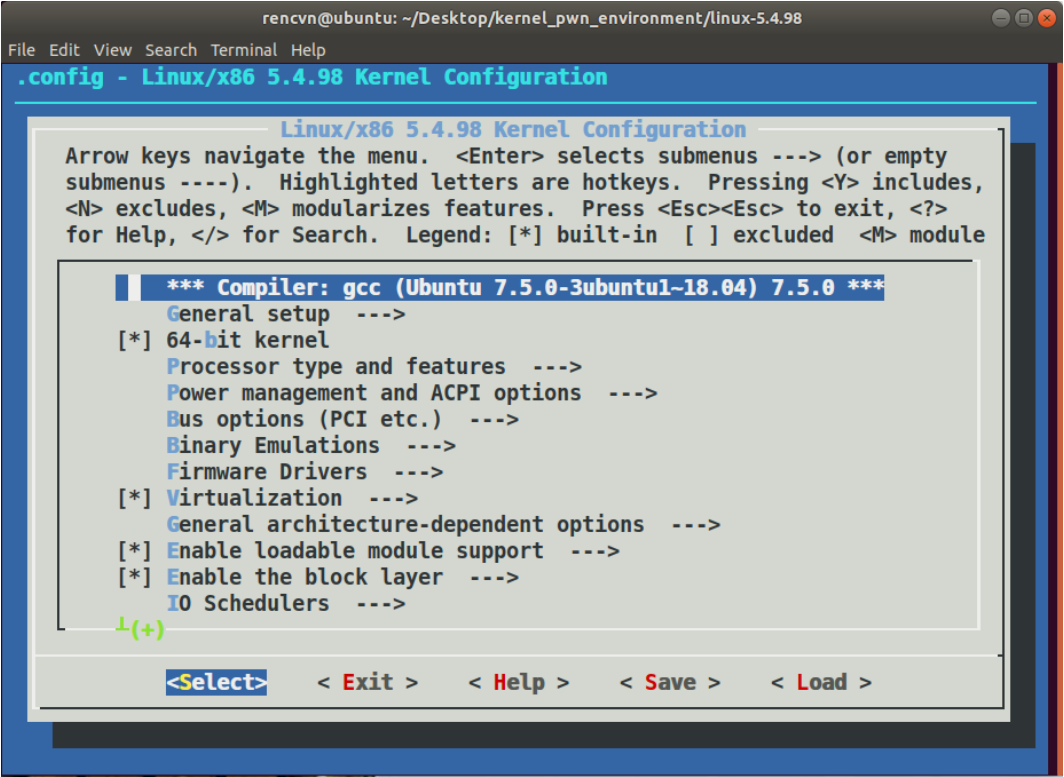
这里我们主要关注调试方面的选项,依次进入到 Kernel hacking -> Compile-time checks and compiler options,然后勾选如下选项Compile the kernel with debug info,以便于调试。不过似乎现在是默认开启的,如果要使用 kgdb 调试内核,则需要选中 KGDB: kernel debugger,并选中 KGDB 下的所有选项.
接着开始正式编译内核:
~# make -j3 bzImage
我输入后直接报错,好家伙,
rencvn@ubuntu:~/Desktop/kernel_pwn_environment/linux-5.4.98$ make -j3 bzImage
Makefile:632: include/config/auto.conf: No such file or directory
Makefile:678: include/config/auto.conf.cmd: No such file or directory
  HOSTLD  scripts/kconfig/conf
scripts/kconfig/conf  --syncconfig Kconfig
  SYSTBL  arch/x86/include/generated/asm/syscalls_32.h
  WRAP    arch/x86/include/generated/uapi/asm/bpf_perf_event.h
  WRAP    arch/x86/include/generated/uapi/asm/errno.h
  WRAP    arch/x86/include/generated/uapi/asm/fcntl.h
  WRAP    arch/x86/include/generated/uapi/asm/ioctl.h
  WRAP    arch/x86/include/generated/uapi/asm/ioctls.h
  WRAP    arch/x86/include/generated/uapi/asm/ipcbuf.h
  WRAP    arch/x86/include/generated/uapi/asm/param.h
  WRAP    arch/x86/include/generated/uapi/asm/poll.h
  WRAP    arch/x86/include/generated/uapi/asm/resource.h
  WRAP    arch/x86/include/generated/uapi/asm/socket.h
  WRAP    arch/x86/include/generated/uapi/asm/sockios.h
  WRAP    arch/x86/include/generated/uapi/asm/termbits.h
  WRAP    arch/x86/include/generated/uapi/asm/termios.h
  WRAP    arch/x86/include/generated/uapi/asm/types.h
  UPD     include/generated/uapi/linux/version.h
  UPD     include/config/kernel.release
  HOSTCC  arch/x86/tools/relocs_32.o
  WRAP    arch/x86/include/generated/asm/dma-contiguous.h
  WRAP    arch/x86/include/generated/asm/early_ioremap.h
  WRAP    arch/x86/include/generated/asm/export.h
  WRAP    arch/x86/include/generated/asm/mcs_spinlock.h
  WRAP    arch/x86/include/generated/asm/mm-arch-hooks.h
  WRAP    arch/x86/include/generated/asm/mmiowb.h
  UPD     include/generated/utsrelease.h
warning: Cannot use CONFIG_STACK_VALIDATION=y, please install libelf-dev, libelf-devel or elfutils-libelf-devel
  HOSTCC  scripts/genksyms/genksyms.o
  HOSTCC  arch/x86/tools/relocs_64.o
  YACC    scripts/genksyms/parse.tab.[ch]
  HOSTCC  arch/x86/tools/relocs_common.o
  LEX     scripts/genksyms/lex.lex.c
  HOSTCC  scripts/genksyms/parse.tab.o
  HOSTLD  arch/x86/tools/relocs
  HOSTCC  scripts/genksyms/lex.lex.o
  SYSHDR  arch/x86/include/generated/asm/unistd_32_ia32.h
  SYSHDR  arch/x86/include/generated/asm/unistd_64_x32.h
  SYSTBL  arch/x86/include/generated/asm/syscalls_64.h
  HOSTLD  scripts/genksyms/genksyms
  HOSTCC  scripts/selinux/genheaders/genheaders
  HOSTCC  scripts/selinux/mdp/mdp
  HOSTCC  scripts/bin2c
  HOSTCC  scripts/kallsyms
  HYPERCALLS arch/x86/include/generated/asm/xen-hypercalls.h
  HOSTCC  scripts/conmakehash
  SYSHDR  arch/x86/include/generated/uapi/asm/unistd_32.h
  SYSHDR  arch/x86/include/generated/uapi/asm/unistd_64.h
  SYSHDR  arch/x86/include/generated/uapi/asm/unistd_x32.h
  HOSTCC  scripts/recordmcount
  HOSTCC  scripts/sortextable
  HOSTCC  scripts/asn1_compiler
  HOSTCC  scripts/sign-file
scripts/sign-file.c:25:10: fatal error: openssl/opensslv.h: No such file or directory
 #include <openssl/opensslv.h>
          ^~~~~~~~~~~~~~~~~~~~
compilation terminated.
scripts/Makefile.host:107: recipe for target 'scripts/sign-file' failed
make[1]: *** [scripts/sign-file] Error 1
make[1]: *** Waiting for unfinished jobs....
Makefile:1120: recipe for target 'scripts' failed
make: *** [scripts] Error 2
根据这行提示:
warning: Cannot use CONFIG_STACK_VALIDATION=y, please install libelf-dev, libelf-devel or elfutils-libelf-devel
#### 解决1:
安装libelf-dev库:
~# sudo apt install libelf-dev
#### 解决2
安装好后执行make -j3 bzImage再次尝试编译,但还是报错:
scripts/extract-cert.c:21:10: fatal error: openssl/bio.h: No such file or directory
上网查看解决办法:
知道了出现scripts/extract-cert.c:21:25: fatal error: openssl /bio.h: No such file or directory 是因为没有安装libssl-dev或者已安装的libssl1.0.0版本太高, 无法支持
继续安装:
sudo apt install libssl-dev
安装好后,编译内核:
~# make -j3 bzlmage
最后验证是否编译成功:
rencvn@ubuntu:~/Desktop/kernel_pwn_environment/linux-5.4.98$ uname -a
Linux ubuntu 5.4.0-109-generic #123~18.04.1-Ubuntu SMP Fri Apr 8 09:48:52 UTC 2022 x86_64 x86_64 x86_64 GNU/Linux

感觉像是成功了,但跟着ctfwiki的接下来的目录,没找到bzlmage,离谱!!
#### 3.再次解决报错:
报错:
No rule to make target ‘debian/canonical-certs.pem‘, needed by ‘certs/x509_certificate_list
网上查到:
编辑.config文件(刚才在终端中执行过配置内核的命令#make menuconfig 后
会在该目录下生成一个隐藏文件.config)
~# vim .config
修改CONFIG_SYSTEM_TRUSTED_KEYS,将其赋空值
修改前:
CONFIG_SYSTEM_TRUSTED_KEYS="debian/canonical-certs.pem"
修改后:
CONFIG_SYSTEM_TRUSTED_KEYS=""
再次在终端输入:
~# make -j3 bzlmage
键入回车,看到在正常进行编译,终于成功!!
#### 4.高兴太早了,又出现报错
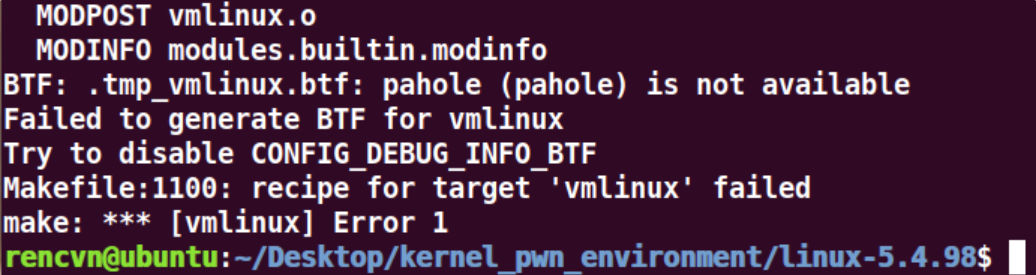
BTF: .tmp_vmlinux.btf: pahole (pahole) is not available
Failed to generate BTF for vmlinux
Try to disable CONFIG_DEBUG_INFO_BTF
Makefile:1100: recipe for target 'vmlinux' failed
make: *** [vmlinux] Error 1
一般是系统缺少dwarves软件包导致。
rencvn@ubuntu:~/Desktop/kernel_pwn_environment/linux-5.4.98$ sudo apt-get install dwarves
安装即可,继续执行:
~# make -j3 bzlmage
希望不要再出报错。
rencvn@ubuntu:~/Desktop/kernel_pwn_environment/linux-5.4.98$ make -j3 bzImage
  DESCEND  objtool
  CALL    scripts/atomic/check-atomics.sh
  CALL    scripts/checksyscalls.sh
  CHK     include/generated/compile.h
  GEN     .version
  CHK     include/generated/compile.h
  UPD     include/generated/compile.h
  CC      init/version.o
  AR      init/built-in.a
  LD      vmlinux.o
  MODPOST vmlinux.o
  MODINFO modules.builtin.modinfo
  LD      .tmp_vmlinux.btf
  BTF     .btf.vmlinux.bin.o
Killed
  LD      .tmp_vmlinux.kallsyms1
  KSYM    .tmp_vmlinux.kallsyms1.o
  LD      .tmp_vmlinux.kallsyms2
  KSYM    .tmp_vmlinux.kallsyms2.o
  LD      vmlinux
  SORTEX  vmlinux
  SYSMAP  System.map
  AS      arch/x86/boot/bioscall.o
  CC      arch/x86/boot/cmdline.o
  CC      arch/x86/boot/a20.o
  AS      arch/x86/boot/copy.o
  HOSTCC  arch/x86/boot/mkcpustr
  CC      arch/x86/boot/cpuflags.o
  CC      arch/x86/boot/cpucheck.o
  CC      arch/x86/boot/early_serial_console.o
  CC      arch/x86/boot/edd.o
  CC      arch/x86/boot/main.o
  CC      arch/x86/boot/memory.o
  LDS     arch/x86/boot/compressed/vmlinux.lds
  AS      arch/x86/boot/compressed/head_64.o
  CC      arch/x86/boot/pm.o
  VOFFSET arch/x86/boot/compressed/../voffset.h
  CC      arch/x86/boot/compressed/string.o
  AS      arch/x86/boot/pmjump.o
  CC      arch/x86/boot/printf.o
  CC      arch/x86/boot/compressed/cmdline.o
  CC      arch/x86/boot/compressed/error.o
  CC      arch/x86/boot/regs.o
  CC      arch/x86/boot/string.o
  OBJCOPY arch/x86/boot/compressed/vmlinux.bin
  CC      arch/x86/boot/tty.o
  RELOCS  arch/x86/boot/compressed/vmlinux.relocs
  CC      arch/x86/boot/video.o
  HOSTCC  arch/x86/boot/compressed/mkpiggy
  CC      arch/x86/boot/video-mode.o
  CC      arch/x86/boot/compressed/cpuflags.o
  CC      arch/x86/boot/compressed/early_serial_console.o
  CC      arch/x86/boot/version.o
  CC      arch/x86/boot/video-vga.o
  CC      arch/x86/boot/video-vesa.o
  CC      arch/x86/boot/compressed/kaslr.o
  CC      arch/x86/boot/video-bios.o
  HOSTCC  arch/x86/boot/tools/build
  CC      arch/x86/boot/compressed/kaslr_64.o
  CPUSTR  arch/x86/boot/cpustr.h
  AS      arch/x86/boot/compressed/mem_encrypt.o
  CC      arch/x86/boot/compressed/pgtable_64.o
  CC      arch/x86/boot/compressed/acpi.o
  CC      arch/x86/boot/compressed/eboot.o
  AS      arch/x86/boot/compressed/efi_stub_64.o
  AS      arch/x86/boot/compressed/efi_thunk_64.o
  CC      arch/x86/boot/compressed/misc.o
  GZIP    arch/x86/boot/compressed/vmlinux.bin.gz
  CC      arch/x86/boot/cpu.o
  MKPIGGY arch/x86/boot/compressed/piggy.S
  AS      arch/x86/boot/compressed/piggy.o
  LD      arch/x86/boot/compressed/vmlinux
  OBJCOPY arch/x86/boot/vmlinux.bin
  ZOFFSET arch/x86/boot/zoffset.h
  AS      arch/x86/boot/header.o
  LD      arch/x86/boot/setup.elf
  OBJCOPY arch/x86/boot/setup.bin
  BUILD   arch/x86/boot/bzImage
Setup is 17692 bytes (padded to 17920 bytes).
System is 9177 kB
CRC 54e6943b
Kernel: arch/x86/boot/bzImage is ready  (#3)
出现表示成功:
Setup is 17692 bytes (padded to 17920 bytes).
System is 9177 kB
CRC 54e6943b
Kernel: arch/x86/boot/bzImage is ready  (#3)
并找到编译好的 bzlmage镜像.
终于成功!!!
编译内核太不容易!
🤣🤩
总结
总体来说跟着ctfwiki来操作还是很好操作的.
意味着编译成功。在编译成功后,我们一般主要关注于如下的文件
- bzImage:
arch/x86/boot/bzImage - vmlinux:源码所在的根目录下。
此外,这里给出常见内核文件的介绍。
- bzImage:目前主流的 kernel 镜像格式,即 big zImage(即 bz 不是指 bzip2),适用于较大的(大于 512 KB) Kernel。这个镜像会被加载到内存的高地址,高于 1MB。bzImage 是用 gzip 压缩的,文件的开头部分有 gzip 解压缩的代码,所以我们不能用 gunzip 来解压缩。
- zImage:比较老的 kernel 镜像格式,适用于较小的(不大于 512KB) Kernel。启动时,这个镜像会被加载到内存的低地址,即内存的前 640 KB。zImage 也不能用 gunzip 来解压缩。
- vmlinuz:vmlinuz 不仅包含了压缩后的 vmlinux,还包含了 gzip 解压缩的代码。实际上就是 zImage 或者 bzImage 文件。该文件是 bootable 的。 bootable 是指它能够把内核加载到内存中。对于 Linux 系统而言,该文件位于 /boot 目录下。该目录包含了启动系统时所需要的文件。
- vmlinux:静态链接的 Linux kernel,以可执行文件的形式存在,尚未经过压缩。该文件往往是在生成 vmlinuz 的过程中产生的。该文件适合于调试。但是该文件不是 bootable 的。
- vmlinux.bin:也是静态链接的 Linux kernel,只是以一个可启动的 (bootable) 二进制文件存在。所有的符号信息和重定位信息都被删除了。生成命令为:
objcopy -O binary vmlinux vmlinux.bin。 - uImage:uImage 是 U-boot 专用的镜像文件,它是在 zImage 之前加上了一个长度为 0x40 的 tag 而构成的。这个 tag 说明了这个镜像文件的类型、加载位置、生成时间、大小等信息。


 1066
1066


 被折叠的 条评论
为什么被折叠?
被折叠的 条评论
为什么被折叠?
 到【灌水乐园】发言


