


step by step.
!声明:本实验整理 不完整且不完全按实验册题目,目的为期末考,带思考,不保证实验作业。
原创。
目录
当前时间按照 -年-月-日 时:分:秒 的格式追加到work1.txt中
通过ls命令长格式查看log.tar.gz文件,追加到work1.txt中
实验一
查看虚拟机IP信息
[root@localhost ~]# ip addr

显然ip地址为:192.168.178.130
重命名文件
[root@localhost ~]# vim exam1.txt --新建一个txt随便写入一点东西(Linuxexam1!)
[root@localhost ~]# mv exam1.txt /tmp/exam1.txt --移动并重命名
 (图片不同,操作不同)
转换为unix格式
[root@localhost ~]# dos2unix tmp/work1.txt

vi打开文件,在第一行加入内容
O
 添加“content...”
重定向追加内容
[root@localhost ~]# echo 12345 >> tmp/work1.txt --重定向内容至指定文件
查看追加情况:

内容追加
/etc/passwd的最后5行追加到work1.txt
[root@localhost ~]# tail -5 /etc/passwd >> tmp/work1.txt

搜索文件+追加
搜索 / 下所有 .xml 结尾的普通文件(-type f)
[root@localhost ~]# find / -name "*.xml" -type f

搜索路径中含usr的文件
[root@localhost ~]# find / -name "*.xml" -type f | grep usr --搜索并增加管道(usr)
搜索路径中含usr的文件追加到work1.txt中
[root@localhost ~]# find / -name "*.xml" -type f | grep usr >> tmp/work1.txt --追加到work1.txt中

当前时间按照 -年-月-日 时:分:秒 的格式追加到work1.txt中
[root@localhost ~]# date +'%Y-%m-%d %H:%M:%S' --查看当前时间(特殊格式)
2022-05-14 08:30:20
[root@localhost ~]# date +'%Y-%m-%d %H:%M:%S' >> tmp/work1.txt --重定向追加内容

压缩生成文件
[root@localhost ~]# tar zcvf log.tar.gz /var/log

通过ls命令长格式查看log.tar.gz文件,追加到work1.txt中
通过式ls命令长格查看log.tar.gz文件
[root@localhost ~]# ls -l log.tar.gz
追加到work1.txt中
[root@localhost ~]# ls -l log.tar.gz | awk '{print $1}' >> tmp/work1.txt


文件转换为windows格式
[root@localhost ~]# unix2dos tmp/work1.txt
实验二
查看目录是否存在子目录,如果没有则新建
[root@localhost ~]# ls -l tmp/myshare --查看是否存在(-l长格式打印)
ls: cannot access tmp/myshare: No such file or directory
[root@localhost ~]# mkdir -p tmp/myshare --新建目录(-p自动创建不存在子目录)
[root@localhost ~]# ls -l tmp/myshare
total 0

创建文件夹、文件
[root@localhost ~]# mkdir -p tmp/myshare/2022 --创建文件夹
[root@localhost ~]# touch tmp/myshare/work2.txt --touch改变文件时间记录、创建空文件

创建用户并指定uid(1024)
[root@localhost ~]# useradd -u 1024 test
查看文件信息并追加
查看文件信息
[root@localhost ~]# cat /etc/passwd /etc/shadow

追加信息
[root@localhost ~]# cat /etc/passwd /etc/shadow | grep test --增加管道
[root@localhost ~]# cat /etc/passwd /etc/shadow | grep test >> tmp/myshare/work2.txt --增加管道并重定向

指定行数内容追加
[root@localhost ~]# head -13 /etc/passwd >> tmp/myshare/work2.txt --追加前13行至work2

追加myshare所有文件、子目录内容(长格式)至work2
[root@localhost ~]# ls -lR tmp/myshare/ >> tmp/myshare/work2.txt


修改文件拥有者并查看、追加
修改文件拥有者并查看修改结果
[root@localhost ~]# chown -R test:mail tmp/myshare --‘修改后拥有者:组名(test:mail)’

追加并查看
[root@localhost ~]# ls -lR tmp/myshare/ >> tmp/myshare/work2.txt
[root@localhost ~]# tail tmp/myshare/work2.txt

小插曲(移动目录,修改拥有者,修改用户,进入目录)
[root@localhost ~]# mv tmp/myshare/ /tmp/myshare --修改为/tmp下文件(权限问题)
[root@localhost ~]# chown -R exm:mail /tmp/myshare --修改拥有者:组名
[root@localhost ~]# su exm --进入用户
[exm@localhost root]$ cd /tmp/myshare/2022 --进入目录[exm@localhost 2022]$
进入用户
[root@localhost ~]# su exm --进入用户exm

进入目录新建、修改程序
[exm@localhost 2022]$ ls
[exm@localhost 2022]$ vi hello.sh

设置文件可读可写可执行权限并追加
设置文件权限
[exm@localhost 2022]$ chmod u=rwx,g=rx,o=x hello.sh --拥有者可读可写可执行(u=rwx),同组可读可执行(g=rx),其他人可执行(o=x)

[root@localhost ~]# ls -l test.sh
-rw-r--r--. 1 root root 124 May 17 18:53 test.sh
[root@localhost ~]# chmod a=rwx test.sh --'a='设置全部权限都为rwx
[root@localhost ~]# ls -l test.sh
-rwxrwxrwx. 1 root root 124 May 17 18:53 test.sh

追加:
[exm@localhost 2022]$ ls -l hello.sh >> /tmp/myshare/work2.txt
执行脚本文件并追加
[exm@localhost 2022]$ ./hello.sh --执行
app starthello Linux!
app end
[exm@localhost 2022]$ ./hello.sh >> /tmp/myshare/work2.txt
进入exm用户主目录
[exm@localhost 2022]$ cd ~ --~为用户主目录

创建软链接
[exm@localhost ~]$ ln -s /tmp/myshare/2022/hello.sh myhello.sh --创建软链接

拷贝文件且改名
[exm@localhost ~]$ cp /tmp/myshare/2022/hello.sh hello.sh.bak -拷贝至当前目录并改名为hello.sh.bak
[exm@localhost ~]$ ls -l --长格式查看

长格式查看所有(含隐藏)文件并追加
[root@localhost ~]# ls -al /home/exm
[root@localhost ~]# ls -al /home/exm >> /tmp/myshare/work2.txt

查找/开始的后缀名为.conf的所有(普通)文件并追加
[root@localhost ~]# find / -name "*.conf" -type f

寻找上一步中容量最大的文件并追加
先按容量排序
[root@localhost ~]# ls -lS `find / -name "*.conf" -type f` --单引号`括起上一部命令,再进行排序
再选取第一个(即容量最大的)
[root@localhost ~]# ls -lS `find / -name "*.conf" -type f` | head -1 --选取head第一个
-rw-r--r--. 1 root root 153591 Oct 19 2020 /usr/src/kernels/3.10.0-1160.el7.x86_64/include/config/auto.conf
追加
[root@localhost ~]# ls -lS `find / -name "*.conf" -type f` | head -1 >> /tmp/myshare/work2.txt

统计用户
[root@localhost ~]# cat /etc/passwd | wc -l --统计行数即用户数
47 --输出47即47个用户


转换格式
[root@localhost ~]# dos2unix /tmp/myshare/work2.txt
删除用户下目录

[root@localhost ~]# userdel -r exm --删除用户exm下所有目录文件
删除目录
[root@localhost ~]# rm -rf /tmp/myshare/ --删除myshare目录
[root@localhost ~]# ls -l /tmp/myshare --查看,果然没啦
ls: cannot access /tmp/myshare: No such file or directory
实验三
安装telnet
[root@localhost ~]# cd /etc/xinetd.d/
[root@localhost xinetd.d]# ls
chargen-dgram daytime-stream echo-dgram telnet vsftpd
chargen-stream discard-dgram echo-stream time-dgram
daytime-dgram discard-stream tcpmux-server time-stream[root@localhost xinetd.d]# vi telnet
[root@localhost xinetd.d]# service xinetd restart
Redirecting to /bin/systemctl restart xinetd.service
[root@localhost xinetd.d]# cd ~

安装ftp服务器(standalone)
[root@localhost ~]# yum install -y vsftpd ftp
[root@localhost ~]# service vsftpd restart

创建a2022账号并设置好密码
[root@localhost ~]# useradd a2022
[root@localhost ~]# passwd a2022
sudoers中添加权限
[root@localhost ~]# ls -l /etc/sudoers --查看sudoers中的用户
-rw-r-----. 1 root root 4364 Apr 17 19:39 /etc/sudoers
[root@localhost ~]# chmod +w /etc/sudoers --添加w权限(请记住是+不是-)

[root@localhost ~]# vi /etc/sudoers
打开后添加信息快捷查看 /root
添加用户信息:


进入用户并查看
[root@localhost ~]# su a2022
[a2022@localhost root]$ sudo cat /etc/shadow
成功!

查看telnet连接情况
[root@localhost ~]# chkconfig --list |grep telnet
[root@localhost ~]# chkconfig --list |grep telnet >> /root/work3.txt

查看vsftpd配置文件信息
[root@localhost ~]# ps -ef | grep vsftpd

windows远程telnetlinux
打开windows的cmd(要通过‘控制面板’-程序与功能打开telnet、ftp)

出错原因:linux防火墙未关闭。
关闭linux防火墙
[root@localhost ~]# service firewalld stop

成功!

追加内容、修改权限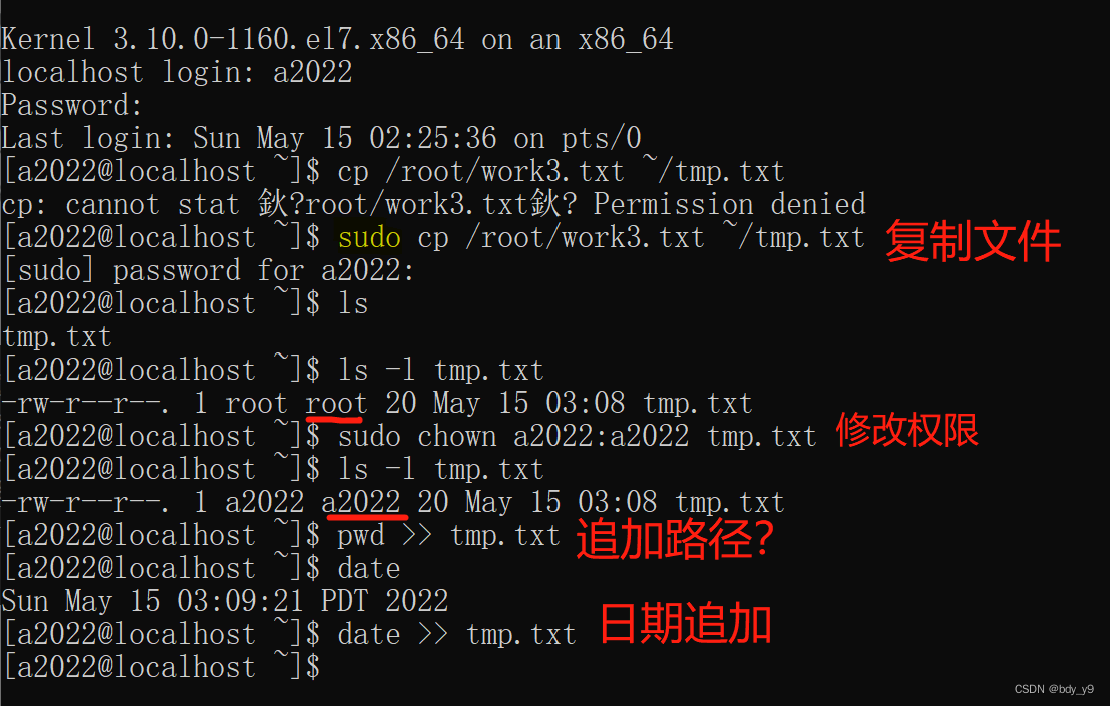
[a2022@localhost ~]$ sudo cp /root/work3.txt ~/tmp.txt --复制文件
[a2022@localhost ~]$ ls -l tmp.txt
-rw-r--r--. 1 root root 20 May 15 03:08 tmp.txt
[a2022@localhost ~]$ sudo chown a2022:a2022 tmp.txt --修改权限
[a2022@localhost ~]$ ls -l tmp.txt
-rw-r--r--. 1 a2022 a2022 20 May 15 03:08 tmp.txt
[a2022@localhost ~]$ pwd >> tmp.txt
[a2022@localhost ~]$ date >> tmp.txt
[root@localhost ~]# ls -l test.sh
-rw-r--r--. 1 root root 124 May 17 18:53 test.sh
[root@localhost ~]# chmod a=rwx test.sh --'a='设置全部权限都为rwx
[root@localhost ~]# ls -l test.sh
-rwxrwxrwx. 1 root root 124 May 17 18:53 test.sh
追加文件1、3、4栏内容至tmp.txt
[a2022@localhost ~]$ cat /etc/passwd | cut -d: -f1,3,4 >> tmp.txt

ftp禁止匿名登录 锁定登录用户目录不可进行目录切换
annoymous_enable=NO

chroot_local_usere=YES 打开 (去掉#)
allow_writeable_chroot=YES
实验三(课上)vi编辑器操作
生成out.txt
[root@localhost ~]# man ls > out.txt

vi编辑out.txt 显示行号
:set nu

vi编辑器光标移动
99G --跳到第99行
10l --右移10字符
gg --移动到首行

![]()
![]()
vi编辑器搜索
/1024 --搜索’1024‘
vi编辑器修改
:50,100 s/o/O/g --50至100行o修改成O 'g':全局
恢复修改
u
复制65到73之间内容粘贴到最后一行
65G
9yy --复制9行
G
p --粘贴


删除21到42行内容
:21,42 d
另存
:w out.txt.bak --另存为out.txt.bak
插入内容
28G --定位28行
3dw --删除3个word
gg --定位到首行
实验五

#!/bin/bash
options_show(){
        echo "Use one of the following options:"
        echo "P:To display current directory"
        echo "S:To display the name of running file"
        echo "D:To display today's date and present time"
        echo "L:To see the list of files in your present working directory"
        echo "W:To see who is logged in"
        echo "I:To see the ip address of this local machine"
        echo "Q:To quit this program"
        echo "Enter your option and hit:"
}

while true
do
        options_show
        read input
        case ${input} in
        p|P)
         'pwd'
         ;;
        s|S)
         echo $0
         ;;
        d|D)
         date +"%Y-%m-%d %H:%M:%S"
         ;;
        l|L)
         ls
         ;;
        w|W)
         who
         ;;
        i|I)
         ifconfig
         ;;
        q|Q)
         exit
         ;;
         *)
         echo "usage error!"
         ;;
        esac
done
options_show
done
增加执行权限
[root@localhost ~]# chmod +x *.sh
执行sh文件
[root@localhost ~]# ./menu.sh --执行menu.sh
Use one of the following options:
P:To display current directory
S:To display the name of running file
D:To display today's date and present time
L:To see the list of files in your present working directory
W:To see who is logged in
I:To see the ip address of this local machine
Q:To quit this program
Enter your option and hit:
p
/root
Use one of the following options:
P:To display current directory
S:To display the name of running file
D:To display today's date and present time
L:To see the list of files in your present working directory
W:To see who is logged in
I:To see the ip address of this local machine
Q:To quit this program
Enter your option and hit:
s
./menu.sh
Use one of the following options:
P:To display current directory
S:To display the name of running file
D:To display today's date and present time
L:To see the list of files in your present working directory
W:To see who is logged in
I:To see the ip address of this local machine
Q:To quit this program
Enter your option and hit:
d
2022-05-15 06:45:33
Use one of the following options:
P:To display current directory
S:To display the name of running file
D:To display today's date and present time
L:To see the list of files in your present working directory
W:To see who is logged in
I:To see the ip address of this local machine
Q:To quit this program
Enter your option and hit:
l
1.sh exam2.txt hello.s program.sh say_hello.o tmp
201925320219.tar exam3.txt log.sh Public score.sh tmp.txt
201925320219.zip file.sh log.tar.gz run1.sh sum tool1
4.sh ftp.sh menu.sh run2.sh sum.c tool2
anaconda-ks.cfg hello Music run3.sh sum.i var
Desktop hello.c original-ks.cfg run4.sh sum.o Videos
Documents hello.i out.txt say_hello.c Templates work3.txt
Downloads hello.o Pictures say_hello.h test
Use one of the following options:
P:To display current directory
S:To display the name of running file
D:To display today's date and present time
L:To see the list of files in your present working directory
W:To see who is logged in
I:To see the ip address of this local machine
Q:To quit this program
Enter your option and hit:
w
root :0 2022-05-15 06:24 (:0)
root pts/0 2022-05-15 06:25 (:0)
Use one of the following options:
P:To display current directory
S:To display the name of running file
D:To display today's date and present time
L:To see the list of files in your present working directory
W:To see who is logged in
I:To see the ip address of this local machine
Q:To quit this program
Enter your option and hit:
i
ens33: flags=4163<UP,BROADCAST,RUNNING,MULTICAST> mtu 1500
inet 192.168.178.130 netmask 255.255.255.0 broadcast 192.168.178.255
inet6 fe80::b507:8c64:3e97:76c prefixlen 64 scopeid 0x20<link>
ether 00:0c:29:06:e0:ca txqueuelen 1000 (Ethernet)
RX packets 693 bytes 62281 (60.8 KiB)
RX errors 0 dropped 0 overruns 0 frame 0
TX packets 237 bytes 23378 (22.8 KiB)
TX errors 0 dropped 0 overruns 0 carrier 0 collisions 0lo: flags=73<UP,LOOPBACK,RUNNING> mtu 65536
inet 127.0.0.1 netmask 255.0.0.0
inet6 ::1 prefixlen 128 scopeid 0x10<host>
loop txqueuelen 1000 (Local Loopback)
RX packets 64 bytes 5568 (5.4 KiB)
RX errors 0 dropped 0 overruns 0 frame 0
TX packets 64 bytes 5568 (5.4 KiB)
TX errors 0 dropped 0 overruns 0 carrier 0 collisions 0virbr0: flags=4099<UP,BROADCAST,MULTICAST> mtu 1500
inet 192.168.122.1 netmask 255.255.255.0 broadcast 192.168.122.255
ether 52:54:00:e5:b3:0e txqueuelen 1000 (Ethernet)
RX packets 0 bytes 0 (0.0 B)
RX errors 0 dropped 0 overruns 0 frame 0
TX packets 0 bytes 0 (0.0 B)
TX errors 0 dropped 0 overruns 0 carrier 0 collisions 0
Use one of the following options:
P:To display current directory
S:To display the name of running file
D:To display today's date and present time
L:To see the list of files in your present working directory
W:To see who is logged in
I:To see the ip address of this local machine
Q:To quit this program
Enter your option and hit:
q

#!/bin/bash
while true
do
        read score
        if[ $score -lt 0 ];then
         exit
        elif[ $score -lt 60 ];then
         echo "Failed"
        elif[ $score -lt 70 ];then
         echo "Passed"
        elif[ $score -lt 80 ];then
         echo "Medium"
        elif[ $score -lt 90 ];then
         echo "Good"
        elif[ $score -le 100];then
         echo"Excellent"
        else
         echo"input error!"
        fi
done


  1 #!/bin/bash
  2 while true
  3 do
  4         echo -e "input a directory:"
  5         read dir
  6         if [ $dir = "q" ];then
  7                 exit
  8         elif [ -e $dir -a -d $dir ];then
  9                 for file in `ls $dir`
 10                         do
 11                                 if [! -e "$dir$file" ];then
 12                                         dd="$dir/$file"
 13                                 else
 14                                         dd="$dir$file"
 15                                 fi
 16                   type=`ls -ld $dd | cut -c1`
 17                                 echo "${dd}_${type}"
 18                   done
 19         else
 20                 echo "$dir is not a directory"
 21         fi
 22         echo -e
 23 done
[root@localhost ~]# ./file.sh --执行
input a directory:
/etc
./file.sh: line 11: [!: command not found
ls: cannot access /etcabrt: No such file or directory
/etcabrt_
input a directory:
/etc_d
/etc_d is not a directory
input a directory:
/etc/passwd_
/etc/passwd_ is not a directory

  1 #!/bin/bash
  2 yum install -y vsftpd
  3 setenforce 0
  4 sed -i 's?anoymous_enable=YES?anonymous_enable=NO?' /etc/vsftpd/vsftpd.conf
  5 service vsftpd start
[root@localhost ~]# ./ftp.sh
Loaded plugins: fastestmirror, langpacks
Loading mirror speeds from cached hostfile
* base: mirrors.ustc.edu.cn
* extras: mirrors.ustc.edu.cn
* updates: mirrors.ustc.edu.cn
Package vsftpd-3.0.2-29.el7_9.x86_64 already installed and latest version
Nothing to do
Redirecting to /bin/systemctl start vsftpd.service
Job for vsftpd.service failed because the control process exited with error code. See "systemctl status vsftpd.service" and "journalctl -xe" for details.
实验六
1. 根据输入循环执行输出
编写⼀段bash shell程序,保存为 program.sh 完成以下输出,可循环执行:
please,input a number:
5(回⻋)
5 4 3 2 1
4 3 2 1
3 2 1
2 1
1
!/bin/bash
echo "please, input a number:"
read num
while [ $num -gt 0 ]
do
        i=$num
        while [ $i -gt 0 ]
        do
                echo -n "$i  "
                i=`expr $i - 1`
        done
        echo -e
        let num=$num-1
done
注意一些空格的地方!

2. 统计每个ip出现的次数(通过run.log行数)
run.log是⼀个具有固定格式的⽇志⽂件。每⼀⾏的格式为: ip[]time[]runner[]command[]result ,其中[]表示空格,ip格式为点分⼗进制表示法。
编写⼀个名为log.sh的shell脚本统计每个ip出现的次数。 例⼦:
10.10.10.1[]32
10.10.10.2[]2
10.10.10.3[]5
#!/bin/bash
ips=`cat run.log | awk '{print $1}' | sort -u`
for ip in ${ips}
do
        count=`cat run.log | grep ${ip} | wc -l`
        echo -e ${ip} ${count}
done
3.
管理员root每天需要完成以下⼯作:
2.1 每天早上8点30分启动服务器的ftp服务,在每天晚上23点30分就关闭ftp服务 。如果启动成功把ftp的进程信息写⼊ /var/ftp/年-⽉-⽇.log ⽂件中,如果启动失败,需要给root发⼀封邮件。邮件内 容为: start ftp error
2.2 在早上8点30分到晚上23点30分之间,每隔1⼩时ping⼀下百度域名(每次ping 发4次),保证⽹络畅通,并把ping的结果追 加到 /var/ftp/年-⽉-⽇.log ⽂件中。
2.3 每天晚上11点50分30秒备份ftp⽬录(/var/ftp)⽣成名为 年-⽉-⽇.tar.gz 的 压缩包,并把压缩包的权限修改为只有root有 读权限,其他都没有权限。把压缩包移动到root主⽬录下。然后清空/var/ftp下的 所有内容。 假设/var/ftp⽬录已存在


 https://blog.csdn.net/weixin_51159944/article/details/124734594?csdn_share_tail=%7B%22type%22%3A%22blog%22%2C%22rType%22%3A%22article%22%2C%22rId%22%3A%22124734594%22%2C%22source%22%3A%22weixin_51159944%22%7D&ctrtid=azCEb


 2887
2887

 被折叠的 条评论
为什么被折叠?
被折叠的 条评论
为什么被折叠?
 到【灌水乐园】发言


