


0X0a Vue
1、Vue概述
Vue 是一套前端框架,免除原生JavaScript中的DOM操作,简化书写。
基于MVVM(Model-View-ViewModel)思想,实现数据的双向绑定,将编程的关注点放在数据上。
2、入门案例
<!DOCTYPE html>
<html lang="en">
<head>
    <meta charset="UTF-8">
    <title>index</title>
</head>
<body>
    <script type="text/javascript" src="js/vue.js"></script>
    <div id="app">
        <input v-model="username">
        <!-- 插值表达式 -->
        {{ username }}
    </div>


    <script>
        // 1、创建Vue的核心对象
        new Vue({
            el: "#app",
            data() {
                return {
                    username: ""
                }
            }
        })
    </script>
</body>
</html>
3、Vue常用指令
![[外链图片转存失败,源站可能有防盗链机制,建议将图片保存下来直接上传(img-IS8vXMNF-1662270983834)(C:\Users\Administrator\AppData\Roaming\Typora\typora-user-images\image-20220729163025178.png)]](https://img-blog.csdnimg.cn/26ea4c254fcb440889340cad6ad243bc.png)
<!DOCTYPE html>
<html lang="en" xmlns:v-bind="http://www.w3.org/1999/xhtml" xmlns:v-on="http://www.w3.org/1999/xhtml">
<head>
    <meta charset="UTF-8">
    <title>index</title>
</head>
<body>
    <script type="text/javascript" src="js/vue.js"></script>
    <div id="app">
        <!-- 和数据进行双向绑定 -->
        <input name="username" v-model="username">
        <p>{{ username }}</p>
        <!-- 绑定属性值
            v-bind:可以简化为:
            <a :href="url">点击一下</a>
        -->
        <a v-bind:href="url">点击一下</a>

        <!-- 绑定事件
        简化写法:
        <button type="button" @click="show()">单击事件</button>
        -->
        <button type="button" v-on:click="show()">单击事件</button>

        <div v-if="count == 1">div1</div>
        <div v-else-if="count == 2">div2</div>
        <div v-else>div3</div>

        <hr>
        <div v-show="count == 3">v-show</div>

        <!-- 循环遍历, i相当于索引-->
        <div v-for="(addr, i) in address">
            <div>{{i+1}}、{{addr}}</div>
        </div>
    </div>

    <script>
        // 1、创建Vue的核心对象
        new Vue({
            el: "#app",
            methods: {
                show() {
                    alert(1);
                }
            },
            // data的两种写法
            /*data:{  // 存储数据
                username: ""
            }
            */
            // 函数式,用返回值传参
            data() {
                return {
                    username: "",
                    url: "http://www.baidu.com",
                    count: 3,
                    address: ["北京", "上海", "广州", "深圳"]
                }
            }
        })
    </script>
</body>
</html>
4、Vue生命周期
通常也叫生命周期回调函数、生命周期函数、生命周期钩子
vue初始化时在不同的阶段调用的不同函数
生命周期函数的this指向为vue实例,名字不能更改
![[外链图片转存失败,源站可能有防盗链机制,建议将图片保存下来直接上传(img-HRjqGP0D-1662270983836)(C:\Users\Administrator\AppData\Roaming\Typora\typora-user-images\image-20220827152407993.png)]](https://img-blog.csdnimg.cn/fc528049d4b44fdd8cfe44ee7f88e62d.png)
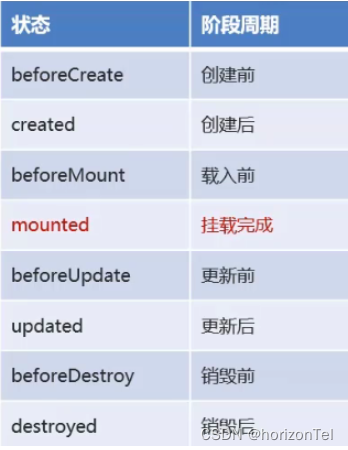
mounted:挂载完成后,Vue初始化成功,HTML页面渲染成功
	发送异步请求,加载数据
<!DOCTYPE html>
<html>
<head>
	<title>Vue</title>
	<meta charset="utf-8">
	<script type="text/javascript" src="./vue.js"></script>
</head>
<body>
    <div id="app">
        <div :style="{fontSize: num + 'px', color: color}">{{name}}</div>
    </div>
    <script>
        new Vue({
            el: '#app',
            data: {
                name: 'hello world',
                num: 12,
                color: ''
            },
            methods: {
                change() {
                    this.color = 'red';
                }
            },
            mounted() {
                this.change();
                setInterval(()=> {
                    this.num += 0.4;
                    if(this.num >= 20)
                        this.num = 12;
                }, 60)
            }
        })
    </script>
</body>
</html>
5、案例
<!DOCTYPE html>
<html lang="en">
<head>
    <meta charset="UTF-8">
    <title>Title</title>
</head>
<body>
<div id="app">

    <a href="addBrand.html"><input type="button" value="新增"></a><br>
    <hr>
    <table id="brandTable" border="1" cellspacing="0" width="100%">
        <tr>
            <th>序号</th>
            <th>品牌名称</th>
            <th>企业名称</th>
            <th>排序</th>
            <th>品牌介绍</th>
            <th>状态</th>
            <th>操作</th>
        </tr>

        <!-- 使用v-for遍历tr -->
        <tr v-for="(brand,i) in brands" align="center">
            <td>{{i + 1}}</td>
            <td>{{brand.brandName}}</td>
            <td>{{brand.companyName}}</td>
            <td>{{brand.ordered}}</td>
            <td>{{brand.description}}</td>
            <td>{{brand.statusStr}}</td>
            <td><a href="#">修改</a> <a href="#">删除</a></td>
        </tr>
    </table>
</div>
<script src="js/axios-0.18.0.js"></script>
<script src="js/vue.js"></script>

<script>

    new Vue({
        el: "#app",
        data(){
            return{
                brands:[]
            }
        },
        mounted(){
            // 页面加载完成后,发送异步请求,查询数据
            var _this = this;
            axios({
                method:"get",
                url:"http://localhost:8080/brand-demo/selectAllServlet"
            }).then(function (resp) {
                _this.brands = resp.data;
            })
        }
    })

</script>

</body>
</html>
<!DOCTYPE html>
<html lang="en">

<head>
    <meta charset="UTF-8">
    <title>添加品牌</title>
</head>
<body>
<div id="app">
    <h3>添加品牌</h3>
    <form action="" method="post">
        品牌名称:<input id="brandName" v-model="brand.brandName" name="brandName"><br>
        企业名称:<input id="companyName" v-model="brand.companyName" name="companyName"><br>
        排序:<input id="ordered" v-model="brand.ordered" name="ordered"><br>
        描述信息:<textarea rows="5" cols="20" id="description" v-model="brand.description" name="description"></textarea><br>
        状态:
        <input type="radio" name="status" v-model="brand.status" value="0">禁用
        <input type="radio" name="status" v-model="brand.status" value="1">启用<br>

        <input type="button" id="btn" @click="submitForm" value="提交">
    </form>
</div>
<script src="js/axios-0.18.0.js"></script>
<script src="js/vue.js"></script>

<script>

    new Vue({
        el: "#app",
        data(){
            return {
                brand:{}
            }
        },
        methods:{
            submitForm(){
                // 发送ajax请求,添加
                var _this = this;
                axios({
                    method:"post",
                    url:"http://localhost:8080/brand-demo/addServlet",
                    data:_this.brand
                }).then(function (resp) {
                    // 判断响应数据是否为 success
                    if(resp.data == "success"){
                        location.href = "http://localhost:8080/brand-demo/brand.html";
                    }
                })

            }
        }
    })

</script>
</body>
</html>
6、事件处理
<!DOCTYPE html>
<html lang="en">
<head>
    <meta charset="UTF-8">
    <title>hello</title>
    <!-- 引入Vue -->
    <script type="text/javascript" src="./vue.js"></script>
</head>
<body>
    <!-- 准备好一个容器 -->
    <div id="root">
        <h1>Hello, {{name}}</h1>
        <!-- 点击事件,$event是自带的参数,可以加可以不加 -->
        <button v-on:click="showInfo(name, $event)">点我</button>
        <!-- <button @click="showInfo()">点我</button>  简写 -->

    </div>

    <script type="text/javascript">
        const vm = new Vue({
            el:'#root',  // 指定当前Vue实例为哪个服务器服务
            data:{  // 存储数据
                name: 'haha'
            },
            methods:{
                showInfo(name, event){     // 传参
                    alert('hello, ' + name);
                    // console.log(event.target.innerText)
                }
            }
        })
    </script>
</body>
</html>
<!DOCTYPE html>
<html lang="en">
<head>
    <meta charset="UTF-8">
    <title>hello</title>
    <!-- 引入Vue -->
    <script type="text/javascript" src="./vue.js"></script>
</head>
<body>
    <!-- 准备好一个容器 -->
    <div id="root">
        <h1>Hello, {{name}}</h1>
        <!-- .prevent 阻止自带的点击后跳转事件 -->
        <!-- .once 事件只触发一次 -->
        <a href="https://www.baidu.com" @click.prevent="showInfo(name)">点击这里</a>

    </div>

    <script type="text/javascript">
        const vm = new Vue({
            el:'#root',  // 指定当前Vue实例为哪个服务器服务
            data:{  // 存储数据
                name: 'haha'
            },
            methods:{
                showInfo(name, event){     // 传参
                    alert('hello, ' + name);
                    // console.log(event.target.innerText)
                }
            }
        })
    </script>
</body>
</html>
7、计算属性
<!-- 小案例 -->
<body>
    <div id="app">
        姓:<input type="text" v-model="firstName"><br/>
        名:<input type="text" v-model="lastName"><br/>
        全名:<input type="text" v-model="allName()">
    </div>
    <script>
        new Vue({
            el: '#app',
            data: {
                firstName: '张',
                lastName: '三'
            },
            methods: {
                allName() {
                    return this.firstName + this.lastName
                }
            }
        })
    </script>
</body>
<!-- 方法二 -->
<div id="app">
        姓:<input type="text" v-model="firstName"><br/>
        名:<input type="text" v-model="lastName"><brc
    	<!-- 插值语法在用computed的时候不需要加() -->
        全名:<input type="text" v-model="allName">
    </div>
    <script>
        new Vue({
            el: '#app',
            data: {
                firstName: '张',
                lastName: '三'
            },
            computed: {
                allName: {
                    // 修改名和姓之后,全名随之修改
                    get() {
                        return this.firstName + ' ' + this.lastName
                    },
                    // 修改全名之后,名和姓随之修改
                    set(value) {
                        this.firstName = value.split(' ')[0];
                        this.lastName = value.split(' ')[1];
                    }
                }
            }
        })
    </script>
8、Vue的监事属性
<!DOCTYPE html>
<html>
<head>
	<title>Vue</title>
	<meta charset="utf-8">
	<script type="text/javascript" src="./vue.js"></script>
</head>
<body>
    <div id="app">
        <div>
            今日任务:{{plan}}
        </div>
        <button type="button" @click="change">改变天气</button>
    </div>
    <script>
        new Vue({
            el: "#app",
            data: {
                plan: "打篮球",
                isSunny: true
            },
            watch: {
                <!-- 监事isSunny属性 -->
                isSunny: {
                    <!-- 开启初始化调用 -->
                    immediate: true,
                    <!-- 如果isSunny属性值改变,就调用handler回调函数 -->
                    handler() {
                        this.plan = this.isSunny ? "打篮球":"写代码"
                    }
                }
            },
            methods: {
                change() {
                    this.isSunny = !this.isSunny;
                }
            }
        })
    </script>
</body>
</html>
监事属性和计算属性
* 监事属性是命令式且重复的
* 通过计算属性实现更加简洁明了
* 两者都能实现的时候,优先使用computed
* watch能实现异步调用,computed不能
9、维护状态key的作用和原理
* key值使用数组的索引index,或者不加,在数组元素顺序打乱时,会产生不必要的DOM更新以及界面效果出问题
* key主要用在 Vue 虚拟 DOM(类似 js 对象格式的数据) 的 Diff 算法,新旧虚拟 DOM 对比,复用不变的旧节点,渲染改变的节点,提高渲染速度
<li v-for="(item,index) in obj" :key="item.id">{{item.name}}</li>
new Vue({
  el: '#app',
  data: {
    obj: [
      { name: '张三', id: '1' },
      { name: '李四', id: '2' },
      { name: '王五', id: '3' },
    ],
  },
});
10、列表过滤
<input type="text" v-model="inputValue" />
<ul>
  <li v-for="item in newList">{{item.name}}-{{item.price}}</li>
</ul>
new Vue({
  el: '#app',
  data: {
    inputValue: '',
    list: [
      { name: '牛仔裤', price: '88元' },
      { name: '运动裤', price: '67元' },
      { name: '羽绒服', price: '128元' },
      { name: '运动服', price: '100元' },
    ],
  },
  computed: {
    newList() {
      return this.list.filter((i) => {
        return i.name.indexOf(this.inputValue) !== -1;
      });
    },
  },
});
11、Vue中的数据更新
// 给obj对象添加name属性,值为小滴课堂
this.$set(this.obj,'name','小滴课堂')
[注] this.$set不能给Vue实例的根数据对象添加属性
对数组进行更新
Vue在数组的原始操作方法上包裹了重新解析模板的方法
push()
pop()
shift()
unshift()
splice()
sort()
reverse()
0X0b Vue脚手架
一、初始化脚手架
-
全局安装
Vue CLI(仅第一次安装需要执行)npm install -g @vue/cli -
进入到要创建项目的文件夹
vue create xxx -
启动项目
npm run serve
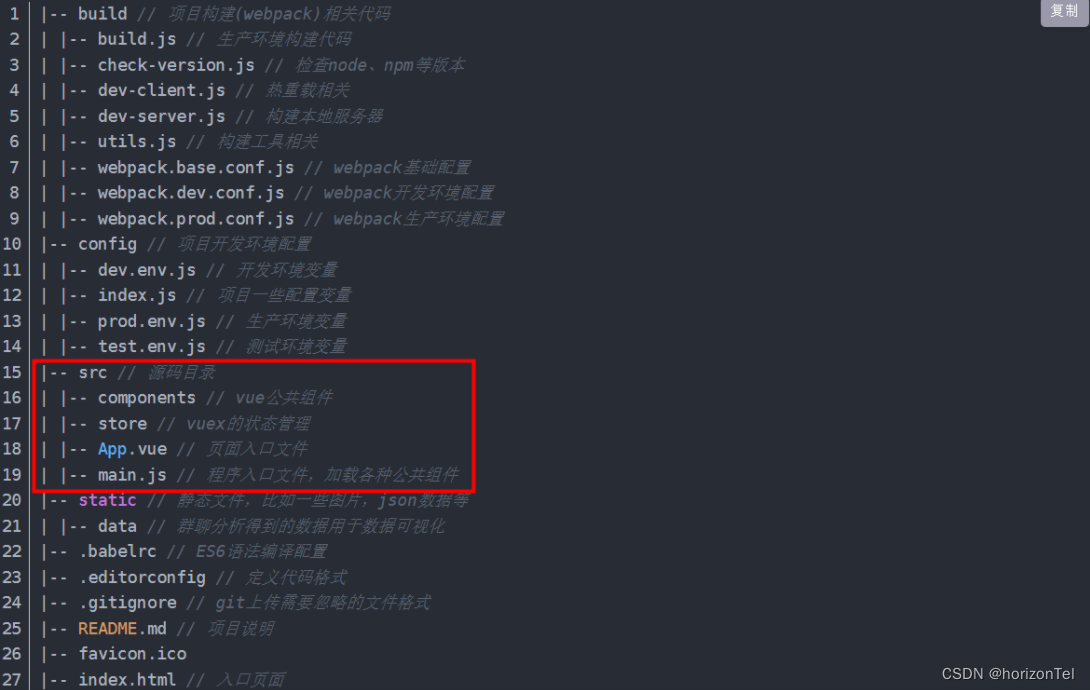
二、分析Vue脚手架结构信息
[外链图片转存失败,源站可能有防盗链机制,建议将图片保存下来直接上传(img-jUdO5fzb-1662270983837)(file:///C:\Users\Administrator\Documents\Tencent Files\2479189935\Image\C2C\7DDA54BF64945F1C47484114C18CCBE3.png)]
// main.js
// 这个位整个文件启动的入口
import Vue from 'vue'
import App from './App.vue'

Vue.config.productionTip = false

new Vue({
  render: h => h(App),
}).$mount('#app')

// new Vue({
//   el: '#app',
//   // 由于我们使用的是运行版的Vue,因此没有模板解析器,因此只能使用render函数
//   // template: "<App></App>",
//   // component: App
// })
App.vue
所有子组件的父组件
三、Vue配置文件的修改
配置文件
	查看vue脚手架的默认配置(修改不奏效)
	vue inspect > output.js
对脚手架进行设置
	新建 vue.config.js文件设置
module.exports = {
    pages: {
        index: {
          // page 的入口
          entry: 'src/index/main.js',
        }
    },
    lintOnSave: false
};
0X0c Vue组件化编程
一、组件化编程
模块
	一般指一个 js 文件,提取公共或逻辑复杂的 js 代码
	复用 js 代码、提高代码的复用率

模块化
	当项目中的 js 都用模块来编写,那这个项目就是模块化的

组件
	实现局部功能、逻辑的代码合集(html、css、js、image、map4)

组件化
	当项目中的功能或者页面都以组件的形式来去编写,那么这个项目就是组件化的
二、组件的全局注册与局部注册
<!DOCTYPE html>
<html>
<head>
	<title>Vue</title>
	<meta charset="utf-8">
	<script type="text/javascript" src="./vue.js"></script>
</head>
<body>
    <div id="app">
        <div>{{name}}</div>
        <!-- 组件的复用 -->
        <button-counter></button-counter>
        <xd></xd>
    </div>
    <script>
        haha = Vue.extend({
            data() {
                return {text: 'Hello'};
            },
            template : '<div>{{text}}</div>'
        })

        // 全局注册
        Vue.component('button-counter', {
            // data必须是一个函数
            data() {
                return {num: 0};
            },
            template: '<button v-on:click="num++">一共点击了{{num}}次</button>'
        }),

        // 局部注册
        xd = Vue.extend({
            data() {
                return { num : 0};
            },
            // 嵌套组件
            components : {
                haha
            },
            template: `<div>
            <button v-on:click="num++">一共点击了{{num}}次</button>
            <haha></haha>
            </div>
            `
        },)


        new Vue({
            el: '#app',
            data: {
                name: 'hello world',
            },
            // 对于局部注册,需要在compoments里注册对应的标签
            components: {
                // 全写为: xd: xd 前一个为标签名称,后一个是对应的局部注册名称
                xd
            }
        })
    </script>
</body>
</html>
三、单文件组件
<!-- HelloWorld.vue -->
<!-- 结构 -->
<template>
<div>{{name}}</div>
</template>

<!-- 交互 -->
<script>
export default{
  data() {
    return {name: 'HelloWorld'};
  }
}
</script>

<!-- 样式 -->
<style>
</style>
四、父子组件的传参
- 父向子传值:props
props的数据时单向的,只能从父组件传到子组件
props的数据不可更改,如果要更改需备份到data中做操作
<!-- HelloWorld.vue -->
<template>
<div>
  <div>{{name}}</div>
  <div>{{msg}}</div>
</div>
</template>

<script>
export default{
  data() {
    return {name: 'HelloWorld'};
  },
  // 父组件传参
  // 父组件传参样式: <HelloWorld msg="Welcome to Your Vue.js App"/>,传参类型为String,如果为其他类型,则写成:msg
  props: ["msg"]
  /*
  传参样式二:
    props: {
      // 强制msg类型为String
      msg: String
    }
    传参样式三:
    props: {
      msg: {
        type: String,
        // 必须传参
        required: true,
        // 设置默认值
        default: "HelloWorld"
      }
    }
  */
}
</script>


<style>
</style>
-
子向父传值
- 父组件通过
props传给子组件事件回调传值
<!-- App.vue -->
<template>
  <div id="app">
    <!-- 传参函数 -->
    <HelloWorld msg="Welcome to Your Vue.js App" :transmit="transmit"/>
    <div>{{ message }}</div>
  </div>
</template>

<script>
import HelloWorld from './components/HelloWorld.vue'

export default {
  name: 'App',
  components: {
    HelloWorld
  },
  data() {
    return {message: ""}
  },
  methods: {
    // 定义回调函数
    transmit(i) {
      this.message = i;
    }
  },
}
</script>
<!-- HelloWorld.vue --> <template> <div> <!-- 事件绑定父组件的函数 --> <div @click="transmit(name)">{{ msg }}</div> </div> </template> <script> export default { data() { return {name: "Hello world!"}; }, // 接收参数和函数 props: ["msg", "transmit"], } </script> <style> </style>- 自定义事件(@绑定)
// 父组件 // 第一个参数为@绑定的值,第二个参数为调用的函数,接收子组件传入的参数 <xd-home @myXd="dianji" /> // 子组件 dianji_xd() { // 第一个参数为@绑定的值,第二个参数为传入的参数 this.$emit("myXd", this.name); },- 自定义事件(ref绑定:灵活,延时效果)
// 父组件 <xd-home ref="child" /> mounted() { this.$refs.child.$on("myXd", this.dianji); //this.dianji在methods声明或者用箭头函数 }, // 子组件 methods: { dianji_xd() { this.$emit("myXd", this.name); }, }, - 父组件通过
5、非父子组件间的通讯
- 兄弟组件的数据操作
将一个子组件的数据放在父组件维护(状态提升)
操作声明在父组件,传到另一个子组件就可实现兄弟组件间的数据操作
<!-- App.vue -->
<template>
  <div id="app">
    <img alt="Vue logo" src="./assets/logo.png">
    <HelloWorld msg="Welcome to Your Vue.js App"/>
    <FirstCustom :list="list"/>
    <SecondCustom :deleteClick="deleteClick"/>
  </div>
</template>

<script>
import HelloWorld from './components/HelloWorld.vue'
import FirstCustom from './components/FirstCustom.vue'
import SecondCustom from './components/SecondCustom.vue'

export default {
  name: 'App',
  components: {
    HelloWorld,
    FirstCustom,
    SecondCustom
  },
  data() {
    return {
      list: ["苹果", "香蕉", "梨子"],
    }
  },
  methods: {
    deleteClick() {
      this.list.pop();
    }
  }
}
</script>

<style>
</style>
<!-- FirstCustom.vue -->
<!-- 用来展示数据 -->
<template>
    <div>
        <div v-for="(i, index) in list" :key="index">{{i}}</div>
    </div>
</template>

<script>
export default {
    props: ["list"],
}
</script>

<style>
</style>
<!-- SecondCustom.vue -->
<!-- 对兄弟组件数据的操作 -->
<template>
    <button @click="deleteClick">delete</button>
</template>

<script>
export default {
    props: ["deleteClick"],
}
</script>

<style>
</style>
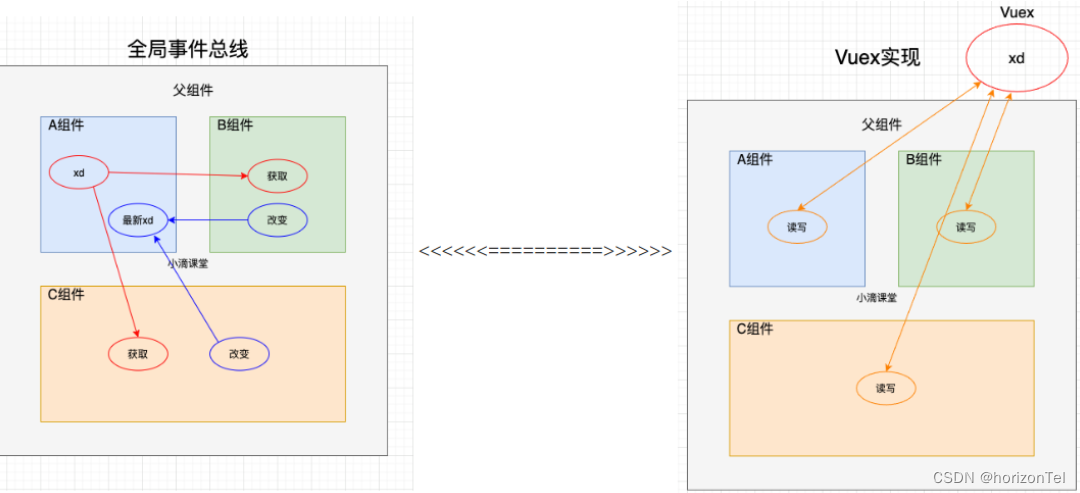
-
任意组件的事件
- 安装全局事件总线
new Vue({ ... beforeCreate(){ Vue.prototype.$bus = this } ... })- 在需要接收数据的组件绑定自定义事件
methods:{ xd(i){ console.log(i) } } mounted(){ this.$bus.$on('xx',this.xd) }- 提供数据的组件
this.$bus.$emit('xx',数据)
6、Vue中的插槽
- 默认插槽
- 父子组件通讯的一种方式,可以在子组件指定的节点插入html内容
<!-- 父组件 -->
<HelloWorld>
    <!-- 插入子组件的内容 -->
  <span>Hello World</span>
</HelloWorld>
<!-- 子组件 -->
<template>
  <div>
    <h1>
        <!-- 相当于指明插入在此处 -->
        <slot></slot>
    </h1>
    <p></p>
  </div>
</template>
- 具名插槽
- 有多个HTML内容需要指定插入到子组件的对应节点
<!-- 父组件 -->
<HelloWorld>
    <!-- v-slot:title只能写在 template 标签以及组件上 -->
    <template v-slot:title>
    	<span>Hello World</span>
    </template>
    <template v-slot:name>
    	<span>Welcome to your Vue</span>
    </template>
    <!-- 方法二,但是已被Vue3弃用
    <span slot="title">World</span>
    <span slot="name">Welcome to your Vue</span> -->
</HelloWorld>
<!-- 子组件 -->
<template>
  <div>
    <h1>
      <slot name="title"></slot>
    </h1>
    <p>
      <slot name="name"></slot>
    </p>
  </div>
</template>
-
作用于插槽
- 数据定义在子组件,但是数据需要在父组件的插槽中使
<!-- 父组件 -->
<template>
  <div id="app">
    <img alt="Vue logo" src="./assets/logo.png">
    <HelloWorld>
      <!-- 父组件接收数据 -->
      <template v-slot="{list}">
        <div v-for="(i, index) in list" :key="index">
          <span>{{i}}</span>
        </div>
      </template>
    </HelloWorld>
  </div>
</template>

<script>
import HelloWorld from './components/HelloWorld.vue'

export default {
  name: 'App',
  components: {
    HelloWorld,
  },
}
</script>

<style>
</style>
<!-- 子组件 -->
<template>
  <div>
      <!-- 传数据到父组件 -->
    <slot :list="list"></slot>
  </div>
</template>

<script>
export default {
  data() {
    return {
      list: ["苹果", "梨子", "香蕉"]
    }
  },
  props: ["msg"],
}
</script>


<style>
</style>
7、实现Vue 组件中的复用功能—混入(mixin)
-
混入
-
提供了一种非常灵活的方式,来分发
Vue组件中的可复用功能。一个混入对象可以包含任意组件选项。当组件使用混入对象时,所有混入对象的选项将被“混合”进入该组件本身的选项// mixin.js export const myMixin = { data() { return { xd: '小滴课堂', }; }, mounted() { console.log('hello from xdclass.net'); }, };
- 局部混入
// 需要混入的组件 import { myMixin } from "../mixin"; mixins: [myMixin],- 全局混入
// 引用使用 // main.js import { myMixin } from "./mixin"; Vue.mixin(myMixin); -
-
注意
当组件和混入对象含有同名选项时,这些选项将进行“合并”
在选项发生冲突时以组件数据优先
请谨慎使用全局混入,因为会使实例以及每个组件受影响
0X0d Vue规模化路由的使用
一、路由的基本使用
安装路由的第三方插件
npm i vue-router
// 创建路由器文件 /router/index.js
import VueRouter from 'vue-router'
import Home from '../components/Home'
import Course from '../components/Course'

export default new VueRouter({
    routes:[
        {
            path: '/home',
            component:Home
        },
        {
            path: '/course',
            component:Course
        }
    ]
});
compoments 里添加Home.vue和Course.vue
// main.js里导入路由
import Vue from 'vue'
import App from './App.vue'
import VueRouter from 'vue-router'
import router from './router/index.js'

Vue.use(VueRouter)
Vue.config.productionTip = false

new Vue({
  render: h => h(App),
  router: router
}).$mount('#app')
<!-- App.vue 的部分 -->
<template>
  <div id="app">
    <div class="nav">
      <!-- 类似于href,指向的是配置好的路由 -->
      <router-link active-class='active' to='/home'>首页</router-link>
      <router-link active-class='active' to='/course'>课程</router-link>
    </div>
    <div class="content">
      <!-- 类似于slot,把子模块插入 -->
      <router-view></router-view>
    </div>
  </div>
</template>
二、路由的嵌套
安装预处理器
npm install less less-loader@7 --save-dev
//index.js
import VueRouter from 'vue-router'
import Home from '../components/Home'
import Course from '../components/Course'
import Front from '../components/Front'
import Back from '../components/Back'

export default new VueRouter({
    routes:[
        {
            path: '/home',
            component:Home
        },
        {
            path: '/course',
            component:Course,
            // 嵌套路由
            children: [
                {
                    // 此处路径不需要加上/
                    path: 'front',
                    component:Front
                },
                {
                    path: 'back',
                    component:Back
                }
            ]
        }
    ]
});
<!-- Course.vue -->
<template>
    <div class="course">
        <div class="title">课程页面</div>
        <div class="content">
            <div class="content_nav">
                <!-- to需要写完整的路径 -->
                <router-link active-class='active' to='/course/front'>前端</router-link>
                <router-link active-class='active' to='/course/back'>后端</router-link>
            </div>
            <div class="content_con">
                <router-view></router-view>
            </div>
        </div>
    </div>
</template>

<script>
    export default {};
</script>

<!-- lang=less的意义在于可以嵌套使用css -->
<style lang="less" scoped>
.course {
    width: 200px;
    height: 200px;
    background-color: palevioletred;
    text-align: center;
    .content_nav {
        display: flex;
        justify-content: space-around;
        .active {
            color: red;
        }
    }
    .content_con {
        width: 140px;
        height: 100px;
        background-color: #fff;
        margin: 5px auto;
    }
}
</style>
路由组件
	由路由控制的组件:新建pages文件夹存放路由组件
被切换的组件:销毁掉
三、路由的传参
- query传参
<!-- 传入字符串 -->
<router-link :to="`/course/front?text=${text}`" active-class="active">
  前端
</router-link>

<!-- 传入对象 -->
<router-link
  :to="{ path: '/course/front', query: { text: text } }"
  active-class="active"
>
  前端
</router-link>
获取对应的参数
this.$route.query.text
- param传参
// 路由器声明 params 传参
{
  name: 'qianduan',
  path: 'front/:text', //字符串形式传参时需加占位符告知路由器,此时是参数
  component: Front,
},
<!-- 传入字符串 -->
<router-link :to="`/course/front/${text}`" active-class="active">
  前端
</router-link>
<!-- 传入对象 -->
<router-link
  :to="{ name: 'qianduan', params: { text: text } }"
  active-class="active"
>
  前端
</router-link>
【注】
字符串形式传参时需加占位符告知路由器, 在路径后面是参数
path 对应的是 query 属性,name 对应的是 params 属性
删除路由之前的历史记录:replace
<router-link replace to="/course/back" active-class="active">
  后端
</router-link>
四、编程式路由导航
当导航跳转不使用声明式跳转时(如:button标签)
不通过事件触发路由跳转
// 传参路由
toFront() {
  this.$router.push({
    name: "qianduan",
    params: {
      text: this.text,
    },
  });
},
// 对应:删除路由之前的历史记录
toFront() {
  this.$router.replace({
    name: "qianduan",
    params: {
      text: this.text,
    },
  });
},
// 路由的前进后退
this.$router.forward()  //前进
this.$router.back()     //后退
this.$router.go()       //前进:正数1、2 或者后退:负数-1、-2
五、路由缓存和全局前置路由
路由缓存
让不展示的路由组件保持挂载在页面,不被销毁
<!-- 注意 Front 是组件的名字 -->
<keep-alive include="Front">
  <router-view></router-view>
</keep-alive>
全局路由配置:对路由组件进行权限控制
{
  path: 'front',
  component: Front,
  meta: { isAuth: true },
},
{
  path: 'back',
  component: Back,
  meta: { isAuth: true },
},
// to:跳转到的路由,from:从哪跳转的,next:跳转的时候执行的函数
router.beforeEach((to, from, next) => {
  if (to.meta.isAuth) {
    if (localStorage.getItem('isShow' === '1')) {
      next();
    } else {
      alert('暂无权限观看');
    }
  } else {
    next();
  }
});
0X0d Vue的状态管理模式Vuex
一、简介
Vuex 是集中式存储管理应用的所有组件的状态(数据)
可以实现任意组件间的通讯
特点:
	当不同的组件需要对同一个状态进行读写时,或者复用的状态较多
    能够保持数据和页面是响应式的
    便于开发和后期数据维护
二、搭建Vuex环境
npm install vuex
// 新建Store/index.js
import Vuex from 'vuex'
import Vue from 'vue'

Vue.use(Vuex)

export default new Vuex.Store({
    // 事件的存放,可以执行异步的操作
    actions: {},
    // 操作state的数据
    mutations: {},
    // 存放共享的数据
    state: {},
});
// main.js
import Vue from 'vue'
import App from './App.vue'
import store from './store/index.js'

Vue.config.productionTip = false

new Vue({
  render: h => h(App),
  store: store,
}).$mount('#app')
三、Vuex小案例:累加和累减
<!-- Counter.vue -->
<template>
  <div class="hello">
    <h3>当前的计数为:<span>{{$store.state.count}}</span></h3>
    <button @click="add">增加</button>
    <button @click="reduce">减少</button>
  </div>
</template>

<script>
  export default {
    methods: {
      add() {
          // 调用vuex中的action里的add函数,参数为1;此操作为异步操作
          // this.$store.dispatch("add", 1);
          // 如果没有异步操作,可以直接调用mutations里的函数
          this.$store.commit("ADD", 1);
      },
      reduce() {
          this.$store.dispatch("reduce", 1);
      }
    }
  };
</script>

<style scoped>
  span {
      color: red;
  }
</style>
<!-- /store/index.js -->
import Vuex from 'vuex'
import Vue from 'vue'

Vue.use(Vuex)

export default new Vuex.Store({
    // 事件的存放,可以执行异步的操作
    actions: {
        add(content, value) {
            // 提交事件,传给mutations
            content.commit("ADD", value);
        },
        reduce(content, value) {
            content.commit("REDUCE", value);
        }
    },
    // 操作state的数据
    mutations: {
        ADD(state, value) {
            state.count += value;
        },
        REDUCE(state, value) {
            state.count -= value;
        }
    },
    // 存放共享的数据
    state: {
        count: 0,
        list: [
            {name: 'html'},
            {name: 'css'},
            {name: 'js'}
        ],
    },
});
注意:
actions 能够提供 dispatch 方法实现异步操作
mutations 必须是同步函数
state 只能通过 mutations 配置的方法去修改
四、计算属性——getters
可以对store中的state数据进行加工
在/store/index.js中添加方法
getters: {
    changeCount(state) {
        return state.list.length * 2;
    },
},
读取方法
this.$store.getters.changeCount;


 2034
2034


 被折叠的 条评论
为什么被折叠?
被折叠的 条评论
为什么被折叠?
 到【灌水乐园】发言


