**新增模板消息**
多商户新增公众号消息模板流程
CRMEB多商户使用,新增一个消息模板或订阅消息。因为操作的逻辑是一样的,所以这里就以消息模板来操作的,订阅消息大同小异。
一、 先登录自己的微信公众号后台,申请模板。我这里以《访客接待消息通知》为例,下图是我申请好的截图。
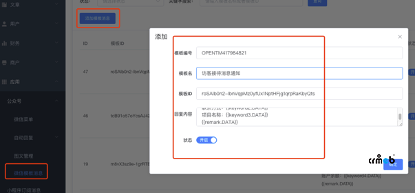
二、将刚才申请的模板信息填写到平台后台的模板管理中去,如下图:


增加模板消息的内容设定,所有模板消息或者订阅消息的内容都在crmeb/services/WechatTemplateMessageService.php 文件中实现的。
修改入口文件,因为我们这个模板需要传入额外的参数,但是原来的方法中并没有这个,所以我们增加一个 $data[‘data’] ?? [] 参数的传入。
public function sendTemplate(array $data)
{
$res =
t
h
i
s
−
>
t
e
m
p
l
a
t
e
M
e
s
s
a
g
e
(
this->templateMessage(
this−>templateMessage(data[‘tempCode’],$data[‘id’],
d
a
t
a
[
′
d
a
t
a
′
]
?
?
[
]
)
;
i
f
(
!
data['data'] ?? []); if(!
data[′data′]??[]);if(!res || !is_array($res))
return true;
}
新增模板消息的内容设定
public function templateMessage(string $tempCode, $id, $params = [])
{
$bill_make = app()->make(UserBillRepository::class);
$order_make = app()->make(StoreOrderRepository::class);
$refund_make = app()->make(StoreRefundOrderRepository::class);
o
r
d
e
r
s
t
a
t
u
s
m
a
k
e
=
a
p
p
(
)
−
>
m
a
k
e
(
S
t
o
r
e
O
r
d
e
r
S
t
a
t
u
s
R
e
p
o
s
i
t
o
r
y
:
:
c
l
a
s
s
)
;
s
w
i
t
c
h
(
order_status_make = app()->make(StoreOrderStatusRepository::class); switch (
orderstatusmake=app()−>make(StoreOrderStatusRepository::class);switch(tempCode) {
case’SERVER_NOTICE’:
/*
{{first.DATA}}
访客姓名:{{keyword1.DATA}}
联系方式:{{keyword2.DATA}}
项目名称:{{keyword3.DATA}}
{{remark.DATA}}
*/
m
e
r
=
a
p
p
(
)
−
>
m
a
k
e
(
M
e
r
c
h
a
n
t
R
e
p
o
s
i
t
o
r
y
:
:
c
l
a
s
s
)
−
>
g
e
t
(
mer = app()->make(MerchantRepository::class)->get(
mer=app()−>make(MerchantRepository::class)−>get(params[‘mer_id’]);
u
s
e
r
=
a
p
p
(
)
−
>
m
a
k
e
(
U
s
e
r
R
e
p
o
s
i
t
o
r
y
:
:
c
l
a
s
s
)
−
>
g
e
t
(
user = app()->make(UserRepository::class)->get(
user=app()−>make(UserRepository::class)−>get(id);
$data[] = [
‘tempCode’ => ‘SERVER_NOTICE’,
‘uid’ => $id,
‘data’ => [
‘first’ => ‘亲,您有新的消息请注意查看~’,
‘keyword1’ => $user[‘nickname’],
‘keyword2’ => $mer[‘mer_name’],
‘keyword3’ => $params[‘keyword3’],
‘remark’ => ‘’
],
‘link’ => ‘’,
‘color’ => null
];
break;
default:
return false;
break;
}
return $data;
}
四、修改需要调用的代码
上面就将模板消息的内容也设定好了,现在就去需要使用的地方调用就好了,我们找到客服消息的监听文件,然后替换之前的发短信提醒的地方,如下图:
这样我们就完成了整个的流程开发了,重启一下项目服务,即可。


 752
752

 被折叠的 条评论
为什么被折叠?


