


安卓app首页
一、实验目标
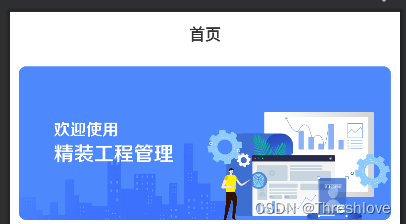
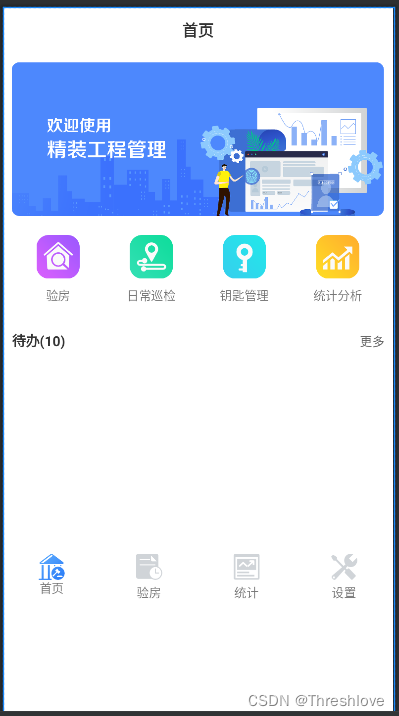
做一个APP首页,包括顶部图片、顶部菜单栏、中部消息模块、底部Tab按钮。学习 ScrollView, RelativeLayout,以及插件之间的穿插使用。
二、实验步骤
创建的父布局
新建ScrollView,他内部有且只能有一个组件
<LinearLayout xmlns:android="http://schemas.android.com/apk/res/android"
    android:layout_width="match_parent"
    android:orientation="horizontal"
    android:layout_height="match_parent">

    <!--内部父布局-->
    <ScrollView
        android:layout_width="match_parent"
        android:layout_height="match_parent">

        <LinearLayout
            android:layout_width="match_parent"
            android:layout_height="match_parent"
            android:orientation="vertical">


        </LinearLayout>

    </ScrollView>

</LinearLayout>
创建顶部首页显示栏
为顶部的首页显示栏设置样式
<LinearLayout
        android:layout_width="match_parent"
        android:layout_height="80dp"
        android:weightSum="4"
        android:layout_marginTop="10dp">

        <!--组件"首页"-->
        <RelativeLayout
            android:layout_width="0dp"
            android:layout_height="match_parent"
            android:layout_weight="1">
            <!--“首页”文字-->
            <TextView
                android:layout_width="match_parent"
                android:layout_height="wrap_content"
                android:layout_below="@+id/shouye"
                android:layout_centerHorizontal="true"
                android:gravity="center"
                android:text="首页" />
创建顶部图片
<!--“首页”图片-->
            <ImageView
                android:id="@+id/shouye"
                android:layout_width="30dp"
                android:layout_height="30dp"
                android:layout_centerHorizontal="true"
                android:layout_marginTop="15dp"
                android:background="@mipmap/test_icon3" />
菜单栏模块
先创建一个横向的LinearLayout作为菜单栏的父布局,然后创建多个linearLayout作为每个按钮的父布局。创建上边的图片按钮,并设置属性;设置按钮底部文字并赋予属性,创建四个小的按钮
<!--菜单栏-->
            <LinearLayout
                android:layout_width="match_parent"
                android:layout_height="wrap_content"
                android:layout_marginLeft="10dp"
                android:layout_marginRight="10dp"
                android:orientation="horizontal"
                android:weightSum="4">
                <!--单个图标"验房"-->
                <LinearLayout
                    android:layout_width="0dp"
                    android:layout_height="100dp"
                    android:layout_weight="1"
                    android:orientation="vertical">
                    <!--图标图片-->
                    <ImageView
                        android:layout_width="50dp"
                        android:layout_height="50dp"
                        android:layout_gravity="center_horizontal"
                        android:layout_marginTop="10dp"
                        android:background="@mipmap/test_icon1" />
                    <!--图标文字-->
                    <TextView
                        android:layout_width="match_parent"
                        android:layout_height="wrap_content"
                        android:layout_marginTop="10dp"
                        android:gravity="center"
                        android:text="验房" />
                </LinearLayout>

            </LinearLayout>
消息模块
先创建一个横向的LinearLayout作为菜单栏的父布局,然后创建待办和更多TextView
 <LinearLayout
                android:layout_width="match_parent"
                android:layout_height="wrap_content"
                android:layout_marginTop="20dp"
                android:orientation="horizontal">
                <!--待办文本-->
                <TextView
                    android:layout_width="wrap_content"
                    android:layout_height="wrap_content"
                    android:layout_marginLeft="10dp"
                    android:layout_weight="1"
                    android:text="待办(10)"
                    android:textColor="#333"
                    android:textSize="16dp"
                    android:textStyle="bold" />
                <!--”更多“文本-->
                <TextView
                    android:layout_width="wrap_content"
                    android:layout_height="wrap_content"
                    android:layout_marginLeft="10dp"
                    android:layout_marginRight="10dp"
                    android:text="更多"
                    android:textColor="#666" />
 </LinearLayout>
底部tab模块
先创建一个横向的LinearLayout作为菜单栏的父布局,再创建一个RalativeLoyout作为单个按钮的父布局
<LinearLayout
        android:layout_width="match_parent"
        android:layout_height="80dp"
        android:weightSum="4"
        android:layout_marginTop="10dp">

        <!--组件"首页"-->
        <RelativeLayout
            android:layout_width="0dp"
            android:layout_height="match_parent"
            android:layout_weight="1">
            <!--“首页”图片-->
            <ImageView
                android:id="@+id/shouye"
                android:layout_width="30dp"
                android:layout_height="30dp"
                android:layout_centerHorizontal="true"
                android:layout_marginTop="15dp"
                android:background="@mipmap/test_icon3" />
            <!--“首页”文字-->
            <TextView
                android:layout_width="match_parent"
                android:layout_height="wrap_content"
                android:layout_below="@+id/shouye"
                android:layout_centerHorizontal="true"
                android:gravity="center"
                android:text="首页" />

        </RelativeLayout>
        <!--组件“验房”-->
        <RelativeLayout
            android:layout_width="0dp"
            android:layout_height="match_parent"
            android:layout_weight="1">
            <!--“验房”图片-->
            <ImageView
                android:id="@+id/yanfang"
                android:layout_width="30dp"
                android:layout_height="30dp"
                android:layout_centerHorizontal="true"
                android:layout_marginTop="15dp"
                android:background="@mipmap/daibanshixiang" />
            <!--“验房”文字-->
            <TextView
                android:layout_width="match_parent"
                android:layout_height="wrap_content"
                android:layout_below="@+id/yanfang"
                android:layout_centerHorizontal="true"
                android:layout_marginTop="5dp"
                android:gravity="center"
                android:text="验房" />

        </RelativeLayout>
        <!--组件“统计”-->
        <RelativeLayout
            android:layout_width="0dp"
            android:layout_height="match_parent"
            android:layout_weight="1">
            <!--“统计”图片-->
            <ImageView
                android:id="@+id/tongji"
                android:layout_width="30dp"
                android:layout_height="30dp"
                android:layout_centerHorizontal="true"
                android:layout_marginTop="15dp"
                android:background="@mipmap/baobiao" />
            <!--“统计”文字-->
            <TextView
                android:layout_width="match_parent"
                android:layout_height="wrap_content"
                android:layout_below="@+id/tongji"
                android:layout_centerHorizontal="true"
                android:layout_marginTop="5dp"
                android:gravity="center"
                android:text="统计" />

        </RelativeLayout>
        <!--组件“设置”-->
        <RelativeLayout
            android:layout_width="0dp"
            android:layout_height="match_parent"
            android:layout_weight="1">
            <!--“设置”图片-->
            <ImageView
                android:id="@+id/guanli"
                android:layout_width="30dp"
                android:layout_height="30dp"
                android:layout_centerHorizontal="true"
                android:layout_marginTop="15dp"
                android:background="@mipmap/guanli" />
            <!--“设置”文字-->
            <TextView
                android:layout_width="match_parent"
                android:layout_height="wrap_content"
                android:layout_below="@+id/guanli"
                android:layout_centerHorizontal="true"
                android:layout_marginTop="5dp"
                android:gravity="center"
                android:text="设置" />

        </RelativeLayout>

    </LinearLayout>
这样就创建好了全部模块
三、程序运行结果
四、问题总结与体会
1.底部的tab栏会和整个屏幕一起滑动
在编写完tab栏的代码之后,发现底部的tab栏会跟着整个页面一起滑动,思考其内部逻辑,上方的整个可滑动的部分和底部tab栏是同等级的,都在最底层的LinearLayout中。原来是我将底部tab栏的模块也放到了滑动模块中,修改。
2.底部导航栏不显示问题
ora-user-images\image-20220822172055271.png" alt=“image-20220822172055271” style=“zoom:67%;” />
四、问题总结与体会
1.底部的tab栏会和整个屏幕一起滑动
在编写完tab栏的代码之后,发现底部的tab栏会跟着整个页面一起滑动,思考其内部逻辑,上方的整个可滑动的部分和底部tab栏是同等级的,都在最底层的LinearLayout中。原来是我将底部tab栏的模块也放到了滑动模块中,修改。
2.底部导航栏不显示问题
紧接上一个问题,在修改之后,底部的tab栏不显示了。检查代码发现是滑动模块的代码高度设置成"match_parent",将父布局完全覆盖了,所以是被盖住了,再次修改,将其高度设置为合适的数值,就可以显示了。


 859
859


 被折叠的 条评论
为什么被折叠?
被折叠的 条评论
为什么被折叠?
 到【灌水乐园】发言


