


开发 ContentProvider 时只需要两步,首先需要创建一个它的子类,该类需要实现它的抽象方法,如 query ()、 insert )、 update ()和 delete ()等方法;然后在 AndroidManifest , xml 文件中注册 ContentProvider 。
上面几个抽象方法的具体作用如下所示:
public boolean onCreate ()一 ContentProvider 创建时调用。
public int delete ()一根据传人的 Uri 删除指定条件下的数据。
public Uri insert ()一根据传人的 Uri 插人数据。
public Cursor query ()一根据传人的 Uri 査询指定的数据。
public int update ()一根据传人的 Uri 更新指定的数据。
1.创建testContentProvider类
public class testContentProvider extends ContentProvider {
    public boolean onCreate(){
        return false;
    }
    public Cursor query(Uri uri,String[] strings,String s,String[] strings1,String s1){
        return null;
    }
    public String getType(Uri uri){
        return null;
    }
    public Uri insert(Uri uri, ContentValues contentValues){
        return null;
    }
    public int delete(Uri uri,String s,String[] strings){
        return 0;
    }
    public int update(Uri uri, ContentValues contentValues,String s,String[] strings){
        return 0;
    }
}
2.在 AndroidManifest , xml 文件中注册 ContentProvider
 <provider
        android:authorities="com.example.cqr_contentprovider.testContentProvider"
        android:name=".testContentProvider">
    </provider>
3.界面设计
修改布局文件,采用线性布局的方式,添加一个 List View 用来显示获取到的姓名和手机号
<?xml version="1.0" encoding="utf-8"?>
<LinearLayout xmlns:android="http://schemas.android.com/apk/res/android"
    android:layout_width="match_parent"
    android:layout_height="match_parent"
    xmlns:tools="http://schemas.android.com/tools"
    tools:context=".MainActivity"
    android:orientation="vertical">

    <ListView
        android:id="@+id/show"
        android:layout_width="match_parent"
        android:layout_height="wrap_content">
    </ListView>

</LinearLayout>
4.MainActivity中的代码
修改 MainActivity 的代码,首先获取布局中定义的 ListView 组件,然后定义获取系统通讯录的 Uri ,然后获取电话本开始一项的 Uri ,最后逐行读取,把信息存储到 List 数组中。
public class MainActivity extends AppCompatActivity {

    @Override
    protected void onCreate(Bundle savedInstanceState) {
        super.onCreate(savedInstanceState);
        List<String> string;
        setContentView(R.layout.layout2);
//得到ContentResolver对象
        ContentResolver cr=getContentResolver();
        Cursor cursor=cr.query(ContactsContract.Contacts.CONTENT_URI,null,null,null,null);
        string=new ArrayList<String>();
        while (cursor.moveToNext()){
//取得联系人名字
            int nameFieldColumnIndex=cursor.getColumnIndex(ContactsContract.PhoneLookup.DISPLAY_NAME);
            String contact=cursor.getString(nameFieldColumnIndex);
//取得电话号码
            String ContactId=cursor.getString(cursor.getColumnIndex(ContactsContract.Contacts._ID));
            Cursor phone =cr.query(ContactsContract.CommonDataKinds.Phone.CONTENT_URI,null,
                    ContactsContract.CommonDataKinds.Phone.CONTACT_ID+"="+ContactId,null,null);
            while (phone.moveToNext()){
                String PhoneNumber=phone.getString(phone.getColumnIndex(ContactsContract.CommonDataKinds.Phone.NUMBER));
                string.add(contact+":"+PhoneNumber+"\n");
            }
        }
        cursor.close();
//获取定义的ListView用来显示通讯录
        ListView peo_list=findViewById((R.id.show));
        peo_list.setAdapter(new ArrayAdapter<String>(MainActivity.this, android.R.layout.simple_expandable_list_item_1,string));

    }
}
5.添加权限
<uses-permission android:name="android.permission.READ_CONTACTS"/>6.所有权限展示
<?xml version="1.0" encoding="utf-8"?>
<manifest xmlns:android="http://schemas.android.com/apk/res/android"
    package="com.example.wey56790">
    <uses-permission android:name="android.permission.READ_CONTACTS"/>
    <application
        android:allowBackup="true"
        android:icon="@mipmap/ic_launcher"
        android:label="@string/app_name"
        android:roundIcon="@mipmap/ic_launcher_round"
        android:supportsRtl="true"
        android:theme="@style/Theme.Wey56790">
        <activity android:name=".MainActivity">
            <intent-filter>
                <action android:name="android.intent.action.MAIN" />

                <category android:name="android.intent.category.LAUNCHER" />
            </intent-filter>
        </activity>
        <provider
            android:authorities="com.example.wey56790.testContentProvider"
            android:name=".testContentProvider">
        </provider>
    </application>

</manifest>
7.运行程序
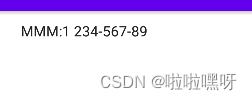
1).在虚拟机上添加用户
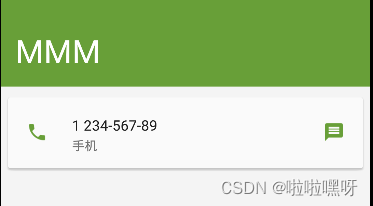
2).显示联系人信息


 1193
1193


 被折叠的 条评论
为什么被折叠?
被折叠的 条评论
为什么被折叠?
 到【灌水乐园】发言


