


步骤1.
首先,通过apt在终端中运行以下以下命令,确保所有系统软件包都是最新的。
sudo apt update
步骤2:
wget -qO- https://repos.influxdata.com/influxdb.key | sudo apt-key add -
source /etc/lsb-release
echo "deb https://repos.influxdata.com/${DISTRIB_ID,,} ${DISTRIB_CODENAME} stable" | sudo tee /etc/apt/sources.list.d/influxdb.list
安装并启动InfluxDB:
sudo apt update
sudo apt install influxdb
成功安装后,启动并启用服务:
sudo systemctl enable --now influxdb步骤3:
配置influxdb,关键!!!
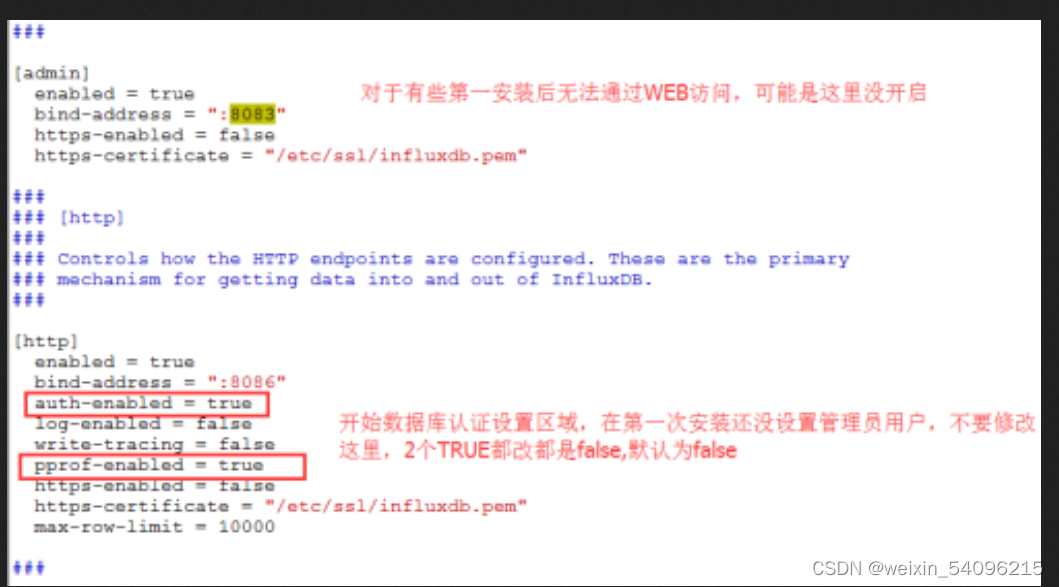
即,只配置:
[http]
  # Determines whether HTTP endpoint is enabled.
  enabled = true

  # Determines whether the Flux query endpoint is enabled.
  flux-enabled = true

  # The bind address used by the HTTP service.
  bind-address = ":8086"
否则会报错:
Authorization failed everytime with: no user provided error
步骤4:
设置好配置以后将重启服务:
service influxdb restart
步骤5:配置防火墙。
我们将打开端口8086。默认情况下,InfluxDB使用以下网络端口:TCP端口8086用于通过InfluxDB的HTTP API进行客户端-服务器通信,而TCP端口8088用于RPC服务进行备份和还原:
sudo ufw enable
sudo ufw allow 8086/tcp
步骤6:
查看influx安装版本:
influx -version如果报错,则根据提示安装:sudo apt install influxdb-client
步骤7:
进入influxdb数据库,并且设置用户名和密码:
influx
show status#查看状态
CREATE USER 'admin' WITH PASSWORD 'password' WITH ALL PRIVILEGES#如果报错则查看配置设置是否和上述的一致
如果报错:ERR: error parsing query: found admin, expected identifier at line 1, char 12
解决:
步骤8:使用Influxdb之使用数据库
新建数据库:create database "wxx"
查看所有的数据库:show databases
使用数据库:use wxx
删除数据库:drop database 'wxx'
使用Influxdb之使用创建表
insert test,host=127.0.0.1,monitor_name=test,count=1
#插入表名为test,字段为host,monitor_name,count的数据
drop measurement measurement_name
#删除表名
select * from database limit 10

#查询表
SELECT field1,field2 FROM "tableName"   WHERE time > '2018-08-15T02:29:20Z' AND time < '2018-08-15T02:30:20Z' Order by time DESC
#添加条件
参考文献:
https://www.cnblogs.com/guyeshanrenshiwoshifu/p/9188368.html
在Ubuntu 20.04 LTS上安装InfluxDB_ubuntu20.4进入influx-CSDN博客
InfluxDB使用教程:Linux常用操作和命令_linux系统重启influxdb服务,并且执行 influxd --no-pprof命令-CSDN博客


 9579
9579

 被折叠的 条评论
为什么被折叠?
被折叠的 条评论
为什么被折叠?
 到【灌水乐园】发言


