


目录
一、apache
1.在centos下安装apache
yum install httpd* -y
①安装报错:
Error downloading packages:
mailcap-2.1.41-2.el7.noarch: [Errno 256] No more mirrors to try.
cyrus-sasl-devel-2.1.26-23.el7.x86_64: [Errno 256] No more mirrors to try.
apr-devel-1.4.8-7.el7.x86_64: [Errno 256] No more mirrors to try.
apr-util-devel-1.5.2-6.el7.x86_64: [Errno 256] No more mirrors to try.
apr-1.4.8-7.el7.x86_64: [Errno 256] No more mirrors to try.
httpd-manual-2.4.6-95.el7.centos.noarch: [Errno 256] No more mirrors to try.
libdb-devel-5.3.21-25.el7.x86_64: [Errno 256] No more mirrors to try.
httpd-devel-2.4.6-95.el7.centos.x86_64: [Errno 256] No more mirrors to try.
httpd-2.4.6-95.el7.centos.x86_64: [Errno 256] No more mirrors to try.
expat-devel-2.1.0-12.el7.x86_64: [Errno 256] No more mirrors to try.
httpd-tools-2.4.6-95.el7.centos.x86_64: [Errno 256] No more mirrors to try.
apr-util-1.5.2-6.el7.x86_64: [Errno 256] No more mirrors to try.
openldap-devel-2.4.44-22.el7.x86_64: [Errno 256] No more mirrors to try.
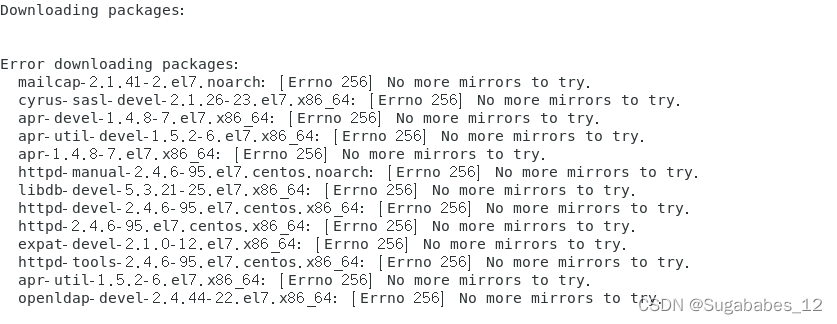 ②yum属于在线安装,及联网获取安装包,如果安装失败的话,一般和网络脱不了关系。
- 通过ping www.baidu.com 来检测网络是否ping通
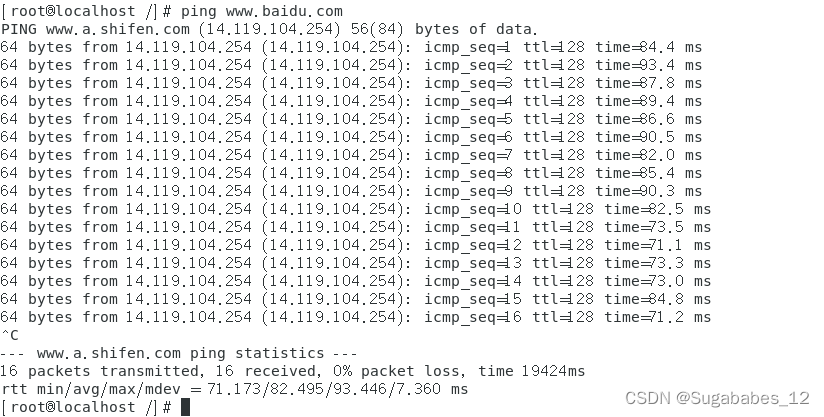
由此可以说明,并不是网络的问题。
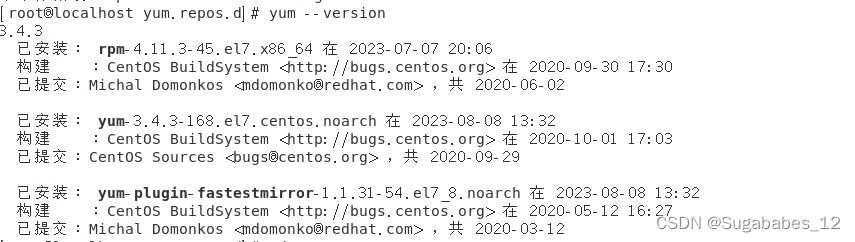
2.重新安装yum
(1)先查看下已经安装的yum文件
rpm -qa | grep yum
(2)卸载原来安装yum文件(注意: --nodeps 要带上,否则会报错)
rpm -e yum-3.4.3-168.el7.centos.noarch --nodeps
rpm -e yum-utils-1.1.31-54.el7_8.noarch --nodeps
rpm -e yum-metadata-parser-1.1.4-10.el7.x86_64 --nodeps
rpm -e PackageKit-yum-1.1.10-2.el7.centos.x86_64 --nodeps
rpm -e yum-plugin-fastestmirror-1.1.31-54.el7_8.noarch --nodeps
rpm -e yum-langpacks-0.4.2-7.el7.noarch --nodeps
(3)下载所需文件
http://mirrors.163.com/centos/7/os/x86_64/Packages/
到上面这个网站去下载如下RPM包(为版本号,根据最新的自己替换即可)
python-iniparse-.noarch.rpm
yum-metadata-parser-.x86_64.rpm
yum-.centos.noarch.rpm
yum-plugin-fastestmirror-*.noarch.rpm
可以使用wget直接下载,如下:
wget http://mirrors.163.com/centos/7/os/x86_64/Packages/python-iniparse-0.4-9.el7.noarch.rpm
wget http://mirrors.163.com/centos/7/os/x86_64/Packages/yum-metadata-parser-1.1.4-10.el7.x86_64.rpm
wget http://mirrors.163.com/centos/7/os/x86_64/Packages/yum-3.4.3-168.el7.centos.noarch.rpm
wget http://mirrors.163.com/centos/7/os/x86_64/Packages/yum-plugin-fastestmirror-1.1.31-54.el7_8.noarch.rpm
(4)安装yum
rpm -ivh --force --nodeps python-iniparse-0.4-9.el7.noarch.rpm
rpm -ivh --force --nodeps yum-metadata-parser-1.1.4-10.el7.x86_64.rpm
rpm -ivh --force --nodeps yum-3.4.3-168.el7.centos.noarch.rpm
rpm -ivh --force --nodeps yum-plugin-fastestmirror-1.1.31-54.el7_8.noarch.rpm
(5)安装成功
二、nginx
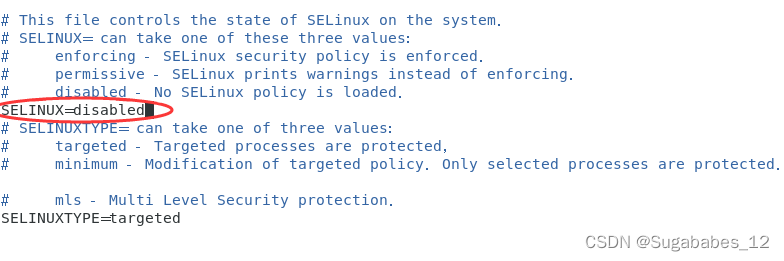
文件夹权限、nginx权限、php-fpm权限要一致
关闭selinux(Linux 内核的安全模块):
1.centos下nginx安装配置
①创建Nginx的目录并进入:
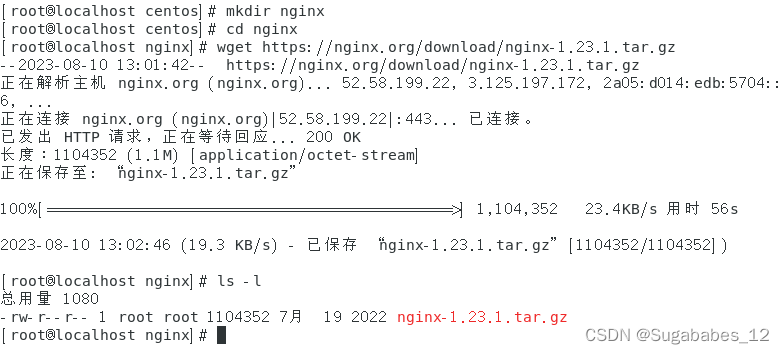
[root@localhost /]# cd /home/centos
[root@localhost centos]# mkdir nginx
[root@localhost centos]# cd nginx
②下载Nginx的安装包,可以通过FTP工具上传离线环境包,也可通过wget命令在线获取安装包:
[root@localhost nginx]# wget https://nginx.org/download/nginx-1.23.1.tar.gz
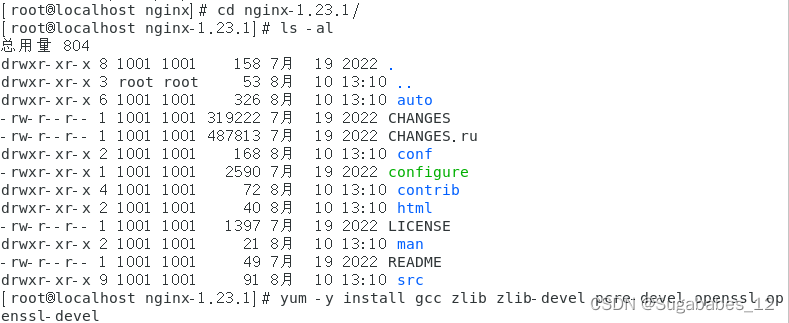
③解压
[root@localhost nginx]# tar -xvzf nginx-1.23.1.tar.gz
④下载并安装Nginx所需的依赖库和包:
出现错误:(Errno 12)

解决方案:修改DNS解析服务地址

修改为:
[root@localhost nginx]# cat /etc/resolv.conf
; generated by /usr/sbin/dhclient-script
nameserver 114.114.114.114
nameserver 8.8.8.8
再次执行命令安装库和包:
[root@localhost nginx-1.23.1]# yum -y install gcc zlib zlib-devel pcre-devel openssl openssl-devel
⑤进入解压后的nginx目录,然后执行Nginx的配置脚本,为后续的安装提前配置好环境,默认位于/usr/local/nginx/目录下(可自定义目录):
[root@localhost nginx]# cd nginx-1.23.1
[root@localhost nginx-1.23.1]# ./configure --prefix=/home/centos/nginx --with-http_stub_status_module --with-http_ssl_module --with-http_sub_module
⑥编译并安装Nginx:
[root@localhost nginx-1.23.1]# make && make install
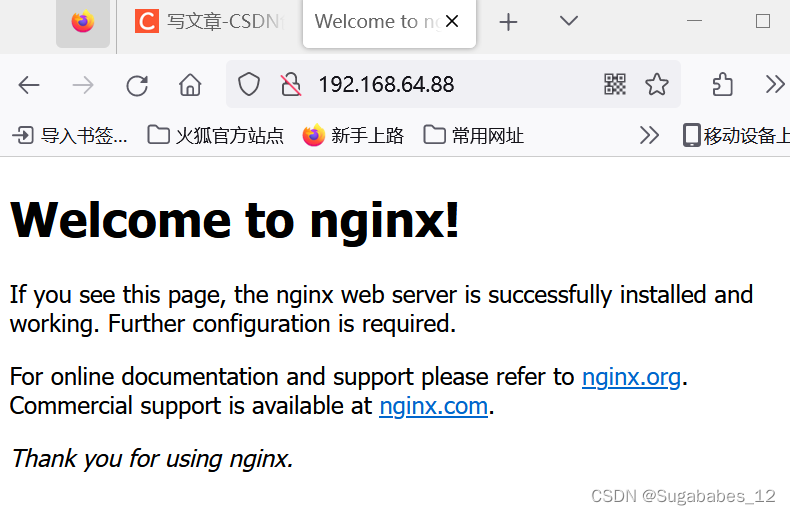
安装启动成功。
⑦在网页中输入虚拟机IP:192.168.64.88:
出现报错:
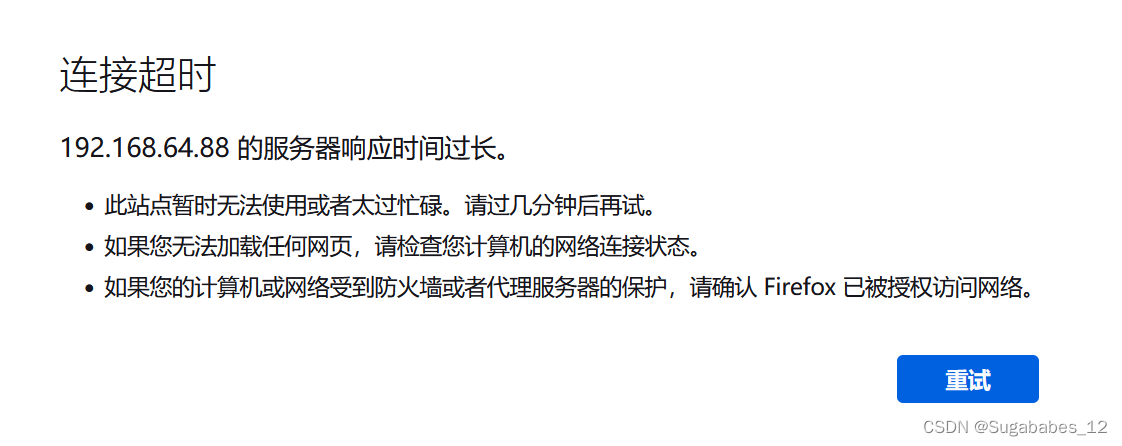
解决方案:
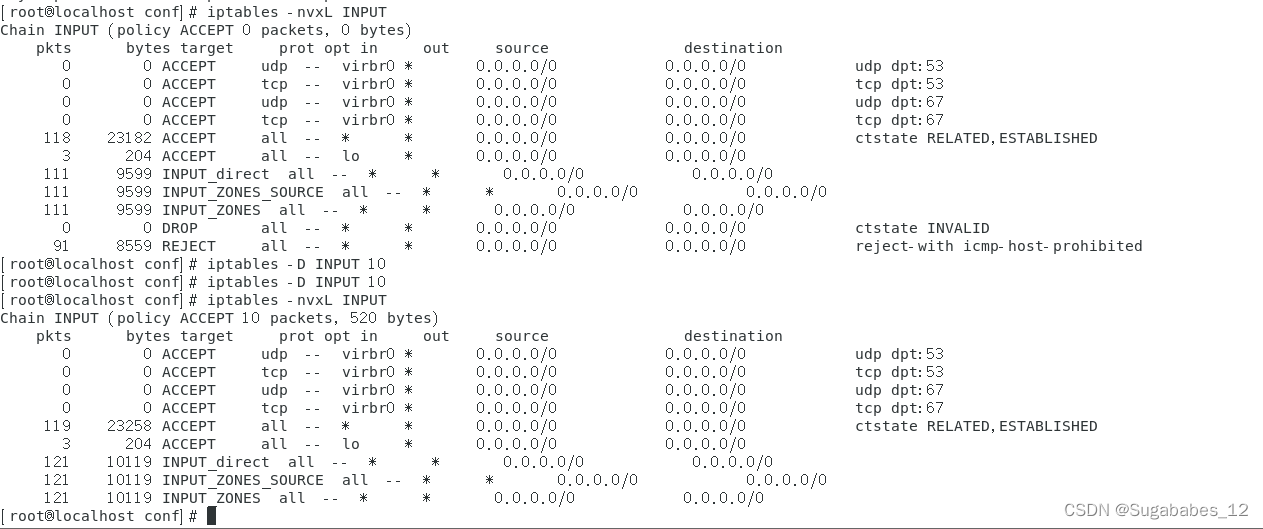
此图中可知,启动防火墙后,默认没有开启任何端口,需要手动开启端口。nginx默认是80端口。。
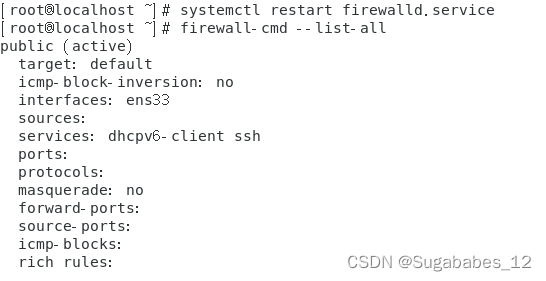
firewall-cmd --zone=public --add-port=80/tcp --permanent
命令含义: --zone #作用域 --add-port=80/tcp #添加端口,格式为:端口/通讯协议 --permanent #永久生效,没有此参数重启后失效。
开启端口后需要重启防火墙生效:
systemctl restart firewalld.service查看防火墙是否开启了80端口的访问:
firewall-cmd --list-all 又出现404 forbidden问题,后文解决。
2.nginx生成自定义证书
csr:证书申请文件 crt:证书 key:私钥
通过证书申请文件拿着私钥去申请证书。
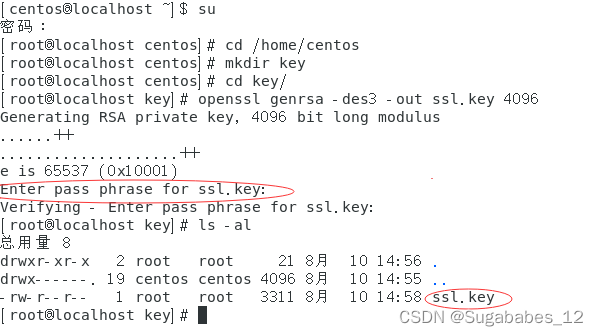
(1)生成key私钥
[root@localhost key]# openssl genrsa -des3 -out ssl.key 4096
密码(随机填写):123456
更改名称,消掉密码(否则每次登录nginx都要输入密码很麻烦):
[root@localhost key]# mv ssl.key first.key
重新生成私钥:
[root@localhost key]# openssl rsa -in first.key -out ssl.key
删除first.key(已重新生成私钥):
[root@localhost key]# rm -rf first.key
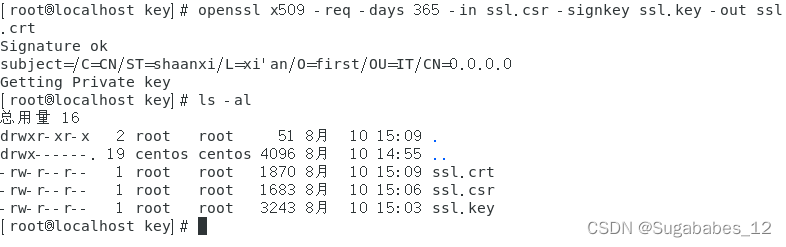
(2)拿着私钥构造证书申请文件
[root@localhost key]# openssl req -new -key ssl.key -out ssl.csr

(3)证书申请文件+私钥去申请证书
[root@localhost key]# openssl x509 -req -days 365 -in ssl.csr -signkey ssl.key -out ssl.crt
(4)证书的使用
在需要使用证书的nginx配置文件的server节点里加入以下配置:
server { listen 443;#https默认使用443端口 server_name 0.0.0.0; #将0.0.0.0替换为你的网站域名或ip
ssl on; ssl_certificate /etc/nginx/key/ssl.crt; ssl_certificate_key /etc/nginx/key/ssl.key; ssl_session_timeout 5m; ssl_protocols SSLv2 SSLv3 TLSv1; ssl_ciphers ALL:!ADH:!EXPORT56:RC4+RSA:+HIGH:+MEDIUM:+LOW:+SSLv2:+EXP;
ssl_prefer_server_ciphers on;
location / { ... }
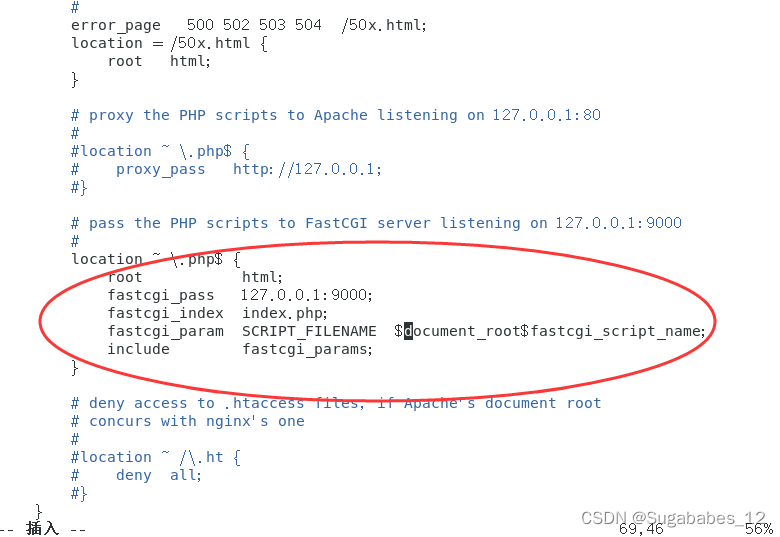
3.支持php文件
(1)安装php-fpm及nginx权限问题:
[root@localhost nginx]# yum install epel-release
##安装源
[root@localhost nginx]# rpm -ivh http://rpms.famillecollet.com/enterprise/remi-release-7.rpm
##安装rpm包,resource下添加一个源
[root@localhost nginx]# yum --enablerepo=remi install php56-php php56-php-devel php56-php-fpm php56-php-gd php56-php-xml php56-php-sockets php56-php-session php56-php-snmp php56-php-mysql
① nginx配置文件:
[root@localhost nginx]# cd conf
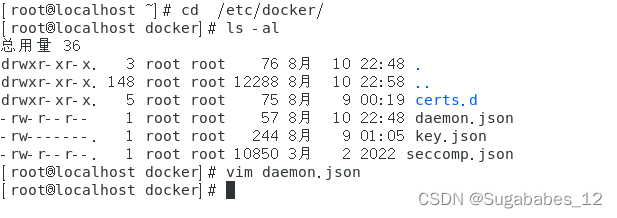
[root@localhost conf]# vim nginx.conf
改成如下格式:
②权限查看
[root@localhost conf]# cd /opt/remi/php56/root/etc/php-fpm.d
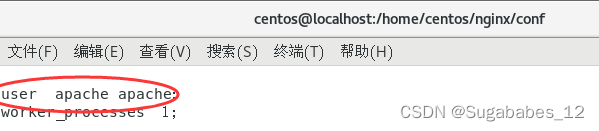
[root@localhost php-fpm.d]# vim www.conf

此时运行用户为apache,监听端口为9000
③网页中使用IP访问页面 ,出现404
a:无法重启nginx:(../sbin/nginx -s reload)
修改配置文件:

出现以下错误:
nginx: [error] open() "/usr/local/lib/ubcsrvd/bin/../logs/nginx.pid" failed (2: No such file or directory)
如何解决:
新建文件createpid.sh,编辑如下内容,保存。
ps x | grep 'nginx' | grep -v grep | awk '{print $1}' > ../logs/nginx.pid修改权限:chmod 777 createpid.sh
执行脚本:sh createpid.sh 生成nginx.pid文件
然后,再执行关闭命令即可。
又出现错误:
nginx: [error] invalid PID number "" in "/home/centos/nginx/logs/nginx.pid"
如何解决:
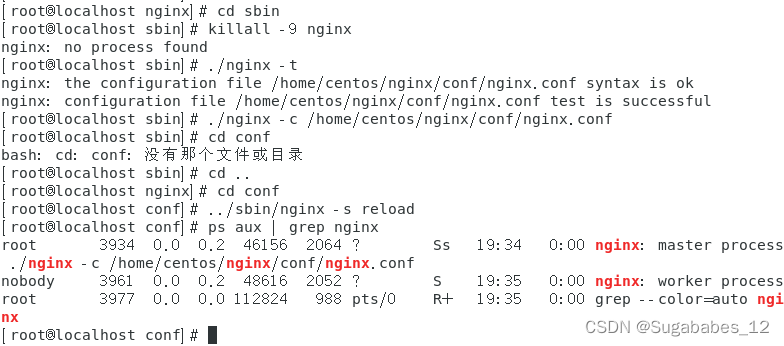
cd /home/centos/nginx/sbin/ #进入/home/centos/nginx/sbin/目录
killall -9 nginx # 杀掉所有nginx进程
./nginx -t #检查配置文件是否有错
./nginx -c /home/centos/nginx/conf/nginx.conf # 指定配置文件-c启动nginx
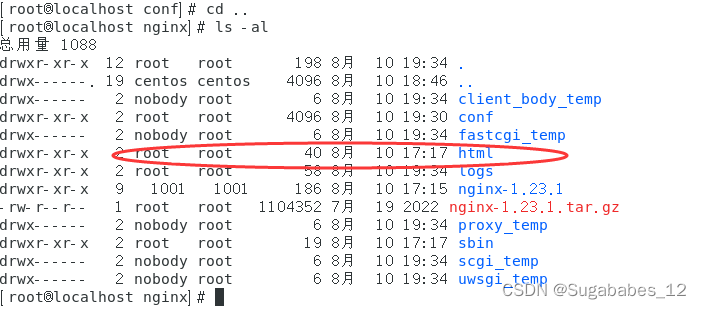
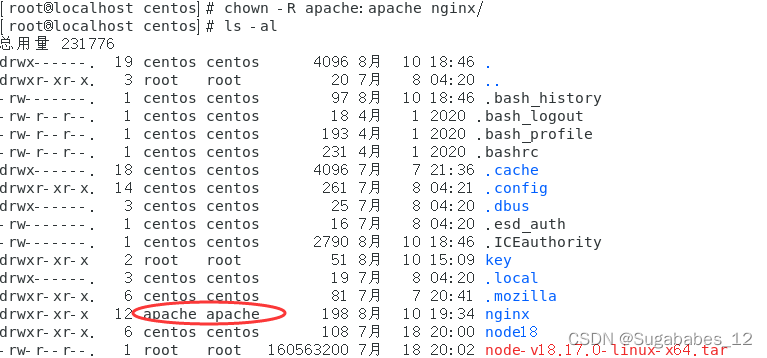
如上图所示,nginx的权限是nobody,下图所示,php-fpm权限是apache,html目录权限为root,要保证三个权限一致

b:403如何解决
在nginx配置文件做如下修改:
然后重启并查看nginx执行权限:
[root@localhost conf]# ../sbin/nginx -s reload
[root@localhost conf]# ps aux | grep nginx

nginx与php-fpm一致:

修改nginx下html的权限,直接修改nginx文件夹:

④成功访问
添加环境变量并重新加载环境:
[root@localhost /]# vim /etc/profile
[root@localhost /]# source /etc/profile

/etc/profile行末添加:PATH=$PATH:/home/centos/nginx/sbin(自己的nginx安装目录下sbin目录地址)
设置开机自启动:
[root@localhost /]# cd /lib/systemd/system/
[root@localhost system]# vim nginx.service
nginx.service中的内容:
[Unit]
Description=nginx
After=network.target
[Service]
Type=forking
ExecStart=/home/centos/nginx/sbin/nginx
ExecReload=/home/centos/nginx/sbin/nginx -s reload
ExecStop=/home/centos/nginx/sbin/nginx -s quit
PrivateTmp=true
[Install]
WantedBy=multi-user.target
注释:[Unit]:服务的说明
Description:描述服务
After:描述服务类别
[Service]服务运行参数的设置
Type=forking是后台运行的形式
ExecStart为服务的具体运行命令
ExecReload为重启命令
ExecStop为停止命令
PrivateTmp=True表示给服务分配独立的临时空间
注意:
[Service]的启动、重启、停止命令全部要求使用绝对路径
[Install]运行级别下服务安装的相关设置,可设置为多用户,即系统运行级别为3
[root@localhost system]# systemctl enable nginx
Created symlink from /etc/systemd/system/multi-user.target.wants/nginx.service to /usr/lib/systemd/system/nginx.service.
###添加到开机启动

可使用如下命令调用nginx:
 systemctl start nginx.service          启动nginx服务
 systemctl stop nginx.service           停止服务
 systemctl restart nginx.service        重新启动服务
 systemctl list-units --type=service     查看所有已启动的服务
 systemctl status nginx.service          查看服务当前状态
 systemctl enable nginx.service          设置开机自启动
 systemctl disable nginx.service         停止开机自启动
服务开启,9000端口启动

删除防火墙规则:
(2)是否可以解析php文件
①在html下新建一个文件web.php并输入如下代码
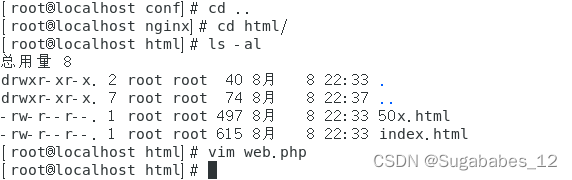
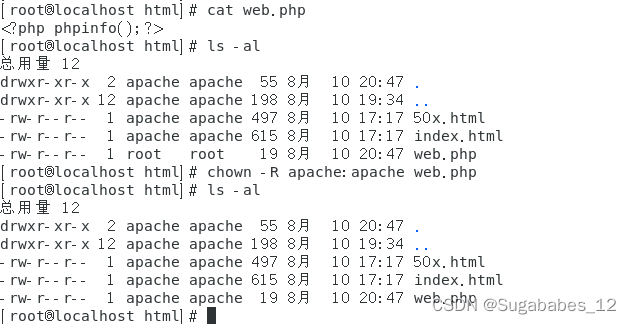
<?php phpinfo();?>
②修改权限
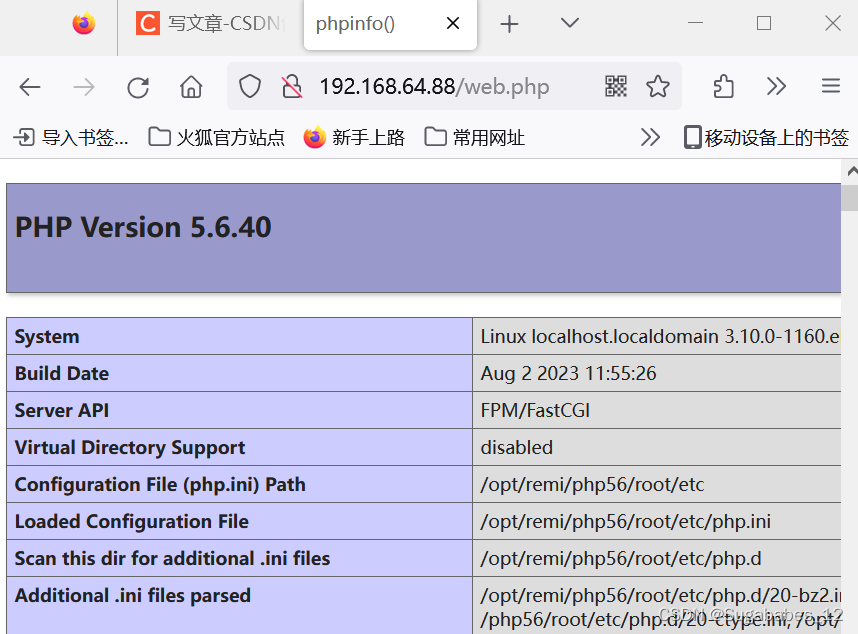
③浏览器中输入对应网址(记得开启php56-php-fpm)
显示如下界面,配置成功!
三、docker
1.将docker环境的安装包拖至centos桌面主目录下并解压
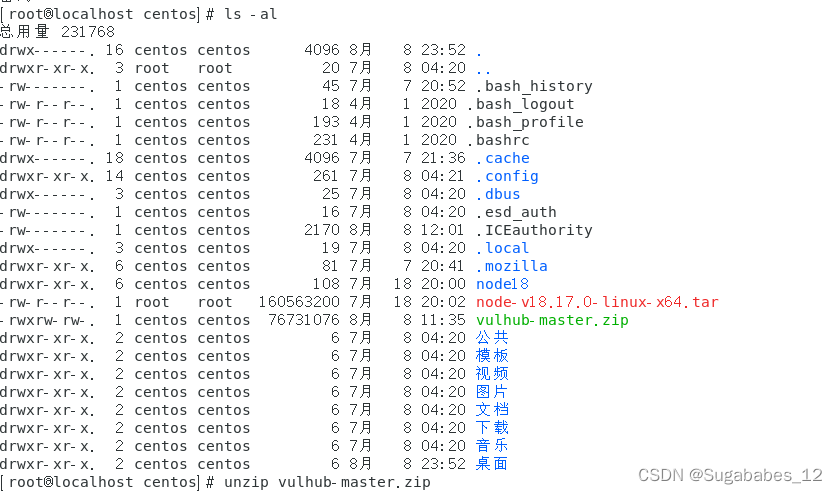
2.重要文件
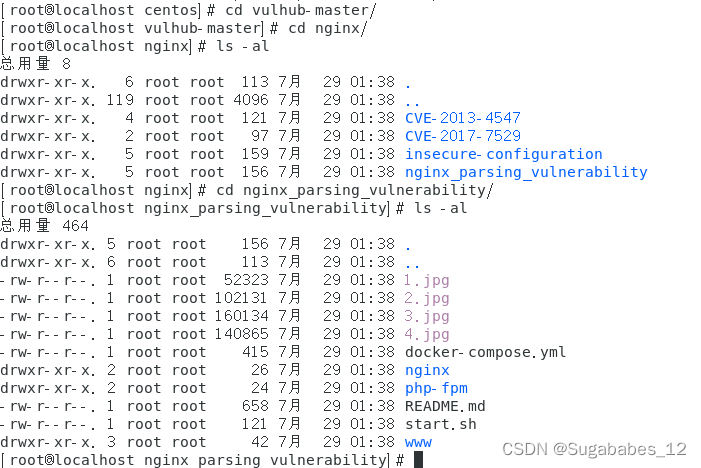

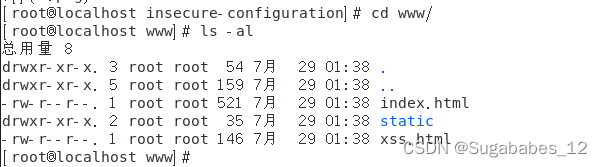
www:要利用的配置文件
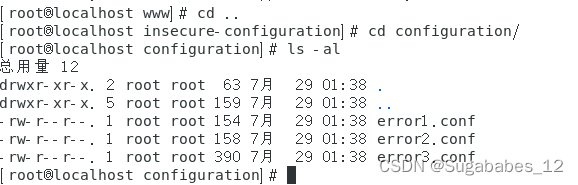
configuration:一些错误配置
3.安装docker-compose并启动
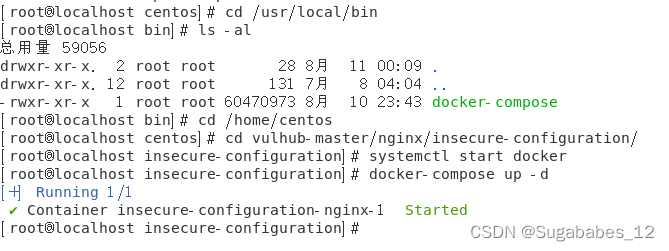
[root@localhost centos]# mv docker-compose-linux-x86_64 /usr/local/bin/docker-compose
[root@localhost centos]# cd ..
[root@localhost home]# cd ..
[root@localhost /]# chmod +x /usr/local/bin/docker-compose
[root@localhost /]# docker-compose
构建镜像:
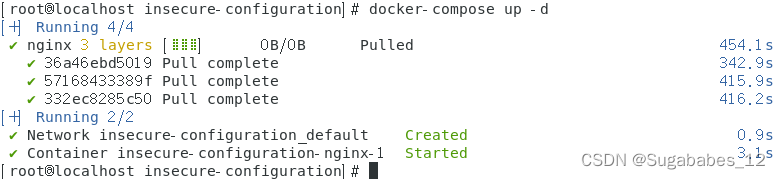
[root@localhost centos]# cd vulhub-master/nginx/insecure-configuration/
[root@localhost insecure-configuration]# systemctl start docker
[root@localhost insecure-configuration]# docker-compose up -d
从国外的镜像加载会很慢,如下操作:

下次启动:
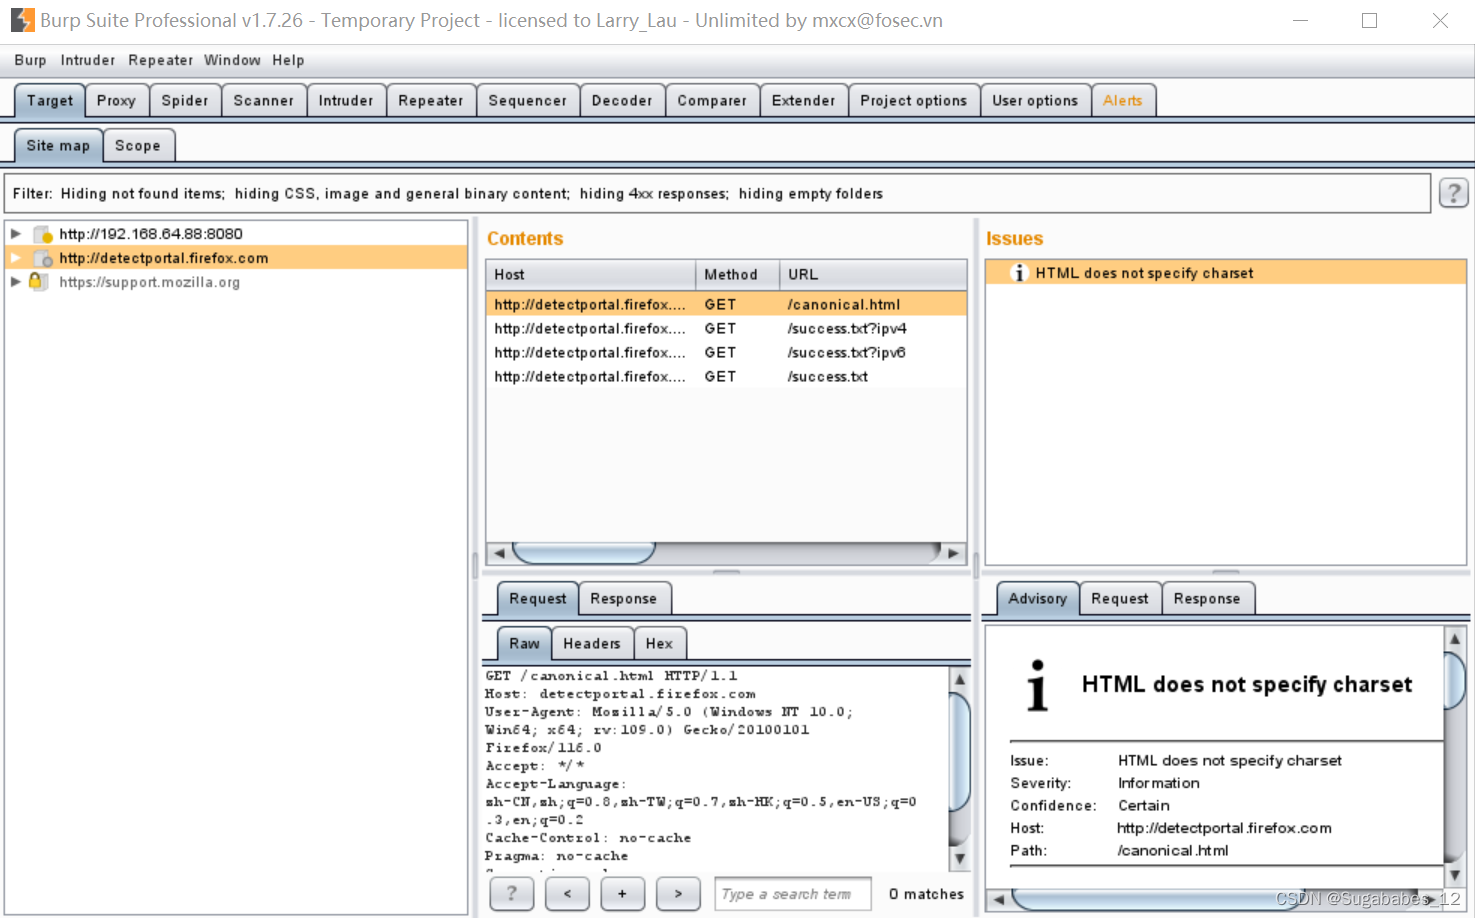
四、burp suite使用
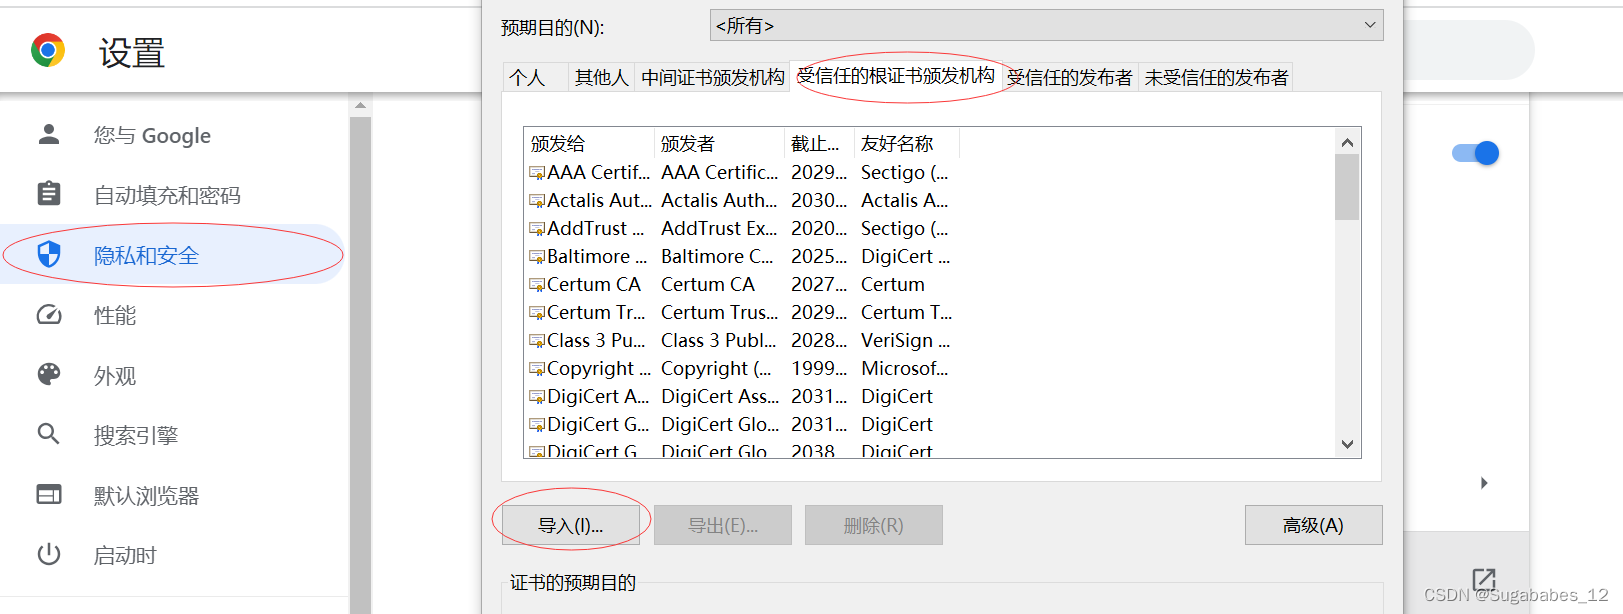
1.下载并导入证书
证书保存为以cer结尾的文件。
打开chrome,隐私与安全→安全→管理设备证书→受信任的根证书颁发机构→导入
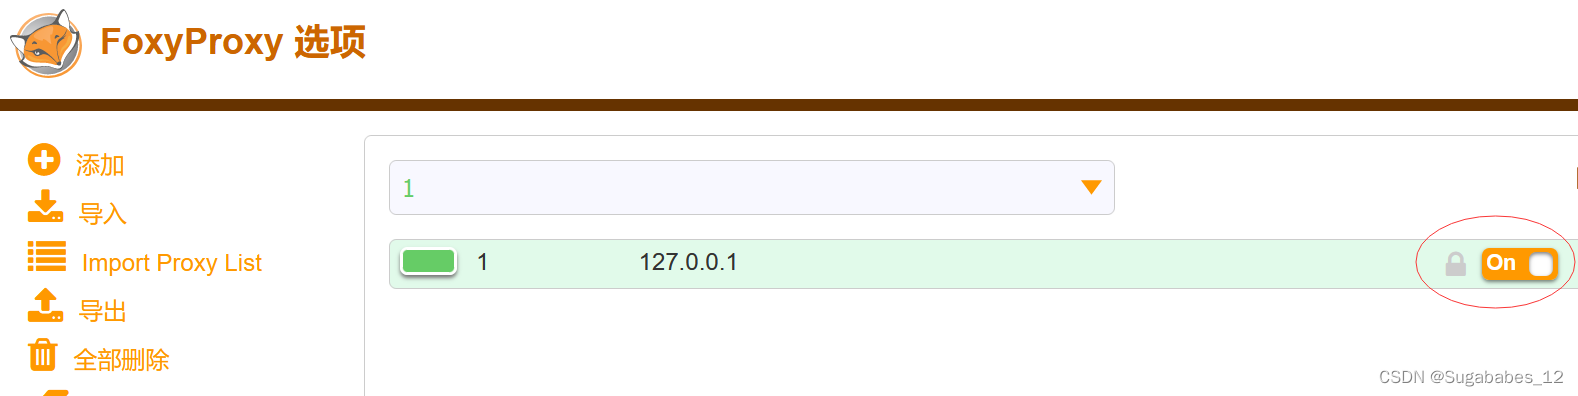
2.在本地开启代理
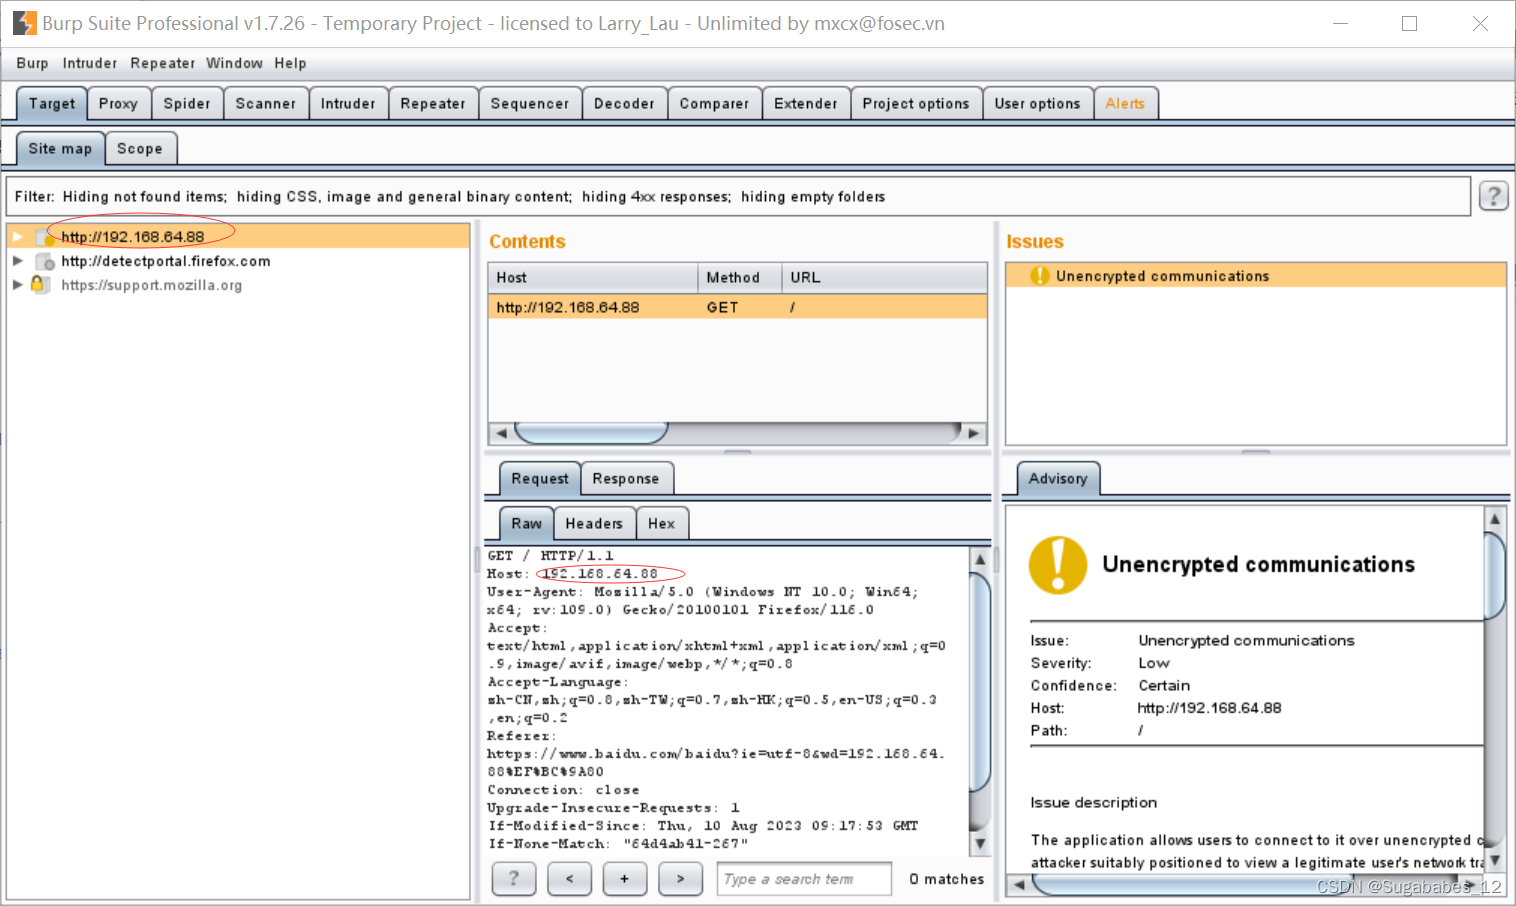
3.浏览器中输入网址192.168.64.88:8080
4.抓包结果测试
send to repeater
五、Nginx配置安全
三个案例看.md
1.$uri导致的CRLF注入漏洞
(1)启动nginx,并查看nginx进程和80端口号占用
[root@localhost ~]# systemctl start nginx.service
[root@localhost ~]# ps aux | grep nginx
root       2581  0.0  0.2  46152  2048 ?        Ss   20:31   0:00 nginx: master process /home/centos/nginx/sbin/nginx
apache     3284  0.0  0.2  48608  2380 ?        S    20:54   0:00 nginx: worker process
root       3300  0.0  0.0 112824   988 pts/0    R+   20:55   0:00 grep --color=auto nginx

[root@localhost ~]# ss -antp | grep 80
LISTEN     0      128          *:80                       *:*                   users:(("nginx",pid=3284,fd=10),("nginx",pid=2581,fd=10))
TIME-WAIT  0      0      192.168.64.88:80                 192.168.64.3:58403
启动docker-compose
[root@localhost centos]# cd vulhub-master/nginx/insecure-configuration/
[root@localhost insecure-configuration]# systemctl start docker
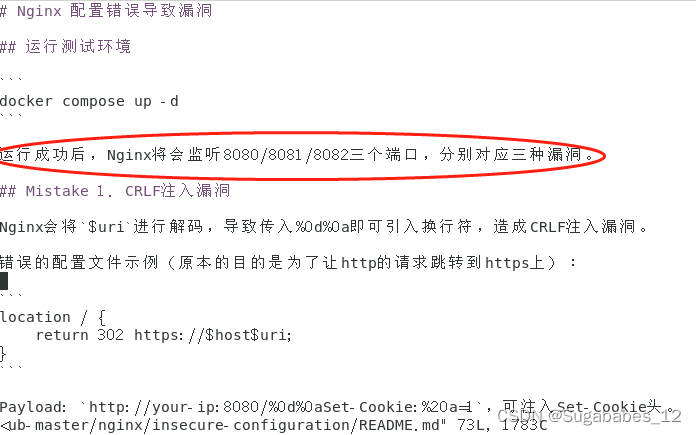
[root@localhost insecure-configuration]# docker-compose up -d
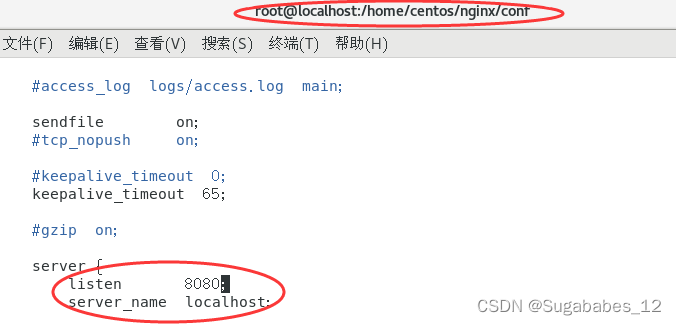
注意:如果本身nginx开启,则不能与docker下nginx端口号重复。运行成功以后,Nginx将会监听8080/8081/8082三个端口,分别对应三种漏洞,而这里为第一种漏洞,nginx监听8080端口。
此时网页中可以访问到192.168.64.88/80、192.168.64.88/8080

(2)测试访问
[root@localhost centos]# vim /home/centos/vulhub-master/nginx/insecure-configuration/README.md
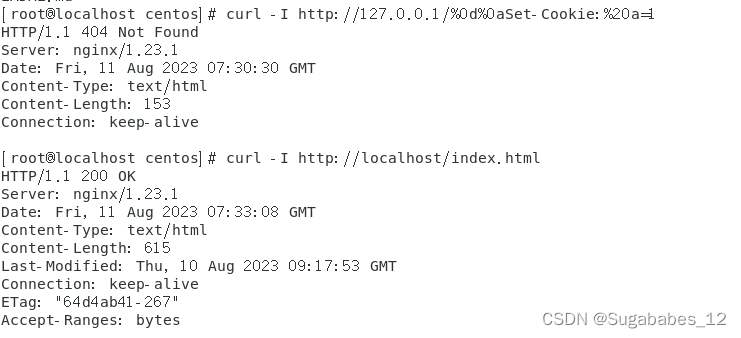
[root@localhost centos]# curl -I http://127.0.0.1/%0d%0aSet-Cookie:%20a=1
[root@localhost centos]# curl -I http://localhost/index.html
(3)重定向为一个https
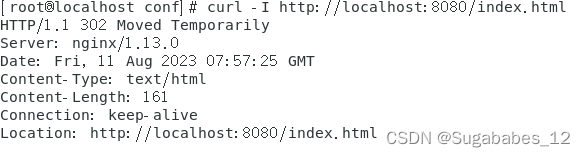
[root@localhost conf]# curl -I http://localhost:8080/index.html
出现了302的跳转:
(4)换行符%0d%0a
[root@localhost conf]# curl -I http://localhost:8080/%0d%0aSet-Cookie:%20a=1
###默认index.html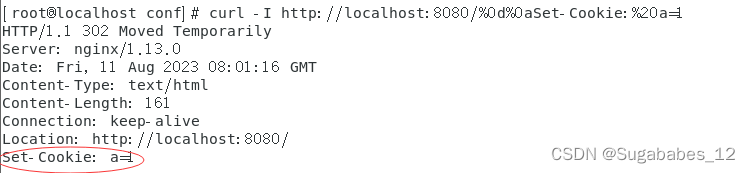
成功将内容换下来!则说明莫名其妙增加了数据。
而这个内容是可以自定义的,很危险,可以使用抓包工具进行测试:
首先打开服务器代理,然后在地址栏中输入地址192.168.64.88:8080,然后可以在burp suite中看到抓到的数据。
将上图中Raw传入repeater并添加字段,如下图(右边成功跳转)

此时换行漏洞成功利用,已经控制http header头,可以利用一些危险代码

还可以加载一些js代码,但实际上CRLF漏洞要配合ssrf服务端请求伪造和redis未授权访问才可以发挥最大的危害。
(5)当用户访问http时自动跳转到https,在跳转的过程中,我们需要保证用户访问的页面不变,所以需要从Nginx获取用户请求的文件路径。查看Nginx文档,可以发现有三个表示uri的变量:
-
$uri -
$document_uri -
$request_uri
解释一下,1和2表示的是解码以后的请求路径,不带参数;3表示的是完整的URI(没有解码)。那么,如果运维配置了下列的代码:
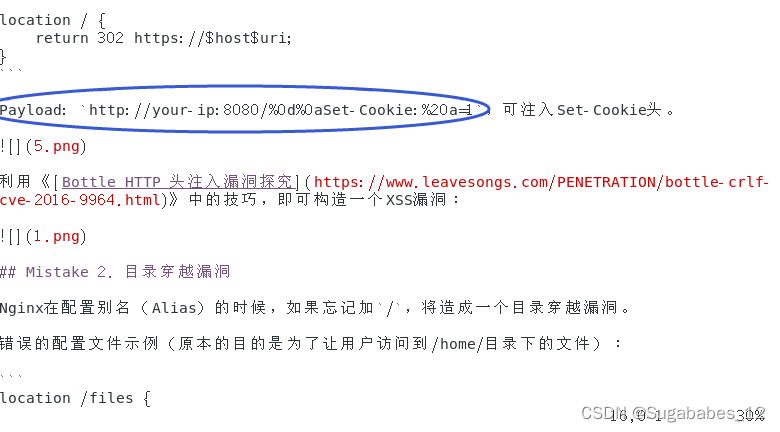
location / {
    return 302 https://$host$request_uri;
}
使用request_uri,不会进行解码,%0d%0a换行符也就失效了。
因为$uri是解码以后的请求路径,所以可能就会包含换行符,也就造成了一个CRLF注入漏洞。
这个CRLF注入漏洞可以导致会话固定漏洞、设置Cookie引发的CSRF漏洞或者XSS漏洞。其中,我们通过注入两个\r\n即可控制HTTP体进行XSS,但因为浏览器认为这是一个301跳转,所以并不会显示我们注入的内容。
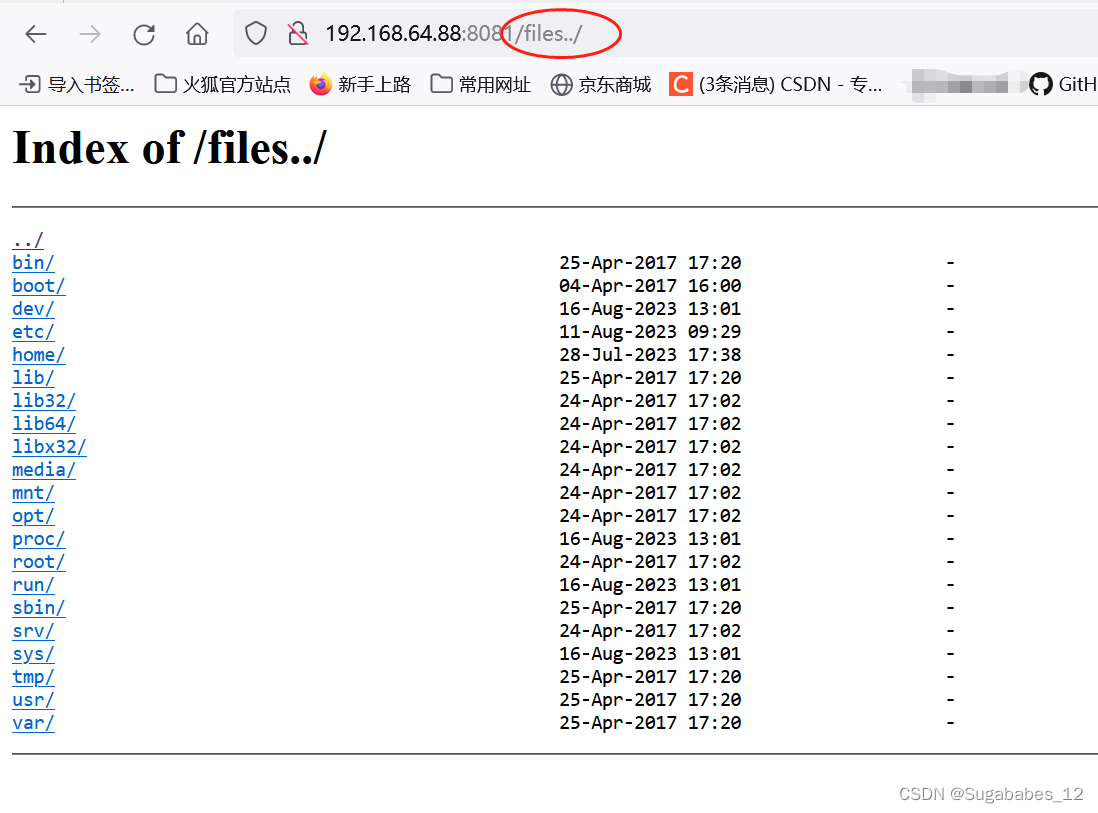
2.目录穿越漏洞
nginx8081
这个常见于Nginx做反向代理的情况,动态的部分被proxy_pass传递给后端端口,而静态文件需要Nginx来处理。
假设静态文件存储在/home/目录下,而该目录在url中名字为files,那么就需要用alias设置目录的别名:
location /files/{
alias /home/;
}上面的files后的斜杠和home后的斜杠必须都同时存在或不存在。
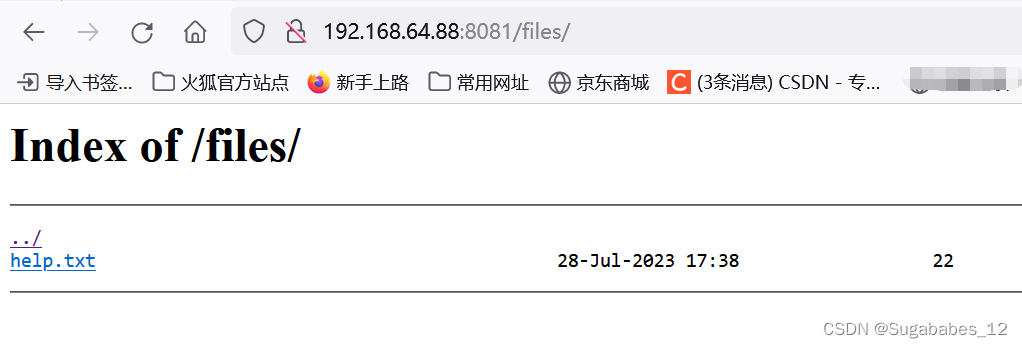
此时,访问http://example.com/files/readme.txt,就可以获取/home/readme.txt文件。
但我们注意到,url上/files没有加后缀/,而alias设置的/home/是有后缀/的,这个/就导致我们可以从/home/目录穿越到他的上层目录:
url上/files../穿越到了根目录下 相当于访问了/home../
3.Http Header被覆盖的问题
(1)原理
Nginx的配置文件分为Server、Location、If等一些配置块,并且存在包含关系,和编程语言比较类似。如果在外层配置的一些选项,是可以被继承到内层的。
但这里的继承也有一些特性,比如add_header,子块中配置后将会覆盖父块中的add_header添加的所有HTTP头,造成一些安全隐患。
如下列代码,Server块添加了CSP头:
server {
...
add_header Content-Security-Policy "default-src 'self'";
add_header X-Frame-Options DENY;
location = /test1 {
rewrite ^(.*)$ /xss.html break;
}
location = /test2 {
add_header X-Content-Type-Options nosniff;
rewrite ^(.*)$ /xss.html break;
}
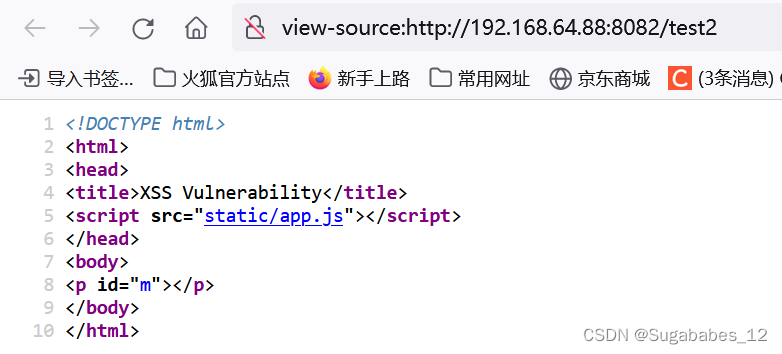
}先查看192.168.64.88:8082网页源码:
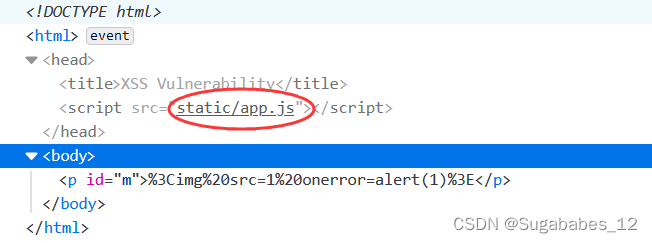
js中有一个文件包含代码:
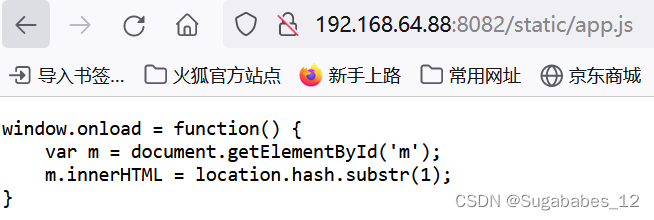
m就是url中井号后面的值,将m放入innerHTML(p标签中)
(2)
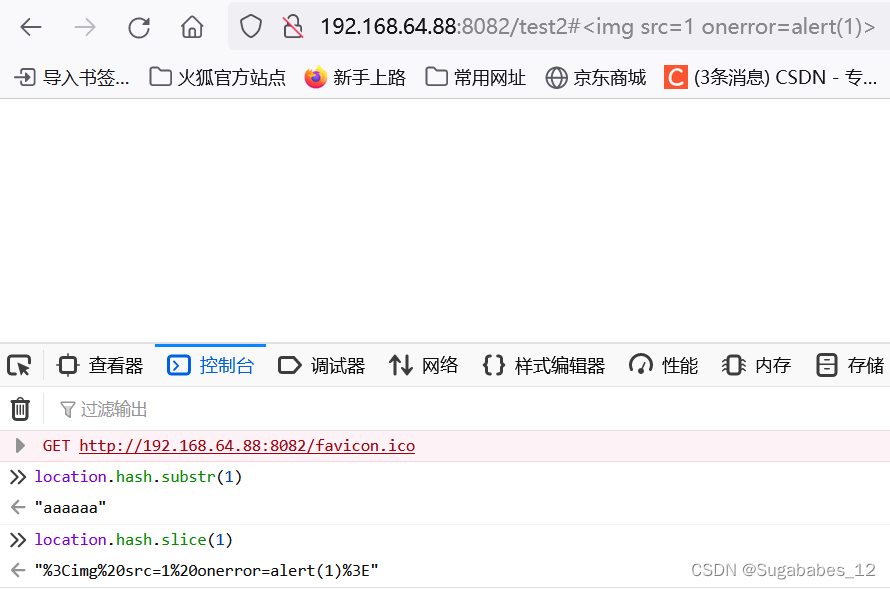
漏洞地址:http://192.168.64.88:8082/test2 (IP为自身虚拟机IP)
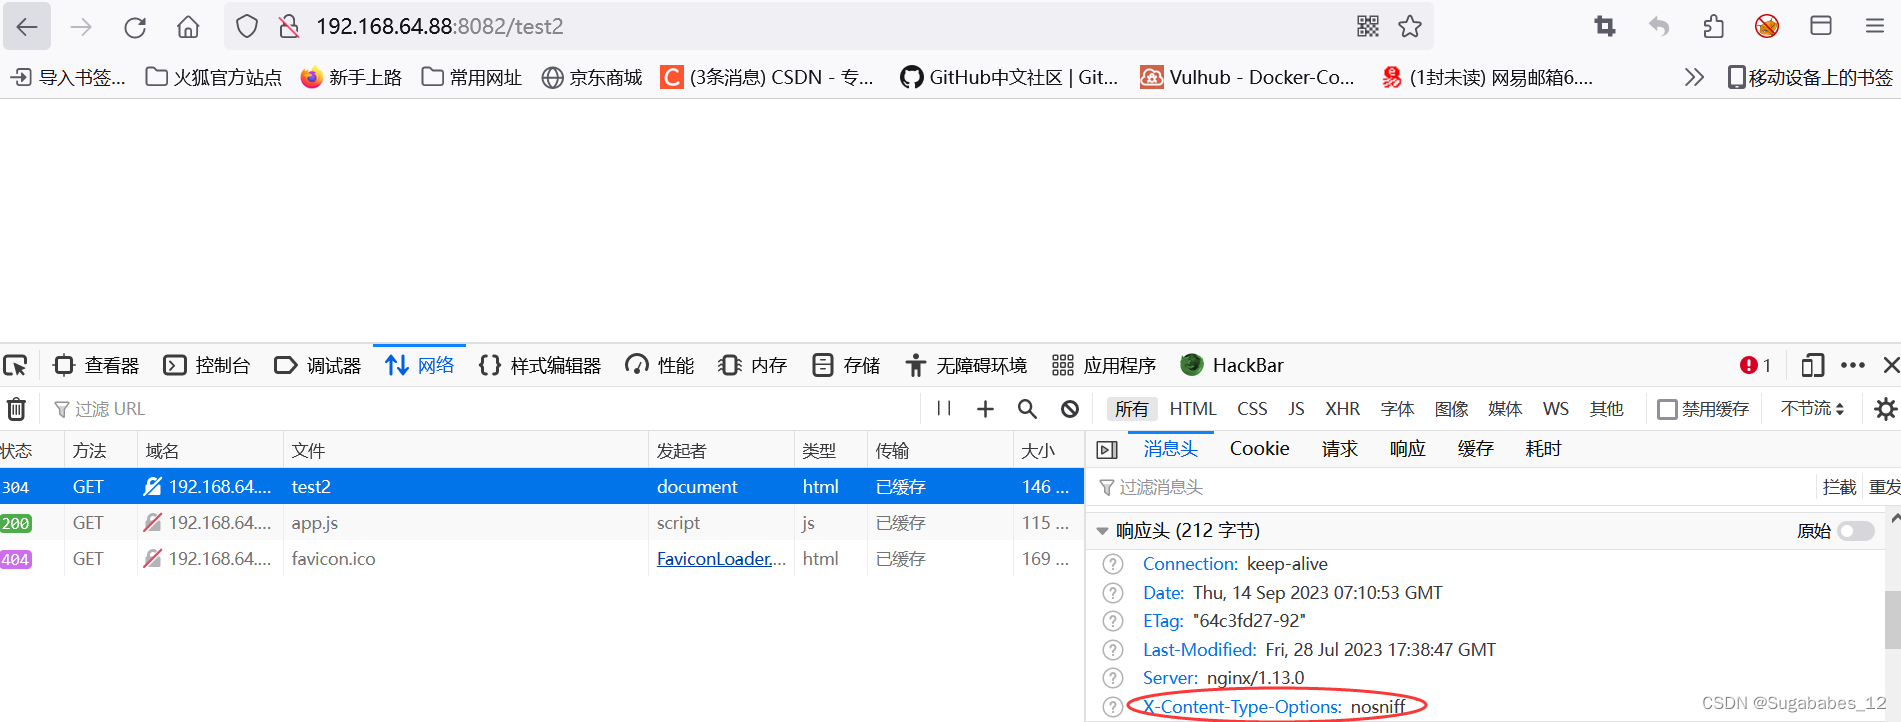
下图中我们可以看到头部已经被更改:
/test2的location中又添加了X-Content-Type-Options头,导致父块中的add_header全部失效
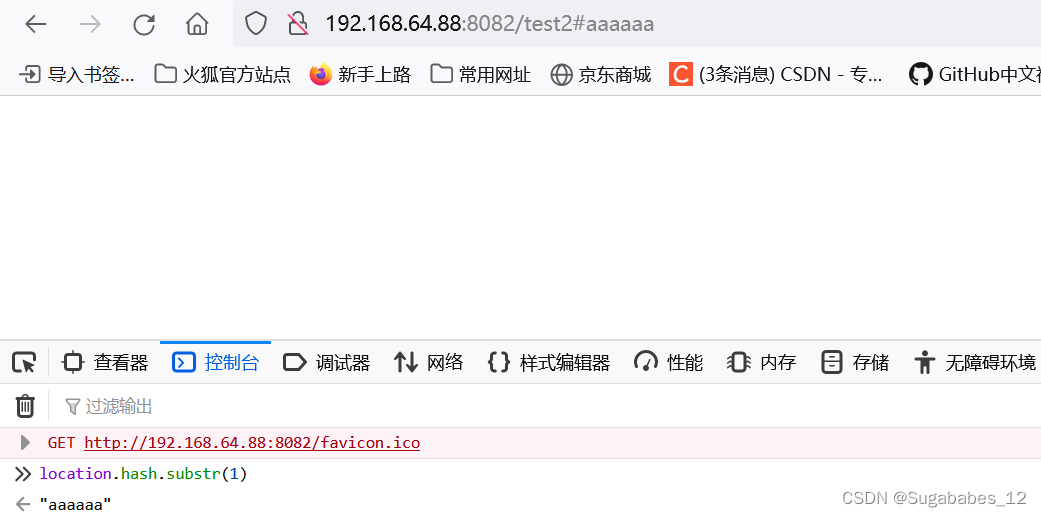
(3)漏洞触发
test2的csp(CSP 头是一种用于保护网站的安全性的方法,可以防止恶意脚本或攻击者利用 XSS 漏洞。)就完全失效了,我们成功触发XSS:


 7569
7569


 被折叠的 条评论
为什么被折叠?
被折叠的 条评论
为什么被折叠?
 到【灌水乐园】发言


