


线程和进程
线程,程序跑起来之后整个程序就是一个进程,而程序里面的mian方法就是应该线程
创建线程
创建线程的方式有
继承Thread类实现run方法
实现Runnable接口
实现Callable接口
2.1继承Thread类创建线程
这个是第一个方式使用线程,代码里面有注释
/**
 * @Author: 李佳芬
 * @Description: 创建线程方式一继承Thread类 流程为 重写run方法然后在main线程里面调用start方法
 * @DateTime: 2023/3/21 14:43
 **/
public class TestThread01 extends Thread{
    @Override
    public void run() {
        for (int i = 0;i<100;i++){
            // 这个是线程体就是线程里面要干的事
            System.out.println("我是线程--------"+i);
        }
    }
    public static void main(String[] args) {

        // new出对象调用start方法
        TestThread01 testThread01 = new TestThread01();
        testThread01.start();

        for (int i = 0;i<1000;i++){
            System.out.println("我是Main线程--------"+i);
        }
    }
}
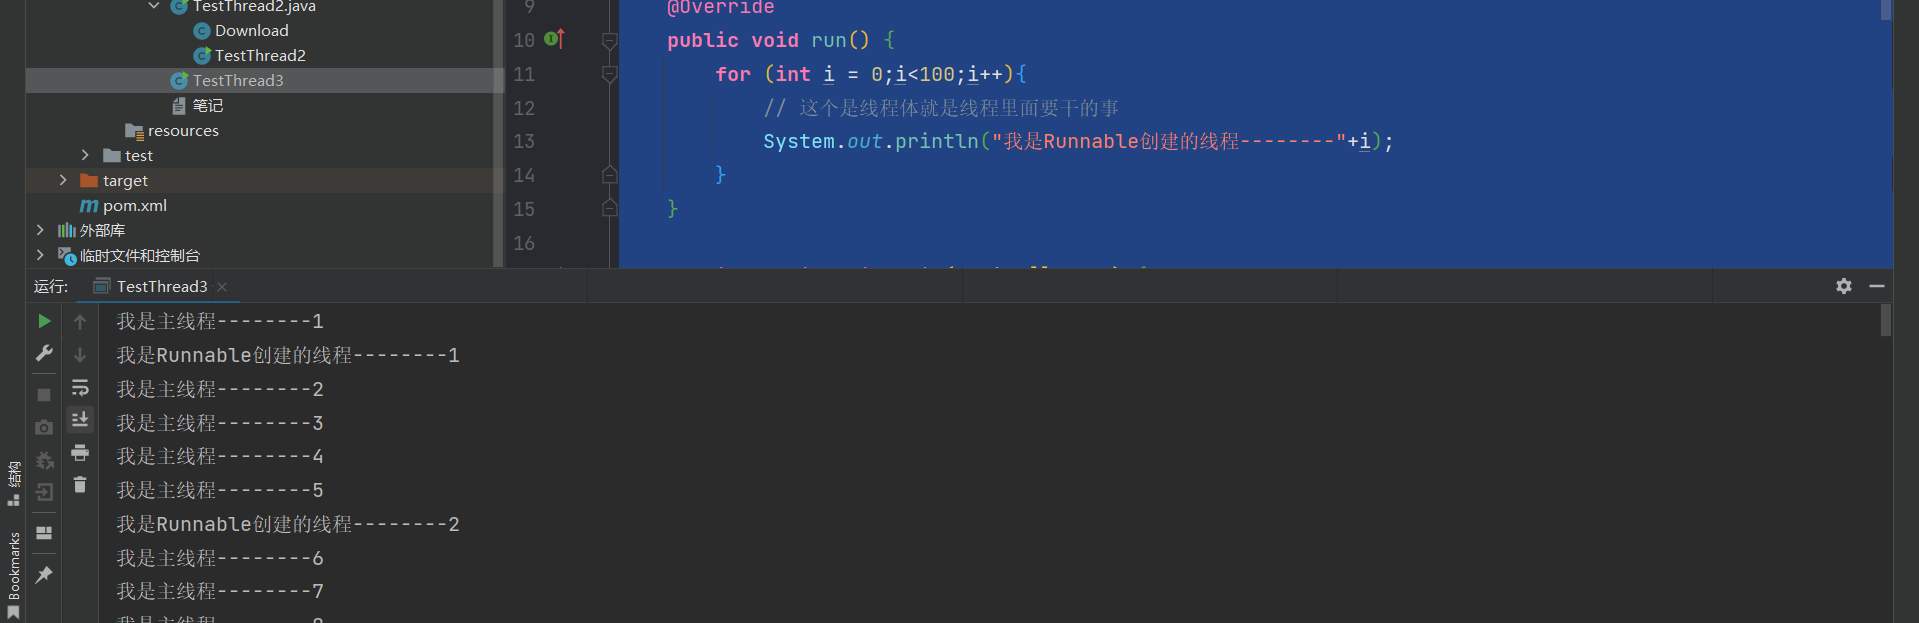
运行结果如图

可以看到线程和main线程是一起运行的
2.2 使用多线程下载图片
我们先要导入一个包
<dependency>
            <groupId>commons-io</groupId>
            <artifactId>commons-io</artifactId>
            <version>2.6</version>
        </dependency>
我们编写一个下载器
class Download{
    public static void DownloadImg(String name,String url){
      // 使用上面导入的包里面的工具类
        try {
            FileUtils.copyURLToFile(new URL(url),new File("D:\\java项目\\多线程\\src\\main\\java\\img",name));
        } catch (IOException e) {
            e.printStackTrace();
            System.out.println("下载器异常");
        }
    }
}
编写类去调用这个下载器
/**
 * @Author: 李佳芬
 * @Description: 练习使用多线程下载图片
 * @DateTime: 2023/3/21 15:29
 **/
public class TestThread2 extends Thread {
    private String name;
    private String url;

    public TestThread2(String url, String name) {
        this.name = name;
        this.url = url;
    }

    @Override
    public void run() {

        Download.DownloadImg(name,url);
    }

    public static void main(String[] args) {
        TestThread2 t1 = new TestThread2("https://pic.netbian.com/uploads/allimg/230215/225946-1676473186490f.jpg","01.png");
        TestThread2 t2 = new TestThread2("https://pic.netbian.com/uploads/allimg/220802/231950-165945359015c6.jpg","02.png");
        TestThread2 t3 = new TestThread2("https://pic.netbian.com/uploads/allimg/220802/231950-165945359015c6.jpg","03.png");

        t1.start();
        t2.start();
        t3.start();
    }
}
重写run方法在run方法里面调用下载器,创建三个线程对象调用三次start方法

可以看到下载的图片和调用的顺序不一样,说明线程是同一时间执行的

2.3 实现Runnable创建线程
步骤编写一个类实现Runnable接口重写run方法,new Thread把实现类传入进去
/**
* @Author: 李佳芬
* @Description: TODO
* @DateTime: 2023/3/21 16:36
**/
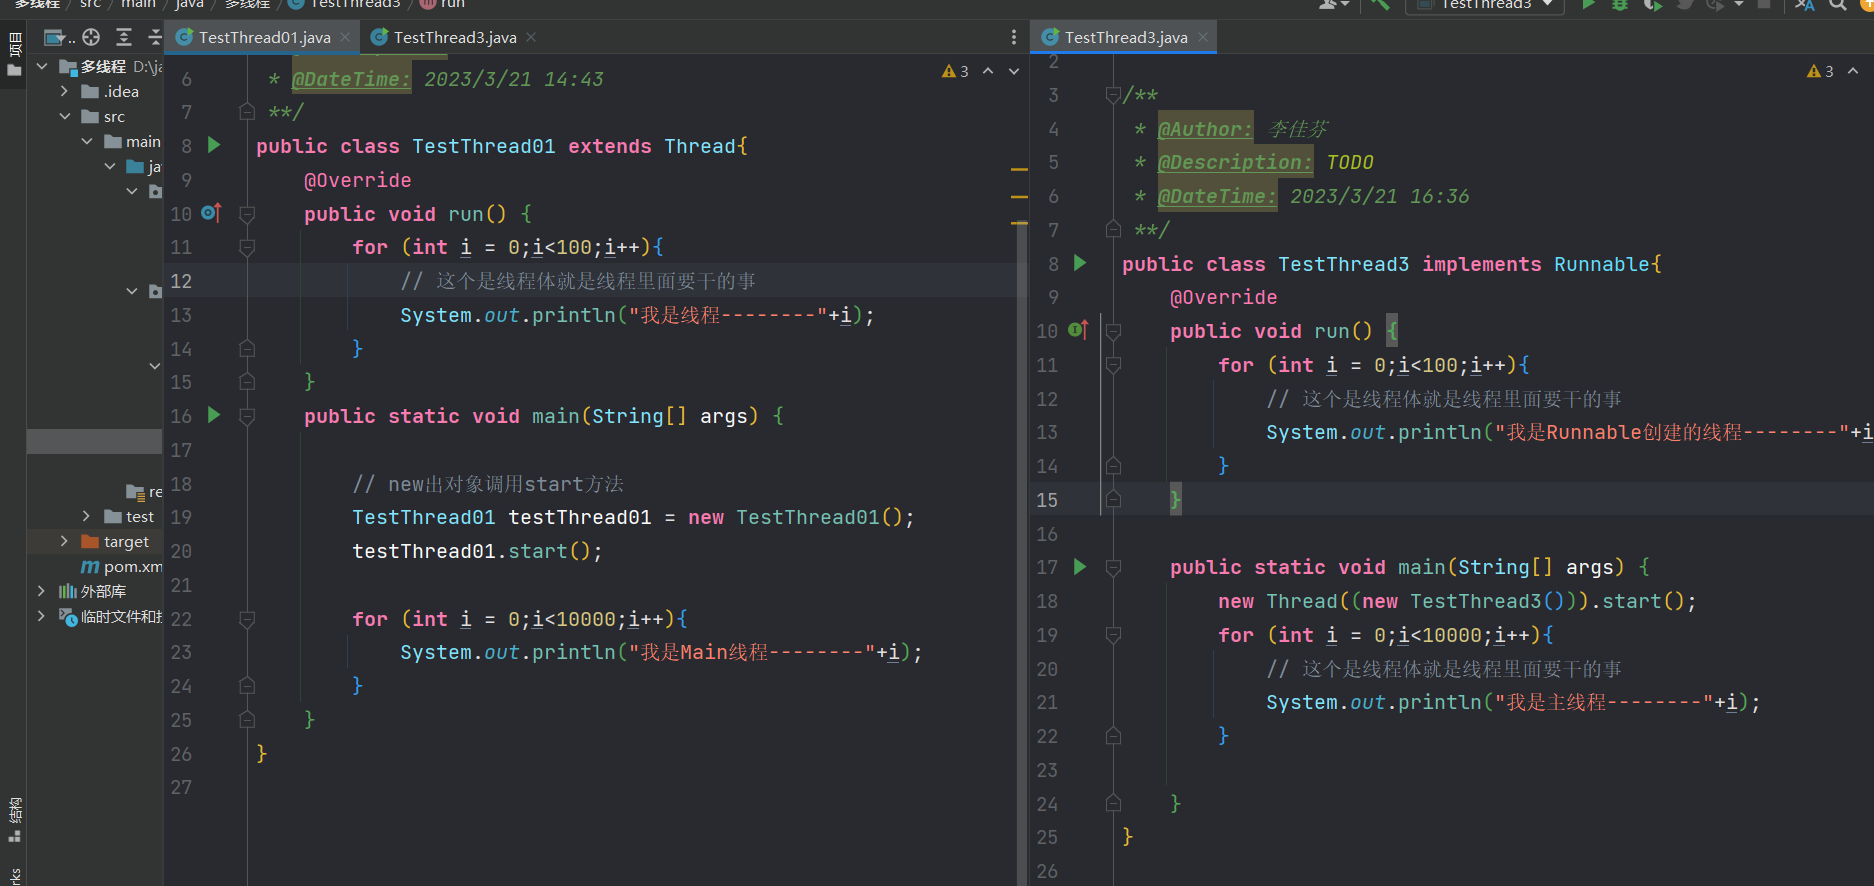
public class TestThread3 implements Runnable{
@Override
public void run() {
for (int i = 0;i<100;i++){
// 这个是线程体就是线程里面要干的事
System.out.println("我是Runnable创建的线程--------"+i);
}
}
public static void main(String[] args) {
new Thread((new TestThread3())).start();
for (int i = 0;i<10000;i++){
// 这个是线程体就是线程里面要干的事
System.out.println("我是主线程--------"+i);
}
}
}运行结果
和Thread创建的一样
对比两种方法的使用
2.4 实现Callable接口创建线程
创建一个类实现Callable接口,重写Call方法
/**
 * @Author: 李佳芬
 * @Description: Callable
 * @DateTime: 2023/3/31 10:44
 **/
public class Callable01 implements Callable<Boolean> {

    private String name;
    private  String url;

    public Callable01(String name, String url) {
        this.name = name;
        this.url = url;
    }

    @Override
    public Boolean call() throws Exception {
        String outimg = OUTIMG(url, name);
        System.out.println("下载了文件"+name+"地址为"+outimg);
        return true;
    }

    public static void main(String[] args) throws ExecutionException, InterruptedException {
        // new出Callable的实现类对象
        Callable01 callable01 = new Callable01("美女键盘","https://pic.netbian.com/uploads/allimg/230327/194745-16799176658fd9.jpg");
        Callable01 callable02 = new Callable01("刻晴","https://pic.netbian.com/uploads/allimg/230326/010720-16797640409489.jpg");
        Callable01 callable03 = new Callable01("可爱女孩 赛博朋克 街道","https://pic.netbian.com/uploads/allimg/230311/003345-16784660256b9e.jpg");
        // 创建线程池
        ExecutorService service = Executors.newFixedThreadPool(3);

        // 提交服务
        Future<Boolean> s1 = service.submit(callable01);
        Future<Boolean> s2 = service.submit(callable02);
        Future<Boolean> s3 = service.submit(callable03);

        // 获取结果
        Boolean aBoolean = s1.get();
        // 关闭线程
        service.shutdownNow();
    }
}
流程为重写call方法创建对象,创建线程池,提交服务,获取结果关闭线程池
3 线程的并发
3.1 初识并发
我们写一段代码来模拟并发的问题
代码思路我们创建一个类让他实现Runnable接口,定义一个属性为车票,重写run方法实现几个人同时抢票,代码如下:
/**
 * @Author: 李佳芬
 * @Description: 多个线程操作同一个对象
 * @DateTime: 2023/3/27 15:57
 **/
public class TestThread4 implements Runnable{

    // 定义十张车票
    private int chepiao = 10;

    public static void main(String[] args) {

        TestThread4 testThread4 = new TestThread4();
        new Thread(testThread4,"佳芬").start();
        new Thread(testThread4,"黄牛").start();
        new Thread(testThread4,"小明").start();
        new Thread(testThread4,"陆泽远").start();

    }

    @Override
    public void run() {
        while (true){
            if (chepiao<=1){
                break;
            }
            // 模拟抢票延迟
            try {
                Thread.sleep(200);
            } catch (InterruptedException e) {
                e.printStackTrace();
            }
            System.out.println(Thread.currentThread().getName()+"拿到了第"+chepiao+"票"+chepiao--);
        }

    }
}
运行结果如图
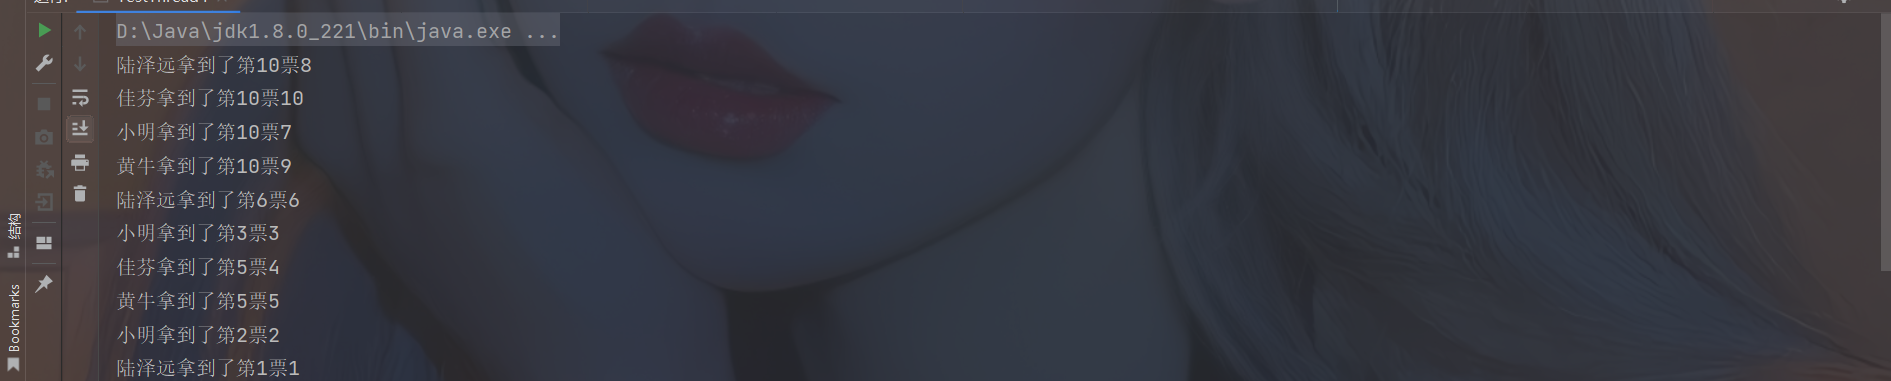
可以看到有人拿到了同一张票
4 线程状态
4.1 线程停止
建议线程自己停止,不建议强行停止,让线程做完自己的事自己停止,不建议使用官方的api停止
建议使用和递归一样的手段设置标志,达到标志停止线程
/**
 * @Author: 李佳芬
 * @Description: 线程停止
 * @DateTime: 2023/3/31 16:20
 **/
public class TestStop implements Runnable{

    private Boolean flag = true;

    @Override
    public void run() {
        int i = 0;
        while (flag){
            System.out.println("我是创建的线程"+"===="+i);
            i++;
        }
    }

    private void Flag(){
        this.flag = false;
    }

    public static void main(String[] args) {

        TestStop testStop = new TestStop();
        new Thread(testStop).start();

        for (int i = 0;i<10000;i++){
            if (i==3000){
              testStop.Flag();
            }
            System.out.println("我是Main线程"+"===="+i);
        }
    }
}
运行结果当Main的i到三千后线程就没有跑了

4.2 线程休眠 Sleep
下面这段代码是模拟倒计时 每个对象都有一把锁,Seelp不会释放锁
/**
 * @Author: 李佳芬
 * @Description: Sleep睡眠
 * @DateTime: 2023/3/31 16:36
 **/
public class TestSleep implements Runnable{

    // 倒计时
    @Override
    public void run() {
       int i= 10;
       do {
          try {
             Thread.sleep(1000);
             System.out.println(i--);
          } catch (InterruptedException e) {
             e.printStackTrace();
          }
       } while (i > 0);
    }

    public static void main(String[] args) {
       TestSleep sleep = new TestSleep();
       new Thread(sleep).start();

    }
}
打印系统当前时间
/**
 * @Author: 李佳芬
 * @Description: 打印时间
 * @DateTime: 2023/3/31 16:50
 **/
public class TestSleep01 implements Runnable{

    @Override
    public void run() {
        Date date = new Date(System.currentTimeMillis());
        try {
            while (true) {
                Thread.sleep(1000);
                System.out.println(new SimpleDateFormat("yyyy-MM-dd hh:mm:ss").format(date));
                date = new Date(System.currentTimeMillis());
            }
        } catch (InterruptedException e) {
            e.printStackTrace();
        }
    }

    public static void main(String[] args) {
        TestSleep01 testSleep01 = new TestSleep01();
        new Thread(testSleep01).start();
    }
}
4.3 线程礼让yield
礼让不一定成功 这个挺简单的
/**
 * @Author: 李佳芬
 * @Description: 线程礼让
 * @DateTime: 2023/3/31 17:06
 **/
public class TestYield implements Runnable{
    @Override
    public void run() {
        System.out.println(Thread.currentThread().getName()+"我线程开始执行了,愿你此生常如意,万里山河无敌人");
        Thread.yield();
        System.out.println(Thread.currentThread().getName()+"我要走了,再见");
    }

    public static void main(String[] args) {
        TestYield testYield = new TestYield();
        TestYield testYield1 = new TestYield();

        new Thread(testYield,"你你你").start();
        new Thread(testYield1,"哈哈哈").start();
    }
}
4.4 线程插队join
线程插队,插队后执行完才会执行被插队的线程
/**
 * @Author: 李佳芬
 * @Description: 线程插队,插队后执行完才会执行被插队的线程
 * @DateTime: 2023/3/31 17:15
 **/
public class TestJoin implements Runnable{
    @Override
    public void run() {
        for (int i = 0; i < 1000; i++) {
            System.out.println("我是插队的VIP线程"+"===="+i);
        }
    }

    public static void main(String[] args) throws InterruptedException {
        TestJoin testJoin = new TestJoin();
        Thread thread = new Thread(testJoin);
        thread.start();
        for (int i = 0; i < 1000; i++) {
            if (i==300){
                thread.join();
            }
            System.out.println("我是Main"+"==="+i);
        }

    }
}
运行截图


vip线程跑完后Main线程才继续接着跑的
4.5 线程的五个状态
线程在刚new出来的状态为NEW 运行中的状态为 RUNNABLE 睡眠中或者堵塞状态为TIMED_WAITING 线程终止状态为TERMINATED 代码如下
package 线程状态;

/**
 * @Author: 李佳芬
 * @Description: 线程的五个状态
 * @DateTime: 2023/3/31 17:15
 **/
public class TestState {
    public static void main(String[] args) throws InterruptedException {

      Thread thread = new Thread(()->{
            for (int i = 0; i < 5; i++) {
                try {
                    Thread.sleep(200);
                } catch (InterruptedException e) {
                    throw new RuntimeException(e);
                }
            }
          System.out.println("。。。。。。。。。。。。。。。。。。。。。");
        });
        Thread.State state = thread.getState();   // NEW 状态
        System.out.println(state);

        thread.start(); // 启动线程
         state = thread.getState(); // 更新线程状态
        System.out.println(state);
        while (state != Thread.State.TERMINATED){
            Thread.sleep(100);
            state = thread.getState();
            System.out.println(state);
        }

    }

}
观测线程方法为getState();
5 线程优先级
线程优先级为 1到10 主线程的优先级为默认的5 优先级是告诉jvm你要先执行我最终执行还是要看cpu的调度
这个为jdk的源码线程优先级只能在1到10之间否则就抛出异常
public final void setPriority(int newPriority) {
        ThreadGroup g;
        checkAccess();
        if (newPriority > MAX_PRIORITY || newPriority < MIN_PRIORITY) {
            throw new IllegalArgumentException();
        }
        if((g = getThreadGroup()) != null) {
            if (newPriority > g.getMaxPriority()) {
                newPriority = g.getMaxPriority();
            }
            setPriority0(priority = newPriority);
        }
    }
下面是测试代码
// 线程优先级测试
public class TestPriority {
    public static void main(String[] args) {
        System.out.println(Thread.currentThread().getName()+"----->"+"优先级为"+Thread.currentThread().getPriority());

        MyPriority myPriority = new MyPriority();

        Thread thread = new Thread(myPriority);
        Thread thread1 = new Thread(myPriority);
        Thread thread2 = new Thread(myPriority);
        Thread thread3 = new Thread(myPriority);
        Thread thread4 = new Thread(myPriority);


        thread.setPriority(10);
        thread.start();

        thread1.setPriority(1);
        thread1.start();

        thread2.setPriority(6);
        thread2.start();

        thread3.setPriority(8);
        thread3.start();

        thread4.setPriority(2);
        thread4.start();


    }
}
 class MyPriority implements Runnable{

     @Override
     public void run() {
         System.out.println(Thread.currentThread().getName()+"----->"+"优先级为"+Thread.currentThread().getPriority());
     }
 }
运行结果主线程的优先级为5 优先级越高也不一定是先跑 要看cpu调度

6 守护线程

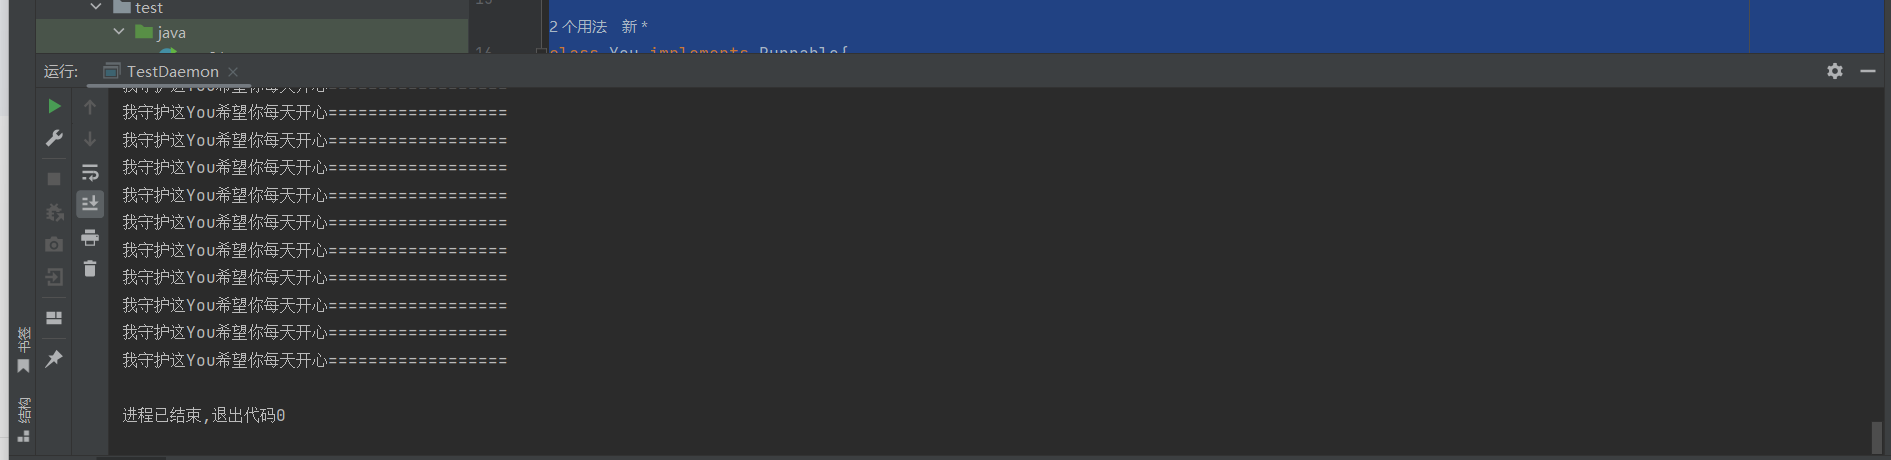
守护线程 Deamon 守护线程在程序结束之后就会自己关闭 gcc也是一个守护线程 看以下案例
god的run方法是一个无线循环的如果他不是守护线程的话这个程序就会一直执行
// 守护线程测试
public class TestDaemon {
    public static void main(String[] args) {
        You you = new You();
        God god = new God();

        new Thread(you).start();
      Thread godT = new Thread(god);
      godT.setDaemon(true);  // 设置为true的话这个线程就会成为一个守护线程
      godT.start();
    }
}

class You implements Runnable{

    // 这个是你
    @Override
    public void run() {
        for (int i = 0; i < 36500; i++) {
            System.out.println("我很开心====================================");
        }
        System.out.println("拜拜我走了");
    }
}

class God implements Runnable{

    // 这个是一个守护线程 守护线程程序结束他就结束
    @Override
    public void run() {
        // 如果为普通线程的话永远都不会停下来
        while (true){
            System.out.println("我守护这You希望你每天开心==================");
        }
    }
}
7 线程安全和并发
线程同步的前提是 队列加锁 每一个对象都有一把锁 线程同步必定会影响性能
7.1 线程同步和synchronized 锁
三个小案例
7.1.1多人买票问题 synchronized 方法锁
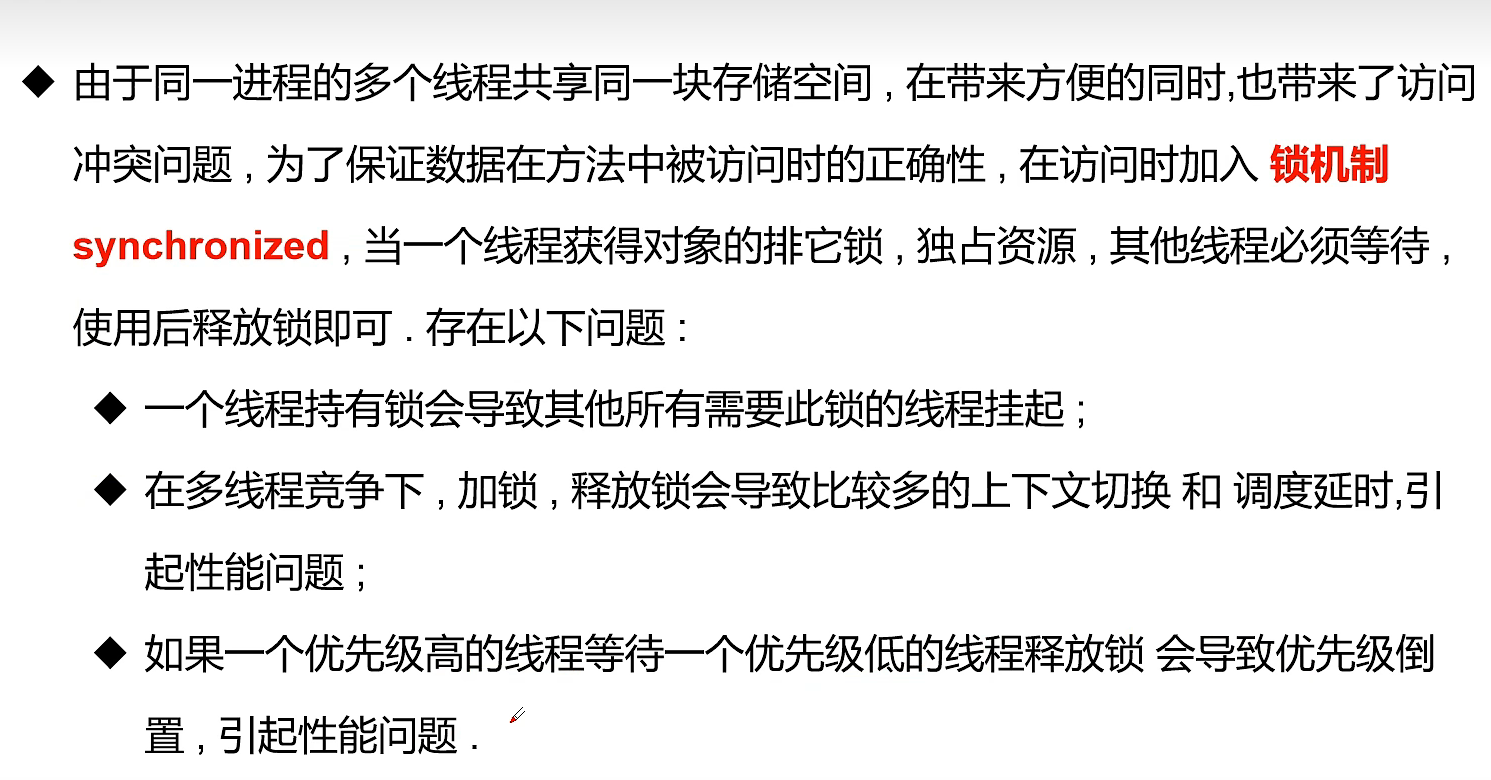
四个人同时买10张票会导致有人抢到同一张票
// 不安全买票
public class BuyingTickets implements Runnable{

    // 定义一些票
    public static int tickets = 100;
    boolean flas = true;
    @Override
    public void run() {
        // 买票
        while (flas){
            buy();
        }
    }

    public void buy(){
        if (tickets<=0){
            flas = false;
            return;
        }
        /*try {
            Thread.sleep(100);
        } catch (InterruptedException e) {
            throw new RuntimeException(e);
        }*/
        System.out.println(Thread.currentThread().getName()+"买到了第"+tickets--+"票");
    }

    public static void main(String[] args) {
        BuyingTickets buyingTickets = new BuyingTickets();
        new Thread(buyingTickets,"黄牛").start();
        new Thread(buyingTickets,"小白").start();
        new Thread(buyingTickets,"快递").start();
        new Thread(buyingTickets,"我").start();
    }
}
运行结果
解决办法在buy方法上加上synchronized锁让买票的人一个一个来
public synchronized void buy(){
if (tickets<=0){
flas = false;
        return;
    }
/*try {
        Thread.sleep(100);
    } catch (InterruptedException e) {
        throw new RuntimeException(e);
    }*/
    System.out.println(Thread.currentThread().getName()+"买到了第"+tickets--+"票");
}
7.1.2 银行取钱问题 synchronized 代码块锁
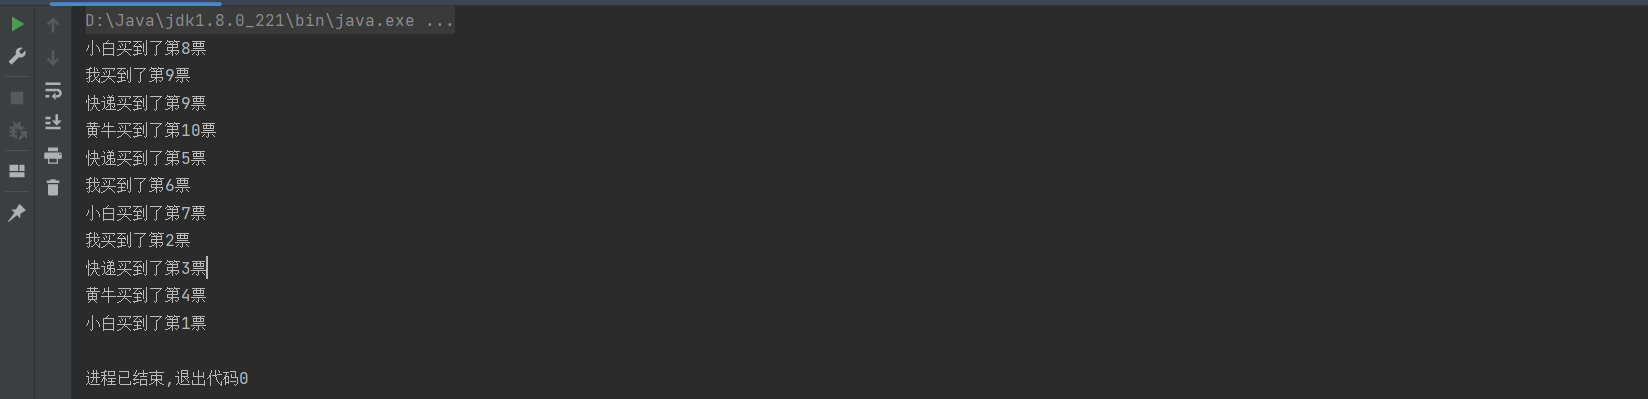
模拟一张银行账户两个人同时取钱 会导致卡内余额出现问题
不安全的代码
/ 不安全的取钱
public class Money {
    public  static void main(String[] args) {
        Account account = new Account(1000,"建设银行");
        bank bank1 = new bank(account,800,"我");
        bank bank2 = new bank(account,700,"傻逼");
        bank1.start();
        bank2.start();
    }

}


// 银行类
class bank extends Thread{
      final Account account; // 银行卡
    int getmoney; // 取走的钱

    public bank(Account account, int getmoney, String name) {
        super(name);
        this.account = account;
        this.getmoney = getmoney;
    }

    private int vacancies; // 手里的钱

    @Override
    public  void run() {

            // 判断还有没有钱
            if (account.money - getmoney<=0){
                System.out.println(this.getName()+"钱不够了");
                return;
            }
            // 取钱
            try {
                Thread.sleep(100);
            } catch (InterruptedException e) {
                throw new RuntimeException(e);
            }
            account.money = account.money - getmoney;
            vacancies = vacancies + getmoney;
            System.out.println(this.getName()+"取走了"+getmoney+"还剩下"+account.money);
            System.out.println(this.getName()+"有"+vacancies);
            System.out.println(account.money);
        }

}

// 账户类
class  Account{
    int money;
    String name;

    public Account(int money, String name) {
        this.money = money;
        this.name = name;
    }

    public int getMoney() {
        return money;
    }

    public void setMoney(int money) {
        this.money = money;
    }

    public String getName() {
        return name;
    }

    public void setName(String name) {
        this.name = name;
    }
}
运行截图
这里可以看到余额出现了问题
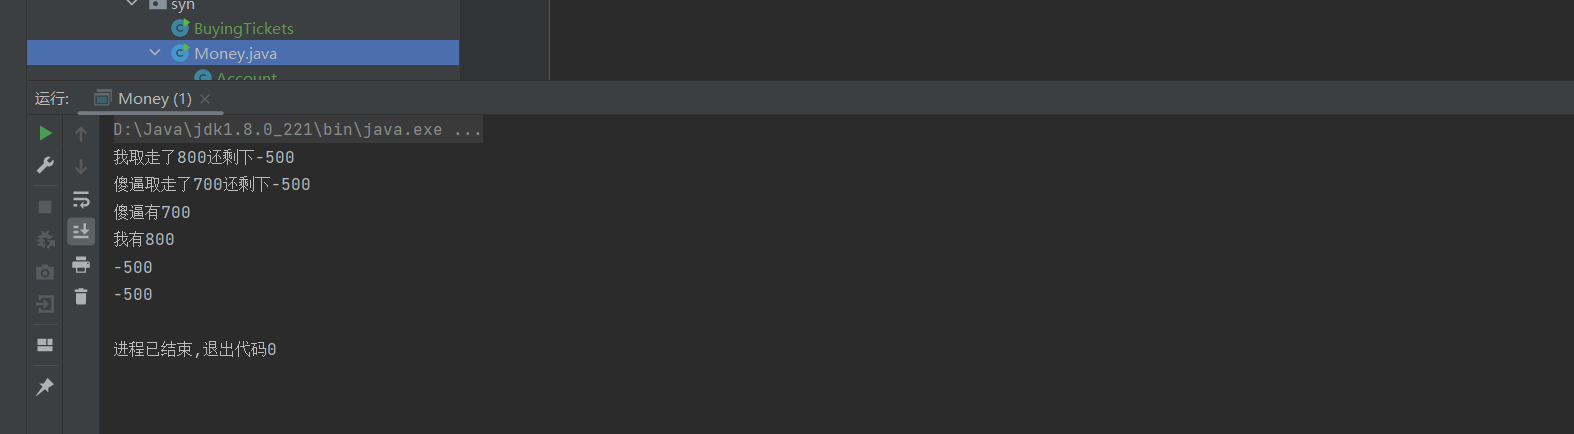
解决方法我们如果我们在run方法上加锁时我们的运行结果还是有问题的余额还是有问题
我们可以采用synchronized块的方式把银行账户这个对象锁起来
 @Override
    public  void run() {
        synchronized (account){
               // 判断还有没有钱
               if (account.money - getmoney<=0){
                   System.out.println(this.getName()+"钱不够了");
                   return;
               }
               // 取钱
               try {
                   Thread.sleep(100);
               } catch (InterruptedException e) {
                   throw new RuntimeException(e);
               }
               account.money = account.money - getmoney;
               vacancies = vacancies + getmoney;
               System.out.println(this.getName()+"取走了"+getmoney+"还剩下"+account.money);
               System.out.println(this.getName()+"有"+vacancies);
               System.out.println(account.money);
           }

        }

}
运行结果
7.1.3 list集合的线程不安全性
public class TestList {
    public static void main(String[] args) {
        List<String> list = new ArrayList<>();
        for (int i = 0; i < 10000; i++) {
            new Thread(()->{
                list.add(Thread.currentThread().getName());
            }).start();
        }
        System.out.println(list.size());
    }
}
按照代码正常执行的话list的长度应该是在10000的

解决方法使用synchronized代码块
public class TestList {
    public static void main(String[] args) throws InterruptedException {
        List<String> list = new ArrayList<>();

            for (int i = 0; i <10000; i++) {
                    new Thread(() -> {
                        synchronized (list) {
                            list.add(Thread.currentThread().getName());
                        }
                    }).start();
            }
            Thread.sleep(2000);
            System.out.println(list.size());

        }
    }
运行结果就为10000了
因为ArrayList的add方法没有给他上锁
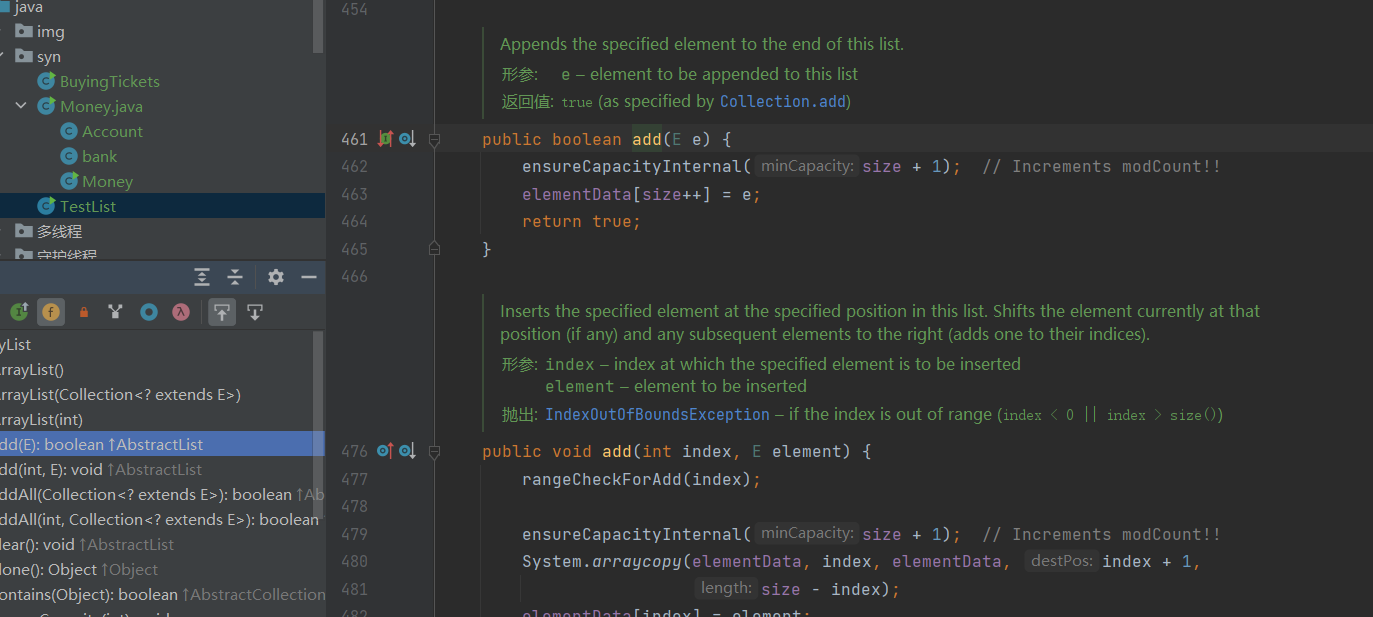
线程安全可以采用Vector集合这个类下面的方法全部采用了synchronized机制
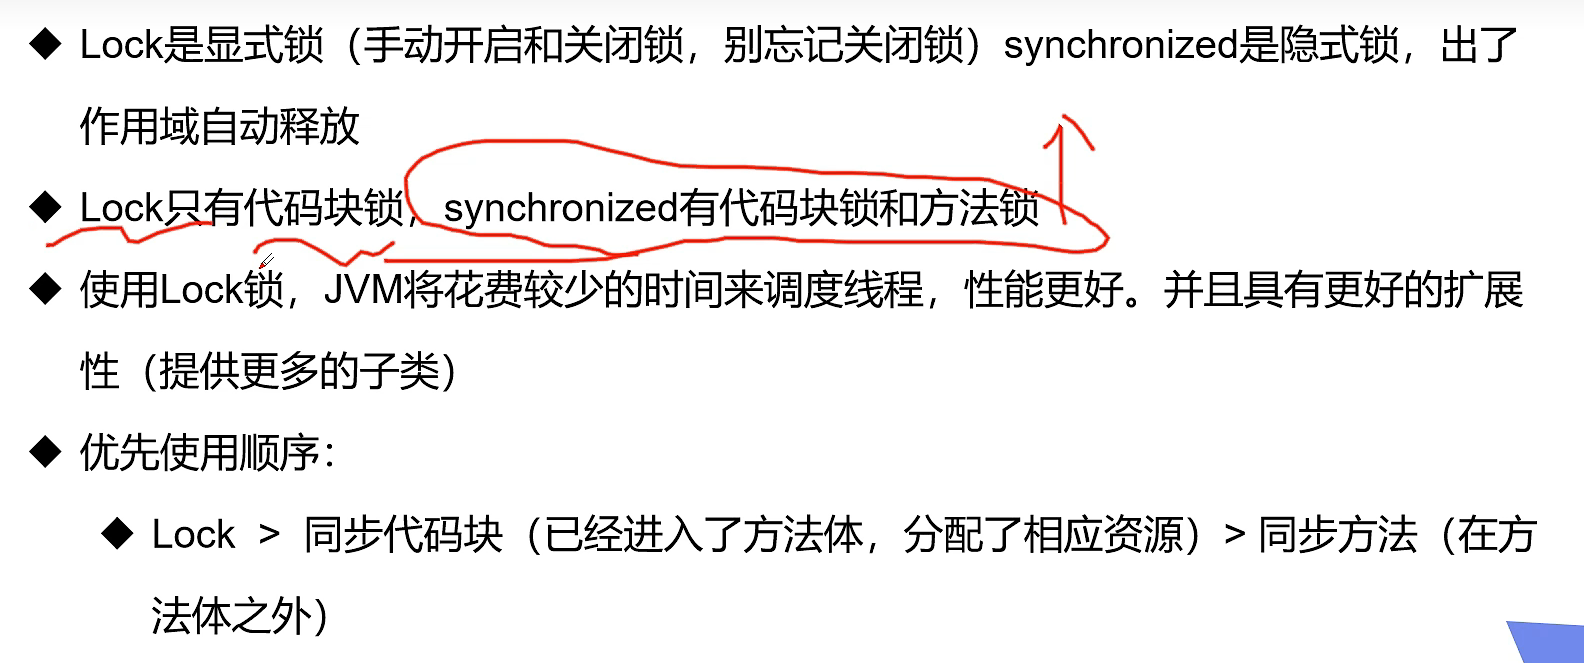
7.2 Lok锁
Lok锁是Guc包下的,他的优势在于可重复利用,可以自定义释放锁
还是买票案例
//  测试Lok锁
public class LokTest implements Runnable {

    private int piao = 20;
    private final ReentrantLock lock = new ReentrantLock();

    @Override
    public void run() {
        while (true) {
            try {
                lock.lock();
                if (piao > 0) {
                    System.out.println(Thread.currentThread().getName() + "拿到了第" + piao-- + "票");
                    try {
                        Thread.sleep(1000);
                    } catch (InterruptedException e) {
                        throw new RuntimeException(e);
                    }
                } else {
                    break;
                }
            } finally {
                lock.unlock(); // 每一个人拿了一张票就把锁给关闭了
                System.out.println("把锁关了");
            }
        }
    }

    public static void main(String[] args) {
        LokTest lokTest = new LokTest();
         new Thread(lokTest, "1111").start();
        new Thread(lokTest, "2222").start();
        new Thread(lokTest, "33333").start();
        new Thread(lokTest, "44444").start();
    }
}
Lok和synchronized的区别
8 线程通信
线程通信的分析
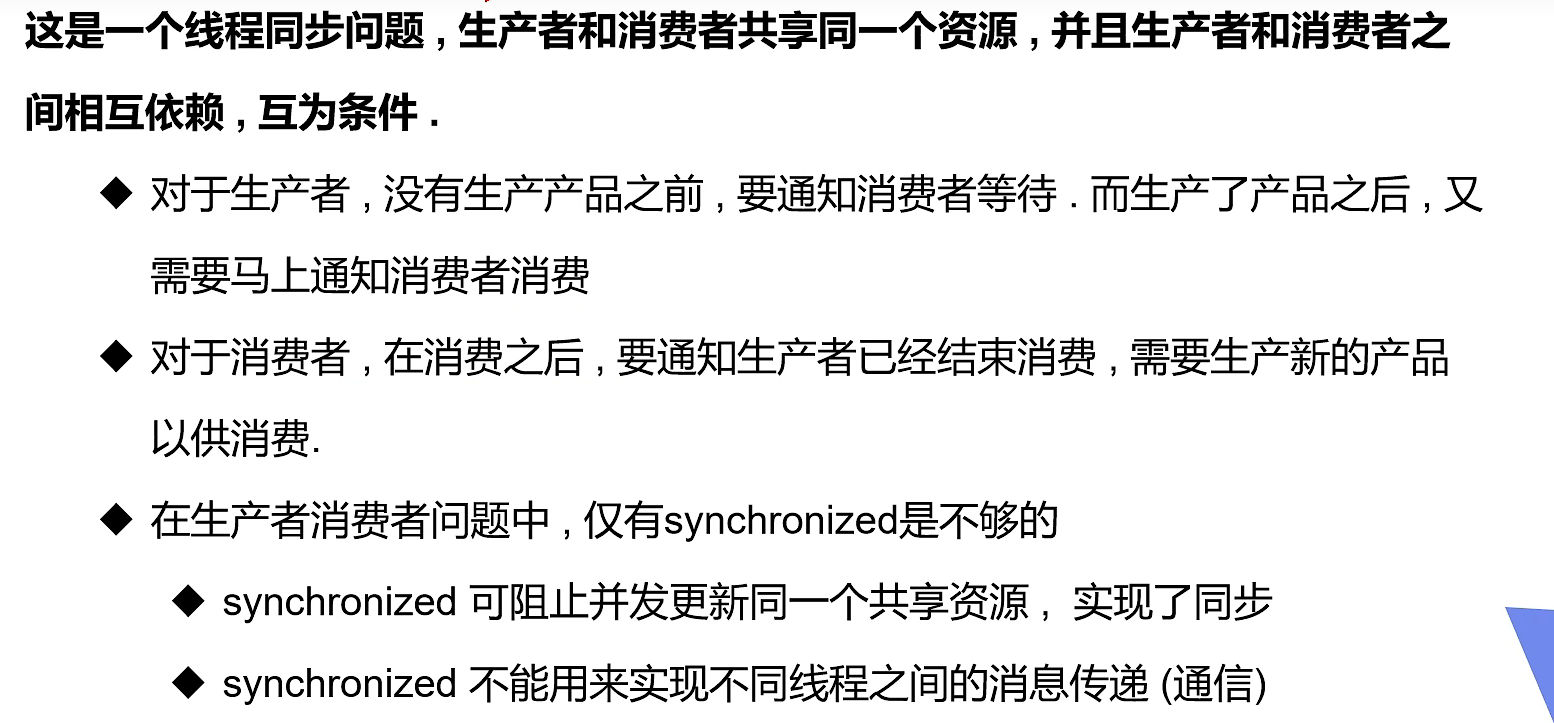
8.1 管程法
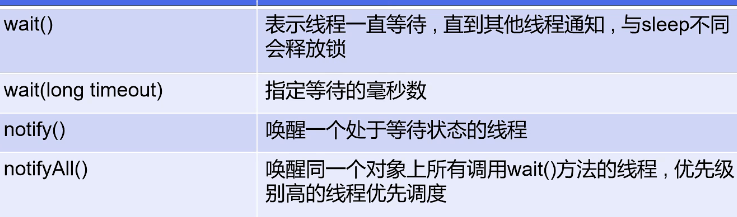
代码例子为 一个消费者 一个生产者 一个缓冲区 消费者生产了诺干个产品后通知消费者消费 消费者判断没有产品后去通知生产者去生产
// 测试管程法实现线程通信  生产者(生产产品放入缓冲区)--->(缓冲区)--->消费者(消费产品)
public class TestProgramming {
    public static void main(String[] args) {
     buffer buffer = new buffer();
     new Consumer(buffer).start();
     new Produce(buffer).start();
    }
}

class Consumer extends Thread{
    // 消费者 只管消费
    private buffer buffer;
    public Consumer(buffer buffer){
        this.buffer = buffer;
    }
    @Override
    public void run() {
        for (int i = 0; i < 100; i++) {
            product consume = buffer.consume();
            System.out.println("我消费了第"+consume.id);
        }
    }
}

class Produce extends Thread{
    // 生产者 只管生产
    private buffer buffer;
    public Produce(buffer buffer){
        this.buffer = buffer;
    }
    @Override
    public void run() {
        // 生产产品
        for (int i = 0; i < 100; i++) {
            buffer.produces(new product(i));
            System.out.println("生产了"+i+"个产品");
        }
    }
}

class buffer{
    //  定义一个容器 用来存放生产的产品
   static product[] products = new product[10];
   static int x = 0;
    // 缓冲区
    public synchronized void produces(product p){
        // 生产方法
        if (x==10){
            // 通知消费者生产
            try {
                this.wait();
            } catch (InterruptedException e) {
                throw new RuntimeException(e);
            }
        }
            // 如果没有满我们就要生产产品
            products[x] = p;
            x++;
            this.notifyAll();
    }

    public synchronized product consume(){
        if (x==0){
           // 没有产品我们要通知生产者去生产
            try {
                this.wait();
            } catch (InterruptedException e) {
                throw new RuntimeException(e);
            }
        }
        x--;
        product product = products[x];
        this.notifyAll();
        return product;
    }
}
// 餐品类
class product{
    // 消费的产品
    int id;
    public product(int id) {
        this.id = id;
    }
}
9 线程池
public class pool {
public static void main(String[] args) {
// 创建一个池子
        ExecutorService executorService = Executors.newFixedThreadPool(4);
// 把线程放入池子
        executorService.execute(new MyThread());
executorService.execute(new MyThread());
executorService.execute(new MyThread());
executorService.execute(new MyThread());
executorService.shutdown();
    }
}
class MyThread implements Runnable{

@Override
    public void run() {
System.out.println(Thread.currentThread().getName());
    }
}


 709
709


 被折叠的 条评论
为什么被折叠?
被折叠的 条评论
为什么被折叠?
 到【灌水乐园】发言


