


Centos7.4LNMP分离部署及WordPress部署
实验环境:
准备三台centos7虚拟机
| 192.168.10.101 | Nginx |
|---|---|
| 192.168.10.102 | PHP |
| 192.168.10.103 | MySQL |
1、安装Mysql (192.168.10.103)
略 (详细安装教程点击查看MySQL安装脚本)
2、安装PHP(192.168.10.102)
2.1创建nginx用户
###上传php源码包和libmcrypt-2.5.8.tar.gz依赖包
[root@c7-02 ~]# yum -y install epel-release gcc gcc-c++
[root@c7-02 ~]# groupadd -r -g 955 nginx
[root@c7-02 ~]# useradd -M -s /sbin/nologin -g 955 -u 955 nginx
[root@c7-02 ~]# id nginx
uid=955(nginx) gid=955(nginx) 组=955(nginx)   #PHP和nginx的nginx用户的uid、gid、组id一致
2.2安装php依赖包
[root@c7-02 ~]# yum -y install epel-release gcc gcc-c++
[root@c7-02 ~]# yum -y install libxml2 libxml2-devel openssl openssl-devel bzip2 bzip2-devel libcurl libcurl-devel libjpeg libjpeg-devel libpng libpng-devel freetype freetype-devel gmp gmp-devel libmcrypt libmcrypt-devel readline readline-devel libxslt libxslt-devel mhash mhash-devel
[root@c7-02 ~]# tar zxvf libmcrypt-2.5.8.tar.gz -C /usr/src/
[root@c7-02 ~]# cd /usr/src/libmcrypt-2.5.8/
[root@c7-02 ~]# ./configure && make && make install
2.3解压并安装php
[root@c7-02 ~]# cd /usr/src/
[root@c7-02 src]# tar zxvf php-5.5.38.tar.gz
[root@c7-02 src]# cd php-5.5.38/
[root@c7-02 php-5.5.38]# ./configure --prefix=/usr/local/php --with-mysql=mysqlnd --with-pdo-mysql=mysqlnd --with-mysqli=mysqlnd --with-openssl --enable-fpm --enable-sockets --enable-sysvshm --enable-mbstring --with-freetype-dir --with-jpeg-dir --with-png-dir --with-zlib --with-libxml-dir=/usr --enable-xml --with-mhash --with-mcrypt=/usr/local/libmcrypt --with-config-file-path=/etc --with-config-file-scan-dir=/etc/php.d --with-bz2 --enable-maintainer-zts && make && make install
2.4配置环境变量
[root@c7-02 php-5.5.38]# echo 'export PATH=/usr/local/php/bin:$PATH' > /etc/profile.d/php.sh
[root@c7-02 php-5.5.38]# source /etc/profile.d/php.sh
[root@c7-02 php-5.5.38]# which php
/usr/local/php/bin/php
2.5配置php-fpm
[root@c7-02 php-5.5.38]# cp php.ini-production /etc/php.ini
[root@c7-02 php-5.5.38]# cp sapi/fpm/init.d.php-fpm /etc/init.d/php-fpm
[root@c7-02 php-5.5.38]# chmod +x /etc/rc.d/init.d/php-fpm
[root@c7-02 php-5.5.38]# cd /usr/local/php/etc/
[root@c7-02 etc]# cp php-fpm.conf.default php-fpm.conf
2.6修改php-fpm配置文件
[root@c7-02 etc]# vim php-fpm.conf
user = nginx
group = nginx
listen = 192.168.10.102:9000       本机ip
pm.max_children = 50
pm.start_servers = 5
pm.min_spare_servers = 2
pm.max_spare_servers = 8
2.7启动php-fpm
[root@c7-02 etc]# service php-fpm start
Starting php-fpm  done
[root@c7-02 etc]# ss -antl
State      Recv-Q Send-Q             Local Address:Port                            Peer Address:Port
LISTEN     0      128                            *:22                                         *:*
LISTEN     0      100                    127.0.0.1:25                                         *:*
LISTEN     0      128               192.168.10.106:9000                                       *:*
LISTEN     0      128                           :::80                                        :::*
LISTEN     0      128                           :::22                                        :::*
LISTEN     0      100                          ::1:25                                        :::*
3、nginx安装与配置(192.168.10.101)
上传nginx源码包
3.1创建nginx用户
[root@c7-01 ~]# groupadd -r -g 955 nginx
[root@c7-01 ~]# useradd -M -s /sbin/nologin -g 955 -u 955 nginx
[root@c7-01 ~]# id nginx
uid=955(nginx) gid=955(nginx) 组=955(nginx)
3.2安装依赖包
[root@c7-01 ~]# yum install -y pcre pcre-devel zlib zlib-devel openssl openssl-devel
3.3配置并安装nginx
[root@c7-01 ~]# tar zxvf nginx-1.12.0.tar.gz -C /usr/src
[root@c7-01 src]# cd /usr/src/nginx-1.12.0/
[root@c7-01 nginx-1.12.2]#./configure --prefix=/usr/local/nginx --with-http_dav_module --with-http_stub_status_module --with-http_addition_module --with-http_sub_module --with-http_flv_module --with-http_mp4_module --with-http_ssl_module --with-http_gzip_static_module --user=nginx --group=nginx && make && make install
3.4创建软连接并启动nginx
[root@c7-01 nginx-1.12.2]# ln -s /usr/local/nginx/sbin/nginx /usr/local/sbin/
[root@c7-01 nginx-1.12.2]# nginx -t
nginx: the configuration file /usr/local/nginx/conf/nginx.conf syntax is ok
nginx: configuration file /usr/local/nginx/conf/nginx.conf test is successful
[root@c7-01 nginx-1.12.2]# nginx
[root@c7-01 nginx-1.12.2]# netstat -anput | grep nginx
tcp        0      0 0.0.0.0:80              0.0.0.0:*               LISTEN      27185/nginx: master
4、配置nginx支持PHP环境(192.168.10.101)
4.1配置nginx配置文件支持php
[root@c7-01 ~]#vim /usr/local/nginx/conf/nginx.conf


location / {
            root   /www;  更改网页目录
            index  index.php index.html index.htm;  添加index.php
        }
location ~ \.php$ {
            root           /www;    更改目录
            fastcgi_pass   192.168.10.102:9000;  ###在这里添加PHP主机IP地址
            fastcgi_index  index.php;
            fastcgi_param  SCRIPT_FILENAME  /scripts$fastcgi_script_name;
            include        fastcgi_params;
        }
[root@c7-01 ~]# vim /usr/local/nginx/conf/fastcgi_params


添加
fastcgi_param  SCRIPT_FILENAME    $document_root$fastcgi_script_name;
4.2创建/www目录并创建测试页
[root@c7-01 ~]# mkdir /www
[root@c7-01 ~]# chown nginx:nginx /www/
[root@c7-01 ~]# cd /www/
[root@c7-01 www]# vim index.php
<?php
phpinfo();
?>
4.3在php上同样创建/www(192.168.10.102)
[root@c7-02 ~]# mkdir /www
[root@c7-02 ~]# chown -R nginx:nginx /www/
[root@c7-02 ~]# cd /www/
[root@c7-02 www]# vim index.php
[root@c7-02 www]# cat index.php
<?php
phpinfo();
?>
4.4重启nginx和php
[root@c7-01 www]# nginx -s reload
[root@c7-02 www]# service php-fpm restart
4.5访问nginx测试
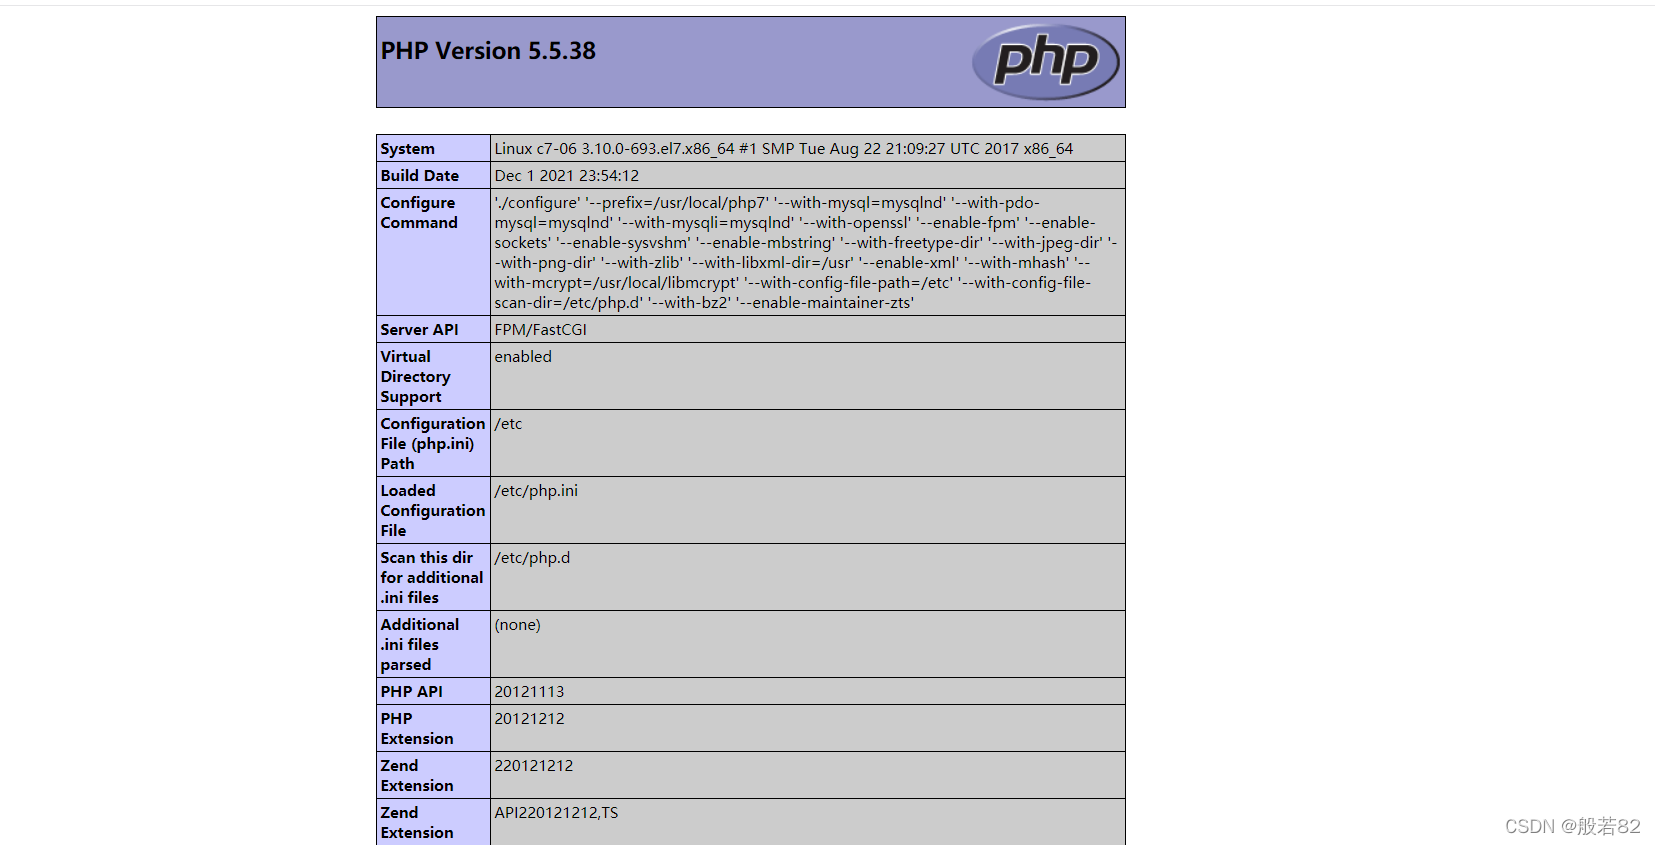
5、部署wordpress个人站点
5.1mysql创建库并授权(192.168.10.103)
mysql> create database wordpress;
Query OK, 1 row affected (0.00 sec)
mysql> grant all on wordpress.* to root@'%' identified by '123.com';
Query OK, 0 rows affected, 1 warning (0.00 sec)
5.2解压并部署wordpress
上传wordpress软件包(192.168.10.101)
[root@c7-01 ~]# unzip  wordpress-4.2.2-zh_CN.zip
[root@c7-01 ~]# mv wordpress/* /www/
php同上(192.168.10.102)
[root@c7-02 ~]# unzip  wordpress-4.2.2-zh_CN.zip
[root@c7-02 ~]# mv wordpress/* /www/
5.3访问测试
http://192.168.10.101/wp-admin/setup-config.php

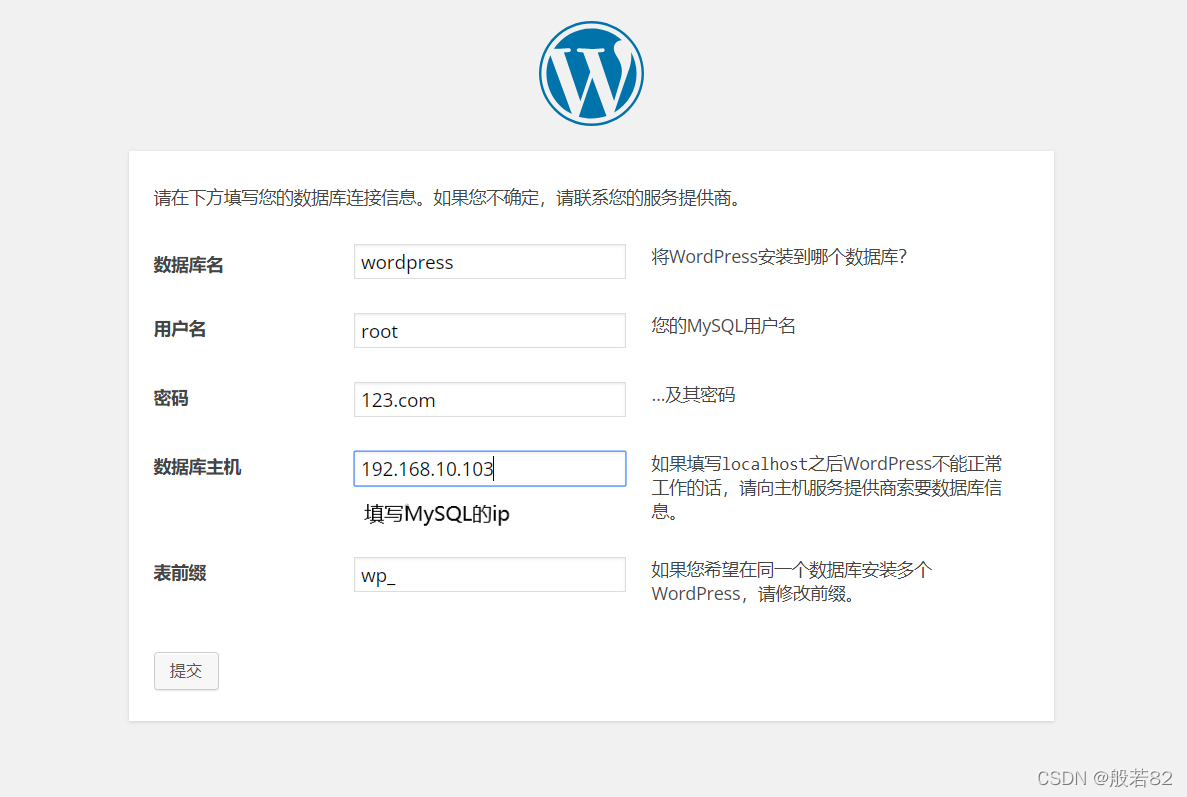
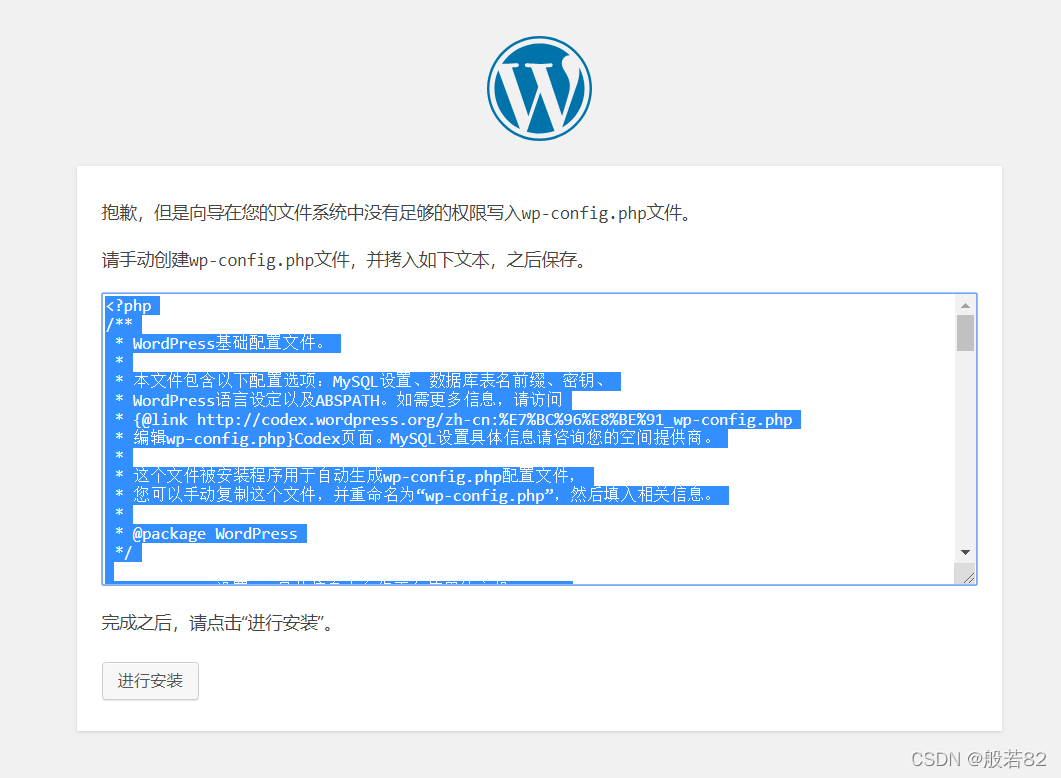
出现这种情况时需要在nginx上和php上进行以下操作
[root@C7-01 ~]# cd /www
[root@C7-01 www]# vim wp-config.php
<?php
/**
 * WordPress基础配置文件。
 *
 * 本文件包含以下配置选项:MySQL设置、数据库表名前缀、密钥、
 * WordPress语言设定以及ABSPATH。如需更多信息,请访问
 * {@link http://codex.wordpress.org/zh-cn:%E7%BC%96%E8%BE%91_wp-config.php
 * 编辑wp-config.php}Codex页面。MySQL设置具体信息请咨询您的空间提供商。
 *
 * 这个文件被安装程序用于自动生成wp-config.php配置文件,
 * 您可以手动复制这个文件,并重命名为“wp-config.php”,然后填入相关信息。
 *
 * @package WordPress
 */

// ** MySQL 设置 - 具体信息来自您正在使用的主机 ** //
/** WordPress数据库的名称 */
define('DB_NAME', 'wordpress');

/** MySQL数据库用户名 */
define('DB_USER', 'root');

/** MySQL数据库密码 */
define('DB_PASSWORD', '123.com');

/** MySQL主机 */
define('DB_HOST', '192.168.10.107');

/** 创建数据表时默认的文字编码 */
define('DB_CHARSET', 'utf8mb4');

/** 数据库整理类型。如不确定请勿更改 */
define('DB_COLLATE', '');

/**#@+
 * 身份认证密钥与盐。
 *
 * 修改为任意独一无二的字串!
 * 或者直接访问{@link https://api.wordpress.org/secret-key/1.1/salt/
 * WordPress.org密钥生成服务}
 * 任何修改都会导致所有cookies失效,所有用户将必须重新登录。
 *
 * @since 2.6.0
 */
define('AUTH_KEY',         '*|46Cct3~K5 uc`j_)PqAho;$|c*#!(?,yde`/ XYhmqgX]AjvNT|!+uHXi%NnH7');
define('SECURE_AUTH_KEY',  '|7NA~j<g@^tGMbJ&_%c([tnzs.j^d:(J,HP`beW:i&6yA1[LcqZOO|stmGj0Uq5l');
define('LOGGED_IN_KEY',    'cnF|dw5|UpgzMs-cDR8:$n1+7_Z-PEd)Al1/l?<wr>se;:JX=FTCpR>E&2/u9o9V');
define('NONCE_KEY',        '|Gm>urhh!QPXj$^rKOc9=|NX9HFYTAlw3Kws*N^jbX+;T$z!9UmCR{q,)euJCzKV');
define('AUTH_SALT',        'G};UV:P0<4=RnY7o:bo0/=l!],R+~{JNYg1>d[465U9-&},2cP+m^}{sRz8aoqNY');
define('SECURE_AUTH_SALT', 'n^mE_E<OhI&_A(/?abA<>7Y~4?cn0dFH%z2IOJSQ{808gwPEgpx#4MSTUr^!9f(&');
define('LOGGED_IN_SALT',   'u*CdngB[7le})wz@2kKfrw.3+4Z]1maJlMH}7^2KFc.lCNOdRCm$<>sBT<q|OGl0');
define('NONCE_SALT',       '<L9eo4by7[f26jG*[<X ZMW/S{Q=^%)pTP%#JCmB7SSs@wwhO&]{Ee]M]*[ry D#');

/**#@-*/

/**
 * WordPress数据表前缀。
 *
 * 如果您有在同一数据库内安装多个WordPress的需求,请为每个WordPress设置
 * 不同的数据表前缀。前缀名只能为数字、字母加下划线。
 */
$table_prefix  = 'wp_';

/**
 * 开发者专用:WordPress调试模式。
 *
 * 将这个值改为true,WordPress将显示所有用于开发的提示。
 * 强烈建议插件开发者在开发环境中启用WP_DEBUG。
 */
define('WP_DEBUG', false);

/**
 * zh_CN本地化设置:启用ICP备案号显示
 *
 * 可在设置→常规中修改。
 * 如需禁用,请移除或注释掉本行。
 */
define('WP_ZH_CN_ICP_NUM', true);

/* 好了!请不要再继续编辑。请保存本文件。使用愉快! */

/** WordPress目录的绝对路径。 */
if ( !defined('ABSPATH') )
	define('ABSPATH', dirname(__FILE__) . '/');

/** 设置WordPress变量和包含文件。 */
require_once(ABSPATH . 'wp-settings.php');
?>
php也做同样的操作
完成后点击进行安装
由于我已近安装过了,这里就不再进行演示了,接下来只需要根据提示进行填写即可
到这里LNMP分离部署及WordPress部署就做完了


 1727
1727


 被折叠的 条评论
为什么被折叠?
被折叠的 条评论
为什么被折叠?
 到【灌水乐园】发言


