


鸿蒙HarmonyOS开发往期必看:
最新版!“非常详细的” 鸿蒙HarmonyOS Next应用开发学习路线!(从零基础入门到精通)
介绍
本示例介绍使用Swiper实现自定义日历月视图和周视图左右滑动切换月或周的效果。同时使用分段按钮和Tabs实现月视图和周视图的切换效果。
效果图预览

使用说明
-
进入页面,在月视图上手指往右滑动,可切换到上个月,往左滑动可切换到下个月。
-
在月视图上点击非当日日期,日期上显示绿色边框选中效果。选中当日日期,当日日期显示为红底白字。
-
月视图上点击非当月的日期,可切换到对应月,同时日期显示选中效果。
-
点击“周”按钮,可从月视图切换到周视图,周视图展示的周信息根据月视图之前选中的日期进行跳转。
-
周视图左右滑动可切换下一周和上一周。
-
周视图上选中日期后,点击“月”按钮,可从周视图切换到月视图,月视图展示的月份信息根据周视图之前选中的日期进行月份跳转。
-
周视图切换时,默认根据周视图中第一天的年月信息刷新页面顶部的“xxxx年x月”数据。手动点击周视图日期时,则根据选中的年月信息刷新数据。
实现思路
- 自定义日历组件CustomCalendar。这里参考日历三方库@xsqd/calendar的部分源码使用两个ForEach循环实现日历的月视图和周视图的日期布局效果。通过CalendarStateType条件渲染对应的月视图或周视图。源码参考CustomCalendar.ets。
if (this.calendarState === CalendarStateType.MONTH) {
  // 月视图
  ForEach(this.monthDays, (items: Day[], index: number) => {
    Row() {
      ForEach(items, (item: Day) => {
        this.monthDayBuilder(item, index + 1)
      }, (item: Day, index: number) => {
        return item.dayNum + "" + index
      })
    }
    .width($r('app.string.calendar_switch_full_size'))
    .justifyContent(FlexAlign.SpaceBetween)
  }, (item: Day[], index: number) => {
    return item.reduce((item1, item2) => {
      return item1 + item2.dayInfo.year + item2.dayInfo.month + item2.dayInfo.date
    }, '') + index
  })
} else if (this.calendarState === CalendarStateType.WEEK) {
  // 周视图
  ForEach(this.weekDays, (items: Day[], index: number) => {
    Row() {
      ForEach(items, (item: Day) => {
        this.weekDayBuilder(item)
      }, (item: Day, index: number) => {
        return item.dayNum + "" + index;
      })
    }
    .width($r('app.string.calendar_switch_full_size'))
    .justifyContent(FlexAlign.SpaceBetween)
  }, (item: Day[], index: number) => {
    return item.reduce((item1, item2) => {
      return item1 + item2.dayInfo.year + item2.dayInfo.month + item2.dayInfo.date
    }, '') + index
  })
}
- 为了实现月视图和周视图的左右切换月或周的效果,通过在Swiper里分别使用三个自定义日历组件CustomCalendar实现。以月视图为例,Swiper中索引0,1,2分别对应上个月,本月,下个月份的数据,通过yearMonthInfo进行指定。周视图类似,通过weekNum指定上一周,本周,下一周的数据。源码参考CalendarSwitch.ets。
Swiper() {
  CustomCalendar({
    currentSelectDay: this.currentSelectDay, // 必选项。选中的日期(年月日)
    yearMonthInfo: this.lastYearMonth, // 必选项。设置日历年月信息
    weekNum: this.weekNumDefault, // 必选项。仅用于周视图,weekNum需要使用@Link。月视图没有实际作用。
    onCalendarClick: (item: CalendarData) => {
      // 可选项。日期点击监听
      hilog.info(0x0000, TAG, `day: ${JSON.stringify(item)}`);
    },
    CalendarStyle: {
      textScaling: TEXT_SCALE, // 可选项。公历,农历文字缩放比例
    },
    ColorType: {
      backgroundColor: Color.Transparent, // 可选项。日历背景色
      monthDayColor: Color.Black, // 可选项。本月公历日期颜色
      noMonthDayColor: Color.Gray, // 可选项。非本月公历日期颜色
      lunarColor: Color.Gray // 可选项。农历的文字颜色
    }
  })

  CustomCalendar({
    currentSelectDay: this.currentSelectDay,
    yearMonthInfo: this.currentYearMonth,
    weekNum: this.weekNumDefault,
    onCalendarClick: (item: CalendarData) => {
      hilog.info(0x0000, TAG, `day: ${JSON.stringify(item)}`);
    },
    CalendarStyle: {
      textScaling: TEXT_SCALE,
    },
    ColorType: {
      backgroundColor: Color.Transparent,
      monthDayColor: Color.Black,
      noMonthDayColor: Color.Gray,
      lunarColor: Color.Gray
    }
  })

  CustomCalendar({
    currentSelectDay: this.currentSelectDay,
    yearMonthInfo: this.nextYearMonth,
    weekNum: this.weekNumDefault,
    onCalendarClick: (item: CalendarData) => {
      hilog.info(0x0000, TAG, `day: ${JSON.stringify(item)}`);
    },
    CalendarStyle: {
      textScaling: TEXT_SCALE,
    },
    ColorType: {
      backgroundColor: Color.Transparent,
      monthDayColor: Color.Black,
      noMonthDayColor: Color.Gray,
      lunarColor: Color.Gray
    }
  })
}
- 月视图和周视图都是根据Swiper的onChange事件(当前显示的子组件索引变化)进行月份或周的切换。以月视图为例,通过oldMonthViewIndex存储上一次的Swiper索引值,然后跟本次切换的索引进行比较,来识别月份是左滑还是右滑。然后根据当前切换后的索引值去刷新所需的月份。例如,假设swiper索引0(7月),swiper索引1(8月),swiper索引2(9月),当前Swiper显示的索引为1。当Swiper右滑从索引1(8月)切换到索引0(7月)时,需要把Swiper里索引2(9月)的月份更新为6月的数据。周视图的onChange也是类似处理逻辑,这里不再赘述。源码参考CalendarSwitch.ets。
.onChange((index: number) => {
  if (this.oldMonthViewIndex === index) {
    return;
  }
  // 判断是否右滑切换月份
  const IS_RIGHT_SLIDE: boolean =
    (this.oldMonthViewIndex === 1 && index === 0) || (this.oldMonthViewIndex === 0 && index === 2) ||
      (this.oldMonthViewIndex === 2 && index === 1);
  this.oldMonthViewIndex = index;
  // 右滑切换月份
  if (IS_RIGHT_SLIDE) {
    if (index === 0) {
      // swiper索引右滑到0时,修改swiper索引2的月份为当前月份(索引0)的上一个月。比如,假设swiper索引0(7月),swiper索引1(8月),swiper索引2(9月)。当左滑切换到索引0(7月)时,需要把索引2(9月)的月份改成6月。
      this.setMonthViewLeftSlide();
      // 修改swiper索引2的月份为当前月份(索引0)的上一个月
      this.nextYearMonth.year = this.getLastYear();
      this.nextYearMonth.month = this.getLastMonth();
    } else if (index === 1) {
      // swiper索引右滑到1时,修改swiper索引0的月份为当前月份(索引1)的上一个月。
      this.setMonthViewLeftSlide();
      this.lastYearMonth.year = this.getLastYear();
      this.lastYearMonth.month = this.getLastMonth();
    } else if (index === 2) {
      // swiper索引右滑到2时,修改swiper索引1的月份为当前月份(索引2)的上一个月。
      this.setMonthViewLeftSlide();
      this.currentYearMonth.year = this.getLastYear();
      this.currentYearMonth.month = this.getLastMonth();
    }
  } else {
    // 左滑切换月份
    if (index === 0) {
      // swiper索引左滑到0时,修改swiper索引1的月份为当前月份(索引0)的下一个月。
      this.setMonthViewRightSlide();
      this.currentYearMonth.year = this.getNextYear();
      this.currentYearMonth.month = this.getNextMonth();
    } else if (index === 1) {
      // swiper索引左滑到1时,修改swiper索引2的月份为当前月份(索引1)的下一个月。
      this.setMonthViewRightSlide();
      this.nextYearMonth.year = this.getNextYear();
      this.nextYearMonth.month = this.getNextMonth();
    } else if (index === 2) {
      // swiper索引左滑到2时,修改swiper索引0的月份为当前月份(索引2)的下一个月。
      this.setMonthViewRightSlide();
      this.lastYearMonth.year = this.getNextYear();
      this.lastYearMonth.month = this.getNextMonth();
    }
  }
})
- 月视图和周视图之间的切换通过changeIndex控制Tabs切换到指定月视图或周视图的页签。从周视图切换到月视图时,月视图需要刷新的月份数据根据目前选中的日期currentSelectDay中的年月信息设置CustomCalendar的yearMonthInfo,然后通过触发yearMonthInfo的updateMonthViewData监听进行月份数据刷新(getMonthViewData)。从月视图切换到周视图时,周视图需要刷新的周数据,也是根据目前选中的日期currentSelectDay中的年月日信息。通过计算选中日期到今天相差几周,来计算需要传入CustomCalendar的weekNum,触发updateWeekData监听,进行周数据刷新(getWeekViewData)。源码参考CalendarSwitch.ets。
if (this.tabSelectedIndexes[0] === 0) {
  // 切到月视图
  this.tabController.changeIndex(0);
  // 月视图swiper索引重置为1
  this.swiperMonthIndex = 1;
  this.oldMonthViewIndex = 1;
  // 刷新年月数据
  this.currentShowYear = this.currentSelectDay.year;
  this.currentShowMonth = this.currentSelectDay.month;
  this.currentYearMonth.year = this.currentSelectDay.year;
  // month设置-1是为了在周视图选择过日期后,切换回月视图时触发月视图的刷新
  this.currentYearMonth.month = -1;
  this.currentYearMonth.month = this.currentSelectDay.month;
  this.lastYearMonth.year =
    (this.currentYearMonth.month - 1 < 1) ? this.currentYearMonth.year - 1 : this.currentYearMonth.year;
  this.lastYearMonth.month = (this.currentYearMonth.month - 1 < 1) ? 12 : this.currentYearMonth.month - 1;
  this.nextYearMonth.year =
    (this.currentYearMonth.month + 1 > 12) ? this.currentYearMonth.year + 1 : this.currentYearMonth.year;
  this.nextYearMonth.month = (this.currentYearMonth.month + 1 > 12) ? 1 : this.currentYearMonth.month + 1;
} else if (this.tabSelectedIndexes[0] === 1) {
  // 切到周视图
  this.tabController.changeIndex(1);
  // 周视图swiper索引重置为1
  this.swiperWeekIndex = 1;
  const SELECT_DAY =
    new Date(this.currentSelectDay.year, this.currentSelectDay.month - 1, this.currentSelectDay.date);
  // 计算目前选中的日期selectDay距离今天相差的周数
  const WEEKS_BETWEEN = this.weeksBetweenDates(SELECT_DAY);
  this.weekNumOne = WEEKS_BETWEEN - 1; // 设置上一周
  this.weekNumTwo = WEEKS_BETWEEN; // 设置本周
  this.weekNumThree = WEEKS_BETWEEN + 1; // 设置下一周
}
高性能知识点
本示例中月视图左右滑动切换日历月份时,只更新一个月数据。周视图每次切换周时,只更新一周的数据,以优化日历左右切换时的性能。
以下是使用DevEco Studio内置的Profiler中的帧率分析工具Frame抓取本案例性能的相关数据(性能耗时数据因设备版本而异,以实测为准):
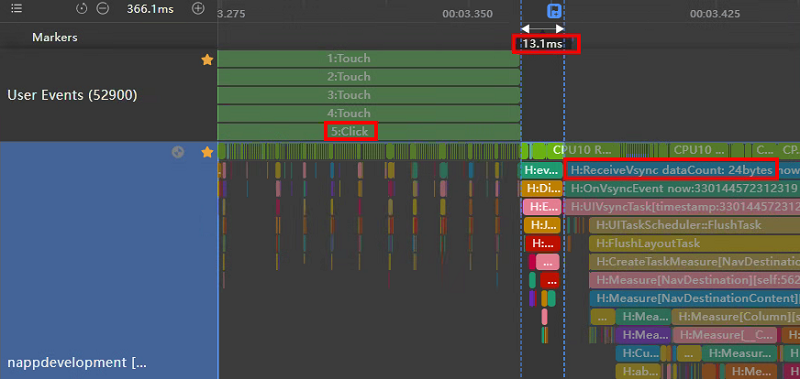
- 响应时延。在cases工程案例列表中找到本案例模块,使用Frame抓取从点击案例模块到跳转进入案例页面绘制第一帧的耗时。如下图所示,可以看出点击响应时延为13.1ms。
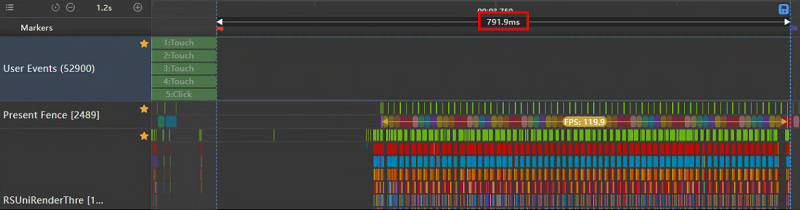
- 完成时延。在cases工程案例列表中找到本案例模块,使用Frame抓取从点击案例模块到跳转案例页面的转场动画结束的耗时,如下图所示,可以看出完成时延为791.9ms。
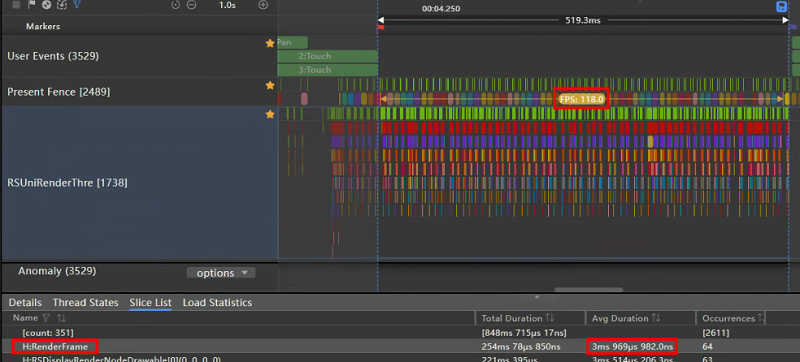
- 月视图左右滑动切换月份的帧率,如下图所示,可以看出月视图左右滑动切换月份的帧率为118.0fps。通过RenderFrame(执行GPU绘制)标签可以看出,滑动切换月份过程的平均渲染耗时为3.969ms。
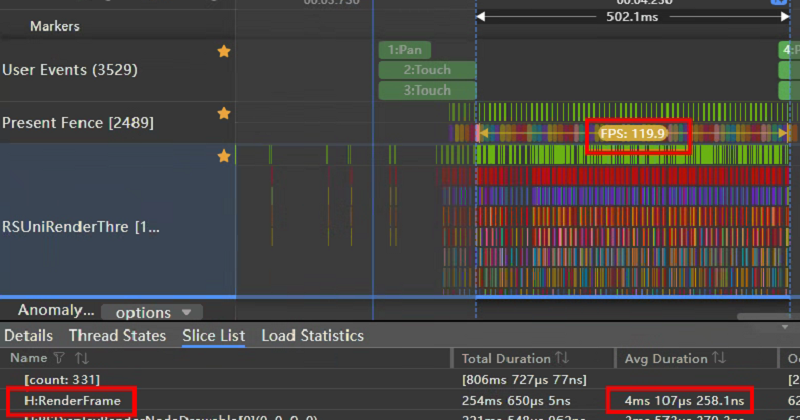
- 周视图左右滑动切换周的帧率,如下图所示,可以看出周视图左右滑动切换周的帧率为119.9fps。通过RenderFrame(执行GPU绘制)标签可以看出,滑动切换周过程的平均渲染耗时为4.107ms。
工程结构&模块类型
calendarswitch                               // har类型
|---constant
|   |---Constants.ets                        // 常量定义
|---model
|   |---CalendarModel.ets                    // 日历配置
|---utils
|   |---TimeUtils.ets                        // 日历工具类
|---view
|   |---CalendarSwitch.ets                   // 日历切换页面
|   |---CustomCalendar.ets                   // 自定义日历组件
最后
小编在之前的鸿蒙系统扫盲中,有很多朋友给我留言,不同的角度的问了一些问题,我明显感觉到一点,那就是许多人参与鸿蒙开发,但是又不知道从哪里下手,因为体系杂乱无章,教授的人也多,无从选择。有很多小伙伴不知道学习哪些鸿蒙开发技术?不知道需要重点掌握哪些鸿蒙应用开发知识点?而且学习时频繁踩坑,最终浪费大量时间。所以有一份实用的鸿蒙(HarmonyOS NEXT)路线、视频、文档用来跟着学习是非常有必要的。
如果你是一名有经验的资深Android移动开发、Java开发、前端开发、对鸿蒙感兴趣以及转行人员
鸿蒙 NEXT 全栈开发学习笔记 希望这一份鸿蒙学习文档能够给大家带来帮助~
鸿蒙(HarmonyOS NEXT)最新学习路线

该路线图包含基础技能、就业必备技能、多媒体技术、六大电商APP、进阶高级技能、实战就业级设备开发,不仅补充了华为官网未涉及的解决方案
路线图适合人群:
IT开发人员:想要拓展职业边界
零基础小白:鸿蒙爱好者,希望从0到1学习,增加一项技能。
技术提升/进阶跳槽:发展瓶颈期,提升职场竞争力,快速掌握鸿蒙技术
2.视频教程+学习PDF文档
(鸿蒙语法ArkTS、TypeScript、ArkUI教程……)

纯血版鸿蒙全套学习文档(面试、文档、全套视频等)
总结
参与鸿蒙开发,你要先认清适合你的方向,如果是想从事鸿蒙应用开发方向的话,可以参考本文的学习路径,简单来说就是:为了确保高效学习,建议规划清晰的学习路线


 4418
4418

 被折叠的 条评论
为什么被折叠?
被折叠的 条评论
为什么被折叠?
 到【灌水乐园】发言


