


完整代码:https://download.csdn.net/download/weixin_55771290/87428654
实验目的
使用 TensorFlow Object Detection API 进行实时目标检测(基于 SSD 模型)
任务列表:
行人识别
人脸识别
交通灯识别
实时检测(平均 FPS>15)
使用 tflite 将模型移植到嵌入式设备
目录结构
为了先对工程有个整体性的了解,故将此项目的目录结构列出如下:
Object-Detection-USTC
├── object_detection
│ ├── data # 存放数据
│ │ ├── mscoco_label_map.pbtxt # 预训练模型(coco数据集)的Label Maps
│ │ ├── pascal_label_map.pbtxt # 数据集2的Label Maps
│ │ ├── pascal_train.record # 数据集2生成的tfrecord格式的训练集
│ │ ├── pascal_val.record # 数据集2生成的tfrecord格式的验证集
│ │ ├── PennFudanPed # 数据集1(Penn-Fudan Database)
│ │ ├── PennFudanPed_label_map.pbtxt # 数据集1的Label Maps
│ │ ├── PennFudanPed_train.record # 数据集1生成的tfrecord格式的训练集
│ │ ├── PennFudanPed_val.record # 数据集1生成的tfrecord格式的验证集
│ │ └── VOC2007 # 数据集2
│ ├── dataset_tools # 数据集格式转换工具
│ │ ├── create_pascal_tf_record.py # 用于将本实验中的数据集2转换成tfrecord格式的脚本
│ │ └── ...# 用于将其他数据集转换成tfrecord格式的脚本文件
│ ├── legacy
│ │ ├── train.py # 用于训练我们自己的模型
│ │ └── ...
│ ├── ssd_mobilenet # 模型相关
│ │ ├── faster_rcnn_inception_v2_coco_2018_01_28 # 预训练模型1
│ │ ├── ssd_mobilenet_v1_coco_11_06_2017 # 预训练模型2
│ │ ├── ssd_mobilenet_v1_coco_2018_01_28 # 预训练模型3
│ │ ├── ssd_mobilenet_v2_coco_2018_03_29 # 预训练模型4(最终选用)
│ │ ├── output_inference_graph # 导出的我们自己训练的模型
│ │ ├── pipeline_ssd_mobilenet_v2_coco_2018_03_29.config # 管道配置文件
│ │ └── train_logs # 训练过程中产生的记录
│ │     ├── graph.pbtxt
│ │     ├── model.ckpt-1000.data-00000-of-00001
│ │     ├── model.ckpt-1000.index
│ │     ├── model.ckpt-1000.meta
│ │     └── ...
│ ├── export_inference_graph.py # 用于导出我们自己训练的模型的py脚本
│ ├── export_tflite_ssd_graph.py # 用于导出tflite压缩图的py脚本
│ └── ... # 其他文件略去
├── object_detection_video.py # 用于实时视频检测
├── utils # 实时视频检测时用到的两个库文件
│ ├── app_utils.py
│ └── test_app_utils.py
├── slim # 环境依赖
├── tflite # tflite产生的文件
│ ├── tflite_graph.pb
│ └── tflite_graph.pbtxt
├── create_pascal_tfrecord.sh # 用于将数据集2转换成tfrecord格式的shell脚本
├── train.sh # 用于执行训练命令的shell脚本
├── export_model.sh # 用于导出我们自己训练的模型的shell脚本
├── create_PennFudanPed_tfrecord.py # 将数据集1转换成tfrecord格式的py脚本
├── export_tflite_ssd_graph.sh # 用于导出tflite压缩图的shell脚本
└── video # 测试视频
    └── 2.mp4
实验环境安装
下载 Tensorflow 对象检测 API
Tensorflow/models 的 GitHub 地址:https://github.com/tensorflow/models
对象检测 API 的目录:tensorflow/models/research/object_detection
通过以下命令将其克隆到本地工作目录
git clone https://github.com/tensorflow/models.git安装依赖库
本次实验使用的是 TensorFlow Object Detection API,根据官方文档介绍,需要安装以下库:
Protobuf 3.0.0
Python-tk
Pillow 1.0
lxml
tf Slim (which is included in the “tensorflow/models/research/“ checkout)
Jupyter notebook
Matplotlib
Tensorflow (>=1.9.0)
Cython
contextlib2
cocoapi
其中,关于 Tensorflow 的详细安装步骤,可以按照 Tensorflow 官方安装说明进行操作。一般安装好 python 之后可以使用以下命令之一安装 Tensorflow:
# CPU版本
pip install tensorflow
# GPU版本
pip install tensorflow-gpu
安装 GPU 版本的 tensorflow 可以参考 这篇文章
其余的库可以通过 apt-get 安装在 Ubuntu 16.04 上:
sudo apt-get install protobuf-compiler python-pil python-lxml python-tk
pip install --user Cython
pip install --user contextlib2
pip install --user jupyter
pip install --user matplotlib
pip 默认将 Python 包安装到系统目录(例如 /usr/local/lib/python3.6),这需要 root 访问权限。
--user 选项的意思是:在你的主目录中创建 pip 安装包,而不需要任何特殊权限。
或者,你也可以使用 pip 安装依赖项:
pip install --user Cython
pip install --user contextlib2
pip install --user pillow
pip install --user lxml
pip install --user jupyter
pip install --user matplotlib
Protobuf 编译
Tensorflow 对象检测 API 使用 Protobufs 配置模型和训练参数。在使用框架之前,必须编译 Protobuf 库,可以通过在目录 tensorflow/models/research/ 运行以下命令来完成:
# From tensorflow/models/research/
protoc object_detection/protos/*.proto --python_out=.
如果在编译时遇到错误,则可能使用的是不兼容的 Protobuf 编译器。如果是这种情况,可以使用手动安装来解决。
手动 Protobuf 编译器安装和使用
如果你使用的是 Linux:
下载并安装 protoc 的 3.0 版本,然后解压缩该文件。在目录 tensorflow/models/research/ 运行以下命令:
# From tensorflow/models/research/
wget -O protobuf.zip https://github.com/google/protobuf/releases/download/v3.0.0/protoc-3.0.0-linux-x86_64.zip
unzip protobuf.zip
再次运行编译过程,但使用刚才我们自己下载的 protoc 版本,在目录 tensorflow/models/research/ 运行以下命令:
# From tensorflow/models/research/
./bin/protoc object_detection/protos/*.proto --python_out=.
MacOS 可以参考 这个链接
将库添加到 PYTHONPATH
在本地运行时,tensorflow/models/research/ 和 tensorflow/models/research/slim 目录需要添加到 PYTHONPATH,可以通过在目录 tensorflow/models/research/ 运行以下命令来完成:
# From tensorflow/models/research/
export PYTHONPATH=$PYTHONPATH:`pwd`:`pwd`/slim
每次运行新终端时,都要重新输入此命令,如果希望避免繁琐的操作,可以将其作为新行追加到 ~/ .bashrc 文件的末尾,将“pwd”替换此项目目录的绝对路径。
测试安装
到现在所有的环境配置就完成了,可以通过运行以下命令来测试是否已正确安装 Tensorflow Object Detection API:
python object_detection/builders/model_builder_test.py如果出现下面的结果就表示安装成功:
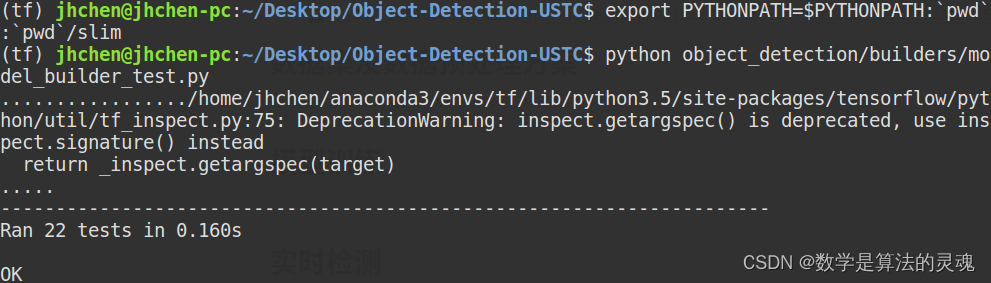
建立自己的工作空间
因为 tensorflow/models/* 里面有太多其他的模块了,我们这次实验只需要用到其中的 tensorflow/models/research/object_detection,所以在环境搭建好之后我们建立一个自己的项目文件夹,让整个工程更简洁。
首先新建文件夹 Object-Detection-USTC,然后将刚才目录 tensorflow/models/research/ 中的 object_detection 文件夹和 slim 文件夹分别复制一份到 Object-Detection-USTC 文件夹中。
此时的工程目录结如下:
Object-Detection-USTC
├── object_detection
└── slim
数据集及数据预处理方案
数据集
数据集 1:Penn-Fudan Database
来源:https://www.cis.upenn.edu/~jshi/ped_html/
**内容:**这是一个图像数据集,其中包含可以用于行人检测的图片。图片来自校园和城市街道周围的场景,我们对这些图片中感兴趣的对象是行人,每张图片中至少有一个行人。此数据集共有 170 张图片,345 个行人标注,其中 96 张图像来自宾夕法尼亚大学,其余 74 张图片来自复旦大学。
目录结构:
PennFudanPed
├── added-object-list.txt
├── Annotation # 标注文件
│   ├── FudanPed00001.txt
│   ├── FudanPed00002.txt
│   └── ...
├── PedMasks # 遮罩文件,用于做像素级别的图像分割,本次实验不涉及
│   ├── FudanPed00001_mask.png
│   ├── FudanPed00002_mask.png
│   └── ...
├── PNGImages # 图片
│   ├── FudanPed00001.png
│   ├── FudanPed00002.png
│   └── ...
└── readme.txt
**缺点:**不含红绿灯、不含人脸标注
数据集 2
**来源:**监控视频 2.mp4
**内容:**此数据集为我们将视频中的帧截取保存(每 3 帧截取一张)后,使用标注精灵工具人工标注而成,一共有大约 600 张标注有行人、人脸、红灯、绿灯的图片,最后标注的保存格式为 PascalVoc,方便后面将其转换成 tfrecord 格式。
转换数据集格式
根据官方文档,要在 Tensorflow Object Detection API 中使用我们自己的数据集,必须将其转换为 TFRecord 文件格式。
数据集 1
建立标签地图(Label Maps)
每个数据集都需要具有与之关联的标签映射,此标签映射定义了从字符串类名(如:‘person’)到整数类 Ids(如:1)的映射,所以我们首先建立数据集的标签地图(Label Maps)。
注意:标签地图的 id 号应该从 1 开始,不能从 0 开始。
在目录 Object-Detection-USTC/object_detection/data/ 下新建文件 PennFudanPed_label_map.pbtxt,并写入以下内容:
item {
  id: 1
  name: 'person'
}
因为数据集 1 中的标注只有行人,所以只用在 Label Maps 中写一个 item。
编写转换脚本
将数据集 1(Penn-Fudan Database)下载解压后放入目录 Object-Detection-USTC/object_detection/data/。
因为此数据集的标注文档(如:PennFudanPed/Annotation/FudanPed00001.txt)不规则,所以我们需要自己写一个脚本来将这个数据集转换成 tfrecord 格式。
在目录 Object-Detection-USTC/ 下新建文件 create_PennFudanPed_tfrecord.py,并写入以下内容:
# -*- coding: utf-8 -*-
# @File 	: create_PennFudanPed_tfrecord.py
# @Author 	: jianhuChen
# @Date 	: 2018-12-23 16:53:11
# @License 	: Copyright(C), USTC
# @Last Modified by  : jianhuChen
# @Last Modified time: 2019-01-17 17:54:31
import os
import io
import pandas as pd
import numpy as np
import tensorflow as tf

from object_detection.utils import dataset_util

from tqdm import *

def data_pre_processing(annotation_path):
	datas = [] # 存储图片信息
	files = os.listdir(annotation_path)
	for file in files:
        sample = {}
        xmins = []
        xmaxs = []
        ymins = []
        ymaxs = []
        classes_text = []
        classes = []
        with open(annotation_path+'/'+file, 'r') as fp:
            lines = fp.readlines()
            for line in lines:
                if line.startswith('Image filename :'):
                    filename = line.strip().split('/')[-1][:-1] # get image name
                    image_format = filename.split('.')[-1] # get image format
                elif line.startswith('Image size (X x Y x C) :'):
                    width_height_channel = line.split(':')[-1].split('x')
                    width = eval(width_height_channel[0].strip()) # get image width
                    height = eval(width_height_channel[1].strip()) # get image height
                elif line.startswith('Original label for object'):
                    label = line.split(':')[-1].strip()[1:-1]
                    if label == 'PennFudanPed': # get the object id
                        classes.append(1)
                        classes_text.append('person'.encode('utf8')) # get the object label
                elif line.startswith('Bounding box for object'):
                    Xmin_Ymin_Xmax_Ymax = line.split(':')[-1].strip() # like:(160, 182) - (302, 431)
                    xmin = eval(Xmin_Ymin_Xmax_Ymax.split(',')[0][1:])
                    ymin = eval(Xmin_Ymin_Xmax_Ymax.split(',')[1].partition(') - (')[0])
                    xmax = eval(Xmin_Ymin_Xmax_Ymax.split(',')[1].partition(') - (')[2])
                    ymax = eval(Xmin_Ymin_Xmax_Ymax.split(',')[2][:-1])
                    xmins.append(xmin)
                    xmaxs.append(xmax)
                    ymins.append(ymin)
                    ymaxs.append(ymax)
            # 将该图片所有属性添加到字典里
            sample['filename'] = filename
            sample['image_format'] = image_format
            sample['width'] = width
            sample['height'] = height
            sample['classes_text'] = classes_text
            sample['classes'] = classes
            sample['xmins'] = xmins
            sample['xmaxs'] = xmaxs
            sample['ymins'] = ymins
            sample['ymaxs'] = ymaxs
            # 将该图片添加到数据集列表里
            datas.append(sample)
	return datas

def create_tf_example(sample, image_path):
	height = sample['height']
	width = sample['width']
	filename = sample['filename']
	image_format = sample['image_format']
	# 注意:坐标需要标准化
	xmins = np.array(sample['xmins'])/width
	xmaxs = np.array(sample['xmaxs'])/width
	ymins = np.array(sample['ymins'])/height
	ymaxs = np.array(sample['ymaxs'])/height
	classes_text = sample['classes_text']
	classes = sample['classes']

	# 读取图片数据
	encoded_img = tf.gfile.FastGFile(image_path+'/'+sample['filename'],'rb').read()

	tf_example = tf.train.Example(features=tf.train.Features(feature={
        'image/height': dataset_util.int64_feature(height),
        'image/width': dataset_util.int64_feature(width),
        'image/filename': dataset_util.bytes_feature(filename.encode('utf8')),
        'image/source_id': dataset_util.bytes_feature(filename.encode('utf8')),
        'image/encoded': dataset_util.bytes_feature(encoded_img),
        'image/format': dataset_util.bytes_feature(image_format.encode('utf8')),
        'image/object/bbox/xmin': dataset_util.float_list_feature(xmins),
        'image/object/bbox/xmax': dataset_util.float_list_feature(xmaxs),
        'image/object/bbox/ymin': dataset_util.float_list_feature(ymins),
        'image/object/bbox/ymax': dataset_util.float_list_feature(ymaxs),
        'image/object/class/text': dataset_util.bytes_list_feature(classes_text),
        'image/object/class/label': dataset_util.int64_list_feature(classes),
	}))

	return tf_example

def main(_):
	# 标注文件路径
	annotation_path = r'object_detection/data/PennFudanPed/Annotation'
	# 图片文件路径
	image_path = r'object_detection/data/PennFudanPed/PNGImages'
	# tfrecord输出路径
	output_path = r'object_detection/data'

	train_writer = tf.python_io.TFRecordWriter(os.path.join(output_path, 'PennFudanPed_train.record'))
	val_writer = tf.python_io.TFRecordWriter(os.path.join(output_path, 'PennFudanPed_val.record'))

	annotation_datas = data_pre_processing(annotation_path)
	for sample in tqdm(annotation_datas[:]):
        tf_sample = create_tf_example(sample, image_path)
        train_writer.write(tf_sample.SerializeToString())
	print('Successfully created the TFRecords(train).')

	for sample in tqdm(annotation_datas[150:]):
        tf_sample = create_tf_example(sample, image_path)
        val_writer.write(tf_sample.SerializeToString())
	print('Successfully created the TFRecords(val).')

	train_writer.close()
	val_writer.close()

if __name__ == '__main__':
	tf.app.run()
执行此脚本后,会在目录 Object-Detection-USTC/object_detection/data/ 下生成两个 tfrecord 文件:PennFudanPed_train.record 和 PennFudanPed_val.record ,它们分别是数据集 1 对应的 tfrecord 格式的训练集和验证集。
此脚本编写时参考此官方文档: 点击查看
数据集 2
建立标签地图(Label Maps)
将数据集 2(文件夹名字为:VOC2007)格式组织好后放入目录 Object-Detection-USTC/object_detection/data/。
接下来建立数据集 2 的标签地图(Label Maps),在目录 Object-Detection-USTC/object_detection/data/ 下新建文件 pascal_label_map.pbtxt,并写入以下内容:
item {
  name: "person"
  id: 1
  display_name: "person"
}
item {
  name: "face"
  id: 2
  display_name: "face"
}
item {
  name: "red_light"
  id: 3
  display_name: "red_light"
}
item {
  name: "green_light"
  id: 4
  display_name: "green_light"
}
因为数据集 2 中标注了 4 类对象,所以只用在 Label Maps 中有 4 个 item。
运行转换脚本
此数据集为我们自己人工标注,保存格式为 PascalVoc(与 ImageNet 采用的格式相同),而 tensorflow 提供了将 PascalVoc 格式的数据集转换成 tfrecord 格式的脚本,路径为 Object-Detection-USTC/object_detection/dataset_tools/create_pascal_tf_record.py,所以我们不用自己写了。
接下来写一个 shell 脚本来执行上述文件,在 Object-Detection-USTC/ 目录下新建文件 create_pascal_tfrecord.sh 并写入如下命令:
python object_detection/dataset_tools/create_pascal_tf_record.py \
    --label_map_path=object_detection/data/pascal_label_map.pbtxt \
    --data_dir=object_detection/data  --year=VOC2007 --set=train \ # 生成训练集
    --output_path=object_detection/data/pascal_train.record # 训练集输出路径

python object_detection/dataset_tools/create_pascal_tf_record.py \
    --label_map_path=object_detection/data/pascal_label_map.pbtxt \
    --data_dir=object_detection/data  --year=VOC2007 --set=val\ # 生成验证集
    --output_path=object_detection/data/pascal_val.record # 验证集输出路径
PascalVoc 格式的数据集 2 存放目录结构为:
Object-Detection-USTC
└── object_detection
    └── data
        └── VOC2007
            ├── Annotations
            ├── ImageSets
            ├── JPEGImages
            └── readme.txt
上面的 shell 脚本中,参数意义如下:
参数 data_dir 指定数据目录 object_detection/data,目录里面有 VOC2007 文件夹,VOC2007 文件夹里面有存放图片的 JPEGImages,存放标注分类坐标信息 Annotations。
ImageSets/Main 目录下有四个文件:test.txt 是测试集,train.txt 是训练集,val.txt 是验证集,trainval.txt 是训练和验证集。
参数 set 指定要使用的数据集是那个,这里使用了 train 和 val 两个。
然后在 Object-Detection-USTC/ 目录下行运行这个脚本就可以转换成功:
./create_pascal_tfrecord.sh转换完成后会在目录 Object-Detection-USTC/object_detection/data/ 下生成两个 tfrecord 文件:pascal_train.record 和 pascal_val.record ,它们分别是数据集 2 对应的 tfrecord 格式的训练集和验证集。
此处之所以要写 shell 脚本的原因是:上面的命令太长了,每次执行都要在命令行敲一遍太麻烦,写 shell 脚本的好处是以后每次执行上面的命令的时候只用在命令行输入这个脚本的名字就行了
转换数据集格式到此结束,总结一下,在 Object-Detection-USTC/object_detection/data 目录下有以下文件:
pascal_label_map.pbtxt # 数据集 2 生成的 tfrecord 格式的训练集
pascal_train.record # 数据集 2 生成的 tfrecord 格式的训练集
pascal_val.record # 数据集 2 生成的 tfrecord 格式的验证集
PennFudanPed # 数据集 1(Penn-Fudan Database)
PennFudanPed_label_map.pbtxt # 数据集 1 的 Label Maps
PennFudanPed_train.record # 数据集 1 生成的 tfrecord 格式的训练集
PennFudanPed_val.record # 数据集 1 生成的 tfrecord 格式的验证集
VOC2007 # 数据集 2
模型训练
下载预训练模型
为了加快训练速度,我们需要基于谷歌提供的预训练模型来微调参数(即迁移学习),官方提供了不少预训练模型,点击查看。
我们对比尝试了以下训练模型:
模型 | 平均帧率 |
faster_rcnn_inception_v2_coco | 4.92 |
SSD-MobileNet-v1-2017 | 14.57 |
SSD-MobileNet-v1-2018 | 18.88 |
SSD-MobileNet-v2-2018 | 14.33 |
上表的数据是在视频实时检测实现之后直接拿这些预训练模型测试所得
最终选择了 SSD-MobileNet-v2-2018 预训练模型进行迁移学习训练,因为它能相对较好的兼顾实时性和准确性。
在工程目录 Object-Detection-USTC/object_detection/ 下新建文件夹 ssd_mobilenet(此文件夹的用途是存放与模型相关的文件,包括待会儿我们自己训练出来的模型),将下载好的 SSD-MobileNet-v2-2018 压缩包解压后,放入目录 Object-Detection-USTC/object_detection/ssd_mobilenet/,会得到如下目录结构:
Object-Detection-USTC
└── object_detection
	└── ssd_mobilenet
        └── ssd_mobilenet_v2_coco_2018_03_29
            ├── checkpoint
            ├── frozen_inference_graph.pb # 冻结图
            ├── model.ckpt.data-00000-of-00001 # 检查点
            ├── model.ckpt.index # 检查点
            ├── model.ckpt.meta # 检查点
            ├── pipeline.config # 用于训练和生成模型的管道配置文件
            └── saved_model
修改管道配置文件
将目录 Object-Detection-USTC/object_detection/ssd_mobilenet/ssd_mobilenet_v2_coco_2018_03_29 中的管道文件 pipeline.config 复制到上级目录(ssd_mobilenet 目录)下,为了好辨别,将此文件更名为 pipeline_ssd_mobilenet_v2_coco_2018_03_29.config,再修改如下几个位置:
(以下配置以使用数据集 2 训练为例,使用数据集 1 训练同理也可做相应的配置)
修改类别数
num_classes:5修改预训练模型位置
fine_tune_checkpoint: "/home/jhchen/Desktop/Object-Detection-USTC/object_detection/ssd_mobilenet/ssd_mobilenet_v2_coco_2018_03_29/model.ckpt"为避免找不到文件的位置,此处使用绝对路径,下同
修改训练次数
num_steps: 1000修改训练数据位置
train_input_reader {
  # 标签地图(Label Maps)配置文件路径
  label_map_path: "/home/jhchen/Desktop/Object-Detection-USTC/object_detection/data/pascal_label_map.pbtxt"
  tf_record_input_reader {
    # 训练集径
    input_path: "/home/jhchen/Desktop/Object-Detection-USTC/object_detection/data/pascal_train.record"
  }
}
修改验证评估数据位置(可选)
eval_input_reader {
  label_map_path: "/home/jhchen/Desktop/Object-Detection-USTC/object_detection/data/pascal_label_map.pbtxt"
  shuffle: false
  num_readers: 1
  tf_record_input_reader {
    input_path: "/home/jhchen/Desktop/Object-Detection-USTC/object_detection/data/pascal_val.record"
  }
}
开始训练
Tensorflow 官方提供了训练的脚本,路径为 Object-Detection-USTC/object_detection/legacy/train.py,接下来,我们要调用它来开始我们的迁移学习训练。
在工程目录 Object-Detection-USTC/ 下新建一个训练的脚本文件 train.sh,并写入以下内容:
# 如果不存在这个路径,就递归地创建它
if [ ! -d "object_detection/ssd_mobilenet/train_logs" ]; then
  mkdir -p object_detection/ssd_mobilenet/train_logs
fi
# 设置管道配置文件的路径
PIPELINE_CONFIG_PATH=object_detection/ssd_mobilenet/pipeline_ssd_mobilenet_v2_coco_2018_03_29.config
# 设置模型训练过程中产生的记录文件的存放位置
TRAIN_LOGS=object_detection/ssd_mobilenet/train_logs
# 运行train.py文件
python object_detection/legacy/train.py \
    --logtostderr \
    --train_dir=$TRAIN_LOGS \
    --pipeline_config_path=$PIPELINE_CONFIG_PATH
文件夹 Object-Detection-USTC/object_detection/ssd_mobilenet/train_logs 中存放模型训练过程中产生的记录文件,后面需要通过这个文件夹内的文件来导出我们可以使用的模型。
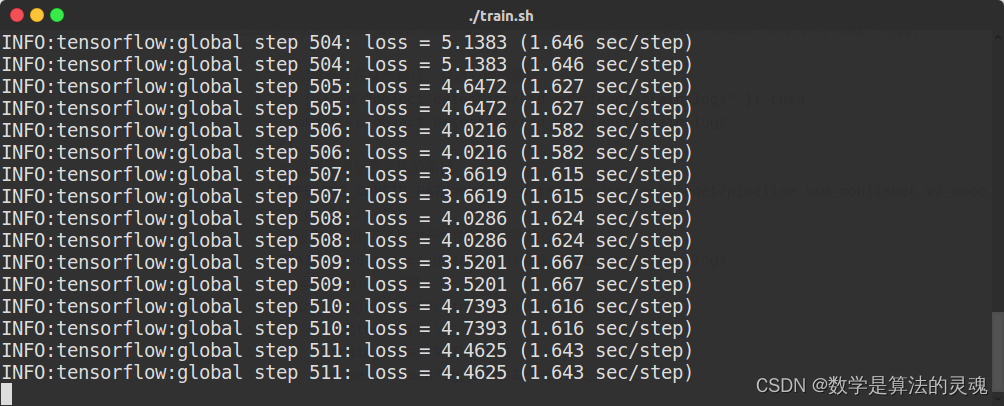
然后在 Object-Detection-USTC/ 目录下行运行这个脚本就可以开始训练:
./train.sh看到如下的提示信息就表示开始训练了
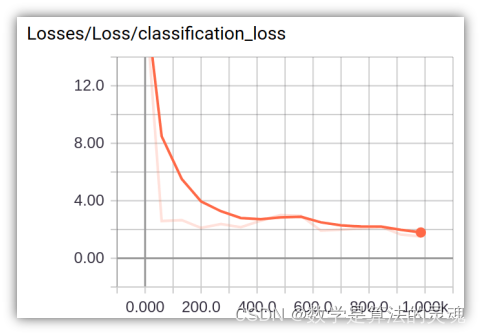
可视化训练过程
在训练的过程中,可以同时通过 tensorboard 来查看训练的情况。新开一个终端,在 Object-Detection-USTC/ 目录下,运行如下命令:
tensorboard --logdir=object_detection/ssd_mobilenet/train_logs在浏览器打开 http://localhost:6006,即可看到 Loss 等信息的实时变化情况。
导出模型
训练结束后,在 Object-Detection-USTC/object_detection/ssd_mobilenet/train_logs 路径下,可以看到一些 checkpoint 文件,如:
train_logs
├── graph.pbtxt
├── model.ckpt-1000.data-00000-of-00001
├── model.ckpt-1000.index
└── model.ckpt-1000.meta
meta 保存了 graph 和 metadata,ckpt 保存了网络的 weights。
进行预测时只需模型和权重,不需要 metadata,故可使用 tensorflow 官方提供的脚本导出训练好的模型,此脚本路径为 Object-Detection-USTC/object_detection/export_inference_graph.py。
在 Object-Detection-USTC/ 目录下新建一个导出模型图的 shell 脚本 export_model.sh,并写入以下内容:
# 如果不存在这个路径,就递归地创建它
if [ ! -d "object_detection/ssd_mobilenet/output_inference_graph" ]; then
  mkdir -p object_detection/ssd_mobilenet/output_inference_graph
fi
# 运行export_inference_graph.py文件
python object_detection/export_inference_graph.py \
    --input_type image_tensor \
    --pipeline_config_path object_detection/ssd_mobilenet/pipeline_ssd_mobilenet_v2_coco_2018_03_29.config \
    --trained_checkpoint_prefix object_detection/ssd_mobilenet/train_logs/model.ckpt-500 \
    --output_directory object_detection/ssd_mobilenet/output_inference_graph
文件夹 Object-Detection-USTC/object_detection/ssd_mobilenet/output_inference_graph 用来存放我们导出的模型。
然后在 Object-Detection-USTC/ 目录下行运行这个脚本就可以开始导出我们刚才训练好的模型:
./export_model.sh导出后文件夹 output_inference_graph 中的内容与我们下载的预训练模型的目录类似,如下:
output_inference_graph
├── checkpoint
├── frozen_inference_graph.pb
├── model.ckpt.data-00000-of-00001
├── model.ckpt.index
├── model.ckpt.meta
├── pipeline.config
└── saved_model
至此,我们自己的模型已经训练完成,待会儿就可以用它来进行行人、人脸等对象的检测了。
还可以通过官方提供的测试程序( Object-Detection-USTC/object_detection/object_detection_tutorial.ipynb)来看看模型的检测效果,需要用 Jupyter Notebook 打开,具体的测试方法打开上述文档就能看到,只需要将其中的模型替换为我们刚才训练得到的模型即可。(也可以 点击这里在 GitHub 上查看此文档。)
实时检测
实时检测方案
实时检测的意思是:将视频中的每一帧图像送入刚才训练好的模型中进行对象检测,再将模型识别出的对象信息标注(画边界框,置信度等)到这一帧图像上并显示出来,速度非常快时就能达到像播放视频一样的效果。
但是如果我们的程序真的向上述的过程一样,每读取一帧图像,再经过模型检测,再显示出来,这样效率显然很低,实时性极差,我们可以引入线程和队列来提升实时性:
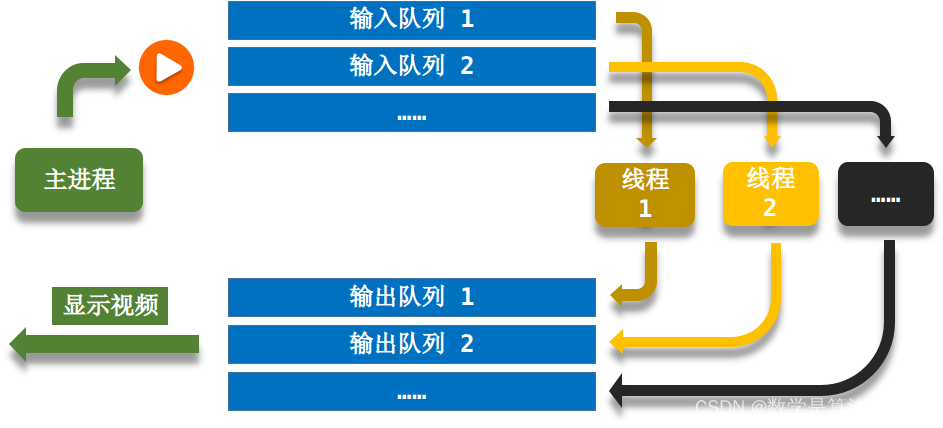
整个实时检测方案的流程如下图所示:
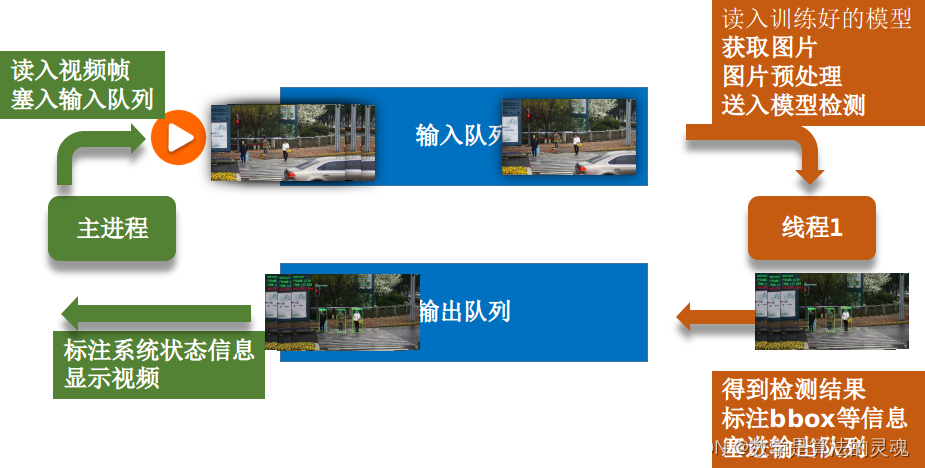
主进程做的事情图中用深绿色标出,线程 1 做的事情图中用黄色标出。
运行过程:
主程序读入视频并不断将这些帧按顺序塞入输入队列,线程 1 读入我们刚才训练好的模型,然后按顺序不断地从输入队列获取图片,将图片进行优化处理(调整对比度和亮度),再送入模型进行检测,如此,我们就能得到模型的检测结果,接下来线程 1 会将模型检测出的对象信息(bbox、置信度等)标注到图片上,然后将此标注好的图片塞入输出队列。主进程除了读入视频并将之入输入队列外,同时还会不断地从输出队列里面取图片并显示。
**注意:**上述过程中,主进程和线程 1 是并行执行的。
总结一下上图的运行过程,其中包含以下几个对象:
**输入队列:**从主进程接收原视频帧,传给线程 1
**输出队列:**接收经线程 1 处理后的视频帧,回传给主进程,由主进程来显示
输入队列和输出队列的作用是方便主进程和线程 1 之间进行通信
**主进程:**负责以下任务
读入视频帧
将视频帧塞入输入队列
显示识别后的视频帧
检测按键
计算系统运行信息(播放速度、已处理帧数、已花时间等信息)
最后两项任务上图中未体现,下文会详细介绍
**线程 1:**负责以下任务
读入训练好的模型
从输入队列获取图片
图片预处理
送入模型检测
得到检测结果
标注 bbox 等信息
将标注后的视频帧塞入输出队列
改进实时检测效果
使用上面的实时检测方案后,能达到较好的实时检测效果,但是我们还可以通过下面的方法来改进我们的检测准确率和实时性。
准确率改进方案
改变图片的对比度和亮度(OpenCV 基础知识)
观察下面这张图片中的红框处,我们发现交通灯的颜色几乎快要与背景色融为一体了,所以我们可以在把图片送入模型检测之前,对其做适当的预处理,从而使得模型能更容易地检测出这些对象。
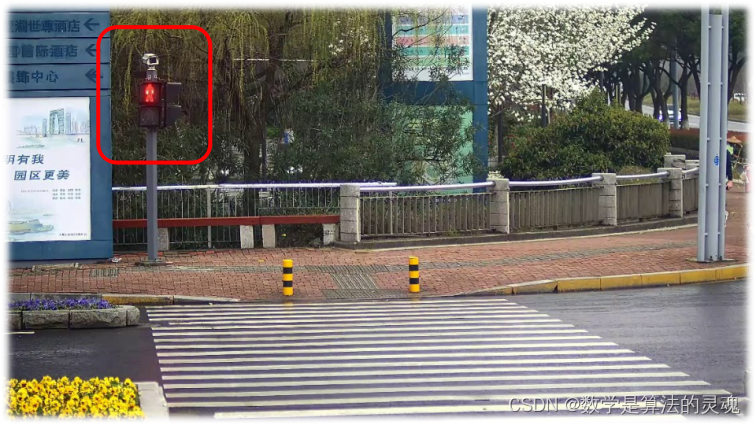
本次实验中,我们使用 opencv 中的基础知识改变了图片的对比度和亮度来达到上述效果。
使用类似于集成学习的方案:模型 1+ 模型 2 同时检测
在测试过程中我们发现,我们自己训练出的模型(模型 1)对人脸(face)和行人(person)的识别效果很好,对交通灯(traffic_light)的识别效果欠佳,而模型 2——预训练模型 SSD-MobileNet-v2-2018(微软 coco 数据集训练过)对交通灯的识别效果很好,所以我们尝试将每帧图片都送入两个模型检测,最终识别结果取模型 1 的人脸、行人和模型 2 的交通灯综合的结果。
模型 1 对交通灯识别效果欠佳的原因是:模型 1 经数据集 2 训练而得,而数据集 2 中交通灯的位置始终不变,相当于整个数据集只有一个交通灯对象,最终导致训练出的模型对交通灯不敏感。
实时性改进方案
使用上述的两个模型同时检测的方案后,毋庸置疑的是检测时间会大幅增加,于是我们又尝试了下述的方案来提升系统的实时性。
改用检测时间更短的预训练模型
对比尝试了常用的对象识别的网络模型,最终选择了 SSD-MobileNet 这种网络进行迁移学习,因为它能相对较好地在实时性和准确性之间取得平衡。
每两帧检测一次(奇数帧检测,偶数帧不检测)
我们此次的实验检测的目标对象为行人、人脸、交通灯,而观察视频发现这三者其实在较短的时间内位移量并不大,所以我们可以通过隔一帧检测一次对象的方法来成倍地提升系统实时性,具体做法是:我们对每一帧图像进行编号*[Math Processing Error](1,2,…)*,在将图像送入模型检测之前,先判断它的编号,如果编号为奇数,就送入模型检测,如果是偶数就不检测此帧,在标注时沿用上一帧检测出来的信息。
注意:
如果是奇数帧检测,偶数帧不检测,那么编号一定要从 1 开始而不能从 0 开始,因为如果从 0 开始编号,那么在判断第 0 帧是否检测时结果为不检测,标注信息沿用上次的检测结果,但是没有上一帧。同理,如果是偶数帧检测,奇数帧不检测,那么编号应该从偶数(如:0 或 2)开始。
如果检测的目标对象包含类似于车(car)这种短时间内有较大位移的物体,那么此方法会失效。
使用多线程 + 多队列
上述的方案中,使用线程 + 队列的方式能大幅提升系统的实施性,于是我们设想,使用多线程 + 多队列会不会能继续提升系统的实时性呢?
使用多线程 + 多队列的系统运行过程如下图所示:
运行过程与之前分析的线程 + 队列方案类似,只是现在有多个线程来同时跑模型处理图像了。
测试结果显示,多线程 + 多队列的方法似乎不能很好地提高实时性了,分析其原因,有以下几点:
查了资料发现,python 中的线程似乎有点儿鸡肋,多线程更适合做一些并行 I/O 操作,而并行计算操作似乎效率并不会提升…
线程的工作原理是通过操作系统来分时间片轮转调度他们,类似于通信中的“时分复用”,所以实际上这么多线程还是运行在这 1 颗核心上
开启多个线程会增加操作系统调度和切换线程时的开销,占用计算机资源
代码详解
(下文中的代码都有详细的中文注释)
在目录 Object-Detection-USTC/ 下新建文件 object_detection_video.py 用于对视频进行实时检测。
首先导入相关的库:
import tensorflow as tf
import cv2 # opencv库
import os
import time
import numpy as np
from queue import Queue # 队列
from threading import Thread # 线程
from object_detection.utils import label_map_util # tf官方api,用于读取label maps
from utils.app_utils import draw_boxes_and_labels, FPS # 用于解析图片识别结果,记录FPS
Object-Detection-USTC/utils 中的库借鉴于此项目: https://github.com/datitran/object_detector_app
作用是解析图片识别结果和记录 FPS
设置视频的尺寸:
# 视频尺寸,不用做更改,后面会有代码自动获取并更新此值
width = 640
height = 480
之所以需要设置尺寸,是因为模型在检测时,会将图片归一化到[0,1],最后返回的对象边界信息也是[0,1]之间的数字,最后需要乘以这两个尺寸才能得到正确的坐标信息
设置模型 1 和模型 2 是否启用,并获取当前工程目录:
MODEL1_FLAG = True
MODEL2_FLAG = True
CWD_PATH = os.getcwd()
用一些变量来存放模型相关信息:
if MODEL1_FLAG:
	# 模型名字
	MODEL_NAME = 'output_inference_graph-1000'
	# 模型的checkpoint文件路径
	PATH_TO_CKPT = os.path.join(CWD_PATH, 'object_detection', 'ssd_mobilenet', MODEL_NAME, 'frozen_inference_graph.pb')
	# 模型的label map路径
	PATH_TO_LABELS = os.path.join(CWD_PATH, 'object_detection', 'data', 'pascal_label_map.pbtxt')
	# 模型能检测的对象类别数
	NUM_CLASSES = 4
	# 调用官方库加载label map, 用于识别出物品后展示类别名
	label_map = label_map_util.load_labelmap(PATH_TO_LABELS)
	# 将读入的map文件转换成字典的列表,如:[{'name': 'person', 'id': 1}, ...]
	categories = label_map_util.convert_label_map_to_categories(label_map, max_num_classes=NUM_CLASSES, use_display_name=True)
	# 得到每个类别的id和name,字典,{1: {'id': 1, 'name': 'person'}, 2: {'id': 2, 'name': 'bicycle'}}
	category_index = label_map_util.create_category_index(categories)

if MODEL2_FLAG:
	MODEL_NAME2 = 'ssd_mobilenet_v1_coco_2018_01_28'  # fps: 18.88
	# MODEL_NAME2 = 'ssd_mobilenet_v2_coco_2018_03_29' # 14.33
	# MODEL_NAME2 = 'ssd_mobilenet_v1_coco_11_06_2017' # 14.57
	# MODEL_NAME2 = 'faster_rcnn_inception_v2_coco_2018_01_28' # 4.92	PATH_TO_CKPT2 = os.path.join(CWD_PATH, 'object_detection', 'ssd_mobilenet', MODEL_NAME2, 'frozen_inference_graph.pb')
	PATH_TO_LABELS2 = os.path.join(CWD_PATH, 'object_detection', 'data', 'mscoco_label_map.pbtxt')
	NUM_CLASSES2 = 90
	label_map2 = label_map_util.load_labelmap(PATH_TO_LABELS2)
	categories2 = label_map_util.convert_label_map_to_categories(label_map2, max_num_classes=NUM_CLASSES2, use_display_name=True)
	category_index2 = label_map_util.create_category_index(categories2)
定义对象函数 detect_objects(image_np, sess, detection_graph, category_index):
参数解释:
image_np:需要检测的图片,np.array 格式
sess:tf 会话
detection_graph:用于检测的模型图
category_index:分类索引,通过它能完成模型识别出的对象的 id 号与 str 类型的 label 之间相关转换
def detect_objects(image_np, sess, detection_graph, category_index):
	# 扩展图像的尺寸, 因为模型要求图像具有形状: [1, None, None, 3]
	image_np_expanded = np.expand_dims(image_np, axis=0)

	image_tensor = detection_graph.get_tensor_by_name('image_tensor:0')
	# 检测结果,每个框表示检测到特定对象的图像的一部分
	boxes = detection_graph.get_tensor_by_name('detection_boxes:0')
	# scores表示识别出的物体的置信度 是一个概率值,他最后会与label一起显示在图像上
	scores = detection_graph.get_tensor_by_name('detection_scores:0')
	classes = detection_graph.get_tensor_by_name('detection_classes:0')
	num_detections = detection_graph.get_tensor_by_name('num_detections:0')

	# 运行会话开始检测并返回结果,feed为传入的图像张量
	(boxes, scores, classes, num_detections) = sess.run(
		[boxes, scores, classes, num_detections],
		feed_dict={image_tensor: image_np_expanded})

	# 检测结果的可视化,也就是将返回的框框画在图像上
	# 返回框坐标、类名和颜色
	rect_points, class_names, class_colors = draw_boxes_and_labels(
		boxes=np.squeeze(boxes),
		classes=np.squeeze(classes).astype(np.int32),
		scores=np.squeeze(scores),
		category_index=category_index,
		min_score_thresh=.3  # 可视化的最低分数阈值
	)

	return dict(rect_points=rect_points, class_names=class_names, class_colors=class_colors)
为了提高测试图像的对比度和亮度,定义图像预处理的函数 contrast_brightness_image(img, c, b):
# 调整亮度和对比度
# c:对比度, b:亮度
def contrast_brightness_image(img, c, b):
	h, w, ch = img.shape  # 获取shape的数值,height/width/channel
	# 新建全零图片数组blank,将height和width,类型设置为原图片的通道类型(色素全为零,输出为全黑图片)
	blank = np.zeros([h, w, ch], img.dtype)
	dst = cv2.addWeighted(img, c, blank, 1-c, b) # 计算两个图像阵列的加权和 dst=src1*alpha+src2*beta+gamma
	return dst
定义线程 1 的处理函数 thread_worker(input_q, output_q):
参数解释:
input_q:输入队列
output_q:输出队列
# 用于对象检测的线程
def thread_worker(input_q, output_q):
	# Load a (frozen) Tensorflow model into memory.
	if MODEL1_FLAG:
		detection_graph = tf.Graph()
		with detection_graph.as_default():
			od_graph_def = tf.GraphDef()
			with tf.gfile.GFile(PATH_TO_CKPT, 'rb') as fid:
				serialized_graph = fid.read()
				od_graph_def.ParseFromString(serialized_graph)
				tf.import_graph_def(od_graph_def, name='')
				sess = tf.Session(graph=detection_graph)

	if MODEL2_FLAG:
		detection_graph2 = tf.Graph()
		with detection_graph2.as_default():
			od_graph_def2 = tf.GraphDef()
			with tf.gfile.GFile(PATH_TO_CKPT2, 'rb') as fid2:
				serialized_graph2 = fid2.read()
				od_graph_def2.ParseFromString(serialized_graph2)
				tf.import_graph_def(od_graph_def2, name='')
				sess2 = tf.Session(graph=detection_graph2)
	# 设置奇数检测,偶数不检测,第一帧一定要检测,所以设置初始值为True
	detect_flag = True
	while True:
		# 从输入队列里取出待检测的图片
		frame = input_q.get()
		# 由于使用opencv读入的图片是BGR色彩模式,我们需要将其转换成RGB模式
		frame = cv2.cvtColor(frame, cv2.COLOR_BGR2RGB)
		# 图像预处理,增强对比度和亮度
		con_bri_frame = contrast_brightness_image(frame, 1.3, 0)
		# 设置在图片上标注label时的字体
		font = cv2.FONT_HERSHEY_SIMPLEX
		if MODEL1_FLAG:
			if detect_flag: # 判断是否需要检测,如果为False,后面的代码会使用上一次检测出的data来标注
				# 调用目标检测函数,需要传入预处理后的图像,tf会话,图,
				# 返回的是一个字典,其中包含的信息有:对象边界的两个点(左上角和右下角),对象的类名, 标注此对象时的框框颜色
				data1 = detect_objects(con_bri_frame, sess, detection_graph, category_index)
			rec_points = data1['rect_points']  # 获取BBOX的坐标
			class_names = data1['class_names']  # 获取类名
			# print(class_names)
			class_colors = data1['class_colors']
			for point, name, color in zip(rec_points, class_names, class_colors):
				# 获得检测出的对象信息:左上角顶点和右下角顶点的坐标 类名 颜色
				# 在图片上标注这些检测出来的对象
				if name[0].startswith('face') or name[0].startswith('person'):
					cv2.rectangle(frame, (int(point['xmin'] * width), int(point['ymin'] * height)), (int(point['xmax'] * width), int(point['ymax'] * height)), color, 2)
					cv2.rectangle(frame, (int(point['xmin'] * width), int(point['ymin'] * height)), (int(point['xmin'] * width) + len(name[0]) * 6, int(point['ymin'] * height) - 10), color, -1, cv2.LINE_AA)
					cv2.putText(frame, name[0], (int(point['xmin'] * width), int(point['ymin'] * height)), font, 0.3, (0, 0, 0), 1)

		if MODEL2_FLAG:
			if detect_flag:
				data2 = detect_objects(con_bri_frame, sess2, detection_graph2, category_index2)
			rec_points = data2['rect_points']
			class_names = data2['class_names']
			class_colors = data2['class_colors']
			for point, name, color in zip(rec_points, class_names, class_colors):
				if name[0].startswith('traffic light') or (MODEL1_FLAG==False and (name[0].startswith('person'))):
					cv2.rectangle(frame, (int(point['xmin'] * width), int(point['ymin'] * height)), (int(point['xmax'] * width), int(point['ymax'] * height)), color, 2)
					cv2.rectangle(frame, (int(point['xmin'] * width), int(point['ymin'] * height)), (int(point['xmin'] * width) + len(name[0]) * 6, int(point['ymin'] * height) - 10), color, -1, cv2.LINE_AA)
					cv2.putText(frame, name[0], (int(point['xmin'] * width), int(point['ymin'] * height)), font, 0.3, (0, 0, 0), 1)

		# 交替检测
		detect_flag = not detect_flag
		# 将检测完并标注好对象信息的图片塞入输出队列
		output_q.put(frame)
	if MODEL1_FLAG:
		sess.close() # 关闭会话
	if MODEL2_FLAG:
		sess2.close()
注意:
使用 opencv 读入的图片是 BGR 色彩模式,我们需要将其转换成 RGB 模式,再送入模型进行检测,否则会使色彩信息丢失,甚至对检测造成误导
接下来定义主函数(主进程)main()
def main():
	speed = 20 # 视频速度控制
	thread_num = 1 # 线程数量
	get_frame_num = 1 # 已经显示图片的数量
	video_path = "video/2.mp4" # 待检测的视频路径
	input_q = [Queue(400), # 输入队列列表,容量为400
				# Queue(400),
				# Queue(400),
				]
	output_q = [Queue(), # 输出队列列表,无限大容量
				# Queue(),
				# Queue(),
				]
	for i in range(thread_num): # 进程的个数
		t = Thread(target=thread_worker, args=(input_q[i], output_q[i]))
		t.daemon = True # 这个线程是不重要的,在进程退出的时候,不用等待这个线程退出
		t.start()

	# 开始读取视频
	video_capture = cv2.VideoCapture(video_path)  # 导入视频
	global width, height # 通过opencv获取视频的尺寸
	width, height = int(video_capture.get(3)), int(video_capture.get(4))
	print('video width-height:', width, '-',height)
	fps = FPS().start() # 开始计算FPS,这句话的作用是打开计时器开始计时
	while True:
		ret, frame = video_capture.read() # 读取视频帧
		if ret == False: # 读完图片退出
			break
		fps.update() # 每读一帧,计数+1
		# if not input_q.full():
		in_q_index = fps.getNumFrames()%thread_num # 计算该帧图片应该入哪个输入队列
		input_q[in_q_index].put(frame) # 将该帧图片入输入队列

		frame_start_time = time.time() # 计录处理当前帧图片的起始时间
		out_q_index = get_frame_num%thread_num # 计算目前应该从哪个输出队列取图片显示
		if not output_q[out_q_index].empty():
			get_frame_num += 1 # 已经显示的图片数量+1
			# 将从输出队列获取到的图片色彩模式转换回BGR,再显示
			od_frame = cv2.cvtColor(output_q[out_q_index].get(), cv2.COLOR_RGB2BGR)
			ch = cv2.waitKey(speed) # 检测按键
			if ch & 0xFF == ord('q'): # q键:退出
				break
			elif ch & 0xFF == ord('w'): # w键:速度减慢
				speed += 10
			elif ch & 0xFF == ord('s'): # s键:速度加快
				speed -= 10
			elif ch & 0xFF == ord('r'): # r键:恢复初始速度
				speed = 50
			# 将速度放到图片左上角去
			cv2.putText(od_frame, 'SPEED:' + str(speed), (20, int(height/20)), cv2.FONT_HERSHEY_SIMPLEX,
						0.7, (0, 255, 0), 2)
			# 将当前帧数、运行时间、平均帧率标注到图片左上角去
			fps.stop()
			cv2.putText(od_frame, 'FRAME:{:}'.format(fps._numFrames), (20, int(height*2/20)), cv2.FONT_HERSHEY_SIMPLEX,
						0.8, (0, 255, 0), 2)
			cv2.putText(od_frame, 'TIME:{:.3f}'.format(fps.elapsed()), (20, int(height*3/20)), cv2.FONT_HERSHEY_SIMPLEX,
						0.8, (0, 255, 0), 2)
			cv2.putText(od_frame, 'AVE_FPS: {:.3f}'.format(fps.fps()), (20, int(height*4/20)), cv2.FONT_HERSHEY_SIMPLEX,
						0.7, (0, 0, 255), 2)
			cv2.imshow('Video', od_frame)
		# 打印当前帧处理所花的时间
		print('[INFO] elapsed time: {:.5f}'.format(time.time() - frame_start_time))

	fps.stop()
	# 打印总时间
	print('[INFO] elapsed time (total): {:.4f}'.format(fps.elapsed()))
	# 打印平均帧率
	print('[INFO] approx. FPS: {:.2f}'.format(fps.fps()))

	cv2.destroyAllWindows()
在主进程中,我们添加了通过按键来控制播放速度的功能,其中 speed 变量的作用就是用来存放播放速度的,它表示主程序每次运行到此处要延时 speed 这么长时间,也相当于是多长时间从输出队列读取一次图片显示,通过此方式间接控制了播放速度, speed 的值越小表示播放速度越快,反之越慢:
w 键:speed 加大,播放速度减慢
s 键:speed 减小,播放速度加快
r 键:恢复初始速度
主进程中的 FRAME 表示到目前为止已经识别的总帧数, TIME 表示系统总运行时间,平均帧率 AVE_FPS 的计算公式如下:
[Math Processing Error]AVE_FPS=FRAMETIME
最后调用 main() 函数:
if __name__ == '__main__':
	main()
测试运行效果
运行效果如下图所示:
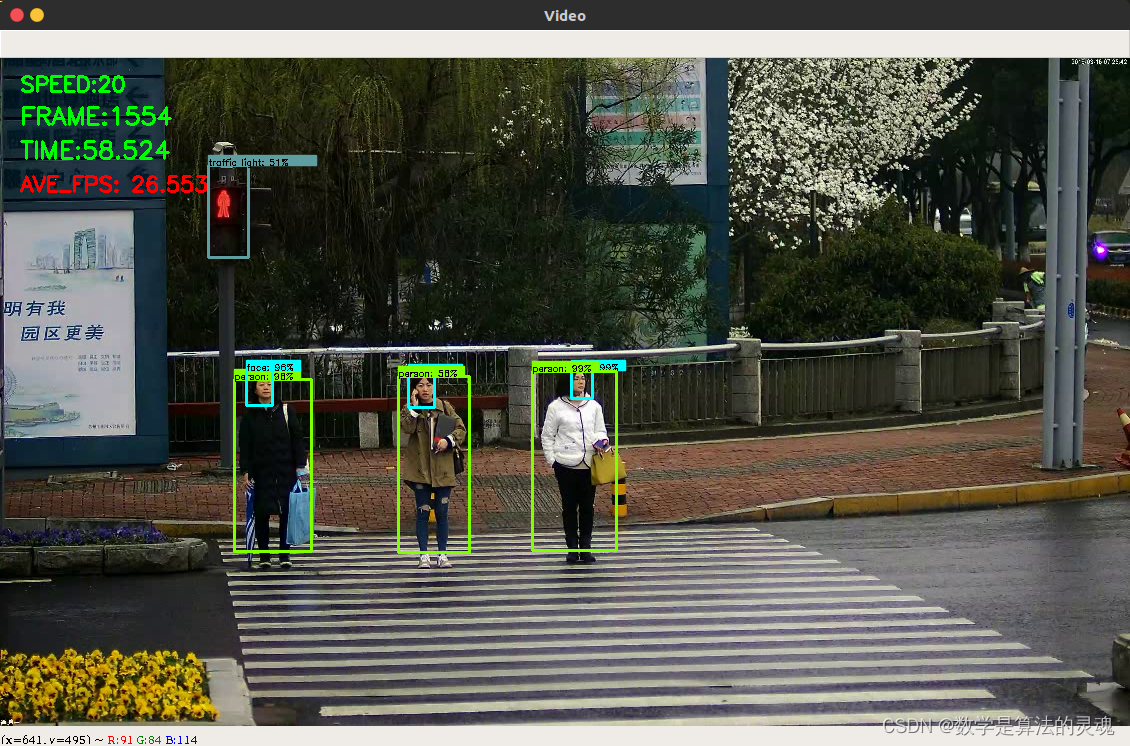
测试结果显示,我们的模型能实时有效检测 person、face、traffic_light 对象
可通过键盘按键实时调节视频播放速度
增加了检测实时帧数、视频时长及帧率的显示功能
平均帧率如下表所示
模型 | 平均帧率 |
模型 1 | 30+ |
模型 2 | 30+ |
模型 1+ 模型 2 | 20+ |
模型 1:通过迁移学习得到的模型
模型 2: SSD-MobileNet-v2-2018(coco 数据集训练过)
以上数据测试于 NVIDIA GeForce GTX 850M 平台
移植模型到手机
将模型移植到嵌入式设备的任务还未全部实现,但是做了一部分工作,所以写一下我们已完成的步骤:
TensorFlow Lite 是 TensorFlow 针对移动和嵌入式设备的轻量级解决方案,根据官方文档,我们可以使用 TensorFlow Lite 获得更小的模型,并针对移动设备进行优化。
目前 TensorFlow Lite 仅支持 SSD 型号,不支持类似 faster_rcnn 的模型。
首先需要安装 bazel 构建工具
tensorflow 官方提供了脚本将训练好的模型转换成 tflite 的冻结图,文件目录为 Object-Detection-USTC/object_detection/export_tflite_ssd_graph.py,接下来使用此文件来完成转换。
在目录 Object-Detection-USTC/ 下新建 shell 脚本 export_tflite_ssd_graph.sh 并写入以下内容:
if [ ! -d "tflite" ]; then
  mkdir -p tflite
fi

python object_detection/export_tflite_ssd_graph.py \
        --pipeline_config_path=/home/jhchen/Desktop/Object-Detection-USTC/object_detection/ssd_mobilenet/ssd_mobilenet_v1_coco_2018_01_28/pipeline.config \
        --trained_checkpoint_prefix=/home/jhchen/Desktop/Object-Detection-USTC/object_detection/ssd_mobilenet/ssd_mobilenet_v1_coco_2018_01_28/model.ckpt \
        --output_directory=tflite \
        --add_postprocessing_op=true
打开终端,在目录 Object-Detection-USTC/ 下输入以下命令执行上面的脚本:
./export_tflite_ssd_graph.sh执行完后,会在目录 Object-Detection-USTC/ 下新建一个文件夹 tflite,里面应该看到两个文件:tflite_graph.pb 和 tflite_graph.pbtxt
接下来,我们使用 TensorFlow Lite 优化转换器 TOCO 来获得优化模型
……(后期有时间再填坑)
总结
实验完成度
级别 | 要求 | 完成度 |
基本要求 | 可以运行,通过测试 | 100% |
进阶要求 | 检测人脸、交通灯(红绿灯) | 100% |
性能挑战 | 平均 FPS>=15 | 100% |
移植挑战 | 使用 tensorflowLite 进行模型压缩 | 20% |
实验创新点
使用队列的方式提升实时性
改变图片的对比度和亮度(OpenCV 基础知识)
使用类似于集成学习的方案:模型 1+ 模型 2 同时检测
每两帧检测一次(奇数帧检测,偶数帧不检测)
使用多线程 + 多队列


 1244
1244

 被折叠的 条评论
为什么被折叠?
被折叠的 条评论
为什么被折叠?
 到【灌水乐园】发言


