


哔哩哔哩教程:【【卷积神经网络】案例详细讲解(MATLAB)】https://www.bilibili.com/video/BV1Ks42137WH?vd_source=471188e4bb1a707946690b75051d386c
一、卷积神经网络模型构建
% Step 1: Load and Preprocess Data
% 步骤 1:加载和预处理数据
% Define the data path
% 定义数据路径
bananaPath = 'C:\Users\19350\Desktop\banana'; % 香蕉图像的路径
applePath = 'C:\Users\19350\Desktop\apple'; % 苹果图像的路径
% Create an imageDatastore object to manage image data
% 创建一个imageDatastore对象来管理图像数据
imdsBanana = imageDatastore(bananaPath, 'LabelSource', 'foldernames'); % 创建香蕉图像的imageDatastore对象
imdsApple = imageDatastore(applePath, 'LabelSource', 'foldernames'); % 创建苹果图像的imageDatastore对象
% Combine the two datastores
% 合并两个数据存储
imdsFiles = cat(1, imdsBanana.Files, imdsApple.Files); % 将香蕉和苹果图像文件路径合并
imdsLabels = cat(1, imdsBanana.Labels, imdsApple.Labels); % 将对应的标签合并
imds = imageDatastore(imdsFiles, 'Labels', imdsLabels); % 创建包含所有图像路径和标签的imageDatastore对象
% Split data into training, validation, and test sets
% 将数据集拆分为训练、验证和测试集
[imdsTrain, imdsValidation, imdsTest] = splitEachLabel(imds, 0.7, 0.15, 0.15, 'randomized'); % 将数据集按比例拆分为训练、验证和测试集
% Define image size and preprocess images
% 定义图像大小并预处理图像
inputSize = [64 64 3]; % 设置输入图像的大小为 64x64 像素,RGB 彩色图像
% Data augmentation
% 数据增强
augimdsTrain = augmentedImageDatastore(inputSize, imdsTrain, ...
'DataAugmentation', imageDataAugmenter('RandRotation', [-10, 10], 'RandXTranslation', [-3 3], 'RandYTranslation', [-3 3])); % 对训练数据进行数据增强
augimdsValidation = augmentedImageDatastore(inputSize, imdsValidation); % 不对验证数据进行数据增强
augimdsTest = augmentedImageDatastore(inputSize, imdsTest); % 不对测试数据进行数据增强
% Step 2: Define CNN Architecture
% 步骤 2:定义CNN架构
layers = [
imageInputLayer(inputSize) % 输入层
convolution2dLayer(3, 8, 'Padding', 'same') % 卷积层
batchNormalizationLayer % 批标准化层
reluLayer % ReLU 激活层
maxPooling2dLayer(2, 'Stride', 2) % 最大池化层
convolution2dLayer(3, 16, 'Padding', 'same') % 卷积层
batchNormalizationLayer % 批标准化层
reluLayer % ReLU 激活层
maxPooling2dLayer(2, 'Stride', 2) % 最大池化层
convolution2dLayer(3, 32, 'Padding', 'same') % 卷积层
batchNormalizationLayer % 批标准化层
reluLayer % ReLU 激活层
maxPooling2dLayer(2, 'Stride', 2) % 最大池化层
fullyConnectedLayer(64) % 全连接层
reluLayer % ReLU 激活层
fullyConnectedLayer(numel(categories(imdsTrain.Labels))) % 全连接层
softmaxLayer % softmax 激活层
classificationLayer]; % 分类层
% Step 3: Train the Model
% 步骤 3:训练模型
options = trainingOptions('sgdm', ... % 使用随机梯度下降(SGD)进行训练
'InitialLearnRate', 0.01, ... % 初始学习率
'MaxEpochs', 10, ... % 最大迭代次数
'ValidationData', augimdsValidation, ... % 验证集
'ValidationFrequency', 30, ... % 每隔多少次迭代进行一次验证
'Verbose', false, ... % 是否显示训练过程信息
'Plots', 'training-progress'); % 是否显示训练进度图
net = trainNetwork(augimdsTrain, layers, options); % 训练网络模型
% Step 4: Evaluate the Model
% 步骤 4:评估模型
YPred = classify(net, augimdsTest); % 对测试集进行分类预测
YTest = imdsTest.Labels; % 测试集的真实标签
accuracy = mean(YPred == YTest); % 计算准确率
disp(['Test Accuracy: ', num2str(accuracy)]); % 显示测试准确率
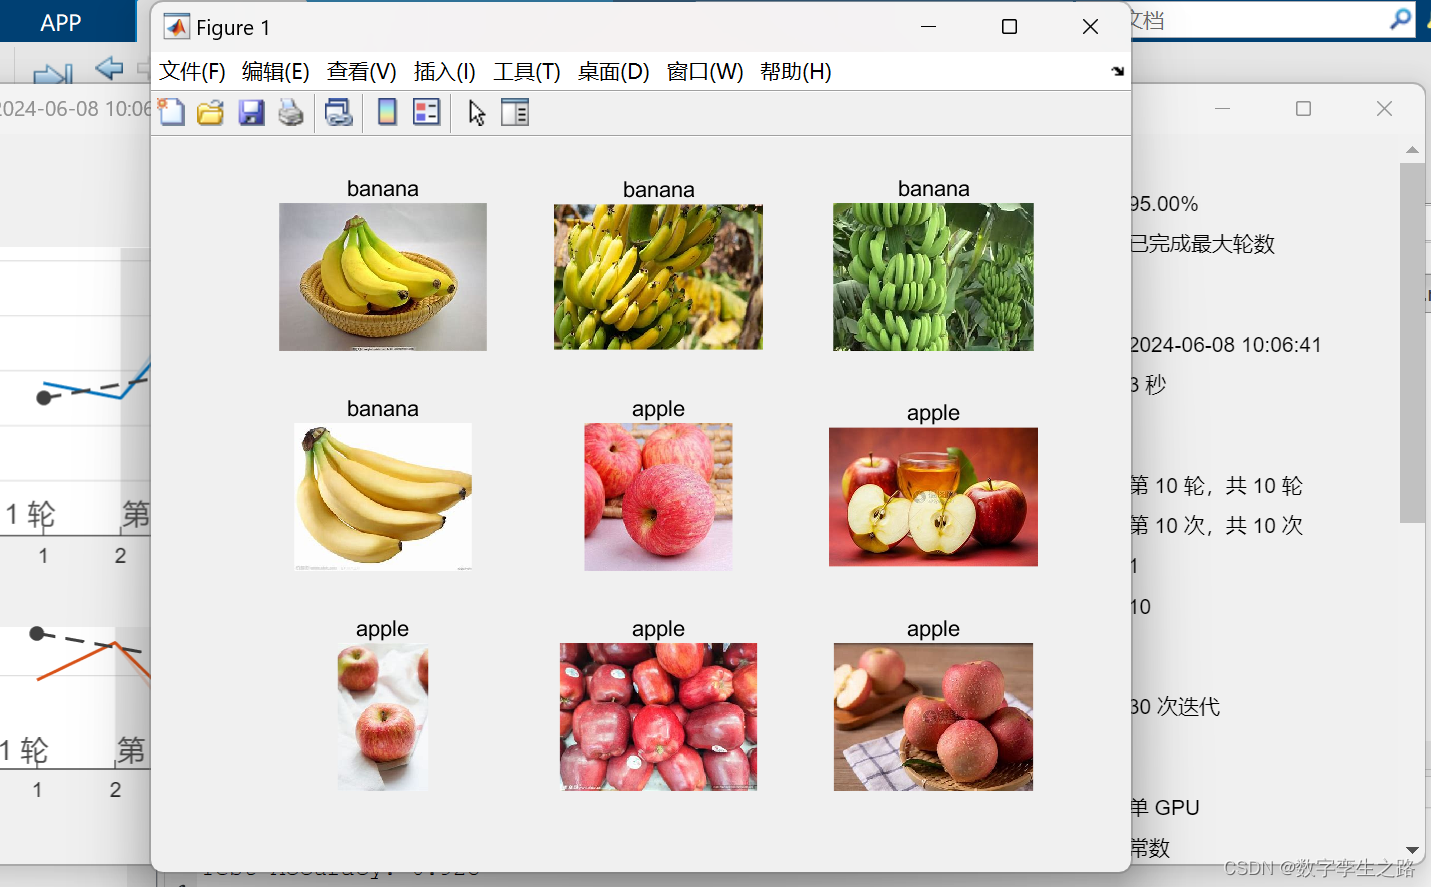
% Display a few sample results
% 显示部分样本结果
idx = randperm(numel(imdsTest.Files), 9); % 从测试集中随机选择 9 张图像
figure;
for i = 1:9
subplot(3, 3, i);
I = readimage(imdsTest, idx(i)); % 读取图像
imshow(I); % 显示图像
label = YPred(idx(i)); % 获取预测标签
title(string(label)); % 设置标题为预测标签
end
save('imagetrainedNet.mat', 'net'); % 保存训练好的网络模型
二、构建调用模型函数
function label = myImageRecognition(image)
    % 加载预训练的模型
    trainedNet = load('imagetrainedNet.mat');
    net = trainedNet.net;

    % 对输入图像进行预处理
    imageResized = imresize(image, [64 64]);

    % 使用训练好的模型进行图像识别
    label = classify(net, imageResized);
end
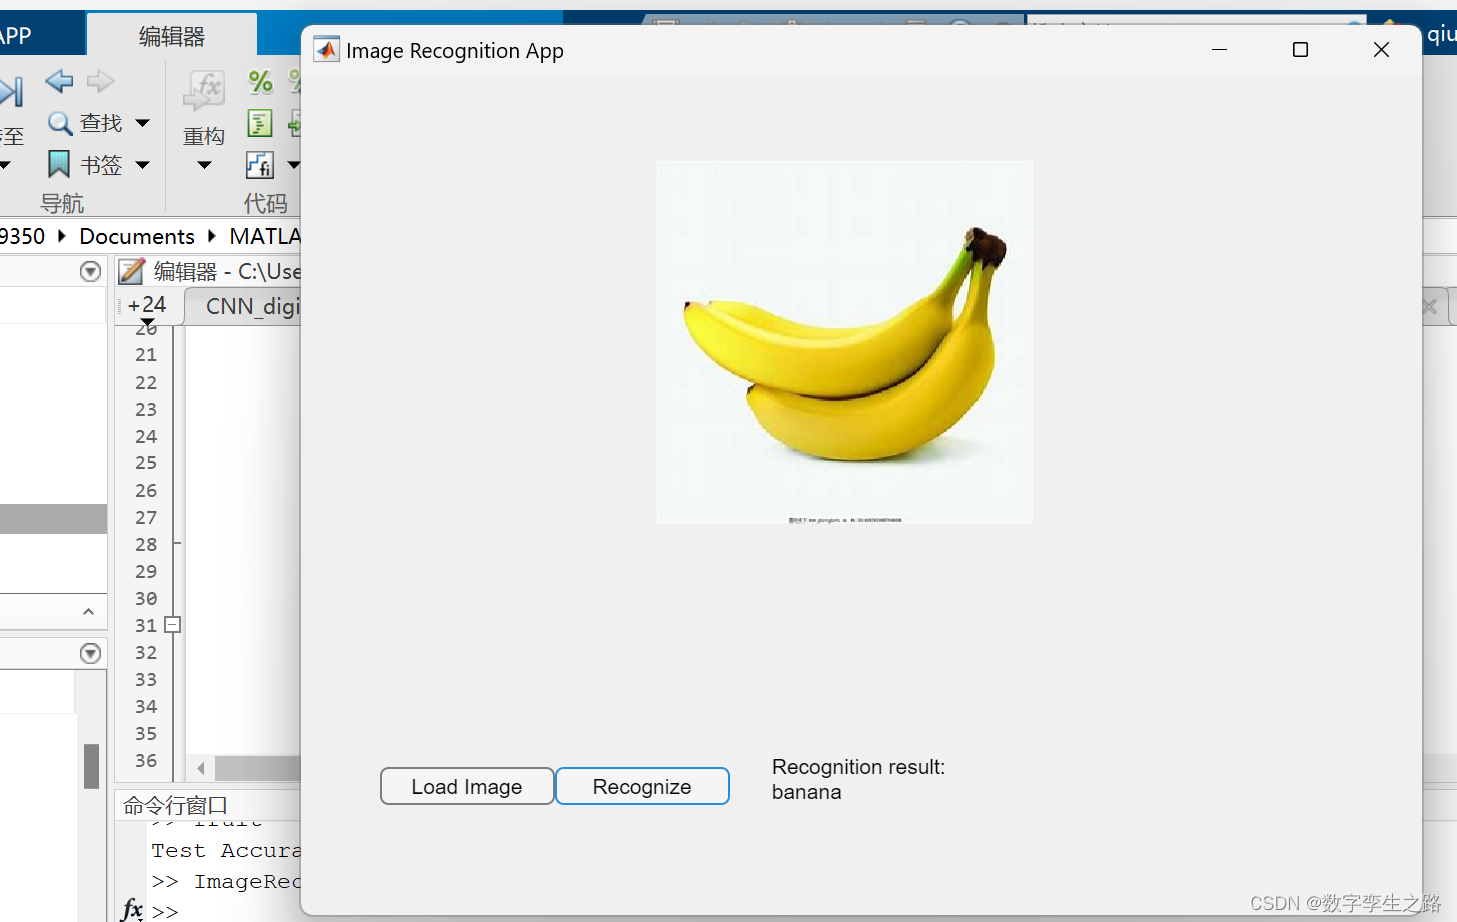
三、构建APP可视化图片识别界面
classdef ImageRecognitionApp < matlab.apps.AppBase

    % Properties that correspond to app components
    properties (Access = private)
        UIFigure           matlab.ui.Figure
        ImageAxes          matlab.ui.control.UIAxes
        LoadImageButton    matlab.ui.control.Button
        RecognizeButton    matlab.ui.control.Button
        ResultLabel        matlab.ui.control.Label
        Image              % Placeholder for loaded image
    end

    % Callbacks that handle component events
    methods (Access = private)

        % Button pushed function: LoadImageButton
        function LoadImageButtonPushed(app, ~)
            [fileName, filePath] = uigetfile({'*.jpg;*.png;*.bmp', 'Image Files (*.jpg, *.png, *.bmp)'}, 'Select an Image');
            if isequal(fileName,0) || isequal(filePath,0)
                return; % User cancelled the operation
            end
            % Read the selected image file
            app.Image = imread(fullfile(filePath, fileName));
            % Display the image in the UIAxes
            imshow(app.Image, 'Parent', app.ImageAxes);
            % Clear previous result label
            app.ResultLabel.Text = '';
        end

        % Button pushed function: RecognizeButton
        function RecognizeButtonPushed(app, ~)
            if isempty(app.Image)
                % No image loaded, display warning
                app.ResultLabel.Text = 'Please load an image first.';
            else
                % Perform image recognition
                label = myImageRecognition(app.Image); % Function to recognize image
                % Display recognition result
                app.ResultLabel.Text = ['Recognition result: ', label];

            end
        end
    end

    % App initialization and construction
    methods (Access = private)

        % Create UIFigure and components
        function createComponents(app)
            % Create UIFigure and hide until all components are created
            app.UIFigure = uifigure('Visible', 'off');
            app.UIFigure.Position = [100 100 640 480];
            app.UIFigure.Name = 'Image Recognition App';
            app.UIFigure.Visible = 'on';

            % Create ImageAxes
            app.ImageAxes = uiaxes(app.UIFigure);
            title(app.ImageAxes, '')
            xlabel(app.ImageAxes, '')
            ylabel(app.ImageAxes, '')
            app.ImageAxes.Position = [46 180 547 260];

            % Create LoadImageButton
            app.LoadImageButton = uibutton(app.UIFigure, 'push');
            app.LoadImageButton.ButtonPushedFcn = createCallbackFcn(app, @LoadImageButtonPushed, true);
            app.LoadImageButton.Position = [46 65 100 22];
            app.LoadImageButton.Text = 'Load Image';

            % Create RecognizeButton
            app.RecognizeButton = uibutton(app.UIFigure, 'push');
            app.RecognizeButton.ButtonPushedFcn = createCallbackFcn(app, @RecognizeButtonPushed, true);
            app.RecognizeButton.Position = [146 65 100 22];
            app.RecognizeButton.Text = 'Recognize';

            % Create ResultLabel
            app.ResultLabel = uilabel(app.UIFigure);
            app.ResultLabel.Position = [270 60 400 40];
            app.ResultLabel.Text = '';
        end
    end

    % App creation and deletion
    methods (Access = public)

        % Construct app
        function app = ImageRecognitionApp
            % Create and configure components
            createComponents(app);

            % Register the app with App Designer
            registerApp(app, app.UIFigure);

            if nargout == 0
                clear app
            end
        end

        % Code that executes before app deletion
        function delete(app)

            % Delete UIFigure when app is deleted
            delete(app.UIFigure);
        end
    end
end
四、结果显示


 3941
3941

 被折叠的 条评论
为什么被折叠?
被折叠的 条评论
为什么被折叠?
 到【灌水乐园】发言


