


LVS负载均衡化群集
一,基本配置
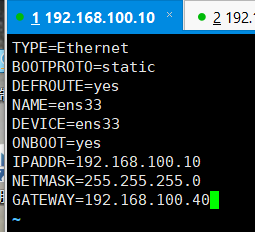
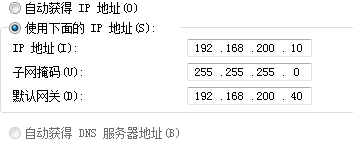
Centos01:

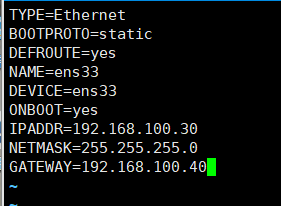
Centos02:


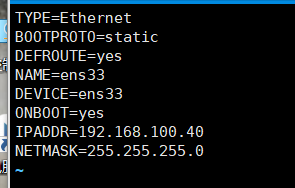
Centos03:

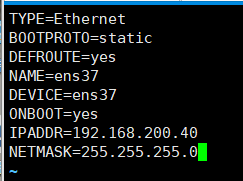
Centos04:


二.配置LVS服务器
1.安装LVS(centos04,系统盘)
安装ipvsadm
[root@centos08 ~]# yum -y install ipvsadm

设置服务开机自动启动
[root@centos08 ~]# systemctl enable ipvsadm

清空默认规则
[root@centos08 ~]# ipvsadm -C

查看规则

保存
[root@centos08 ~]# ipvsadm-save

2.搭建服务器池(centos01,centos02,系统盘)
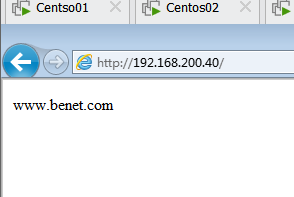
Centos01:
[root@centos ~]# yum -y install httpd

[root@centos ~]# echo “www.benet.com” > /var/www/html/index.html
[root@centos ~]# systemctl start httpd
[root@centos ~]# systemctl enable httpd

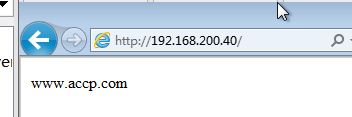
Centos02:
[root@centos ~]# yum -y install httpd

[root@centos ~]# echo “www.accp.com” > /var/www/html/index.html
[root@centos ~]# systemctl start httpd
[root@centos ~]# systemctl enable httpd

3.开启路由转发功能(centos04)
[root@centos08 ~]# vim /etc/sysctl.conf

net.ipv4.ip_forward = 1

[root@centos08 ~]# sysctl -p

4.配置LVS的NAT模式 (centos04)
创建负载均衡器指定IP地址192.168.200.40端口80算法使用rr
[root@centos08 ~]# ipvsadm -A -t 192.168.200.40:80 -s rr

负载均衡池添加网站服务器
[root@centos08 ~]# ipvsadm -a -t 192.168.200.40:80 -r 192.168.100.10:80 -m -w 1
[root@centos08 ~]# ipvsadm -a -t 192.168.200.40:80 -r 192.168.100.20:80 -m -w 1

保存规则
[root@centos08 ~]# ipvsadm-save

查看规则
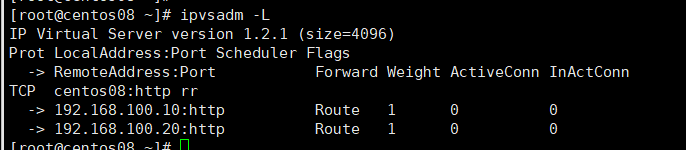
[root@centos08 ~]# ipvsadm -Ln

轮寻验证:
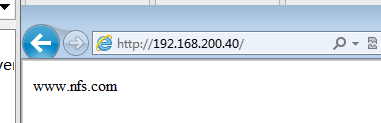
5.安装共享存储(centos03,centos01,centos02,系统盘)
Centos03:
安装共享存储服务
[root@centos07 ~]# yum -y install rpcbubd nfs-utils

创建共享存储根目录
[root@centos07 ~]# mkdir /web
[root@centos07 ~]# echo “www.nfs.com” > /web/index.html

配置NFS允许WEB服务器访问存储
[root@centos07 ~]# vim /etc/exports

/web 192.168.100.10(rw) 192.168.100.20(rw)

启动服务
[root@centos07 ~]# systemctl start nfs
[root@centos07 ~]# systemctl start rpcbind
[root@centos07 ~]# systemctl enable nfs
[root@centos07 ~]# systemctl enable rpcbind

检查共享存储
[root@centos07 ~]# showmount -e 192.168.100.30

Centos01:
网站链接共享存储
[root@centos ~]# vim /etc/fstab

192.168.100.30:web /var/www/html nfs defaults,_netdev 0 0

重启:
[root@centos ~]# reboot

查看共享存储
[root@centos ~]# df -Th

查看日志
[root@centos ~]# tail -f /var/log/httpd/access_log

Centos02:
[root@centos ~]# vim /etc/fstab

192.168.100.30:web /var/www/html nfs defaults,_netdev 0 0

[root@centos ~]# reboot

查看共享存储
[root@centos ~]# df -Th

查看日志
[root@centos ~]# tail -f /var/log/httpd/access_log

验证:

5.配置LVS的DR模式
将centos04恢复干净系统
生成虚拟网卡:
[root@centos08 ~]# cp /etc/sysconfig/network-scripts/ifcfg-ens33 /etc/sysconfig/network-scripts/ifcfg-
ens33:0

[root@centos08 ~]# vim /etc/sysconfig/network-scripts/ifcfg-ens33:0

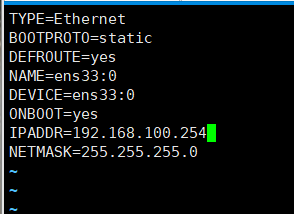
[root@centos08 ~]# systemctl restart network

生成虚接口:
Centos01:
[root@centos ~]# cp /etc/sysconfig/network-scripts/ifcfg-lo /etc/sysconfig/network-scripts/ifcfg-lo:0

[root@centos ~]# vim /etc/sysconfig/network-scripts/ifcfg-lo:0

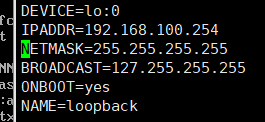
[root@centos ~]# systemctl restart network

Centos02:
[root@centos ~]# cp /etc/sysconfig/network-scripts/ifcfg-lo /etc/sysconfig/network-scripts/ifcfg-lo:0

[root@centos ~]# vim /etc/sysconfig/network-scripts/ifcfg-lo:0


[root@centos ~]# systemctl restart network

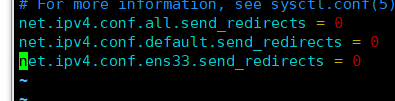
修改LVS服务器内核参数禁止响应客户端请求(centos04)
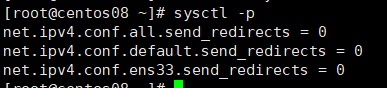
[root@centos08 ~]# vim /etc/sysctl.conf

net.ipv4.conf.all.send_redirects = 0
net.ipv4.conf.default.send_redirects = 0
net.ipv4.conf.ens33.send_redirects = 0
[root@centos08 ~]# sysctl -p
修改网站内核参数运行响应客户端请求 (centos01,centos02)
Centos01:
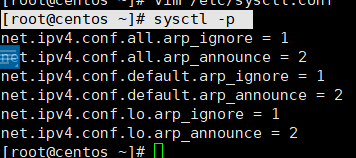
[root@centos ~]# vim /etc/sysctl.conf

net.ipv4.conf.all.arp_ignore = 1
net.ipv4.conf.all.arp_announce = 2
net.ipv4.conf.default.arp_ignore = 1
net.ipv4.conf.default.arp_announce = 2
net.ipv4.conf.lo.arp_ignore = 1
net.ipv4.conf.lo.arp_announce = 2
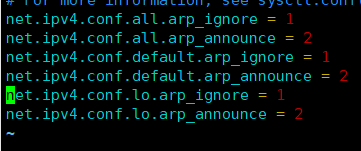
[root@centos ~]# sysctl -p
Centos02:
[root@centos ~]# vim /etc/sysctl.conf

net.ipv4.conf.all.arp_ignore = 1
net.ipv4.conf.all.arp_announce = 2
net.ipv4.conf.default.arp_ignore = 1
net.ipv4.conf.default.arp_announce = 2
net.ipv4.conf.lo.arp_ignore = 1
net.ipv4.conf.lo.arp_announce = 2

[root@centos ~]# sysctl -p

指定LVS负载均衡器的IP地址和端口(centos04)
安装ipvsadm
[root@centos08 ~]# yum -y install ipvsadm

设置服务开机自动启动
[root@centos08 ~]# systemctl enable ipvsadm

清空默认规则
[root@centos08 ~]# ipvsadm -C

查看规则
[root@centos08 ~]# ipvsadm -Ln

保存
[root@centos08 ~]# ipvsadm-save

设置DR规则:
[root@centos08 ~]# ipvsadm -A -t 192.168.100.254:80 -s rr
[root@centos08 ~]# ipvsadm -a -t 192.168.100.254:80 -r 192.168.100.10:80 -g -w 1
[root@centos08 ~]# ipvsadm -a -t 192.168.100.254:80 -r 192.168.100.20:80 -g -w 1

查看规则
保存规则
[root@centos08 ~]# ipvsadm-save

监控日志:(centos01,centos02)
Centos01:
[root@centos ~]# tail -f /var/log/httpd/access_log

Centos02:
[root@centos ~]# tail -f /var/log/httpd/access_log

验证:


 92
92


 被折叠的 条评论
为什么被折叠?
被折叠的 条评论
为什么被折叠?
 到【灌水乐园】发言


