


目录
1、缓存
1、SpringBoot内置缓存解决方案
<dependency>
    <groupId>org.springframework.boot</groupId>
    <artifactId>spring-boot-starter-cache</artifactId>
</dependency>
@SpringBootApplication
//开启缓存功能
@EnableCaching
public class Springboot19CacheApplication {
public static void main(String[] args) {
SpringApplication.run(Springboot19CacheApplication.class, args);
}
}@Service
public class BookServiceImpl implements BookService {
@Autowired
private BookDao bookDao;
@Cacheable(value="cacheSpace",key="#id")
public Book getById(Integer id) {
return bookDao.selectById(id);
}
}在业务方法上面使用注解@Cacheable声明当前方法的返回值放入缓存中,其中要指定缓存的存储位置,以及缓存中保存当前方法返回值对应的名称。上例中value属性描述缓存的存储位置,可以理解为是一个存储空间名,key属性描述了缓存中保存数据的名称,使用#id读取形参中的id值作为缓存名称。
使用@Cacheable注解后,执行当前操作,如果发现对应名称在缓存中没有数据,就正常读取数据,然后放入缓存;如果对应名称在缓存中有数据,就终止当前业务方法执行,直接返回缓存中的数据。
缓存中没有值则放入值,缓存中有值则取值。
2、手机验证码案例
    //此注解仅有存放功能
    @CachePut(value = "smsCode", key = "#tele")
    public String sendCodeToSMS(String tele) {
        String code = codeUtils.generator(tele);
        return code;
    }
//此方法需要被bean管理
@Cacheable(value = "smsCode",key="#tele")
public String get(String tele){
return null;
}3、SpringBoot整合Ehcache缓存
<dependency>
    <groupId>net.sf.ehcache</groupId>
    <artifactId>ehcache</artifactId>
</dependency>
spring:
cache:
type: ehcache
ehcache:
config: ehcache.xml由于ehcache的配置有独立的配置文件格式,因此还需要指定ehcache的配置文件,以便于读取相应配置 :
<?xml version="1.0" encoding="UTF-8"?>
<ehcache xmlns:xsi="http://www.w3.org/2001/XMLSchema-instance"
         xsi:noNamespaceSchemaLocation="http://ehcache.org/ehcache.xsd"
         updateCheck="false">
    <diskStore path="D:\ehcache" />

    <!--默认缓存策略 -->
    <!-- external:是否永久存在,设置为true则不会被清除,此时与timeout冲突,通常设置为false-->
    <!-- diskPersistent:是否启用磁盘持久化-->
    <!-- maxElementsInMemory:最大缓存数量-->
    <!-- overflowToDisk:超过最大缓存数量是否持久化到磁盘-->
    <!-- timeToIdleSeconds:最大不活动间隔,设置过长缓存容易溢出,设置过短无效果,可用于记录时效性数据,例如验证码-->
    <!-- timeToLiveSeconds:最大存活时间-->
    <!-- memoryStoreEvictionPolicy:缓存清除策略-->
    <defaultCache
        eternal="false"
        diskPersistent="false"
        maxElementsInMemory="1000"
        overflowToDisk="false"
        timeToIdleSeconds="60"
        timeToLiveSeconds="60"
        memoryStoreEvictionPolicy="LRU" />

    <cache
        name="smsCode"
        eternal="false"
        diskPersistent="false"
        maxElementsInMemory="1000"
        overflowToDisk="false"
        timeToIdleSeconds="10"
        timeToLiveSeconds="10"
        memoryStoreEvictionPolicy="LRU" />
</ehcache>
@CachePut(value = "smsCode", key = "#tele")
public String sendCodeToSMS(String tele) {
String code = codeUtils.generator(tele);
return code;
}在企业开发过程中,通过设置不同名称的cache来设定不同的缓存策略,应用于不同的缓存数据。
可以发现一点,原始代码没有任何修改, 仅仅是加了一组配置就可以变更缓存供应商了,这也是springboot提供了统一的缓存操作接口的优势,变更实现并不影响原始代码的书写。
4、SpringBoot整合Redis缓存
<dependency>
    <groupId>org.springframework.boot</groupId>
    <artifactId>spring-boot-starter-data-redis</artifactId>
</dependency>
spring:
redis:
host: localhost
port: 6379
cache:
type: redis注意:如果需要对redis作为缓存进行配置,注意不是对原始的redis进行配置,而是配置redis作为缓存使用相关的配置,隶属于spring.cache.redis节点下,注意不要写错位置了。
spring:
  redis:
    host: localhost
    port: 6379
  cache:
    type: redis
#可选填
redis:
use-key-prefix: false
key-prefix: sms_
cache-null-values: false
time-to-live: 10s5、SpringBoot整合jetcache缓存
jetcache严格意义上来说,并不是一个缓存解决方案,只能说他算是一个缓存框架,然后把别的缓存放到jetcache中管理,这样就可以支持AB缓存一起用了。并且jetcache参考了springboot整合缓存的思想,整体技术使用方式和springboot的缓存解决方案思想非常类似。下面咱们就先把jetcache用起来,然后再说它里面的一些小的功能。
做之前要先明确一下,jetcache并不是随便拿两个缓存都能拼到一起去的。目前jetcache支持的缓存方案本地缓存支持两种,远程缓存支持两种,分别如下:
-
本地缓存(Local)
- LinkedHashMap
- Caffeine
-
远程缓存(Remote)
- Redis
- Tair
纯远程
<dependency>
    <groupId>com.alicp.jetcache</groupId>
    <artifactId>jetcache-starter-redis</artifactId>
    <version>2.6.2</version>
</dependency>
jetcache:
remote:
default:
type: redis
host: localhost
port: 6379
poolConfig:
maxTotal: 50其中poolConfig是必配项,否则会报错
@SpringBootApplication
//jetcache启用缓存的主开关
@EnableCreateCacheAnnotation
public class Springboot20JetCacheApplication {
public static void main(String[] args) {
SpringApplication.run(Springboot20JetCacheApplication.class, args);
}
}创建缓存对象Cache,并使用注解@CreateCache标记当前缓存的信息,然后使用Cache对象的API操作缓存,put写缓存,get读缓存。
@Service
public class SMSCodeServiceImpl implements SMSCodeService {
@Autowired
private CodeUtils codeUtils;
@CreateCache(name="jetCache_",expire = 10,timeUnit = TimeUnit.SECONDS)
private Cache<String ,String> jetCache;
public String sendCodeToSMS(String tele) {
String code = codeUtils.generator(tele);
jetCache.put(tele,code);
return code;
}
public boolean checkCode(SMSCode smsCode) {
String code = jetCache.get(smsCode.getTele());
return smsCode.getCode().equals(code);
}
}上述方案中使用的是配置中定义的default缓存,其实这个default是个名字,可以随便写,也可以随便加。例如再添加一种缓存解决方案,参照如下配置进行:
jetcache:
  remote:
    default:
      type: redis
      host: localhost
      port: 6379
      poolConfig:
        maxTotal: 50
sms:
type: redis
host: localhost
port: 6379
poolConfig:
maxTotal: 50@Service
public class SMSCodeServiceImpl implements SMSCodeService {
@Autowired
private CodeUtils codeUtils;
@CreateCache(area="sms",name="jetCache_",expire = 10,timeUnit = TimeUnit.SECONDS)
private Cache<String ,String> jetCache;
public String sendCodeToSMS(String tele) {
String code = codeUtils.generator(tele);
jetCache.put(tele,code);
return code;
}
public boolean checkCode(SMSCode smsCode) {
String code = jetCache.get(smsCode.getTele());
return smsCode.getCode().equals(code);
}
}纯本地
远程方案中,配置中使用remote表示远程,换成local就是本地,只不过类型不一样而已。
<dependency>
<groupId>com.alicp.jetcache</groupId>
<artifactId>jetcache-starter-redis</artifactId>
<version>2.6.2</version>
</dependency>jetcache:
local:
default:
type: linkedhashmap
keyConvertor: fastjson为了加速数据获取时key的匹配速度,jetcache要求指定key的类型转换器。
简单说就是,如果你给了一个Object作为key的话,我先用key的类型转换器给转换成字符串,然后再保存。等到获取数据时,仍然是先使用给定的Object转换成字符串,然后根据字符串匹配。
@SpringBootApplication
//jetcache启用缓存的主开关
@EnableCreateCacheAnnotation
public class Springboot20JetCacheApplication {
    public static void main(String[] args) {
        SpringApplication.run(Springboot20JetCacheApplication.class, args);
    }
}@Service
public class SMSCodeServiceImpl implements SMSCodeService {
@CreateCache(name="jetCache_",expire = 1000,timeUnit = TimeUnit.SECONDS,cacheType = CacheType.LOCAL)
private Cache<String ,String> jetCache;
public String sendCodeToSMS(String tele) {
String code = codeUtils.generator(tele);
jetCache.put(tele,code);
return code;
}
public boolean checkCode(SMSCode smsCode) {
String code = jetCache.get(smsCode.getTele());
return smsCode.getCode().equals(code);
}
}cacheType控制当前缓存使用本地缓存还是远程缓存,配置cacheType=CacheType.LOCAL即使用本地缓存。
本地+远程
在创建缓存的时候,配置cacheType为BOTH即则本地缓存与远程缓存同时使用。
jetcache:
local:
default:
type: linkedhashmap
keyConvertor: fastjson
remote:
default:
type: redis
host: localhost
port: 6379
poolConfig:
maxTotal: 50
sms:
type: redis
host: localhost
port: 6379
poolConfig:
maxTotal: 50@Service
public class SMSCodeServiceImpl implements SMSCodeService {
@CreateCache(name="jetCache_",expire = 1000,timeUnit = TimeUnit.SECONDS,cacheType = CacheType.BOTH)
private Cache<String ,String> jetCache;
}cacheType如果不进行配置,默认值是REMOTE,即仅使用远程缓存方案。关于jetcache的配置,参考以下信息
方法缓存
给一个方法添加一个注解,方法就会自动使用缓存。
<dependency>
    <groupId>com.alicp.jetcache</groupId>
    <artifactId>jetcache-starter-redis</artifactId>
    <version>2.6.2</version>
</dependency>
jetcache:
local:
default:
type: linkedhashmap
keyConvertor: fastjson
remote:
default:
type: redis
host: localhost
port: 6379
keyConvertor: fastjson
valueEncode: java
valueDecode: java
poolConfig:
maxTotal: 50
sms:
type: redis
host: localhost
port: 6379
poolConfig:
maxTotal: 50由于redis缓存中不支持保存对象,因此需要对redis设置当Object类型数据进入到redis中时如何进行类型转换。需要配置keyConvertor表示key的类型转换方式,同时标注value的转换类型方式,值进入redis时是java类型,标注valueEncode为java,值从redis中读取时转换成java,标注valueDecode为java。
注意,为了实现Object类型的值进出redis,需要保障进出redis的Object类型的数据必须实现序列化接口。
@Data
public class Book implements Serializable {
    private Integer id;
    private String type;
    private String name;
    private String description;
}
启用缓存时开启方法缓存功能,并配置basePackages,说明在哪些包中开启方法缓存
@SpringBootApplication
//jetcache启用缓存的主开关
@EnableCreateCacheAnnotation
//开启方法注解缓存
@EnableMethodCache(basePackages = "com.itheima")
public class Springboot20JetCacheApplication {
    public static void main(String[] args) {
        SpringApplication.run(Springboot20JetCacheApplication.class, args);
    }
}
使用注解@Cached标注当前方法使用缓存
@Service
public class BookServiceImpl implements BookService {
    @Autowired
    private BookDao bookDao;

    @Override
    @Cached(name="book_",key="#id",expire = 3600,cacheType = CacheType.REMOTE)
    public Book getById(Integer id) {
        return bookDao.selectById(id);
    }
}
远程方案的数据同步
由于远程方案中redis保存的数据可以被多个客户端共享,这就存在了数据同步问题。jetcache提供了3个注解解决此问题,分别在更新、删除操作时同步缓存数据,和读取缓存时定时刷新数据 。
更新缓存
@CacheUpdate(name="book_",key="#book.id",value="#book")
public boolean update(Book book) {
    return bookDao.updateById(book) > 0;
}
删除缓存
@CacheInvalidate(name="book_",key = "#id")
public boolean delete(Integer id) {
    return bookDao.deleteById(id) > 0;
}
定时刷新缓存
@Cached(name="book_",key="#id",expire = 3600,cacheType = CacheType.REMOTE)
@CacheRefresh(refresh = 5)
public Book getById(Integer id) {
    return bookDao.selectById(id);
}
数据报表
jetcache还提供有简单的数据报表功能,帮助开发者快速查看缓存命中信息,只需要添加一个配置即可。
jetcache:
  statIntervalMinutes: 1
设置后,每1分钟在控制台输出缓存数据命中信息

6、SpringBoot整合j2cache缓存
jetcache可以在限定范围内构建多级缓存,但是灵活性不足,不能随意搭配缓存,这里介绍一种可以随意搭配缓存解决方案的缓存整合框架,j2cache。以Ehcache与redis整合为例 :
<dependency>
    <groupId>net.oschina.j2cache</groupId>
    <artifactId>j2cache-core</artifactId>
    <version>2.8.4-release</version>
</dependency>
<dependency>
    <groupId>net.oschina.j2cache</groupId>
    <artifactId>j2cache-spring-boot2-starter</artifactId>
    <version>2.8.0-release</version>
</dependency>
<dependency>
    <groupId>net.sf.ehcache</groupId>
    <artifactId>ehcache</artifactId>
</dependency>j2cache的starter中默认包含了redis坐标,官方推荐使用redis作为二级缓存,因此此处无需导入redis坐标。
配置一级与二级缓存,并配置一二级缓存间数据传递方式,配置书写在名称为j2cache.properties的文件中。如果使用ehcache还需要单独添加ehcache的配置文件 。
# 1级缓存
j2cache.L1.provider_class = ehcache
ehcache.configXml = ehcache.xml

# 2级缓存
j2cache.L2.provider_class = net.oschina.j2cache.cache.support.redis.SpringRedisProvider
j2cache.L2.config_section = redis
redis.hosts = localhost:6379

# 1级缓存中的数据如何到达二级缓存
j2cache.broadcast = net.oschina.j2cache.cache.support.redis.SpringRedisPubSubPolicy
@Service
public class SMSCodeServiceImpl implements SMSCodeService {
@Autowired
private CodeUtils codeUtils;
@Autowired
private CacheChannel cacheChannel;
public String sendCodeToSMS(String tele) {
String code = codeUtils.generator(tele);
cacheChannel.set("sms",tele,code);
return code;
}
public boolean checkCode(SMSCode smsCode) {
String code = cacheChannel.get("sms",smsCode.getTele()).asString();
return smsCode.getCode().equals(code);
}
}j2cache的使用和jetcache比较类似,但是无需开启使用的开关,直接定义缓存对象即可使用,缓存对象名CacheChannel。
总结:
-
j2cache是一个缓存框架,自身不具有缓存功能,它提供多种缓存整合在一起使用的方案
-
j2cache需要通过复杂的配置设置各级缓存,以及缓存之间数据交换的方式
-
j2cache操作接口通过CacheChannel实现
2、任务
1、Quartz
-
工作(Job):用于定义具体执行的工作
-
工作明细(JobDetail):用于描述定时工作相关的信息
-
触发器(Trigger):描述了工作明细与调度器的对应关系
-
调度器(Scheduler):用于描述触发工作的执行规则,通常使用cron表达式定义规则
<dependency>
    <groupId>org.springframework.boot</groupId>
    <artifactId>spring-boot-starter-quartz</artifactId>
</dependency>
public class MyQuartz extends QuartzJobBean {
@Override
protected void executeInternal(JobExecutionContext context) throws JobExecutionException {
System.out.println("quartz task run...");
}
}@Configuration
public class QuartzConfig {
@Bean
public JobDetail printJobDetail(){
//绑定具体的工作
return JobBuilder.newJob(MyQuartz.class).storeDurably().build();
}
@Bean
public Trigger printJobTrigger(){
ScheduleBuilder schedBuilder = CronScheduleBuilder.cronSchedule("0/5 * * * * ?");
//绑定对应的工作明细
return TriggerBuilder.newTrigger().forJob(printJobDetail()).withSchedule(schedBuilder).build();
}
}总结
-
springboot整合Quartz就是将Quartz对应的核心对象交给spring容器管理,包含两个对象,JobDetail和Trigger对象
-
JobDetail对象描述的是工作的执行信息,需要绑定一个QuartzJobBean类型的对象
-
Trigger对象定义了一个触发器,需要为其指定绑定的JobDetail是哪个,同时要设置执行周期调度器
2、Task
@SpringBootApplication
//开启定时任务功能
@EnableScheduling
public class Springboot22TaskApplication {
    public static void main(String[] args) {
        SpringApplication.run(Springboot22TaskApplication.class, args);
    }
}
@Component
public class MyBean {
@Scheduled(cron = "0/1 * * * * ?")
public void print(){
System.out.println(Thread.currentThread().getName()+" :spring task run...");
}
}如何想对定时任务进行相关配置,可以通过配置文件进行 :
spring:
  task:
   	scheduling:
      pool:
       	size: 1							# 任务调度线程池大小 默认 1
      thread-name-prefix: ssm_      	# 调度线程名称前缀 默认 scheduling-
        shutdown:
          await-termination: false		# 线程池关闭时等待所有任务完成
          await-termination-period: 10s	# 调度线程关闭前最大等待时间,确保最后一定关闭
3、邮件
-
SMTP(Simple Mail Transfer Protocol):简单邮件传输协议,用于发送电子邮件的传输协议
-
POP3(Post Office Protocol - Version 3):用于接收电子邮件的标准协议
-
IMAP(Internet Mail Access Protocol):互联网消息协议,是POP3的替代协议
简单说就是SMPT是发邮件的标准,POP3是收邮件的标准,IMAP是对POP3的升级。我们制作程序中操作邮件,通常是发邮件,所以SMTP是使用的重点。
<dependency>
    <groupId>org.springframework.boot</groupId>
    <artifactId>spring-boot-starter-mail</artifactId>
</dependency>
配置邮箱的登录信息
spring:
  mail:
    host: smtp.126.com
    username: test@126.com
    password: test
将发送邮件的必要信息(发件人、收件人、标题、正文)封装到SimpleMailMessage对象中,可以根据规则设置发送人昵称等。
@Service
public class SendMailServiceImpl implements SendMailService {
    @Autowired
    private JavaMailSender javaMailSender;

    //发送人
    private String from = "test@qq.com";
    //接收人
    private String to = "test@126.com";
    //标题
    private String subject = "测试邮件";
    //正文
    private String context = "测试邮件正文内容";

    @Override
    public void sendMail() {
        SimpleMailMessage message = new SimpleMailMessage();
        message.setFrom(from+"(小甜甜)");
        message.setTo(to);
        message.setSubject(subject);
        message.setText(context);
        javaMailSender.send(message);
    }
}
发送多组件邮件(附件、复杂正文):
@Service
public class SendMailServiceImpl2 implements SendMailService {
    @Autowired
    private JavaMailSender javaMailSender;

    //发送人
    private String from = "test@qq.com";
    //接收人
    private String to = "test@126.com";
    //标题
    private String subject = "测试邮件";
    //正文
    private String context = "<img src='ABC.JPG'/><a href='https://www.itcast.cn'>点开有惊喜</a>";

    public void sendMail() {
        try {
            MimeMessage message = javaMailSender.createMimeMessage();
            MimeMessageHelper helper = new MimeMessageHelper(message,true);		//此处设置支持附件
            helper.setFrom(to+"(小甜甜)");
            helper.setTo(from);
            helper.setSubject(subject);
            helper.setText(context,true);		//此处设置正文支持html解析

            //添加附件
            File f1 = new File("springboot_23_mail-0.0.1-SNAPSHOT.jar");
            File f2 = new File("resources\\logo.png");

            helper.addAttachment(f1.getName(),f1);
            helper.addAttachment("最靠谱的培训结构.png",f2);

            javaMailSender.send(message);
        } catch (Exception e) {
            e.printStackTrace();
        }
    }
}
4、消息
-
JMS:JMS(Java Message Service),这是一个规范,作用等同于JDBC规范,提供了与消息服务相关的API接口。 JMS规范中规范了消息有两种模型。分别是点对点模型和发布订阅模型。
-
AMQP:一种协议(高级消息队列协议,也是消息代理规范),规范了网络交换的数据格式,兼容JMS操作。 具有跨平台性,服务器供应商,生产者,消费者可以使用不同的语言来实现(RabbitMQ、StormMQ、RocketMQ )
-
MQTT:MQTT(Message Queueing Telemetry Transport)消息队列遥测传输,专为小设备设计,是物联网(IOT)生态系统中主要成分之一。由于与JavaEE企业级开发没有交集,此处不作过多的说明。
1、SpringBoot整合ActiveMQ
解压即可
点击启动
activemq.bat

默认对外服务端口61616

http://127.0.0.1:8161/

账号、密码:admin
<dependency>
<groupId>org.springframework.boot</groupId>
<artifactId>spring-boot-starter-activemq</artifactId>
</dependency>#配置ActiveMQ的服务器地址
spring:
activemq:
broker-url: tcp://localhost:61616@Service
public class MessageServiceActivemqImpl implements MessageService {
@Autowired
private JmsMessagingTemplate messagingTemplate;
@Override
public void sendMessage(String id) {
System.out.println("待发送短信的订单已纳入处理队列,id:"+id);
messagingTemplate.convertAndSend("order.queue.id",id);
}
@Override
public String doMessage() {
String id = messagingTemplate.receiveAndConvert("order.queue.id",String.class);
System.out.println("已完成短信发送业务,id:"+id);
return id;
}
}使用消息监听器在服务器启动后,监听指定位置,当消息出现后,立即消费消息 :
@Component
public class MessageListener {
    @JmsListener(destination = "order.queue.id")
    @SendTo("order.other.queue.id") //此注解将返回值传递给下一个队列
    public String receive(String id){
        System.out.println("已完成短信发送业务,id:"+id);
        return "new:"+id;
    }
}切换消息模型由点对点模型到发布订阅模型,修改jms配置即可 :
spring:
  activemq:
    broker-url: tcp://localhost:61616
  jms:
    pub-sub-domain: true #默认false,点对点
2、SpringBoot整合RabbitMQ
https://blog.csdn.net/weixin_56697114/article/details/120433491
3、SpringBoot整合RocketMQ
https://blog.csdn.net/weixin_56697114/article/details/121592517
<dependency>
    <groupId>org.apache.rocketmq</groupId>
    <artifactId>rocketmq-spring-boot-starter</artifactId>
    <version>2.2.1</version>
</dependency>
rocketmq:
name-server: localhost:9876
producer:
group: group_rocketmq@Service
public class MessageServiceRocketmqImpl implements MessageService {
@Autowired
private RocketMQTemplate rocketMQTemplate;
@Override
public void sendMessage(String id) {
System.out.println("待发送短信的订单已纳入处理队列(rocketmq),id:"+id);
//异步消息
SendCallback callback = new SendCallback() {
@Override
public void onSuccess(SendResult sendResult) {
System.out.println("消息发送成功");
}
@Override
public void onException(Throwable e) {
System.out.println("消息发送失败!!!!!");
}
};
rocketMQTemplate.asyncSend("order_id",id,callback);
}
}@Component
@RocketMQMessageListener(topic = "order_id",consumerGroup = "group_rocketmq")
public class MessageListener implements RocketMQListener<String> {
@Override
public void onMessage(String id) {
System.out.println("已完成短信发送业务(rocketmq),id:"+id);
}
}4、SpringBoot整合Kafka
运行bin目录下的windows目录下的zookeeper-server-start命令即可启动注册中心,默认对外服务端口2181。
运行bin目录下的windows目录下的kafka-server-start命令即可启动kafka服务器,默认对外服务端口9092。
zookeeper-server-start.bat ..\..\config\zookeeper.properties		# 启动zookeeper
kafka-server-start.bat ..\..\config\server.properties				# 启动kafka
# 创建topic
kafka-topics.bat --create --zookeeper localhost:2181 --replication-factor 1 --partitions 1 --topic itheima
# 查询topic
kafka-topics.bat --zookeeper 127.0.0.1:2181 --list
# 删除topic
kafka-topics.bat --delete --zookeeper localhost:2181 --topic itheimakafka-console-producer.bat --broker-list localhost:9092 --topic itheima # 测试生产消息
kafka-console-consumer.bat --bootstrap-server localhost:9092 --topic itheima --from-beginning # 测试消息消费<dependency>
<groupId>org.springframework.kafka</groupId>
<artifactId>spring-kafka</artifactId>
</dependency>spring:
kafka:
bootstrap-servers: localhost:9092
consumer:
group-id: order@Service
public class MessageServiceKafkaImpl implements MessageService {
@Autowired
private KafkaTemplate<String,String> kafkaTemplate;
@Override
public void sendMessage(String id) {
System.out.println("待发送短信的订单已纳入处理队列(kafka),id:"+id);
kafkaTemplate.send("itheima2022",id);
}
}@Component
public class MessageListener {
@KafkaListener(topics = "itheima2022")
public void onMessage(ConsumerRecord<String,String> record){
System.out.println("已完成短信发送业务(kafka),id:"+record.value());
}
}使用注解@KafkaListener定义当前方法监听Kafka中指定topic的消息,接收到的消息封装在对象ConsumerRecord中,获取数据从ConsumerRecord对象中获取即可。
5、监控
Spring Boot Admin,这是一个开源社区项目,用于管理和监控SpringBoot应用程序。这个项目中包含有客户端和服务端两部分,而监控平台指的就是服务端。我们做的程序如果需要被监控,将我们做的程序制作成客户端,然后配置服务端地址后,服务端就可以通过HTTP请求的方式从客户端获取对应的信息,并通过UI界面展示对应信息。
1、可视化监控平台
服务端:
<dependency>
    <groupId>de.codecentric</groupId>
    <artifactId>spring-boot-admin-starter-server</artifactId>
    <version>2.5.4</version>
</dependency>

<dependency>
    <groupId>org.springframework.boot</groupId>
    <artifactId>spring-boot-starter-web</artifactId>
</dependency>
//声明当前应用启动后作为SpringBootAdmin的服务器使用
@SpringBootApplication
@EnableAdminServer
public class Springboot25AdminServerApplication {
public static void main(String[] args) {
SpringApplication.run(Springboot25AdminServerApplication.class, args);
}
}客户端:
<dependency>
    <groupId>de.codecentric</groupId>
    <artifactId>spring-boot-admin-starter-client</artifactId>
    <version>2.5.4</version>
</dependency>

<dependency>
    <groupId>org.springframework.boot</groupId>
    <artifactId>spring-boot-starter-web</artifactId>
</dependency>
spring:
boot:
admin:
client:
url: http://localhost:8080
-
开放指定信息给服务器看
-
允许服务器以HTTP请求的方式获取对应的信息
配置如下:
server:
port: 80
spring:
  boot:
    admin:
      client:
        url: http://localhost:8080
management:
  endpoint:
    health:
      show-details: always
endpoints:
  web:
    exposure: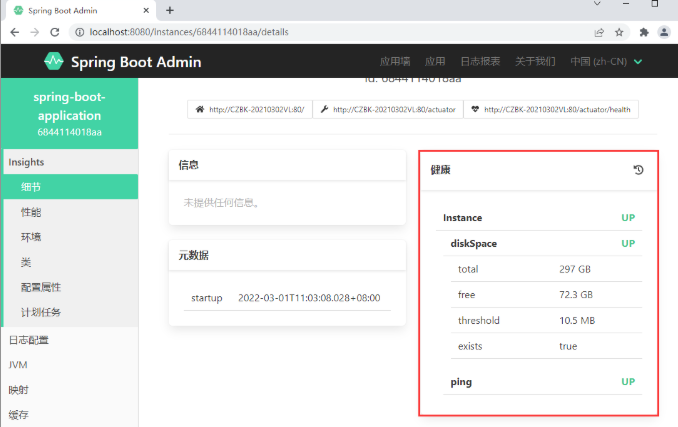
include: "*"解释:springbootadmin的客户端默认开放了13组信息给服务器,但是这些信息除了一个之外,其他的信息都不让通过HTTP请求查看。所以你看到的信息基本上就没什么内容了,只能看到一个内容,就是下面的健康信息。

健康详细信息:
management:
endpoint:
health:
show-details: always
目前除了健康信息,其他信息都查阅不了。原因在于其他12种信息是默认不提供给服务器通过HTTP请求查阅的,所以需要开启查阅的内容项,使用*表示查阅全部。记得带引号。
endpoints:
web:
exposure:
include: "*"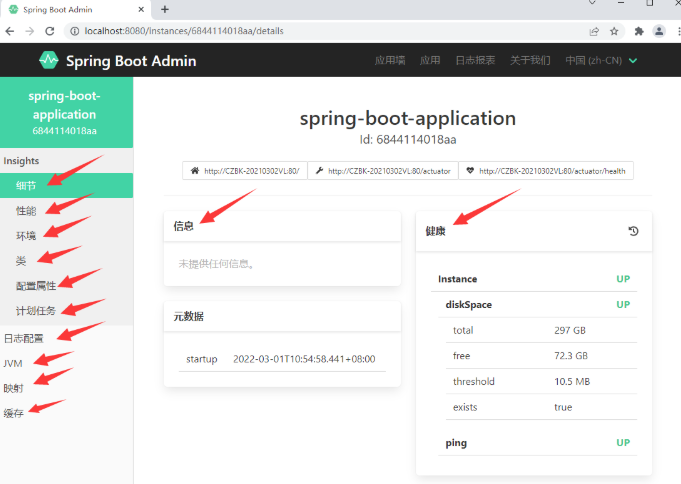
2、监控原理
通过查阅监控中的映射指标,可以看到当前系统中可以运行的所有请求路径,其中大部分路径以/actuator开头
通过发送请求,可以得到一组json信息,如下:
{
    "_links": {
        "self": {
            "href": "http://localhost:81/actuator",
            "templated": false
        },
        "beans": {
            "href": "http://localhost:81/actuator/beans",
            "templated": false
        },
        "caches-cache": {
            "href": "http://localhost:81/actuator/caches/{cache}",
            "templated": true
        },
        "caches": {
            "href": "http://localhost:81/actuator/caches",
            "templated": false
        },
        "health": {
            "href": "http://localhost:81/actuator/health",
            "templated": false
        },

....................
其中每一组数据都有一个请求路径,而在这里请求路径中有之前看到过的health,发送此请求又得到了一组信息 :
{
    "status": "UP",
    "components": {
        "diskSpace": {
            "status": "UP",
            "details": {
                "total": 297042808832,
                "free": 72284409856,
                "threshold": 10485760,
                "exists": true
            }
        },
        "ping": {
            "status": "UP"
        }
    }
}
监控中显示的信息实际上是通过发送请求后得到json数据,然后展示出来。按照上述操作,可以发送更多的以/actuator开头的链接地址,获取更多的数据,这些数据汇总到一起组成了监控平台显示的所有数据。
导入了springboot admin的对应的client,在这个资源中导入了一个名称叫做actuator的包。被监控的应用之所以可以对外提供上述请求路径,就是因为添加了这个包。

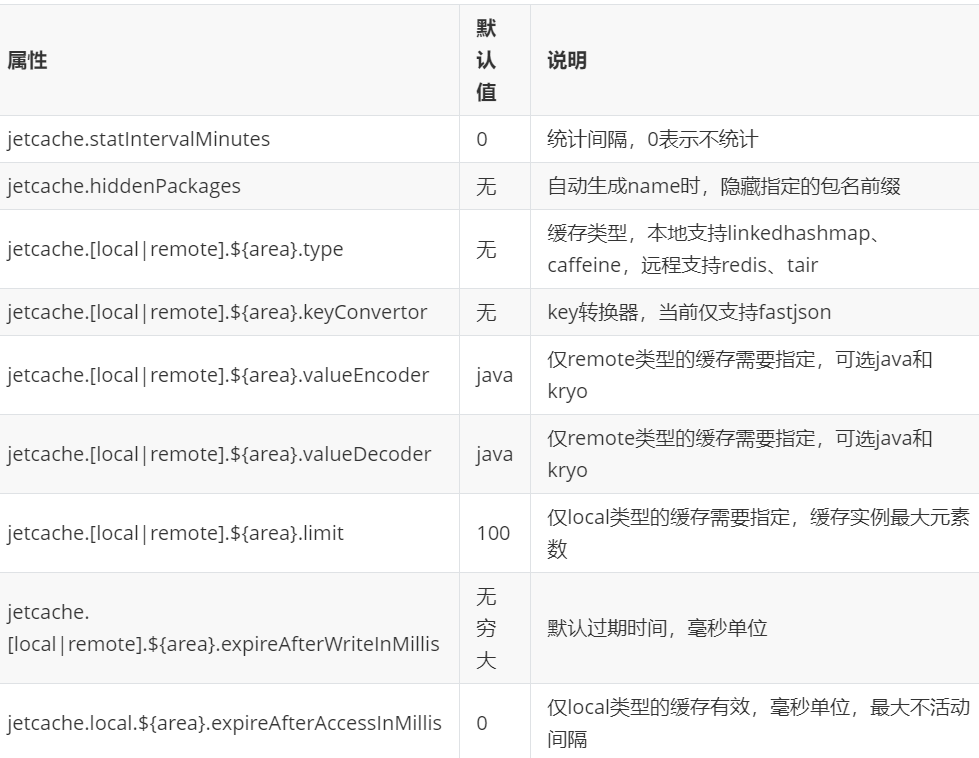
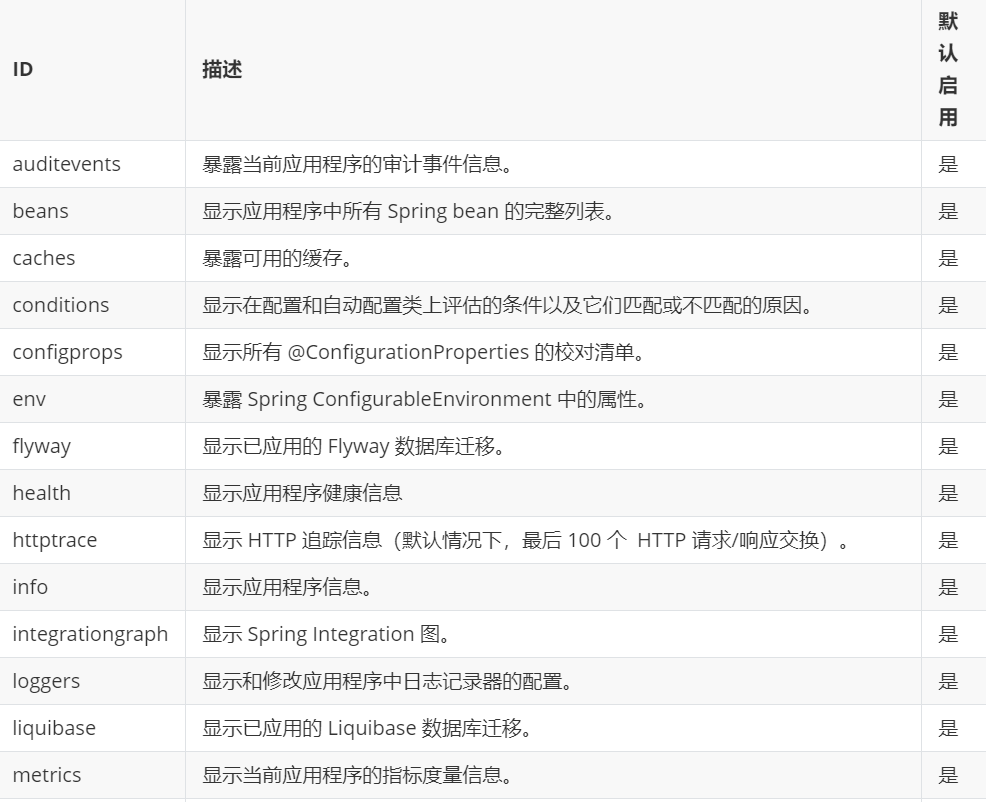
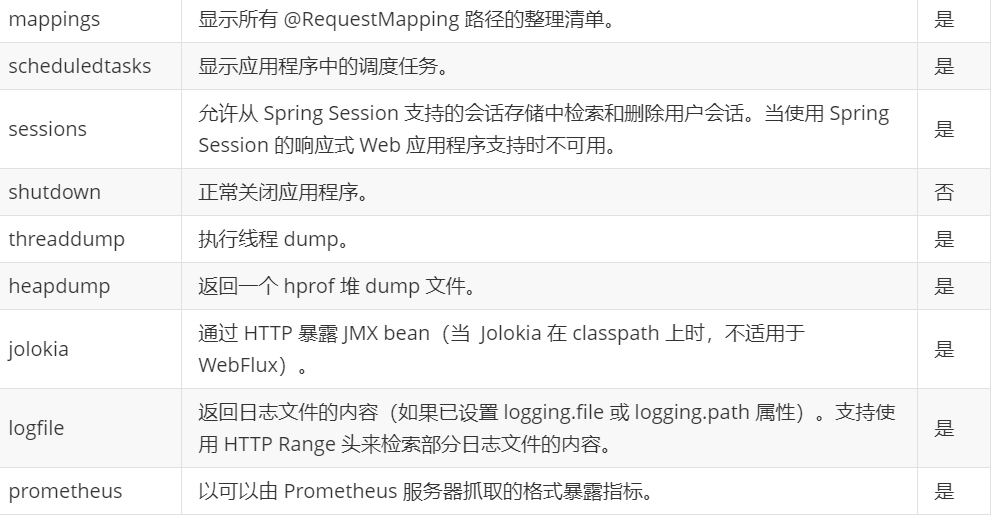
Actuator,可以称为端点,描述了一组监控信息,SpringBootAdmin提供了多个内置端点,通过访问端点就可以获取对应的监控信息,也可以根据需要自定义端点信息。通过发送请求路径/actuator可以访问应用所有端点信息,如果端点中还有明细信息可以发送请求/actuator/端点名称来获取详细信息。以下列出了所有端点信息说明:
上述端点每一项代表被监控的指标,如果对外开放则监控平台可以查询到对应的端点信息,如果未开放则无法查询对应的端点信息。通过配置可以设置端点是否对外开放功能。使用enable属性控制端点是否对外开放。其中health端点为默认端点,不能关闭。
management:
  endpoint:
    health:						# 端点名称
      show-details: always
    info:						# 端点名称
      enabled: true				# 是否开放
为了方便开发者快速配置端点,springboot admin设置了13个较为常用的端点作为默认开放的端点,如果需要控制默认开放的端点的开放状态,可以通过配置设置,如下:
management:
  endpoints:
    enabled-by-default: true	# 是否开启默认端点,默认值true
上述端点开启后,就可以通过端点对应的路径查看对应的信息了。但是此时还不能通过HTTP请求查询此信息,还需要开启通过HTTP请求查询的端点名称,使用“*”可以简化配置成开放所有端点的WEB端HTTP请求权限。
management:
  endpoints:
    web:
      exposure:
include: "*"整体上来说,对于端点的配置有两组信息,一组是endpoints开头的,对所有端点进行配置,一组是endpoint开头的,对具体端点进行配置。
management:
  endpoint:		# 具体端点的配置
    health:
      show-details: always
    info:
      enabled: true
  endpoints:	# 全部端点的配置
    web:
      exposure:
        include: "*"
    enabled-by-default: true
3、自定义监控指标
1、info端点
info端点描述了当前应用的基本信息,可以通过两种形式快速配置info端点的信息
- 配置形式
在yml文件中通过设置info节点的信息就可以快速配置端点信息
info:
  appName: @project.artifactId@
  version: @project.version@
  company: 传智教育
  author: itheima
- 编程形式
通过配置的形式只能添加固定的数据,如果需要动态数据还可以通过配置bean的方式为info端点添加信息,此信息与配置信息共存 。
@Component
public class InfoConfig implements InfoContributor {
    @Override
    public void contribute(Info.Builder builder) {
        builder.withDetail("runTime",System.currentTimeMillis());		//添加单个信息
        Map infoMap = new HashMap();
        infoMap.put("buildTime","2006");
        builder.withDetails(infoMap);									//添加一组信息
    }
}
2、health端点
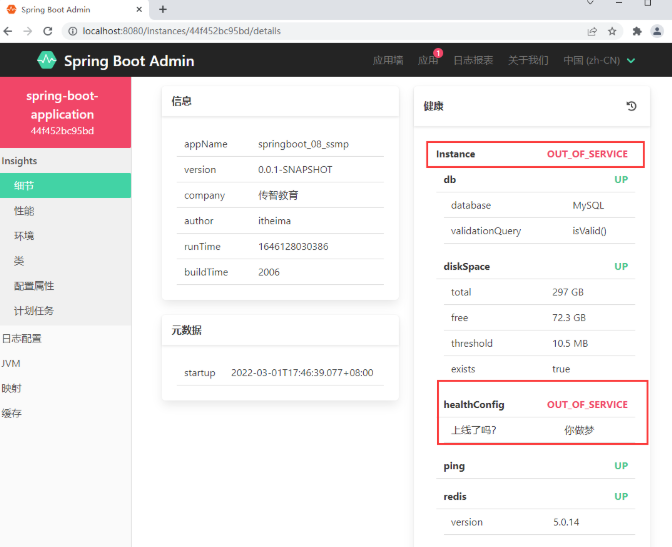
health端点描述当前应用的运行健康指标,即应用的运行是否成功。通过编程的形式可以扩展指标信息。
@Component
public class HealthConfig extends AbstractHealthIndicator {
    @Override
    protected void doHealthCheck(Health.Builder builder) throws Exception {
        boolean condition = true;
        if(condition) {
            builder.status(Status.UP);					//设置运行状态为启动状态
            builder.withDetail("runTime", System.currentTimeMillis());
            Map infoMap = new HashMap();
            infoMap.put("buildTime", "2006");
            builder.withDetails(infoMap);
        }else{
            builder.status(Status.OUT_OF_SERVICE);		//设置运行状态为不在服务状态
            builder.withDetail("上线了吗?","你做梦");
        }
    }
}
当任意一个组件状态不为UP时,整体应用对外服务状态为非UP状态。
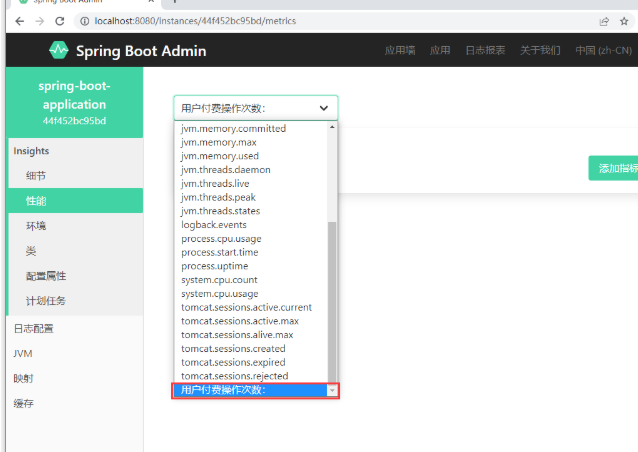
3、Metrics端点
metrics端点描述了性能指标,除了系统自带的监控性能指标,还可以自定义性能指标。
@Service
public class BookServiceImpl extends ServiceImpl<BookDao, Book> implements IBookService {
    @Autowired
    private BookDao bookDao;

    private Counter counter;

    public BookServiceImpl(MeterRegistry meterRegistry){
        counter = meterRegistry.counter("用户付费操作次数:");
    }

    @Override
    public boolean delete(Integer id) {
        //每次执行删除业务等同于执行了付费业务
        counter.increment();
        return bookDao.deleteById(id) > 0;
    }
}
4、自定义端点
可以根据业务需要自定义端点,方便业务监控
@Component
@Endpoint(id="pay",enableByDefault = true)
public class PayEndpoint {
    @ReadOperation
    public Object getPay(){
        Map payMap = new HashMap();
        payMap.put("level 1","300");
        payMap.put("level 2","291");
        payMap.put("level 3","666");
        return payMap;
    }
}
由于此端点数据spirng boot admin无法预知该如何展示,所以通过界面无法看到此数据,通过HTTP请求路径可以获取到当前端点的信息,但是需要先开启当前端点对外功能,或者设置当前端点为默认开发的端点。


 1722
1722


 被折叠的 条评论
为什么被折叠?
被折叠的 条评论
为什么被折叠?
 到【灌水乐园】发言


