


目录
一、前言
从5.0版本开始,全新NGFW下一代防火墙支持单机配置同步、会话同步功能,在一些应用场景中它可以代替双机HA功能,实现控制异步流量的目的。
二、HA网络拓扑结构
1.该拓扑中route1、router2、SW1和SW2之间启用OSPF路由协议。
2.NGFW1和NGFW2透明接入(TP模式,启用vdom)。
3.Client和Server之间的通信存在异步流量。其中internal4是HA心跳接口,用来同步配置。internal3用来同步会话,需要配互联IP地址。

NGFW1
internal1:192.168.1.21/24
internal3:10.1.1.1/24
NGFW2
internal1:192.168.1.22/24
internal3:10.1.1.2/24
三、HA配置步骤
步骤1、配置两条NGFW的HA的配置同步功能
步骤2、在NGFW1上新建VDOM,划分接口,配置策略(配置将自动同步至NGFW2)
步骤3、NGFW1启用会话交接
步骤4、两台NGFW启用会话同步
步骤5、查看配置同步结果
步骤6、注意事项
四、HA基础配置
按照如下方法分别对要做HA的2台防火墙做如下配置。
配置步骤1:两台防火墙分别配置IP,启用配置同步
NGFW1,
RG-WALL #config system interface
RG-WALL (interface) # edit internal1
RG-WALL( internal1) # set ip 192.168.1.21 255.255.255.0 //设置管理接口、ip
RG-WALL( internal1)# set allowaccess ping https ssh snmp http telnet
RG-WALL( internal1) #next
RG-WALL (interface) #edit internal3
RG-WALL( internal3) #set ip 10.1.1.1 255.255.255.0
RG-WALL( internal3) #set allowaccess ping https ssh http telnet
RG-WALL( internal3) #next
RG-WALL (interface) # end
RG-WALL #config system ha
RG-WALL (ha) #set hbdev internal4 0 //设置配置同步接口internal4
RG-WALL (ha) #set standalone-config-sync enable
RG-WALL (ha) #set priority 200 //设置优先级
RG-WALL (ha) #end
NGFW2,
RG-WALL #config system interface
RG-WALL (interface)#edit internal1
RG-WALL( internal1) #set ip 192.168.1.22 255.255.255.0
RG-WALL( internal1) #set allowaccess ping https ssh snmp http telnet
RG-WALL( internal1) #next
RG-WALL (interface)#edit internal3 //配置会话同步接口internal3的 ip地址
RG-WALL( internal3) #set ip 10.1.1.2 255.255.255.0
RG-WALL( internal3) #set allowaccess ping https ssh http telnet fgfm
RG-WALL( internal3) #next
RG-WALL (interface)#end
RG-WALL #config system ha
RG-WALL (ha) #set hbdev internal4 0//设置配置同步接口internal4
RG-WALL (ha) #set standalone-config-sync enable
RG-WALL (ha) #set priority 100//设置优先级
RG-WALL (ha) #end
注,现在修改NGFW1的配置也会同步到NGFW2。
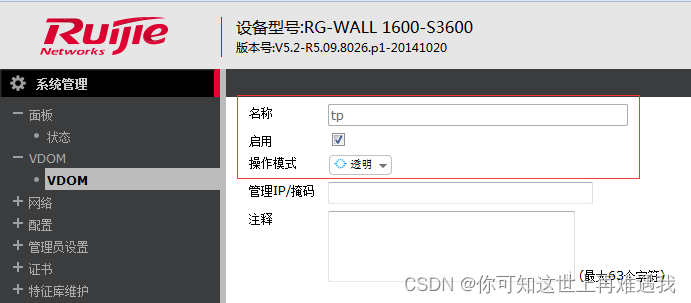
配置步骤2:WEB界面上在NGFW1上增加透明模式vdom,启用策略(配置将同步到NGFW2)
1)增加透明模式vdom
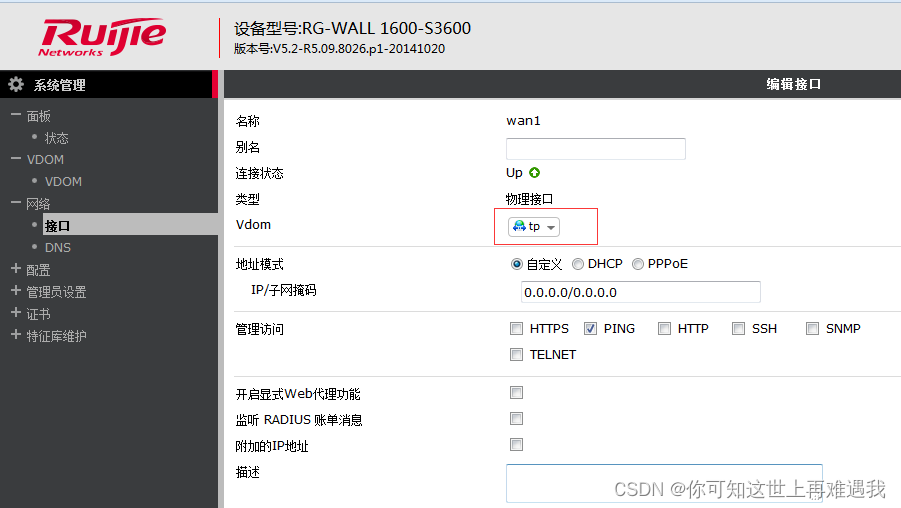
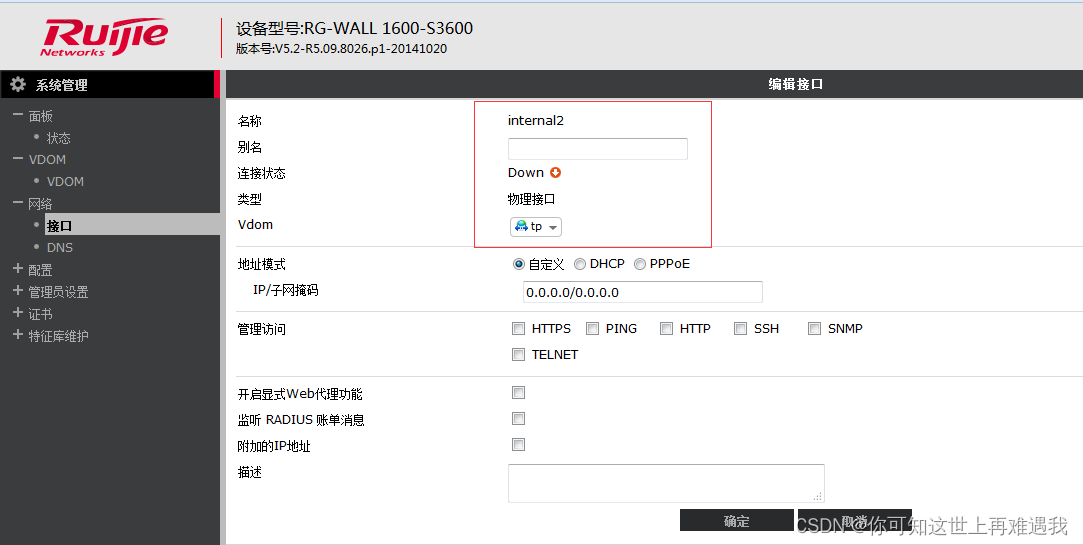
2)增将wan1,inernal2添加到vdom tp中;
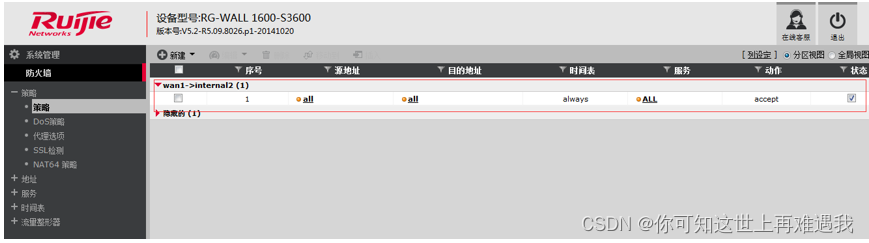
3)设置策略,允许clinet端访问服务器端
配置步骤3:NGFW1启用会话交接(命令行)
NGFW1
RG-WALL #config global
RG-WALL(global) #config system ha
RG-WALL(ha) #set session-sync-dev internal3
RG-WALL(ha) set session-pickup enable
RG-WALL(ha) set session-pickup-connectionless enable
RG-WALL(ha) set session-pickup-expectation enable
RG-WALL(ha) set session-pickup-nat enable
RG-WALL(ha) end
配置步骤4:两台NGFW分别启用会话同步(命令行)
NGFW1,
RG-WALL #config global
RG-WALL(global) #config system session-sync
RG-WALL (session-sync)#edit 1
RG-WALL (1) # set peerip 10.1.1.2
RG-WALL (1) # set syncvd tp
RG-WALL (1) # next
RG-WALL (session-sync)#end
NGFW2
RG-WALL #config global
RG-WALL(global) #config system session-sync
RG-WALL (session-sync)#edit 1
RG-WALL (1) # set peerip 10.1.1.1
RG-WALL (1) # set syncvd tp
RG-WALL (1) # next
RG-WALL (session-sync)#end
五、验证配置结果
启用配置同步后可以使用dia sys ha status 查看同步状态;使用dia sys ha showcsum 比较配置同步详情。
NGFW1:
RG-WALL #config global
RG-WALL(global) # dia sys ha showcsum
is_manage_master()=1, is_root_master()=1
debugzone
global: 8e fe 7b be 34 43 5e cc 3e 0c 6b 31 02 f9 d5 d1
tp: 9f 05 b8 6e f2 12 e8 f7 a1 58 9b b0 ad 60 1b 09
root: 45 73 10 c7 19 9d a2 8f d9 20 71 6c 98 48 e4 30
all: 26 60 34 e7 7d 0e 6e 1f cc 73 96 c4 1b 17 ee 53
checksum
global: 8e fe 7b be 34 43 5e cc 3e 0c 6b 31 02 f9 d5 d1
tp: 9f 05 b8 6e f2 12 e8 f7 a1 58 9b b0 ad 60 1b 09
root: 45 73 10 c7 19 9d a2 8f d9 20 71 6c 98 48 e4 30
all: 26 60 34 e7 7d 0e 6e 1f cc 73 96 c4 1b 17 ee 53
NGFW2
RG-WALL #Config global
RG-WALL(global) # dia sys ha showcsum
is_manage_master()=1, is_root_master()=1
debugzone
global: 8e fe 7b be 34 43 5e cc 3e 0c 6b 31 02 f9 d5 d1
tp: 9f 05 b8 6e f2 12 e8 f7 a1 58 9b b0 ad 60 1b 09
root: 45 73 10 c7 19 9d a2 8f d9 20 71 6c 98 48 e4 30
all: 26 60 34 e7 7d 0e 6e 1f cc 73 96 c4 1b 17 ee 53
checksum
global: 8e fe 7b be 34 43 5e cc 3e 0c 6b 31 02 f9 d5 d1
tp: 9f 05 b8 6e f2 12 e8 f7 a1 58 9b b0 ad 60 1b 09
root: 45 73 10 c7 19 9d a2 8f d9 20 71 6c 98 48 e4 30
all: 26 60 34 e7 7d 0e 6e 1f cc 73 96 c4 1b 17 ee 53
以上命令结果,标黄部分显示同步状态一致;
查看会话状态
NGFW1:
RG-WALL#config vdom
RG-WALL(vdom)#edit tp
RG-WALL(tp) # di sys session list
session info: proto=6 proto_state=01 duration=5 expire=3595 timeout=3600 flags=00000000 sockflag=00000000 sockport=0 av_idx=0 use=3
origin-shaper=
reply-shaper=
per_ip_shaper=
ha_id=0 policy_dir=0 tunnel=/
state=may_dirty br npu synced
statistic(bytes/packets/allow_err): org=92/2/1 reply=0/0/0 tuples=2
orgin->sink: org pre->post, reply pre->post dev=15->16/16->15 gwy=0.0.0.0/0.0.0.0
hook=pre dir=org act=noop 192.168.1.11:1493->10.30.1.3:23(0.0.0.0:0)
hook=post dir=reply act=noop 10.30.1.3:23->192.168.1.11:1493(0.0.0.0:0)
pos/(before,after) 0/(0,0), 0/(0,0)
misc=0 policy_id=1 id_policy_id=0 auth_info=0 chk_client_info=0 vd=3
serial=0001572b tos=ff/ff ips_view=0 app_list=0 app=0
dd_type=0 dd_mode=0
npu_state=00000000
npu info: flag=0x81/0x00, offload=4/0, ips_offload=0/0, epid=11/0, ipid=10/0, vlan=0/0
NGFW2
RG-WALL#config vdom
RG-WALL(vdom)#tp
RG-WALL(tp) # dia sys session list
session info: proto=6 proto_state=01 duration=23 expire=3576 timeout=3600 flags=00000000 sockflag=00000000 sockport=0 av_idx=0 use=3
origin-shaper=
reply-shaper=
per_ip_shaper=
ha_id=0 policy_dir=0 tunnel=/
state=may_dirty br npu
statistic(bytes/packets/allow_err): org=0/0/0 reply=104/2/1 tuples=2
orgin->sink: org pre->post, reply pre->post dev=15->16/16->15 gwy=0.0.0.0/0.0.0.0
hook=pre dir=org act=noop 192.168.1.11:1493->10.30.1.3:23(0.0.0.0:0)
hook=post dir=reply act=noop 10.30.1.3:23->192.168.1.11:1493(0.0.0.0:0)
pos/(before,after) 0/(0,0), 0/(0,0)
misc=0 policy_id=1 id_policy_id=0 auth_info=0 chk_client_info=0 vd=3
serial=0001572b tos=ff/ff ips_view=0 app_list=0 app=0
dd_type=0 dd_mode=0
npu_state=00000000
npu info: flag=0x00/0x81, offload=0/4, ips_offload=0/0, epid=0/10, ipid=0/11, vlan=0/0
NGFW1:
RG-WALL#config vdom
RG-WALL(vdom)#edit tp
RG-WALL(tp) # dia sni packet any 'port 23' 4
interfaces=[any]
filters=[port 23]
24.976627 wan1 in 192.168.1.11.2323 -> 10.30.1.3.23: syn 408581540
24.976641 internal2 out 192.168.1.11.2323 -> 10.30.1.3.23: syn 408581540
24.987196 wan1 in 192.168.1.11.2323 -> 10.30.1.3.23: ack 129336467
24.987205 internal2 out 192.168.1.11.2323 -> 10.30.1.3.23: ack 129336467
29.252381 wan1 in 192.168.1.11.2323 -> 10.30.1.3.23: fin 408581616 ack 129336688
29.252386 internal2 out 192.168.1.11.2323 -> 10.30.1.3.23: fin 408581616 ack 129336688
NGFW2:
RG-WALL#config vdom
RG-WALL(vdom)#edit tp
RG-WALL(tp) # dia sni packet any 'port 23' 4
interfaces=[any]
filters=[port 23]
9.044384 internal2 in 10.30.1.3.23 -> 192.168.1.11.2323: syn 129336466 ack 408581541
9.044396 wan1 out 10.30.1.3.23 -> 192.168.1.11.2323: syn 129336466 ack 408581541
9.049790 internal2 in 10.30.1.3.23 -> 192.168.1.11.2323: psh 129336467 ack 408581541
9.049800 wan1 out 10.30.1.3.23 -> 192.168.1.11.2323: psh 129336467 ack 408581541
13.309659 internal2 in 10.30.1.3.23 -> 192.168.1.11.2323: fin 129336687 ack 408581616
13.309665 wan1 out 10.30.1.3.23 -> 192.168.1.11.2323: fin 129336687 ack 408581616
六、注意事项
1. 关于MAC地址超时问题(重要)
默认NGFW的MAC地址超时时间是300秒,如果300秒后NGFW的上下联设备没有发送新的ARP请求NGFW的MAC表将超时,导致转发流量中断。
1)解决方法一:将NGFW上下联接口做MAC地址绑定
NGFW1 (global) # dia netlink brctl name host tp.b
show bridge control interface tp.b host.
fdb: size=2048, used=9, num=9, depth=1
Bridge tp.b host table
port no device devname mac addr ttl attributes
1 15 wan1 0a:9e:01:b3:dc:0a 0 Static Hit(254423)
2 16 internal2 00:1b:8f:61:08:c3 0 Static Hit(423913)
RG-WALL # config vdom
RG-WALL (vdom) # edit tp
RG-WALL(tp)#config system mac-address-table //说明:需先输入print cliovrd enabl4e并回车,同时用户登出再登录后才可执行下列命令,
RG-WALL (mac-address-table) # edit 0a:9e:01:b3:dc:0a
RG-WALL (0a:9e:01:b3:dc:0a) #set interface wan1
RG-WALL (0a:9e:01:b3:dc:0a) #next
RG-WALL (mac-address-table) #edit 00:1b:8f:61:08:c3
RG-WALL (00:1b:8f:61:08:c3) #set interface internal2
RG-WALL (00:1b:8f:61:08:c3) #next
RG-WALL (mac-address-table) #end
2)解决方法二:将NGFW的MAC超时时间设为最大(100天)
RG-WALL # config vdom
RG-WALL (vdom) # edit tp
RG-WALL#config system settings
RG-WALL(settings)#set mac-ttl 8640000
RG-WALL(settings)#end
关闭anti-replay功能
RG-WALL #config system global
RG-WALL (global) #set anti-replay disable
RG-WALL (global) #end
2. 两台NGFW间可以同步的配置
1. router
access-list
as-path
community-list
prefix-list
route-map
bgp (*exclude* neighbor, router-id, as)
2. firewall
address
addgrp
interface-policy
policy
service custom
service group
shaper
schedule
vip
vipgrp
3. log
all items
4. system
accprofile
admin
console
global
ha
ntp
settings (*exclude* ip/gateway/manageip)
zone
[interface] --*name (16)
|- vdom (12)
|- vlanid (0,0)
|- interface (16)
|- type


 1360
1360


 被折叠的 条评论
为什么被折叠?
被折叠的 条评论
为什么被折叠?
 到【灌水乐园】发言


