


扫描线算法是确定水平扫描线与多边形的相交区间,把该区间内的所有像素一次性赋
予的颜色值。
对每条扫描线,分以下4个步骤:
(1)求交点:计算当前扫描线与多边形所有边的交点。
(2)排序:把这些交点按x坐标值升序排序;
(3)配对:对排序后的交点进行奇偶配对
(4)填色:对每一对交点之间的区域进行填充。
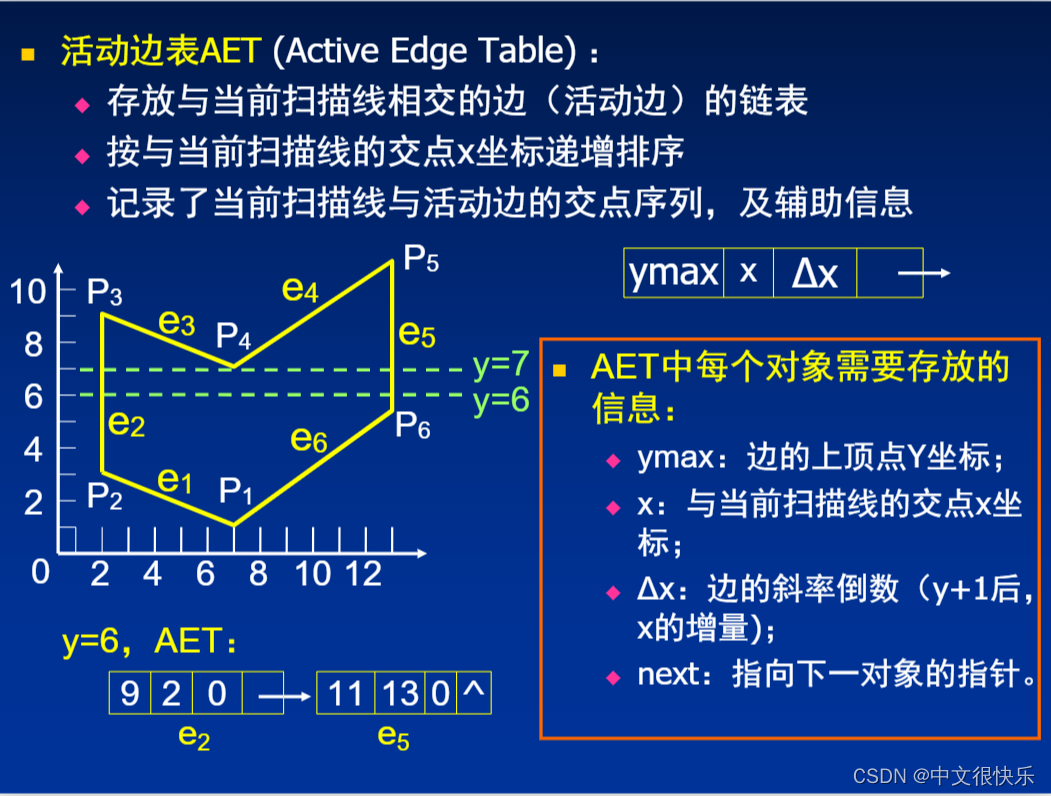
在算法中我们需要两个表:
1.活动边表AET:

2.边表ET:


源代码:
#include <iostream>
#include<GL/glut.h>
#include <windows.h>
using namespace std;
int n;

struct vertex {
    float ver_x;
    float ver_y;
};
typedef struct XET {
    float x;
    float dx, ymax;
    XET* next;
}AET, NET;

struct point {
    float x;
    float y;
};

vertex* ver;
int c = 0;

void input(GLint button, GLint state, GLint x, GLint y) {

        if (button == GLUT_LEFT_BUTTON && state == GLUT_DOWN) {
            ver[c].ver_x = x;
            ver[c].ver_y = y;
            cout << "第" << c + 1 << "个点为:" << x << "    " << y << endl;
            c++;
        }
}

void keyFromBoard() {
    for (int i = 0;i < n;i++) {
        int x, y;
        cin >> x >> y;
        ver[i].ver_x = x;
        ver[i].ver_y = y;
    }
}

void fillwith() {
    int MaxY = 0;
    int i;

    for (i = 0; i < n; i++) {
        if (ver[i].ver_y >= MaxY){
            MaxY = ver[i].ver_y;
        }
    }
    AET* pAET = new AET;
    pAET->next = NULL;
    NET* pNET[1024];
    for (i = 0; i <= MaxY; i++) {
        pNET[i] = new NET;
        pNET[i]->next = NULL;
    }

    glClear(GL_COLOR_BUFFER_BIT);
    glColor3f(0.9, 0.5, 0.6);
    glBegin(GL_POINTS);
    for (i = 0; i < MaxY; i++) {
        for (int j = 0; j < n; j++) {
            if (ver[j].ver_y == i) {
                if (ver[(j + 1 + n) % n].ver_y > ver[j].ver_y) {
                    NET* p = new NET;
                    p->x = ver[j].ver_x;
                    p->ymax = ver[(j + 1 + n) % n].ver_y;
                    p->dx = (ver[(j + 1 + n) % n].ver_x - ver[j].ver_x) / (ver[(j + 1 + n) % n].ver_y - ver[j].ver_y);
                    p->next = pNET[i]->next;
                    pNET[i]->next = p;
                }
                if (ver[(j - 1 + n) % n].ver_y > ver[j].ver_y) {
                    NET* p = new NET;
                    p->x = ver[j].ver_x;
                    p->ymax = ver[(j - 1 + n) % n].ver_y;
                    p->dx = (ver[(j - 1 + n) % n].ver_x - ver[j].ver_x) / (ver[(j - 1 + n) % n].ver_y - ver[j].ver_y);
                    p->next = pNET[i]->next;
                    pNET[i]->next = p;
                }
            }
        }
    }
    glClear(GL_COLOR_BUFFER_BIT);
    glColor3f(0.0, 0.0, 0.0);
    glBegin(GL_POINTS);
    for (i = 0; i <= MaxY; i++) {
        AET* p = new AET;
        p = pAET->next;
        AET* n = new AET;
        //将新边表中的活性边按照从左到右的顺序排序
        if (pNET[i]->next && pNET[i]->next->next) {
            if (pNET[i]->next->dx > 0) {
                NET* t = new NET;
                t = pNET[i]->next;
                n = pNET[i]->next->next;
                t->next = NULL;
                n->next = NULL;
                pNET[i]->next = n;
                n->next = t;
            }
        }
        //更新活性边表中的活性边x坐标的值
        while (p) {
            p->x = p->x + p->dx;
            p = p->next;
        }
        p = pAET->next;
        n = pAET;
        //删掉扫描线高度等同于ymax的废弃点
        while (p) {
            if (p->ymax == i) {
                n->next = p->next;
                free(p);
                p = n->next;
            }
            else {
                p = p->next;
                n = n->next;
            }
        }
        //插入新点,按照顺序插入
        p = pAET->next;
        n = pAET;
        NET* a = new NET;
        a = pNET[i]->next;
        if (a) {
            NET* b = new NET;
            b = a;
            while (b->next) {
                b = b->next;
            }
            if (!pAET->next) {
                pAET->next = a;
            }
            else {
                while (p) {
                    if (a->x < p->x) {
                        b->next = p;
                        n->next = a;
                        break;
                    }
                    if (!p->next) {
                        p->next = a;
                        break;
                    }
                    n = n->next;
                    p = p->next;
                }
            }
        }
        //填充2
        p = pAET->next;
        while (p && p->next) {
            for (float j = p->x; j <= p->next->x; j++) {
                glVertex2i(static_cast<int>(j), i);
            }
            p = p->next->next;
        }
    }
    glEnd();
    glFlush();
}

int init(void) {
    glClearColor(0.0, 1.0, 1.0, 0.0);//画完图形后的背景颜色
    glMatrixMode(GL_PROJECTION);
    //gluOrtho2D(x1, x2, y1, y2)窗口会显示在二维坐标内x1<x<x2,y1<y<y2这个区域的点
    gluOrtho2D(0.0, 600.0, 0.0, 450.0);//窗口的显示的值的范围
    cout << "输入要显示的多边形共有几个顶点" << endl;
    cin >> n;
    cout << "键盘输入为1,鼠标输入为2,你的选择是:" << endl;
    int x;
    cin >> x;
    return x;
}

int main(int argc, char* argv) {

    glutInit(&argc, &argv);//初始化 GLUT 库
    glutInitDisplayMode(GLUT_SINGLE | GLUT_RGB);//指定一个颜色为RGE显示的窗口或者单缓冲区窗口
    glutInitWindowPosition(50, 100);//设置窗口位置,50: 距离屏幕左边的像素数。100:距离屏幕上边的像素数
    glutInitWindowSize(400, 300); //设置窗口大小
    glutCreateWindow("实验3");//设置窗口的标题

    int x = init();
    ver = (vertex*)malloc(sizeof(vertex) * n);//输入顶点以(x,y)格式

    if (x == 1) {
        keyFromBoard();
    }
    else if (x == 2) {
        //鼠标左点击
        for (int i = 0; i < n; i++) {
            glutMouseFunc(input);//鼠标点击时会调用该方法
        }
    }

    glutDisplayFunc(fillwith);
    glutMainLoop();
}
可以通过鼠标点击来进行点的输入或者键盘输入点的位置。
然后进行填充:
比如如下我将进行鼠标的输入:

在绘图区域点击几个点就可以实现:


 1411
1411


 被折叠的 条评论
为什么被折叠?
被折叠的 条评论
为什么被折叠?
 到【灌水乐园】发言


