【代码学习】Mediapipe人脸检测使用记录

Mediapipe,每秒200-300帧的实时人脸检测,提取画面中的人脸框,实现后续各种应用:人脸属性识别、表情识别、关键点检测、三维重建、增强现实、AI换妆等

code:google/mediapipe: Cross-platform, customizable ML solutions for live and streaming media. (github.com)

理论

  检测到的人脸集合,其中每个人脸都表示为一个检测原型消息,其中包含一个边界框和 6 个关键点(右眼、左眼、鼻尖、嘴巴中心、右耳和左耳)。边界框由xminwidth(均由[0.0, 1.0]图像宽度归一化)和ymin和(均由图像高度height归一化)组成。[0.0, 1.0]每个关键点由x和组成,分别由图像宽度和高度y归一化。[0.0, 1.0]


import cv2
import mediapipe as mp
mp_face_detection = mp.solutions.face_detection
mp_drawing = mp.solutions.drawing_utils
# For webcam input:
cap = cv2.VideoCapture(0)
with mp_face_detection.FaceDetection(model_selection=0, 
                                     min_detection_confidence=0.5) as face_detection:
    while cap.isOpened():
        success, image = cap.read()
        if not success:
            print("Ignoring empty camera frame.")
            # If loading a video, use 'break' instead of 'continue'.
            continue
        # To improve performance, optionally mark the image as not writeable to
        # pass by reference.
        image.flags.writeable = False
        image = cv2.cvtColor(image, cv2.COLOR_BGR2RGB)
        results = face_detection.process(image)
        # Draw the face detection annotations on the image.
        image.flags.writeable = True
        image = cv2.cvtColor(image, cv2.COLOR_RGB2BGR)
        if results.detections:
            for detection in results.detections:
                mp_drawing.draw_detection(image, detection)
        # Flip the image horizontally for a selfie-view display.
        cv2.imshow('MediaPipe Face Detection', cv2.flip(image, 1))
        if cv2.waitKey(5) & 0xFF == 27:
            break
cap.release()
复制代码

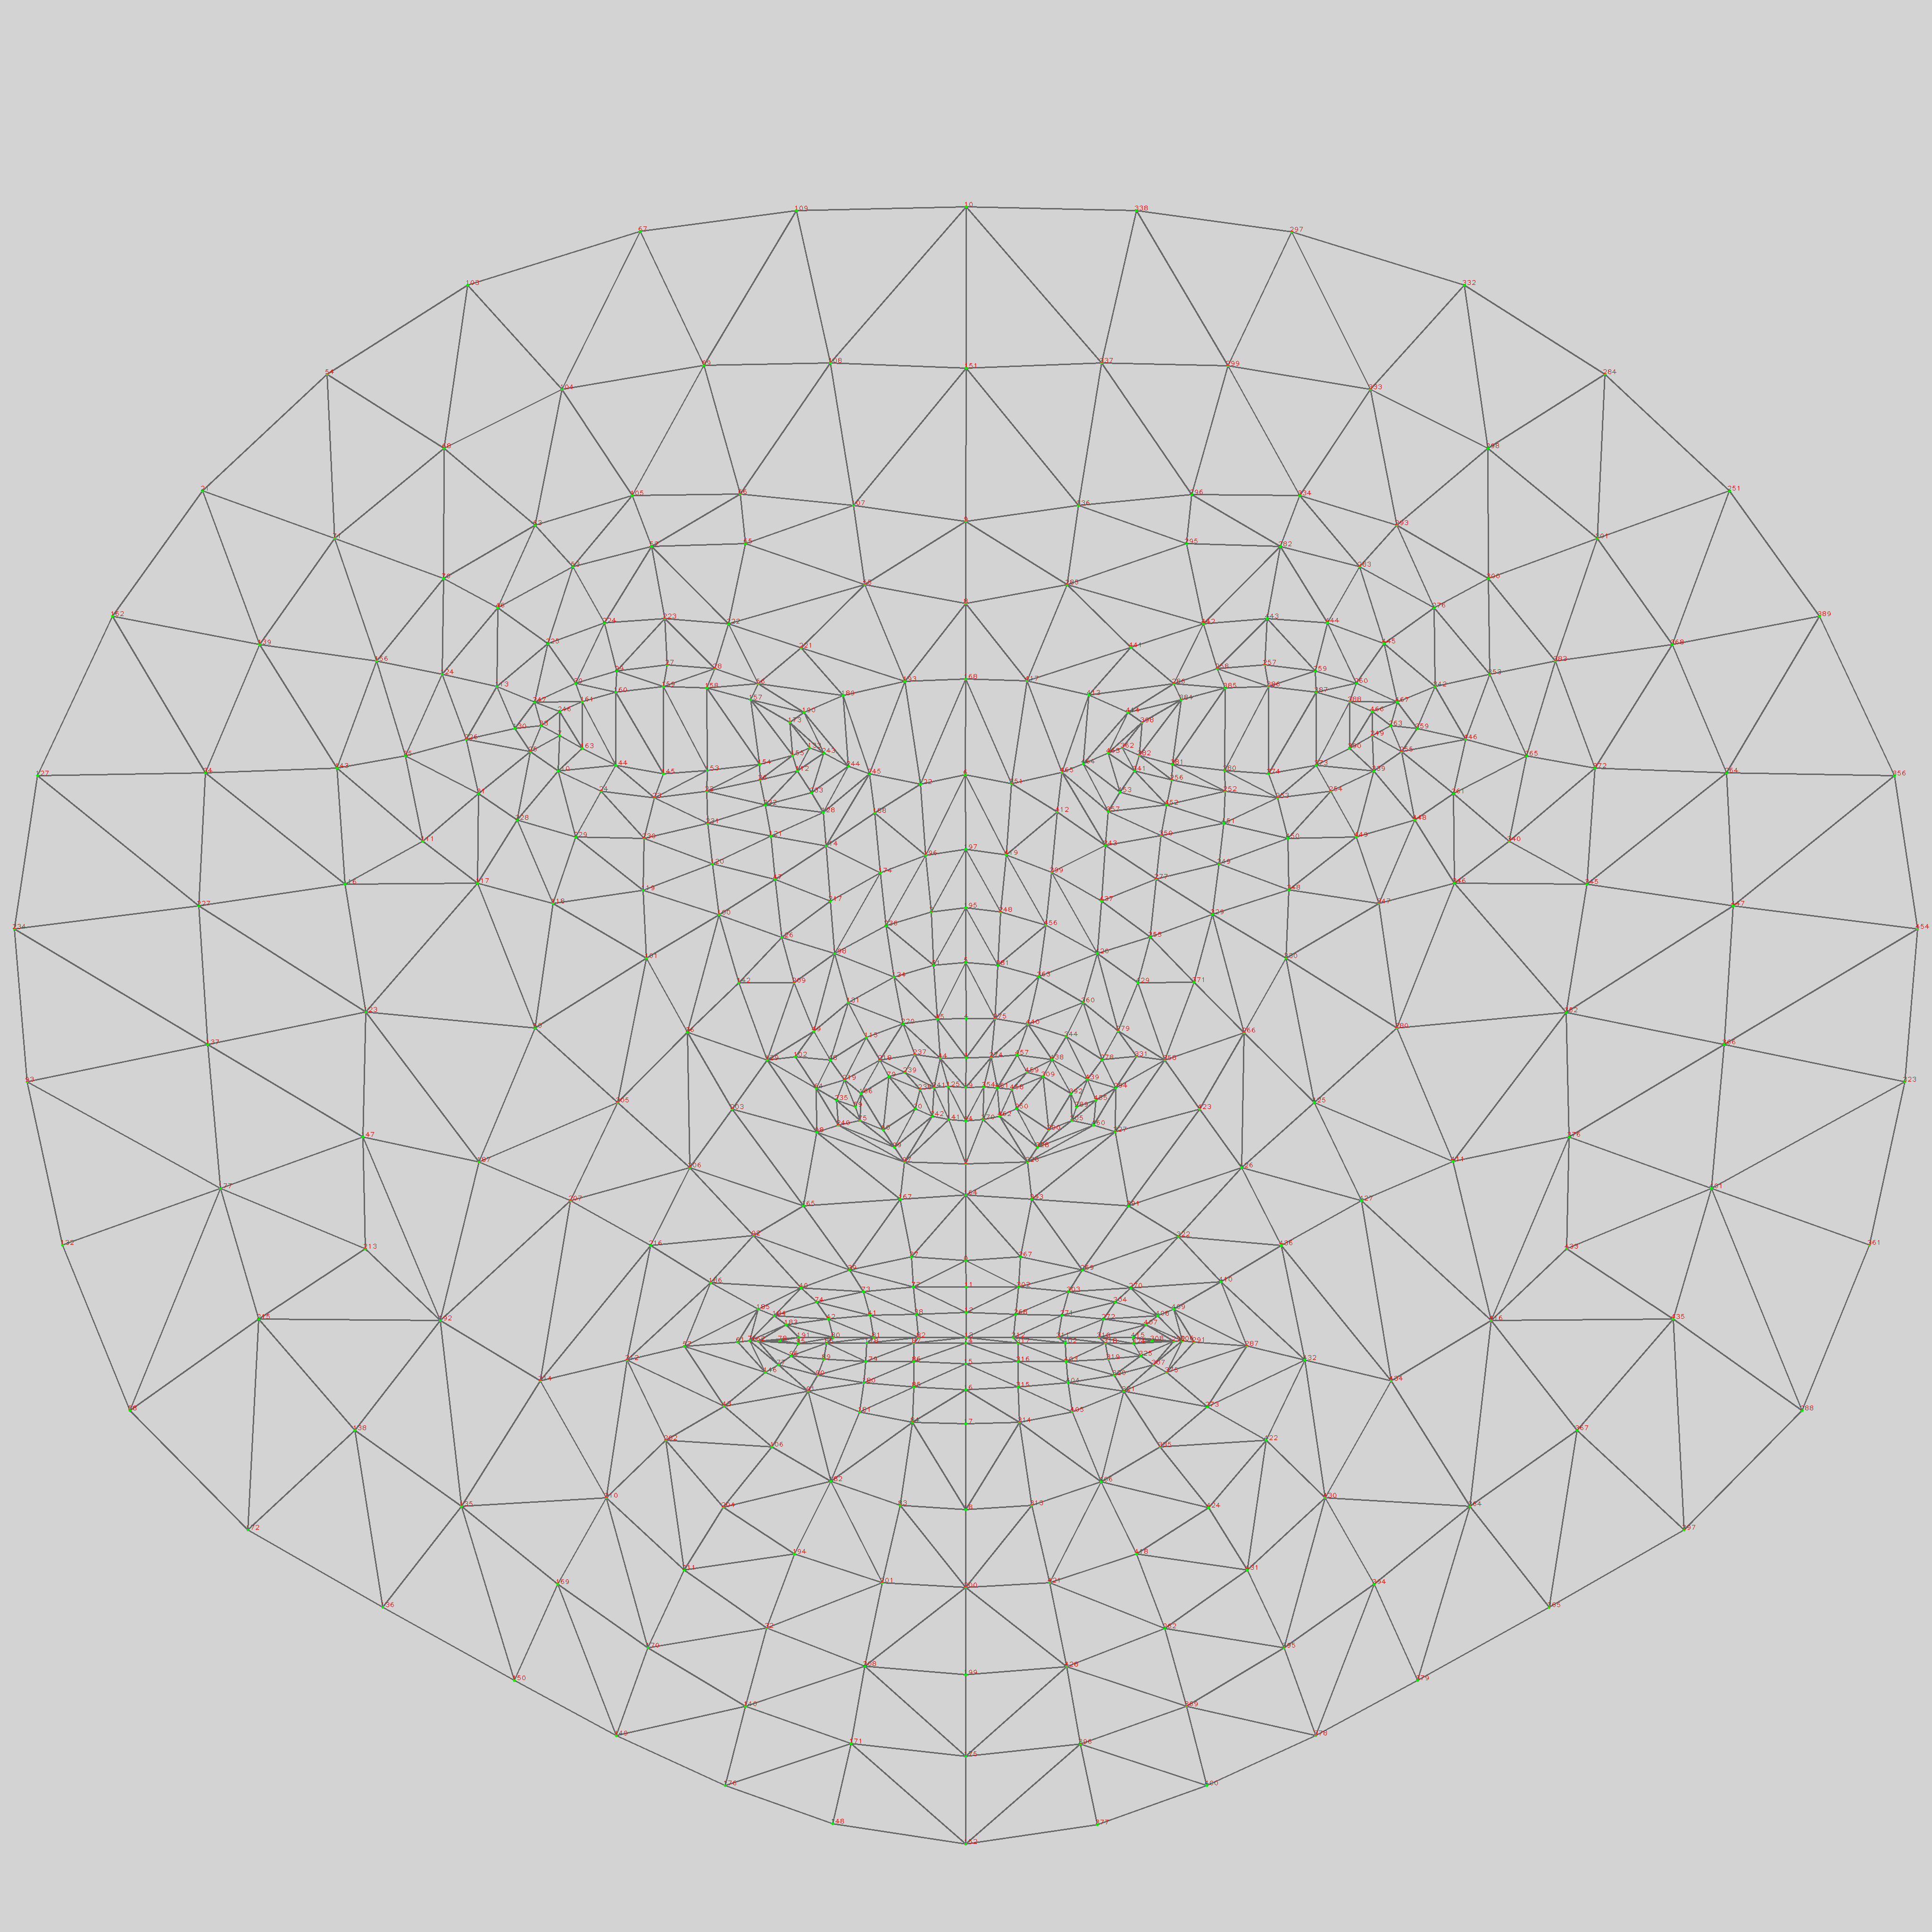
468个人脸关键点:


Diffusion Video Editing

结合论文:Speech Driven Video Editing via an Audio-Conditioned Diffusion Model

video preprocess

每个视频帧需要有一个矩形区域的脸掩盖。使用mediapipe,提取面部landmark来确定颌骨的位置。使用这些信息,mask掉覆盖鼻子下方区域的脸部矩形部分,如图1所示。这个掩码是在数据加载器运行时计算并应用到帧上的。

参考:一起来学MediaPipe(一)人脸及五官定位检测-阿里云开发者社区 (aliyun.com)

  • 3
    点赞
  • 10
    收藏
    觉得还不错? 一键收藏
  • 0
    评论
在 Uniapp 中使用 @mediapipe 进行人脸检测,你可以按照以下步骤进行: 1. 首先,确保你已经安装了 @mediapipe,并且了解了它的使用方式和 API。 2. 在 Uniapp 的项目中创建一个新的页面或组件,用于展示人脸检测的结果。 3. 在该页面或组件的 Vue 文件中,引入 @mediapipe 的库和组件。可以使用 npm 或者 CDN 的方式进行引入。例如,在 `script` 标签中可以写入以下代码: ``` import { FaceDetection } from '@mediapipe/detection_face_landmark'; ``` 4. 在 `template` 标签中,定义一个容器用于显示视频流和检测结果。例如: ``` <template> <div> <video ref="videoElement"></video> <canvas ref="canvasElement"></canvas> </div> </template> ``` 5. 在该页面或组件的 `mounted` 钩子函数中,初始化 @mediapipe人脸检测模型,并开始进行人脸检测。可以参考以下示例代码: ``` mounted() { const videoElement = this.$refs.videoElement; const canvasElement = this.$refs.canvasElement; // 获取视频流 navigator.mediaDevices.getUserMedia({ video: true }) .then((stream) => { videoElement.srcObject = stream; videoElement.play(); const faceDetection = new FaceDetection({ locateFile: (file) => { return `https://cdn.jsdelivr.net/npm/@mediapipe/detection_face_landmark/${file}`; }, }); faceDetection.setOptions({ modelSelection: 0, }); faceDetection.onResults((results) => { // 处理人脸检测的结果 // 可以在 canvas 上绘制人脸框等信息 }); const canvasContext = canvasElement.getContext('2d'); const drawCanvas = () => { canvasContext.drawImage( videoElement, 0, 0, videoElement.videoWidth, videoElement.videoHeight, 0, 0, canvasElement.width, canvasElement.height ); faceDetection.send({ image: videoElement }); requestAnimationFrame(drawCanvas); }; drawCanvas(); }) .catch((error) => { console.error('Error accessing video stream:', error); }); }, ``` 在以上示例代码中,我们使用了 `navigator.mediaDevices.getUserMedia` 获取视频流,并将视频显示在 `video` 标签中。然后,我们初始化了 @mediapipe人脸检测模型,并在每一帧视频中进行人脸检测。最后,我们可以根据检测结果,在 `canvas` 上绘制人脸框等信息。 这只是一个简单的示例,你可以根据实际需求进行适当的修改和扩展。请注意,具体的使用方式和 API 可能会因 @mediapipe 版本的不同而有所差异,建议参考 @mediapipe 的官方文档和示例代码以获取更详细的信息。

“相关推荐”对你有帮助么?

  • 非常没帮助
  • 没帮助
  • 一般
  • 有帮助
  • 非常有帮助
提交
评论
添加红包

请填写红包祝福语或标题

红包个数最小为10个

红包金额最低5元

当前余额3.43前往充值 >
需支付:10.00
成就一亿技术人!
领取后你会自动成为博主和红包主的粉丝 规则
hope_wisdom
发出的红包
实付
使用余额支付
点击重新获取
扫码支付
钱包余额 0

抵扣说明:

1.余额是钱包充值的虚拟货币,按照1:1的比例进行支付金额的抵扣。
2.余额无法直接购买下载,可以购买VIP、付费专栏及课程。

余额充值