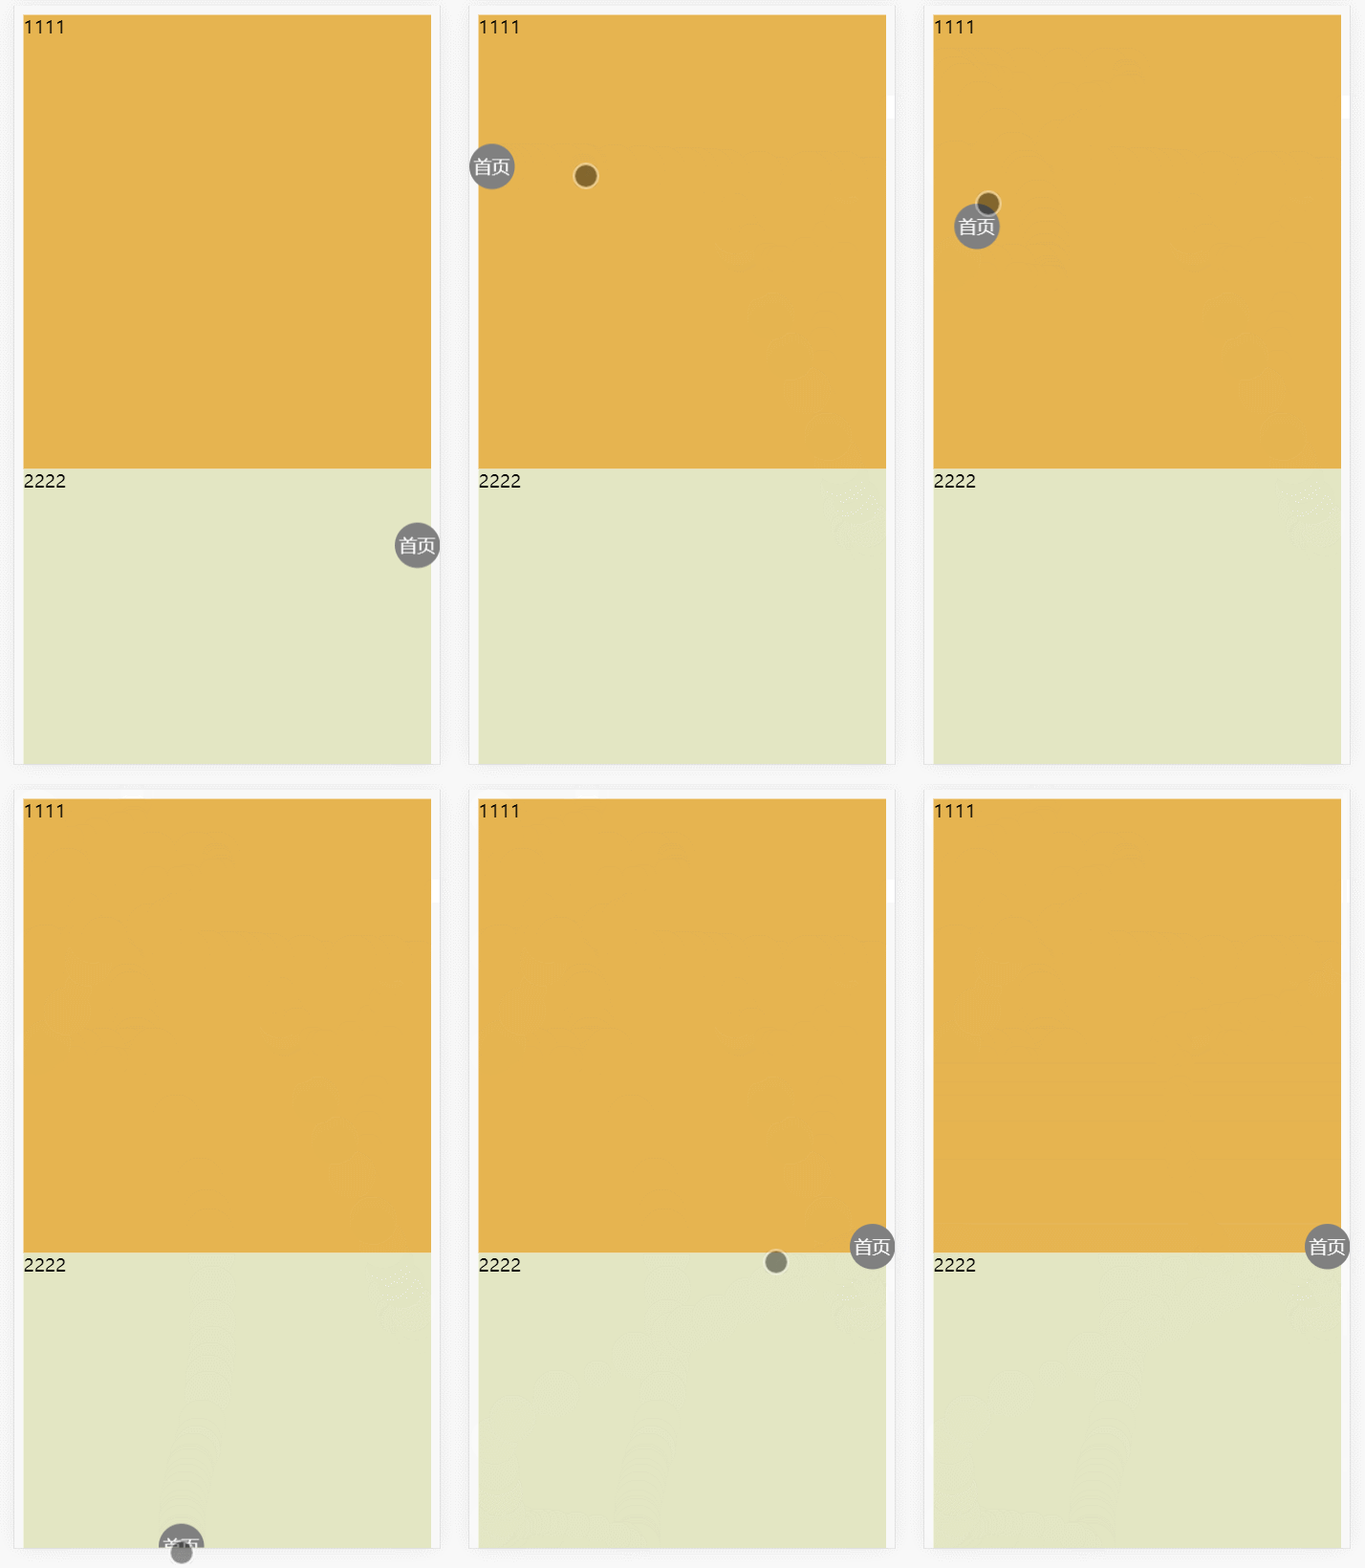
演示图如下:

整体的悬浮球组件代码如下:(原代码,比较冗余)
<!-- 可拖拽的小球 封装 -->
<template>
  <div
    class="backHome"
    ref="floatButton"
    @click="goCreatePage"
    :style="{
      width: itemWidth + 'px',
      height: itemHeight + 'px',
      left: left + 'px',
      top: top + 'px',
    }"
  >
    <img src="" alt="" />
  </div>
</template>

<script>
export default {
  name: "BackHome",
  props: {
    itemWidth: {
      // 悬浮按钮宽度
      type: Number,
      default: 40,
    },
    itemHeight: {
      // 悬浮按钮高度
      type: Number,
      default: 50,
    },
    gapWidth: {
      // 距离左右两边距离
      type: Number,
      default: 20,
    },
    coefficientHeight: {
      // 从上到下距离比例
      type: Number,
      default: 0.72,
    },
  },
  data() {
    return {
      ssicId: "",
      clientWidth: 0,
      clientHeight: 0,
      timer: null,
      currentTop: 0,
      left: 0,
      top: 0,
    };
  },
  created() {
    // this.ssicId = sessionStorage.getItem("ssicId");
    this.clientWidth = document.documentElement.clientWidth;
    this.clientHeight = document.documentElement.clientHeight;
    this.left = this.clientWidth - this.itemWidth - this.gapWidth;
    this.top = this.clientHeight * this.coefficientHeight;
  },
  methods: {
    // 返回首页菜单
    goCreatePage() {
      this.$emit("goManage");
      // location.href = ``;
    },
    handleScrollEnd() {
      let scrollTop =
        document.documentElement.scrollTop || document.body.scrollTop;
      if (scrollTop === this.currentTop) {
        if (this.left > this.clientWidth / 2) {
          this.left = this.clientWidth - this.itemWidth - this.gapWidth;
        } else {
          this.left = this.gapWidth;
        }
      }
      clearTimeout(this.timer);
    },
  },
  mounted() {
    this.$nextTick(() => {
      const floatButton = this.$refs.floatButton;
      floatButton.addEventListener("touchstart", () => {
        floatButton.style.transition = "none";
      });
      // 在拖拽过程中,组件应该跟随手指的移动而移动
      floatButton.addEventListener("touchmove", (e) => {
        if (e.targetTouches.length === 1) {
          // 一根手指
          let touch = e.targetTouches[0];
          this.left = touch.clientX - 20;
          this.top = touch.clientY - 25;
        }
      });
      // 拖拽结束后,重新调整组件的位置并重新设置过渡动画
      floatButton.addEventListener("touchend", () => {
        floatButton.style.transition = "all 0.3s";
        if (this.left > document.documentElement.clientWidth / 2) {
          this.left = document.documentElement.clientWidth - 60;
        } else {
          this.left = 0;
        }
      });
    });
  },
  beforeDestroy() {
    window.removeEventListener("scroll", this.handleScrollStart);
  },
};
</script>

<style lang="scss" scoped>
.backHome {
  position: fixed;
  bottom: 165px;
  right: 15px;
  z-index: 999;
  width: 61px;
  height: 61px;
  img {
    width: 61px;
    height: 61px;
  }
}
</style>
整理过后的精简代码 :
<!-- 可拖拽的小球 封装 -->
<template>
	<div
		ref="floatButton"
		class="backHome"
		@click="goCreatePage"
		:style="{
			width: itemWidth + 'px',
			height: itemHeight + 'px',
			left: left + 'px',
			top: top + 'px',
		}"
	>
		<img src="../assets/xxx.png" />
	</div>
</template>

<script>
export default {
	name: 'BackHome',
	props: {
		itemWidth: {
			// 悬浮按钮宽度
			type: Number,
			default: 64,
		},
		itemHeight: {
			// 悬浮按钮高度
			type: Number,
			default: 64,
		},
		gapWidth: {
			// 距离左右两边距离
			type: Number,
			default: 10,
		},
		coefficientHeight: {
			// 从上到下距离比例
			type: Number,
			default: 0.72,
		},
	},
	data() {
		return {
			top: 0,
			left: 0,
			currentTop: 0,
			clientWidth: 0,
			clientHeight: 0,
			timer: null,
		};
	},
	created() {
		this.clientWidth = document.documentElement.clientWidth; // 手机宽度
		this.clientHeight = document.documentElement.clientHeight;
		this.left = this.clientWidth - this.itemWidth - this.gapWidth;
		this.top = this.clientHeight * this.coefficientHeight;
	},
	mounted() {
		this.$nextTick(() => {
			const floatButton = this.$refs.floatButton;
			floatButton.addEventListener('touchstart', () => {
				floatButton.style.transition = 'none';
			});
			// 在拖拽过程中,组件应该跟随手指的移动而移动
			floatButton.addEventListener('touchmove', (e) => {
				if (e.targetTouches.length === 1) {
					// 一根手指
					let touch = e.targetTouches[0];
					this.left = touch.clientX - 20;
					this.top = touch.clientY - 25;
				}
			});
			// 拖拽结束后,重新调整组件的位置并重新设置过渡动画
			floatButton.addEventListener('touchend', () => {
				floatButton.style.transition = 'all 0.3s';
				if (this.left > document.documentElement.clientWidth / 2) {
					this.left =
						this.clientWidth - this.itemWidth - this.gapWidth;
					// this.left = document.documentElement.clientWidth - 60;
				} else {
					this.left = 10;
					// this.left = 0;
				}
			});
		});
	},
	methods: {
		// 返回首页菜单
		goCreatePage() {
			this.$emit('goManage');
		},
	},
};
</script>

<style lang="scss" scoped>
.backHome {
	position: fixed;
	z-index: 999;
	img {
		width: 100%;
		height: 100%;
	}
}
</style>
用 的话直接引入就行了比如这样:
<template>
  <float-button></float-button>
</template>

<script>
export default {
  components: {
    floatButton: () => import("../components/floatButton"), // 异步组件加载方式
  },
};
</script>
二、
JS 部分:
Vue.component('dragIcon', {
     template: `
       <transition>
           <div ref="dragIcon"
               class="dragIcon"
               @touchstart="handleTouchStart"
               @touchmove.prevent="handleTouchMove"
               @touchend="handleTouchEnd"
               :style="{left: left + 'px',top: top + 'px',width: itemWidth + 'px',height: itemHeight + 'px'}"
               v-text="text"
               v-if="isShow"
           >
           </div>
       </transition>
       `,
     props: {
       text: {
           type: String,
           default: '首页'
       },
       itemWidth: {
           type: Number,
           default: 40
       },
       itemHeight: {
           type: Number,
           default: 40
       }
     },
     data() {
       return {
         left: 0,
         top: 0,
         startToMove: false,
         isShow: true,
         timer: null,
         currentTop: null,
         clientW: document.documentElement.clientWidth,
         clientH: document.documentElement.clientHeight
       }
     },
     created () {
       this.left = (this.clientW - this.itemWidth)
       this.top = (this.clientH/2 - this.itemHeight/2)
     },
     mounted() {
       this.bindScrollEvent()
     },
     beforeDestroy() {
       // 记得销毁一些全局的的事件
       this.removeScrollEvent()
     },
     methods: {
       handleTouchStart() {
         this.startToMove = true
         this.$refs.dragIcon.style.transition = "none"
       },
       handleTouchMove(e) {
         const clientX = e.targetTouches[0].clientX
         const clientY = e.targetTouches[0].clientY
         const isInScreen = clientX <= this.clientW && clientX >= 0 && clientY <= this.clientH && clientY >=0
         if(this.startToMove && e.targetTouches.length === 1) {
             if(isInScreen) {
                 this.left = clientX - this.itemWidth/2
                 this.top = clientY - this.itemHeight/2
             }
         }
       },
       handleTouchEnd() {
         if(this.left < (this.clientW / 2)) {
             this.left = 0
             this.handleIconY()
         } else {
             this.left = this.clientW - this.itemWidth
             this.handleIconY()
         }
         this.$refs.dragIcon.style.transition = "all .3s"
       },
       handleIconY() {
         if (this.top < 0) {
             this.top = 0
         } else if(this.top + this.itemHeight > this.clientH) {
             this.top = this.clientH - this.itemHeight
         }
       },
       bindScrollEvent() {
         window.addEventListener('scroll', this.handleScrollStart)
       },
       removeScrollEvent() {
         window.removeEventListener('scroll',this.handleScrollStart)
       },
       handleScrollStart() {
         this.isShow = false
         this.timer && clearTimeout(this.timer)
         this.timer = setTimeout(() => {
             this.handleScrollEnd()
         },300)
         this.currentTop = document.documentElement.scrollTop || document.body.scrollTop
       },
       handleScrollEnd() {
         this.scrollTop = document.documentElement.scrollTop || document.body.scrollTop
         // 判断是否停止滚动的条件
         if(this.scrollTop == this.currentTop) {
             this.isShow = true
         }
       }
     }
   })
HTML 部分:
<div id="app">
   <div class="content1">1111</div>
   <div class="content2">2222</div>
   <drag-icon></drag-icon>
 </div>
CSS 部分:
.dragIcon {
  position: fixed;
  width: 40px;
  height: 40px;
  border-radius: 50%;
  background-color: gray;
  line-height: 40px;
  text-align: center;
  color: #fff;
}
.content1 {
  height: 400px;
  background-color: rgb(230,180,80);
}
.content2 {
  height: 500px;
  background-color: rgb(227,230,195);
}
.v-enter {
  opacity: 1;
}
.v-leave-to {
  opacity: 0;
}
.v-enter-active,
.v-leave-active {
  transition: opacity 0.3s;
}
功能升华 :


 172
172


 被折叠的 条评论
为什么被折叠?


