企业级iptalbes防火墙
CentOS7: Firewalld systemctl stop firewalld 默认开启22端口 CentOS6: IPtables service iptables stop 默认开启22端口
一、IPtables介绍
http://192.168.91.128/login 应用层(http、ssh、ftp、https) 表示层 会话层 传输层(TCP、UDP) ip+port 网络层(icmp) 数据链路层 物理层 Iptables(以下简称Iptables)是unix/linux自带的一款优秀且开源的,基于包过滤(对OSI模型的四层或者是四层以下进行过滤)的防火墙工具,它的功能十分强大,使用非常灵活,可以对流入和流出服务器的数据包进行很精细的控制。主要针对网络访问
iptables其实并不是真正的防火墙,我们可以把他理解为一个客户端的代理,用户是通过iptables这个代理,将用户的安全设定执行到对应的“安全框架”中,这个“安全框架”才是真正的防火墙。这个框架叫做“netfilter”。 netfilter:内核空间,是真正实现防火墙的功能。 iptables:用户空间,在/sbin/iptables存在的防火墙,通过iptables提供管理,修改,删除或者插入规则。 用户和内核交互的一个工具就是iptables。
实际生产环境中:
关闭Linux自身防火墙。(解决安全问题尽量不给服务器配置外网IP.需要访问的话,就使用代理转发。)因为高并发,iptables会加大延迟。除非并发小,如果服务器必须处于公网。考虑开启防火墙。
大并发的情况,不能开iptables,影响性能因为iptables是要消耗CPU的,利用硬件防火墙提升架构安全;
1.iptables工作原理分类
主机防火墙:主要是用来防范单台主机的进出报文;-----filter表 INPUT链 网络防火墙: 能够实现对进出本网络的所有主机报文加以防护----nat表 raw mangle nat filter raw表:用于对数据包进行连接跟踪前的处理。 mangle表:用于修改数据包的IP头或其他信息。 nat表:用于网络地址转换,如源地址转换和目标地址转换。 filter表:用于执行包过滤,是最常用的表,决定数据包是否被接受、丢弃或拒绝。 ======================================================================== iptables缺点: (1)防火墙虽然可以过滤互联网的数据包,但却无法过滤内部网络的数据包。因此若有人从内部网络攻击时,防火墙没有作用。 (2)电脑本身的操作系统亦可能因一些系统漏洞,使入侵者可以利用这些漏洞绕过防火墙过滤,从而入侵电脑。 (3)防火墙无法有效阻挡病毒攻击,尤其是隐藏在数据中的病毒。
没有绝对安全的操作系统,虽然防火墙有这些缺点,但还是能阻挡大多数来自于外网的攻击。
2. iptables工作流程
四表五链
-
防火墙是一层层过滤的。实际是按照配置规则的顺序从上到下,从前到后进行过滤的。此时,第一条规则匹配成功。则不会继续匹配。
-
如果匹配上了规则,即明确表明是阻止还是通过,此时数据包就不在向下匹配新规则了。匹配到即停止继续匹配。
-
如果所有规则中没有明确表明是阻止还是通过这个数据包,也就是没有匹配上规则,向下进行匹配,直到匹配默认规则得到明确的阻止还是通过。
-
防火墙的默认规则是对应链的所有的规则执行完以后才会执行的(最后执行的规则)。
例如:
-
拒绝所有IP ICPM协议
-
拒绝SSH协议
-
拒绝访问http 80端口
默认规则:运行所有ip访问443端口
二、iptables概念
一、iptables名词和术语
1. 什么是 iptables
举个例子,如果把Netfilter看成是某个小区的一栋楼。那么表(tables)就是楼里的其中的一套房子。这套房子"表(tables)"属于这栋楼“Netfilter/iptables”。
2. 什么是表(tables)
表(tables)是链的容器,即所有的链(chains)都属于其对应的表(tables).如上,如果把Netfilter看成是某个小区的一栋楼.那么表(tables)就是楼里的其中的一套房子。
3 什么是链(chains)
链(chains)是规则(Policys)的容器。如果把表(tables)当作有一套房子,那么链(chains)就可以说是房子里的家具(柜子等)。
4 什么是规则(Policy)
规则(Policy)就比较容易理解了,就是iptables系列过滤信息的规范和具体方法条款了.可以理解为柜子如何增加并摆放柜子东西等。
基本术语如下表格所示:
| Netfilter/iptables | 表(tables) | 链(chains) | 规则(Policy) |
|---|---|---|---|
| 一栋楼 | 楼里的房子 | 房子里的柜子 | 柜子里衣服,摆放规则 |
三、iptables 表和链
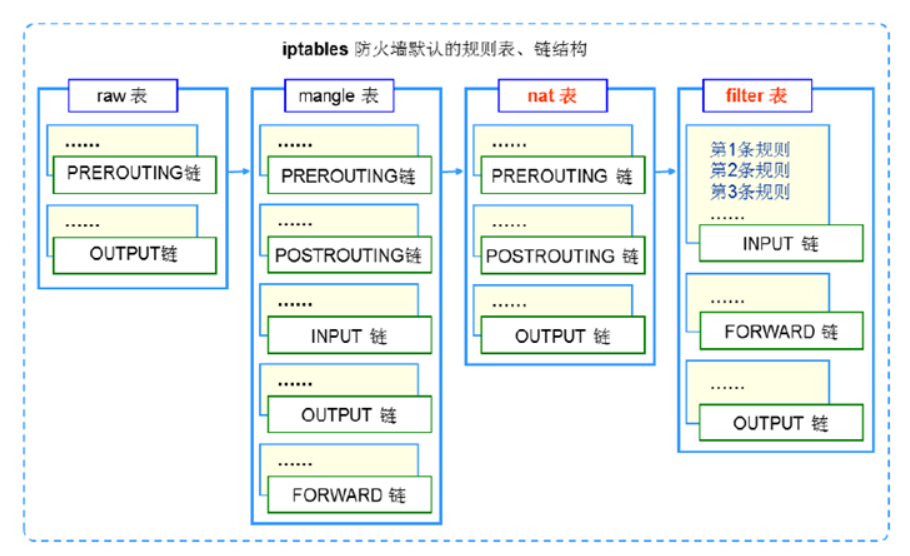
默认情况下,iptables根据功能和表的定义划分包含三个表,filter,nat,mangle,其每个表又包含不同的操作链(chains )。 实际iptables包含4张表和五个链,主要记住filter即可。
1、四张表
 必须是小写
 raw      ------------追踪数据包, ----此表用处较少,可以忽略不计。
 mangle   ------------给数据包打标记,做标记。
 nat      ------------网络地址转换即来源与目的的IP地址和port的转换。
 filter   ------------做过滤的,防火墙里面用的最多的表。
 #表的应用顺序:raw-》mangle-》nat-》filter
2、五条链
 五链:(必须是大写)链里面写的是规则。
 PREROUTING  -----------------进路由之前数据包
 INPUT       -----------------就是过滤进来的数据包(输入)
 FORWARD     -----------------转发
 OUTPUT      -----------------发出去的数据包
 POSTROUTING -----------------路由之后数据包
 #所有的访问都是按顺序:
 入站:比如访问自身的web服务流量。先PREROUTING(是否改地址),再INPUT(是否允许)到达程序。
 转发:经过linux网关的流量.先PREROUTING(是否改地址),然后路由。转发给FORWARD(转发或者丢弃),最后经过POSTROUTING(看看改不改地址。)
 出站:源自linux自身的流量.先OUTPUT,再给POSTROUTING(是否改IP)。
 #规则顺序:逐条匹配,匹配即停止。
3、四表五链
 raw表里面:
 PREROUTING
 OUTPUT
 总结:数据包跟踪  内核模块iptables_raw
 ===============================================================================
 mangel表里面有5个链:
 PREROUTING
 INPUT
 FORWARD
 OUTPUT
 POSTROUTING
 路由标记用的表。内核模块iptables_mangle
 ================================================================================
 nat表里面的链:
 PREROUTING
 INPUT
 OUTPUT
 POSTROUTING
 转换地址的表(改IP,改端口。当网关使用的linux。保护内外网流量。内核模块叫iptable_nat)
 =================================================================================
 filter表有三个链:重点
 INPUT    #负责过滤所有目标是本机地址的数据包通俗来说:就是过滤进入主机的数据包
 FORWARD  #负责转发经过主机的数据包。起到转发的作用
 OUTPUT   #处理所有源地址是本机地址的数据包通俗的讲:就是处理从主机发出的数据包
 总结:根据规则来处理数据包,如转或者丢。就是实现主机型防火墙的主要表。
 内核模块 iptable_filter

四 iptables操作
1、安装
 centos(5/6)
 启动防火墙:#/etc/init.d/iptables start
 centos7
 启动防火墙     -----192.168.246.200服务器实验。
 # yum install -y iptables iptables-services  #一定要记得下载
 # systemctl stop firewalld
 # systemctl disable firewalld
 # systemctl start iptables
 查看版本:
 [root@iptables-server ~]# iptables -V
 iptables v1.4.21
 配置文件:
  /etc/sysconfig/iptables-config
  /etc/sysconfig/iptables   #记录规则文件
2、参数解释
 -L:列出一个链或所有链中的规则信息
 -n:以数字形式显示地址、端口等信息
 -v:以更详细的方式显示规则信息
 --line-numbers:查看规则时,显示规则的序号(方便之处,通过需要删除规则-D INPUT 1
 -F:清空所有的规则(-X是清理自定义的链,用的少;-Z清零规则序号)
 -D:删除链内指定序号(或内容)的一条规则
 -P:为指定的链设置默认规则
 -A:在链的末尾追加一条规则
 -I:在链的开头(或指定序号)插入一条规则
 -t: 指定表名
 .... 更多参数可通过--help查看
3、参数使用
 1.如果不写-t 默认使用filter表
 指定表名查看规则
 [root@iptables-server ~]# iptables -t nat -L
 默认查看规则:
 # iptables  -L
 以数字的形式显示ip和端口与协议
 # iptables -nL
 显示规则行号
 # iptables -nL --line
 清空规则:
 #iptables  -F
 清空单独的某一个链里面的规则
 #iptables  -F  链名
 清空单独的某一个表里的,某一个链里面的规则
 # iptables -t nat -F INPUT
 删除某条规则
 # iptables -t filter  -D INPUT 5
 保存规则:
 前提: iptables处于运行状态: # systemctl start iptables
 # service iptables save
 # iptables-save > /etc/sysconfig/iptables
4、iptables语法
iptables -t 表名 动作  [链名] [-p 匹配条件] [-j 控制类型]
-j:控制类型, 通过前面匹配到之后是丢弃还是保留数据包的处理方式:
ACCEPT允许,
REJECT拒绝,
DROP丢弃。 不会给用户返回任何的拒绝消息,不推荐使用。
======================================================
动作:添规则还是删除规则
-p:匹配条件:数据包特征ip,端口等
如果不写-t 默认使用filter表
=======================================================
动作
修改默认规则: -P (大p)
删除规则:-D
修改规则:-R
追加规则: -A  默认追加到链的末尾
插入规则:-I (大i),在链的开头(或指定序号)插入一条规则
5、查看添加删除规则
观察iptable规则添加的方法,删除和查询的方法。本案例并不是为了体验策略效果。
iptables -t filter -A INPUT -p tcp -j ACCEPT    #最后一行
iptables -I INPUT -p udp -j ACCEPT   #第一行
iptables -I INPUT 4 -p icmp -j ACCEPT   #(插入到第4行)#第4行
iptables -L  #查看规则
iptables -D INPUT 3  #删除第三行
iptables -F  #清空所有规则
service iptables save #保存规则
systemctl restart iptables  #重启服务
注意:如果不保存重启之后规则就不在了。
2、规则匹配条件
1、通用匹配(协议),可以独立使用
协议:-p (小p)
tcp ---用的最多
udp
icmp    ---ping的时候用的协议
#使用协议的时候可以不指定端口,使用端口的时候必须指定协议。
案例:
禁止自己被ping,在filter表的INPUT链插入一个拒绝icmp的规则。
 # iptables -F
 # iptables -A INPUT -p icmp -j REJECT    ----拒绝
  验证:
[root@iptables-test ~]# ping 192.168.246.200
PING 192.168.246.200 (192.168.246.200) 56(84) bytes of data.
From 192.168.246.200 icmp_seq=1 Destination Port Unreachable

# iptables -A INPUT -p icmp -j DROP #丢弃所有icmp数据包
2、通过端口规则匹配:
端口:
--sport    ---源端口
--dport    --目标端口
案例:
拒绝192.168.246.201这台机器通过ssh连接到这台服务器
# iptables -I INPUT -s 192.168.246.201 -p tcp --dport 22 -j REJECT

例子:端口的范围: 拒绝192.168.246.201这台机器通过22端口到80端口的访问,包括22和80端口在内
# iptables -I INPUT -s 192.168.246.201 -p tcp --dport 22:80 -j REJECT

验证:
# curl -I http://192.168.246.200
curl: (7) Failed connect to 192.168.246.200:80; Connection refused
# ssh root@192.168.246.200
ssh: connect to host 192.168.246.200 port 22: Connection refused
===============================================================================
拒绝所有机器通过ssh连接到这台服务器
# iptables -I INPUT  -p tcp --dport 22 -j REJECT

例子:端口的范围: 拒绝所有机器通过22端口到80端口的访问,包括22和80端口在内
# iptables -I INPUT  -p tcp --dport 22:80 -j REJECT
3、通过ip地址
1.#禁止源246.201主机ping进来。(换个主机ping一下,就可以通信)
[root@iptables-server ~]# iptables -I INPUT -s 192.168.246.201  -p icmp -j REJECT
-s: 源ip地址
在源ip机器验证:
[root@iptables-test ~]# ping 192.168.246.200
PING 192.168.246.200 (192.168.246.200) 56(84) bytes of data.
From 192.168.246.200 icmp_seq=1 Destination Port Unreachable
===========================================================================
2.拒绝多个ip地址:后面跟ip地址可以更多个ip地址用逗号隔开
# iptables -t filter -I INPUT -s 192.168.246.201,192.168.246.133  -p icmp -j REJECT
# iptables -t filter -I INPUT -s 192.168.246.201,192.168.246.133  -p tcp --dport 22:80 -j REJECT

验证:在源ip地址通过curl访问。在246.133和246.201机器分别验证
# curl -I http://192.168.246.200
curl: (7) Failed connect to 192.168.246.200:80; Connection refused
# ssh root@192.168.246.200
ssh: connect to host 192.168.246.200 port 22: Connection refused
============================================================
3.举例::#限制源10网段的数据包。
# iptables -I INPUT -s 192.168.10.0/24  -j REJECT
4、修改规则
# iptables -L
target     prot opt source               destination
REJECT     tcp  --  192.168.246.133      anywhere             tcp dpts:ssh:http reject-wi
REJECT     tcp  --  192.168.246.201      anywhere             tcp dpts:ssh:http reject-wi
REJECT     icmp --  192.168.246.201      anywhere             reject-with icmp-port-unreachable
将修改第二条规则访问80端口:
# iptables -R INPUT 2 -p tcp --dport 80 -s 192.168.246.201 -j ACCEPT
# iptables -L
Chain INPUT (policy ACCEPT)
target     prot opt source               destination
REJECT     tcp  --  192.168.246.133      anywhere             tcp dpts:ssh:http reject-with icmp-port-unreachable
ACCEPT     tcp  --  192.168.246.201      anywhere             tcp dpt:http
REJECT     icmp --  192.168.246.201      anywhere             reject-with icmp-port-unreachable
验证在修改为允许访问的源ip机器上:
# curl -I http://192.168.246.200
HTTP/1.1 200 OK
=======================================================================================
# iptables -R INPUT 1 -p tcp -s 192.168.62.185 --dport 22 -j ACCEPT
验证在修改为允许访问的源ip机器上:
# ssh 192.168.62.135
The authenticity of host '192.168.62.135 (192.168.62.135)' can't be established.
ECDSA key fingerprint is SHA256:cUexa/Lv/EtkmiiTrsHUJ1zOWsjT9cihPqLxi23w5ws.
ECDSA key fingerprint is MD5:8c:9c:65:99:b7:6e:df:93:86:c1:7f:38:d9:73:4c:3d.
Are you sure you want to continue connecting (yes/no)?
5、icmp类型匹配
禁止ping策略原则
iptables服务器是ping命令发起者或是接受者
-i --in-interface:在INPUT链配置规则中,指定从哪一个网卡接口进入的流量(只能配置在INPUT链上)
-o --out-interface:在OUTPUT链配置规则中,指定从哪一个网卡接口出去的流量(只能配置在OUTPUT链上)
====================================================
icmp的类型:
0: Echo Reply——回显应答(Ping应答)ping的结果返回。
8: Echo request——回显请求(Ping请求),发出去的请求。
=====================================================
iptables服务器-----发起者:ping 别的机器
1.自己不能ping别人,但是别人可以ping自己:
[root@iptables-server ~]# iptables -I OUTPUT -o ens33 -p icmp --icmp-type 8 -j REJECT  #ping发出的请求禁止掉了
验证:
[root@iptables-server ~]# ping 192.168.246.133  #将ping请求给禁止掉了。
PING 192.168.246.133 (192.168.246.133) 56(84) bytes of data.
ping: sendmsg: Operation not permitted
[root@jenkins-server ~]# ping 192.168.246.200   #可以ping通
PING 192.168.246.200 (192.168.246.200) 56(84) bytes of data.
64 bytes from 192.168.246.200: icmp_seq=1 ttl=64 time=0.280 ms
=========================================================================================
iptables服务器作为接受者。也就是别人ping自己:
2.本机可以ping其他机器。其他机器不能ping通本机:
第一种方法:
[root@iptables-server ~]# iptables -I OUTPUT -o ens33 -p icmp --icmp-type 8 -j ACCEPT #允许自己ping别人
[root@iptables-server ~]# iptables -A INPUT -i ens33 -p icmp  --icmp-type 8 -j DROP  #将进来的ping请求给丢弃了。

换一种方法:
[root@iptables-server ~]# iptables -I OUTPUT -o ens33 -p icmp --icmp-type 0 -j REJECT #不给回应icmp包

验证:
[root@iptables-server ~]# ping 192.168.246.201   #ping其他机器通
PING 192.168.246.201 (192.168.246.201) 56(84) bytes of data.
64 bytes from 192.168.246.201: icmp_seq=1 ttl=64 time=0.491 ms
[root@iptables-test ~]# ping 192.168.246.200    #其他机器ping不同
PING 192.168.246.200 (192.168.246.200) 56(84) bytes of data.
=========================================================================================
拒绝任何ping的协议:
[root@iptables-server ~]# iptables -A INPUT -p icmp -j DROP
3、扩展匹配
显示匹配:如端口匹配,IP范围,MAC地址,等特殊匹配
# iptables -m iprange   --help
1.指定ip范围:
语法: -m iprange --src-range
# iptables -I INPUT -p tcp --dport 80 -m iprange --src-range 192.168.246.199-192.168.246.206 -j REJECT

2.指定多端口范围:一次拒绝多个指定端口
语法:
-m multiport --sports   #源端口
-m multiport --dports   #目的端口
# iptables -A INPUT -p tcp -m  multiport --dports 22,80 -s 192.168.246.133 -j REJECT
验证:在246.133机器上
# ssh root@192.168.246.200  #不通
ssh: connect to host 192.168.246.200 port 22: Connection refused

3.MAC地址匹配
拒绝MAC地址的匹配:只能匹配源MAC地址
语法: -m mac --mac-source
# iptables -I INPUT -p icmp -m mac --mac-source 0:0c:29:cd:26:77 -j REJECT #拒绝指定的MAC地址服务通过icmp协议请求到本地
# iptables -I INPUT -m mac --mac-source 00:0C:29:64:E3:8D -j REJECT  #将指定的MAC地址服务请求全部禁止了
通过网卡接口
# iptables -I INPUT -i ens33 -j DROP #谁也连不上了.
保存和删除规则
删除:
# iptables -D INPUT 3  #通过查看行号,指定行号删除;
=========================================================================================
保存:
[root@iptables-server ~]# iptables-save > /etc/sysconfig/iptables  #保存到文件里面,方式一
[root@iptables-server ~]# service iptables save   #第二种方式,推荐
iptables: Saving firewall rules to /etc/sysconfig/iptables:[  OK  ]
最后写完规则后记得保存!
题库:
1. 开放本机的22端口,对所有地址开放?
iptables -t filter -A INPUT -p tcp --dport 22 -j ACCEPT
2. 开放本机的80端口,对所有地址开放?
iptables -t filter -A INPUT -p tcp --dport 80 -j ACCEPT
3.只允许192.168.91.171来访问本机的3306端口?
iptables -t filter -A INPUT -p tcp --dport 3306 -j REJECT
iptables -t filter -I INPUT -p tcp -s 192.168.91.171 --dport 3306 -j ACCEPT
企业案例:
工作中。Mysql,Redis等服务一般放在内网服务器上,但是为了保证其绝对的安全性,可能会把防火墙打开,打开之后,需要我们配置一些规则,来拒绝大都数的访问,只允许指定的ip地址来访问自身的服务
案例:redis服务器允许指定ip地址访问自身服务:

redis服务器上操作:
# iptables -I INPUT -p tcp --dport 6379 -s 192.168.62.188 -j ACCEPT
# iptables -I INPUT -p tcp --dport 6379 -s 192.168.62.185 -j ACCEPT
# iptables -I INPUT -p tcp --dport 6379 -j REJECT

注意,顺序不能乱
被允许ip服务器上验证:
# telnet 192.168.62.135 6379   #测试本机是否能连同对方的6379端口号
作业:Mysql服务器允许指定ip地址访问自身服务
五、iptables NAT模式-网络地址转换(企业级应用)
网络地址转换NAT(企业应用,虚拟机做实验效果不佳)
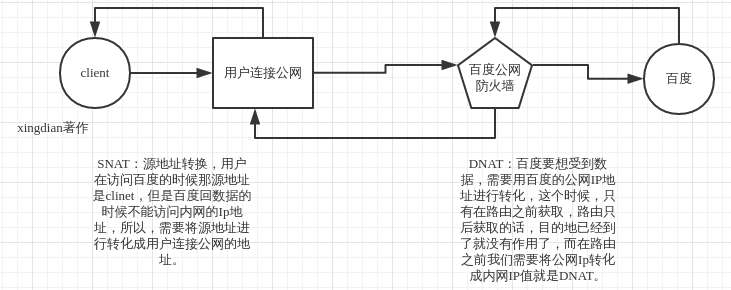
案例图:

1.SNAT:把内网地址转换成公网地址(源地址转换)
一个数据包在经过路由之后(或者说在通过防火墙的过滤之后)才能知道他的源IP是谁,在路由之前只能看到目标IP,如果我看不到你的源IP,那怎么匹配想过滤的数据包并进行源地址转换?我防火墙根本就不能确定你是否是符合匹配条件的IP,所以只能使用POSTROUTING

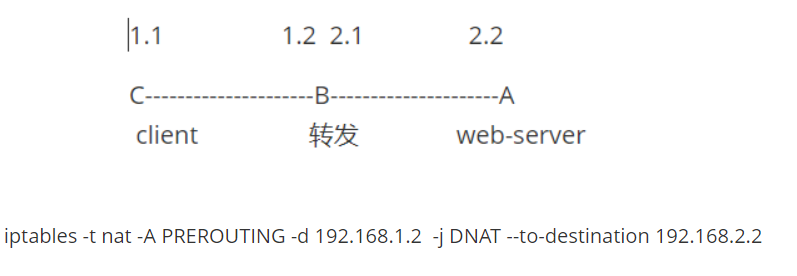
2.DNAT:要把公网ip换到内网IP -----公网ip只有一个, 内网ip有多个。(目标地址转换)
如果不在路由之前就把目标地址转换完成,很显然当数据包到达入口IP之后,他的目的已经达到了,因为他本来的目标IP就是防火墙的对外公网IP,那么数据包还会往里面走吗?显然不可能了,所以只能使用PREROUTING

#企业常用案例功能小结:
1)linux主机防火墙,单机作为防火墙(表filter)。
2)局域网共享上网(表nat POSTROUTING)。
3)外部地址映射为内部地址和端口(表nat PREROUTING)
六、企业级Firewalld防火墙
rhel 7:firewall-cmd工具,firewalld服务
1、区域:
firewalld将网卡对应到不同的区域(zone),通过不同的zone定义了不同的安全等级
trusted :允许所有流量通过
home/internal:仅允许ssh数据通过
work:仅允许ssh,ipp-client,dhcpv6-client数据通过
public:默认区域,仅允许ssh,dhcpv6-client数据通过
external:仅允许ssh数据通过,通过该区域的数据将会伪装(SNAT/DNAT)
dmz:仅允许ssh数据通过
block:任何传入的网络数据包都将被阻止。拒绝所有流量
drop:丢弃所有流量,没有返回回应消息
2、命令详解
firewall-cmd --permanent
--permanent   #永久生效的配置参数、资源、端口以及服务等信息
1、域zone相关的命令
--get-default-zone  #查询默认的区域名称
--set-default-zone=<区域名称>   #设置默认的区域
--get-active-zones  #显示当前正在使用的区域与网卡名称
--get-zones         #显示总共可用的区域
2、services管理的命令
--add-service=<服务名> --zone=<区域>       #设置指定区域允许该服务的流量
--remove-service=<服务名> --zone=<区域>    #设置指定区域不再允许该服务的流量
3、Port相关命令
--add-port=<端口号/协议> --zone=<区域>      #设置指定区域允许该端口的流量
--remove-port=<端口号/协议> --zone=<区域>   #设置指定区域不再允许该端口的流量
4、查看所有规则的命令
--list-all --zone=<区域>  显示指定区域的网卡配置参数、资源、端口以及服务等信息
--reload   #让“永久生效”的配置规则立即生效,并覆盖当前的配置规则
3、firewalld配置使用
查看默认区域:
[root@iptables-server ~]# firewall-cmd --get-default-zone
public
验证:
在192.168.246.201机器上访问192.168.246.200
[root@iptables-test ~]# curl -I http://192.168.246.200   #不通
curl: (7) Failed connect to 192.168.246.200:80; No route to host
[root@iptables-test ~]# ssh root@192.168.246.200  #ssh 可以
root@192.168.246.200's password:
2、更改默认区域
[root@iptables-server ~]# firewall-cmd --set-default-zone=trusted
success
[root@iptables-server ~]# firewall-cmd --reload
success
[root@iptables-server ~]# firewall-cmd --get-default-zone
trusted
验证:
在192.168.246.201机器上访问192.168.246.200
[root@iptables-test ~]# curl -I http://192.168.246.200  #访问成功
HTTP/1.1 200 OK
==================================================================================
修改回默认区域:
[root@iptables-server ~]#  firewall-cmd --set-default-zone=public
success
[root@iptables-server ~]# firewall-cmd --reload
success
3.向public区域添加服务
[root@iptables-server ~]# firewall-cmd --permanent --add-service=http --zone=public
success
[root@iptables-server ~]# firewall-cmd --reload   #重新加载配置文件
success
验证:
在192.168.246.201机器上访问192.168.246.200
[root@iptables-test ~]# curl -I http://192.168.246.200
HTTP/1.1 200 OK

移除:
[root@firewalld ~]# firewall-cmd --permanent --zone=public --remove-service=http
success
[root@firewalld ~]# firewall-cmd --reload
success
4.指定IP地址为192.168.246.201/24的客户端进入drop区域
[root@iptables-server ~]# firewall-cmd --permanent --add-source=192.168.246.201/24 --zone=drop   #/24代表整个网段
success
[root@iptables-server ~]# firewall-cmd --reload
success
验证:
在192.168.246.201的机器上访问246.200
[root@iptables-test ~]# curl -I http://192.168.246.200  #访问不通
5.将192.168.246.201/24移除drop区域
[root@iptables-server ~]# firewall-cmd --permanent --remove-source=192.168.246.201/24 --zone=drop
success
[root@iptables-server ~]# firewall-cmd --reload
success
验证:
在192.168.246.201的机器上面访问246.200
[root@iptables-test ~]# curl -I http://192.168.246.200  #访问成功
HTTP/1.1 200 OK
6.向pubic区域添加服务,以添加端口的方式
[root@iptables-server ~]# firewall-cmd --permanent --add-port=80/tcp --zone=public
success
[root@iptables-server ~]# firewall-cmd --reload
success
验证:
用192.168.246.201访问192.168.246.200机器
[root@iptables-test ~]# curl -I http://192.168.246.200
HTTP/1.1 200 OK
7.删除服务、端口
[root@iptables-server ~]# firewall-cmd --permanent --remove-service=http --zone=public
success
[root@iptables-server ~]# firewall-cmd --reload
success

[root@iptables-server ~]# firewall-cmd --permanent --remove-port=80/tcp --zone=public
success
[root@iptables-server ~]# firewall-cmd --reload
success
验证:
在192.168.246.201访问192.168.246.200机器
[root@iptables-test ~]# curl -I http://192.168.246.200  #访问失败
curl: (7) Failed connect to 192.168.246.200:80; No route to host
8.允许指定ip访问某个端口 仍以Redis为例
Redis服务端操作:
# firewall-cmd --permanent --add-rich-rule="rule family="ipv4" source address="192.168.142.16" port protocol="tcp" port="6379" accept"

被允许ip地址验证:
# telnet 192.168.62.135 6379
七、企业级防火墙配置
1、清除防火墙规则
# iptables -F
2、修改默认规则为拒绝(修改前先放行22端口,保证自己能够连上主机)
[root@iptables-server ~]# iptables -A INPUT -p tcp --dport 22 -j ACCEPT  #放开22号端口
[root@iptables-server ~]# iptables -P INPUT DROP   #将默认所有进来的请求设置为全部拒绝掉
[root@iptables-server ~]# iptables -P FORWARD DROP #将默认所有的转发的规则设置为全部拒绝掉
注意:修改默认规则: 只能使用ACCEPT和DROP
 # iptables -P INPUT DROP      ----拒绝
 # iptables -P INPUT ACCEPT    ----允许
3、放行指定的端口
[root@iptables-server ~]# iptables -A INPUT -i lo -j ACCEPT  #允许通过lo网卡进入的请求
[root@iptables-server ~]# iptables -A INPUT  -p tcp  -m multiport --dport  80,443 -j ACCEPT #允许访问80和443端口
[root@iptables-server ~]# iptables -A INPUT -s 192.168.246.0/24 -j ACCEPT  #允许这个内网网段连接服务器
4、保存iptables配置
[root@iptables-server ~]# service iptables save
iptables: Saving firewall rules to /etc/sysconfig/iptables:[  OK  ]
或者
[root@iptables-server ~]# iptables-save > /etc/sysconfig/iptables


 626
626

 被折叠的 条评论
为什么被折叠?


