


文章目录
一、隐藏版本号
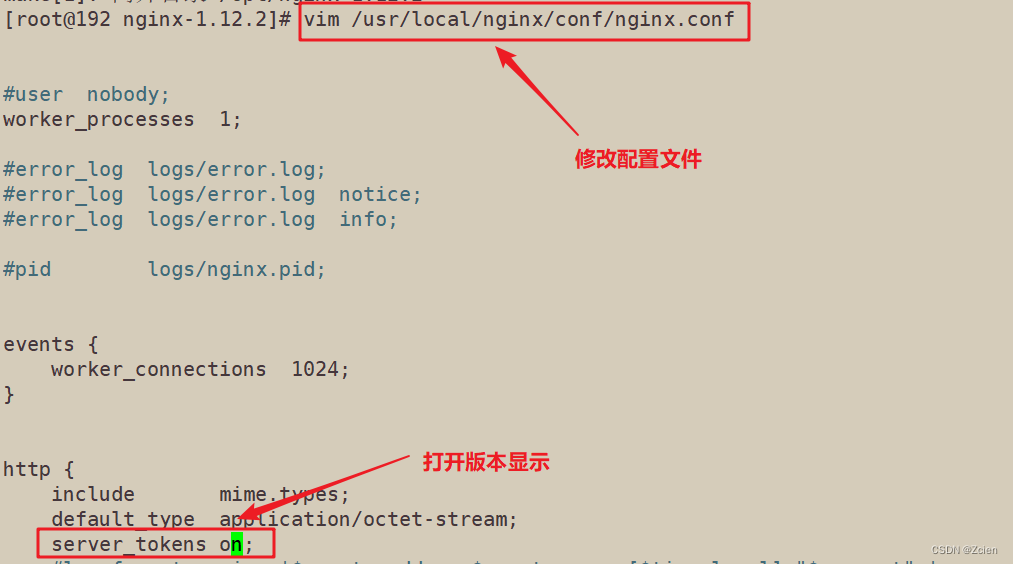
1、隐藏版本号的操作步骤
可以使用 Fiddler 工具抓取数据包,查看 Nginx版本,
也可以在 CentOS 中使用命令 curl -I http://192.168.229.90 显示响应报文首部信息。
curl -I http://192.168.229.90
1.1、方法一:修改配置文件方式
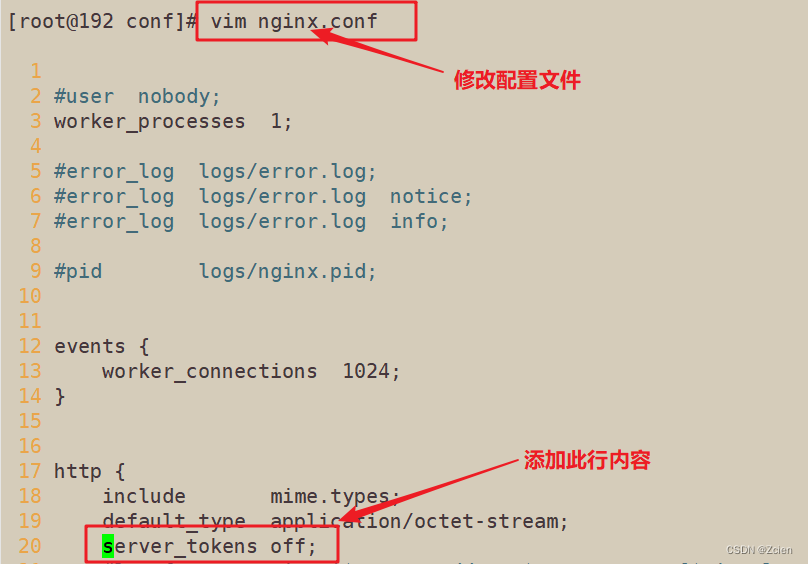
vim /usr/local/nginx/conf/nginx.conf
http {
include mime.types;
default_type application/octet-stream;
server_tokens off; #添加,关闭版本号
......
}
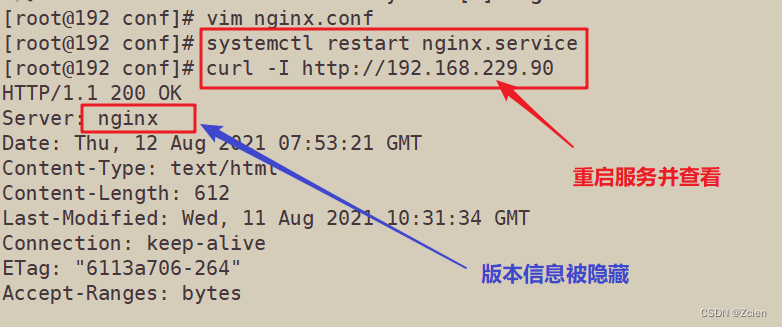
systemctl restart nginx
curl -I http://192.168.229.90
1.2、方法二:修改源码文件,重新编译安装
vim /opt/nginx-1.12.2/src/core/nginx.h
#define NGINX_VERSION "1.1.1"                   #修改版本号
 #define NGINX_VER "IIS" NGINX_VERSION          #修改服务器类型

 cd /opt/nginx-1.12.0/ ./configure --prefix=/usr/local/nginx
 --user=nginx --group=nginx --with-http_stub_status_module make && make install

 vim /usr/local/nginx/conf/nginx.conf http {
     include       mime.types;
     default_type  application/octet-stream;
     server_tokens on;  ...... }

systemctl restart nginx
curl -I http://192.168.229.90
2、实例操作:隐藏版本号
2.1、方法一:修改配置文件方式
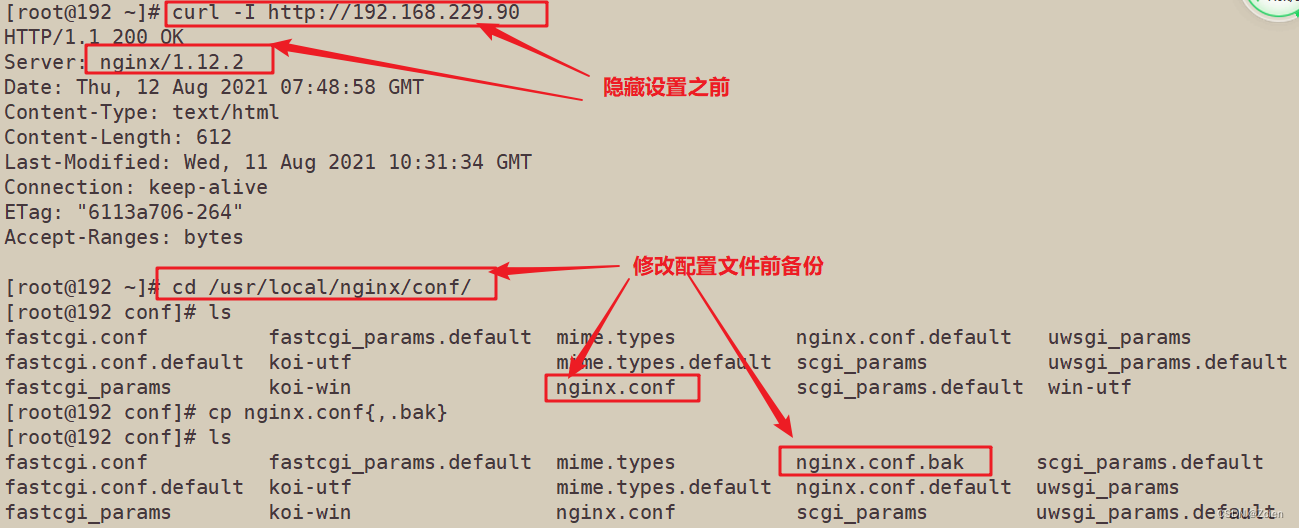
[root@192 ~]# curl -I http://192.168.229.90
HTTP/1.1 200 OK
Server: nginx/1.12.2
Date: Thu, 12 Aug 2021 07:48:58 GMT
Content-Type: text/html
Content-Length: 612
Last-Modified: Wed, 11 Aug 2021 10:31:34 GMT
Connection: keep-alive
ETag: "6113a706-264"
Accept-Ranges: bytes

[root@192 ~]# cd /usr/local/nginx/conf/
[root@192 conf]# ls
fastcgi.conf          fastcgi_params.default  mime.types          nginx.conf.default   uwsgi_params
fastcgi.conf.default  koi-utf                 mime.types.default  scgi_params          uwsgi_params.default
fastcgi_params        koi-win                 nginx.conf          scgi_params.default  win-utf
[root@192 conf]# cp nginx.conf{,.bak}
[root@192 conf]# ls
fastcgi.conf          fastcgi_params.default  mime.types          nginx.conf.bak      scgi_params.default   win-utf
fastcgi.conf.default  koi-utf                 mime.types.default  nginx.conf.default  uwsgi_params
fastcgi_params        koi-win                 nginx.conf          scgi_params         uwsgi_params.default
[root@192 conf]# vim nginx.conf
[root@192 conf]# systemctl restart nginx.service
[root@192 conf]# curl -I http://192.168.229.90
HTTP/1.1 200 OK
Server: nginx
Date: Thu, 12 Aug 2021 07:53:21 GMT
Content-Type: text/html
Content-Length: 612
Last-Modified: Wed, 11 Aug 2021 10:31:34 GMT
Connection: keep-alive
ETag: "6113a706-264"
Accept-Ranges: bytes
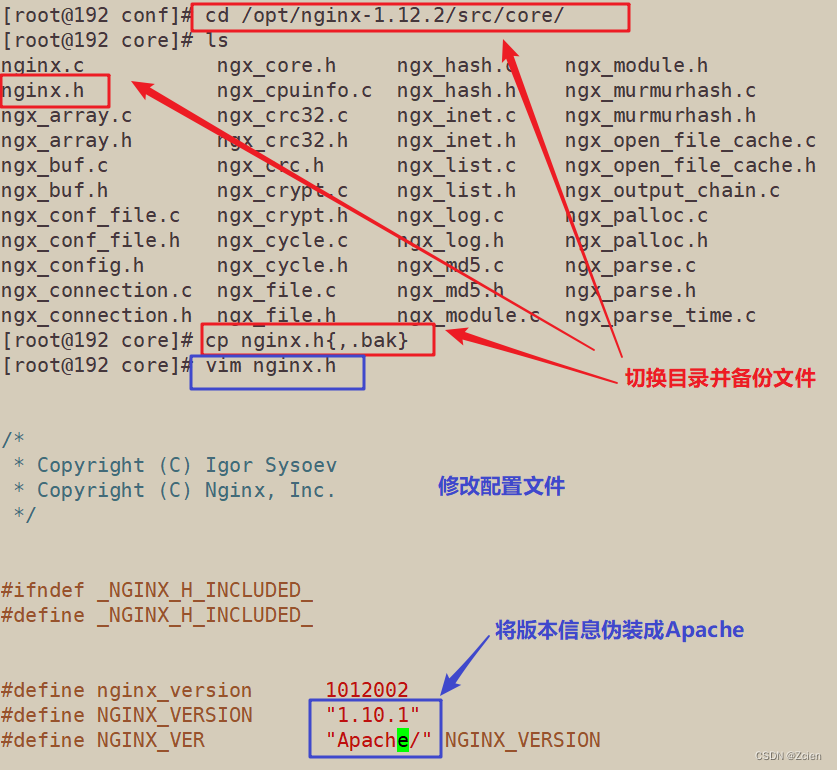
2.2 方法二:修改源码文件,重新编译安装
修改配置文件,将版本信息伪装成Apache
[root@192 conf]# cd /opt/nginx-1.12.2/src/core/
[root@192 core]# ls
nginx.c           ngx_core.h     ngx_hash.c    ngx_module.h           ngx_parse_time.h      ngx_resolver.c  ngx_string.c
nginx.h           ngx_cpuinfo.c  ngx_hash.h    ngx_murmurhash.c       ngx_proxy_protocol.c  ngx_resolver.h  ngx_string.h
ngx_array.c       ngx_crc32.c    ngx_inet.c    ngx_murmurhash.h       ngx_proxy_protocol.h  ngx_rwlock.c    ngx_syslog.c
ngx_array.h       ngx_crc32.h    ngx_inet.h    ngx_open_file_cache.c  ngx_queue.c           ngx_rwlock.h    ngx_syslog.h
ngx_buf.c         ngx_crc.h      ngx_list.c    ngx_open_file_cache.h  ngx_queue.h           ngx_sha1.c      ngx_thread_pool.c
ngx_buf.h         ngx_crypt.c    ngx_list.h    ngx_output_chain.c     ngx_radix_tree.c      ngx_sha1.h      ngx_thread_pool.h
ngx_conf_file.c   ngx_crypt.h    ngx_log.c     ngx_palloc.c           ngx_radix_tree.h      ngx_shmtx.c     ngx_times.c
ngx_conf_file.h   ngx_cycle.c    ngx_log.h     ngx_palloc.h           ngx_rbtree.c          ngx_shmtx.h     ngx_times.h
ngx_config.h      ngx_cycle.h    ngx_md5.c     ngx_parse.c            ngx_rbtree.h          ngx_slab.c
ngx_connection.c  ngx_file.c     ngx_md5.h     ngx_parse.h            ngx_regex.c           ngx_slab.h
ngx_connection.h  ngx_file.h     ngx_module.c  ngx_parse_time.c       ngx_regex.h           ngx_spinlock.c
[root@192 core]# cp nginx.h{,.bak}
[root@192 core]# vim nginx.h


/*
 * Copyright (C) Igor Sysoev
 * Copyright (C) Nginx, Inc.
 */


#ifndef _NGINX_H_INCLUDED_
#define _NGINX_H_INCLUDED_


#define nginx_version      1012002
#define NGINX_VERSION      "1.10.1"
#define NGINX_VER          "Apache/" NGINX_VERSION
重新编译安装
[root@192 core]# vim nginx.h
[root@192 core]# cd /opt/nginx-1.12.2/
[root@192 nginx-1.12.2]# ./configure --prefix=/usr/local/nginx --user=nginx --group=nginx --with-http_stub_status_module && make && make install

打开显示版本信息(因为在方法一中我关闭了此选项)
重启服务并测试
[root@192 nginx-1.12.2]# systemctl restart nginx.service
[root@192 nginx-1.12.2]# curl -I http://192.168.229.90
HTTP/1.1 200 OK
Server: Apache/1.10.1
Date: Thu, 12 Aug 2021 09:11:31 GMT
Content-Type: text/html
Content-Length: 612
Last-Modified: Wed, 11 Aug 2021 10:31:34 GMT
Connection: keep-alive
ETag: "6113a706-264"
Accept-Ranges: bytes

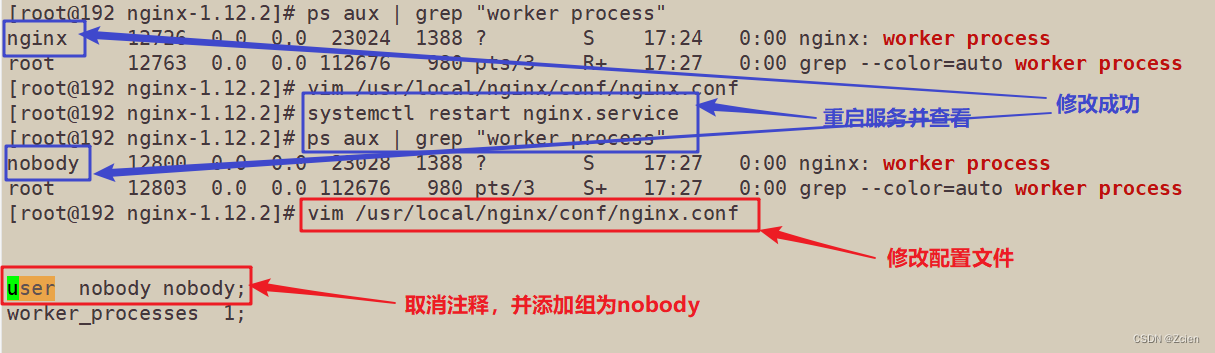
二、修改用户与组
[root@192 nginx-1.12.2]# ps aux | grep "worker process"
nginx     12726  0.0  0.0  23024  1388 ?        S    17:24   0:00 nginx: worker process
root      12763  0.0  0.0 112676   980 pts/3    R+   17:27   0:00 grep --color=auto worker process
[root@192 nginx-1.12.2]# vim /usr/local/nginx/conf/nginx.conf
[root@192 nginx-1.12.2]# systemctl restart nginx.service
[root@192 nginx-1.12.2]# ps aux | grep "worker process"
nobody    12800  0.0  0.0  23028  1388 ?        S    17:27   0:00 nginx: worker process
root      12803  0.0  0.0 112676   980 pts/3    S+   17:27   0:00 grep --color=auto worker process
三、缓存时间
1、缓存时间的操作步骤
vim /usr/local/nginx/conf/nginx.conf
http {
......
    server {
    ......
        location / {
            root html;
            index index.html index.htm;
        }

        location ~ \.(gif|jpg|jepg|png|bmp|ico)$ {      #加入新的 location,以图片作为缓存对象
            root html;
            expires 1d;                                 #指定缓存时间,1天
        }
......
    }
}

systemctl restart nginx
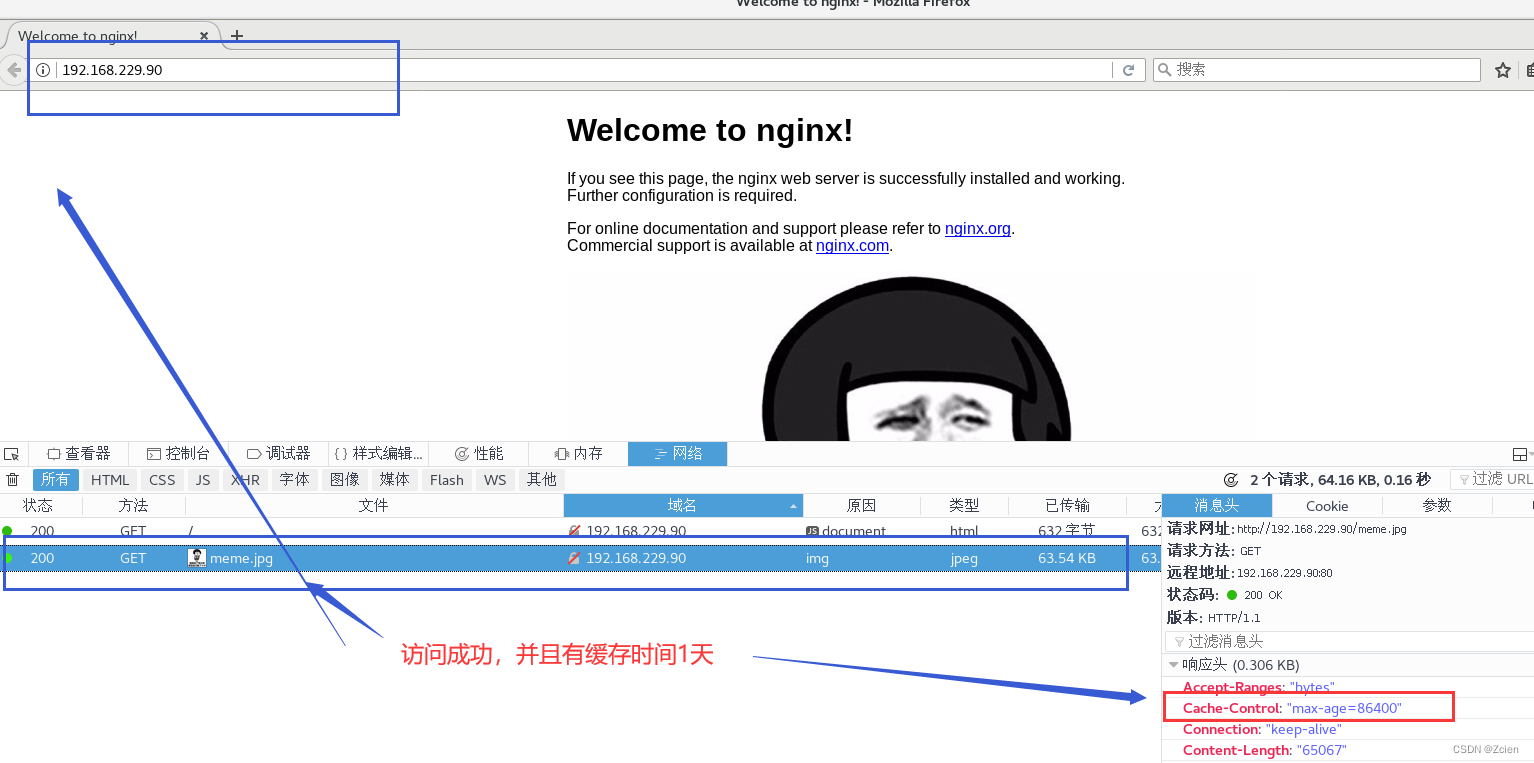
在Linux系统中,打开火狐浏览器,右击点查看元素
选择 网络 —> 选择 HTML、WS、其他
访问 http://192.168.229.90,双击200响应消息查看响应头中包含 Cahce-Control:max-age=86400 表示缓存时间是 86400 秒。也就是缓存一天的时间,一天之内浏览器访问这个页面,都是用缓存中的数据,而不需要向 Nginx 服务器重新发出请求,减少了服务器的使用带宽。
2、实例操作:缓存时间
2.1 修改主配置文件

2.2 传入图片并对网页文件进行编辑
[root@192 nginx-1.12.2]# cd /usr/local/nginx/html/
[root@192 html]# ls
50x.html  index.html
[root@192 html]# rz -E
rz waiting to receive.
[root@192 html]# ls
50x.html  index.html  meme.jpg
[root@192 html]# vim index.html
[root@192 html]# systemctl restart nginx.service
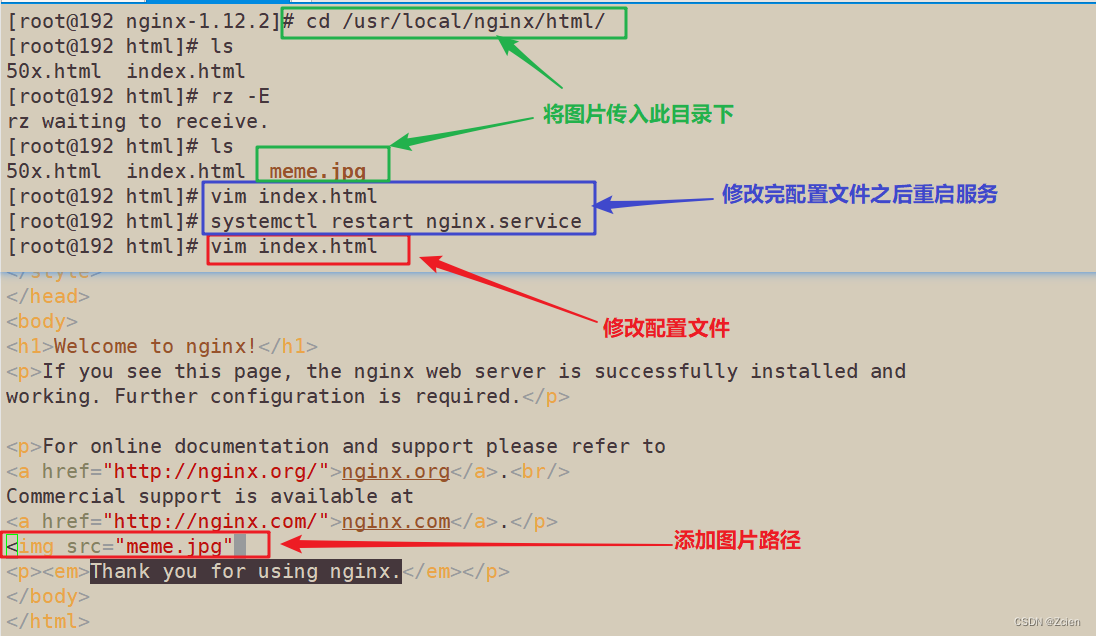
2.3 浏览器中访问并查看是否有效
四、日志切割
1、日志切割的操作步骤
vi /opt/fenge.sh
#!/bin/bash
# Filename: fenge.sh
d=$(date -d "-1 day" "+%Y%m%d")                                             #显示前一天的时间
logs_path="/var/log/nginx"
pid_path="/usr/local/nginx/logs/nginx.pid"
[ -d $logs_path ] || mkdir -p $logs_path                                    #创建日志文件目录
mv /usr/local/nginx/logs/access.log ${logs_path}/kgc.com-access.log-$d      #移动并重命名日志文件
kill -USR1 $(cat $pid_path)                                                 #重建新日志文件
find $logs_path -mtime +30 -exec rm -rf {} \;                               #删除30天之前的日志文件
#find $logs_path -mtime +30 |xargs rm -rf

chmod +x /opt/fenge.sh
/opt/fenge.sh
ls /var/log/nginx
ls /usr/local/nginx/logs/access.log

crontab -e
0 1 * * * /opt/fenge.sh
小知识
在linux操作系统中,每个文件都有很多的时间参数,其中有三个比较主要,分别是ctime,atime,mtime
ctime(status time): 当修改文件的权限或者属性的时候,就会更新这个时间,ctime并不是createtime,更像是change time, 只有当更新文件的属性或者权限的时候才会更新这个时间,但是更改内容的话是不会更新这个时间。
atime(accesstime): 当使用这个文件的时候就会更新这个时间。
mtime(modification time):当修改文件的内容数据的时候,就会更新这个时间,而更改权限或者属性,mtime不会改变,这就是和ctime的区别。
2、实例操作:日志切割
2.1 编写脚本
[root@192 html]# vim /opt/split.sh

#!/bin/bash
#This is the script used for log splitting

d=$(date -d "-1 day" "+%Y%m%d")
logs_path="/var/log/nginx"
pid_path="/usr/local/nginx/logs/nginx.pid"

[ -d $logs_path ] || mkdir -p ${logs_path}
mv /usr/local/nginx/logs/access.log ${logs_path}/ly.com.access.log-$d
kill -USR1 $(cat $pid_path)
find $logs_path -mtime +30 -exec rm -rf {} \;
 2.2 执行脚本,查看日志分割是否实现
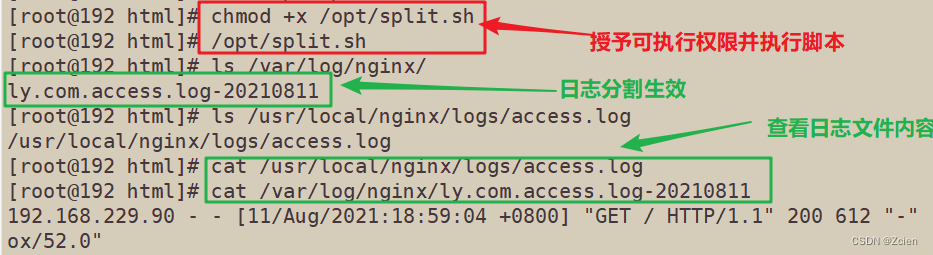
[root@192 html]# chmod +x /opt/split.sh
[root@192 html]# /opt/split.sh
[root@192 html]# ls /var/log/nginx/
ly.com.access.log-20210811
[root@192 html]# ls /usr/local/nginx/logs/access.log
/usr/local/nginx/logs/access.log
[root@192 html]# cat /usr/local/nginx/logs/access.log
[root@192 html]# cat /var/log/nginx/ly.com.access.log-20210811
2.3 做计划性任务,每天定时做日志分割

五、连接超时
HTTP有一个KeepAlive模式,它告诉web服务器在处理完一个请求后保持这个TCP连接的打开状态。若接收到来自客户端的其它请求,服务端会利用这个未被关闭的连接,而不需要再建立一个连接
KeepAlive 在一段时间内保持打开状态,它们会在这段时间内占用资源。占用过多就会影响性能
1、连接超时的操作步骤
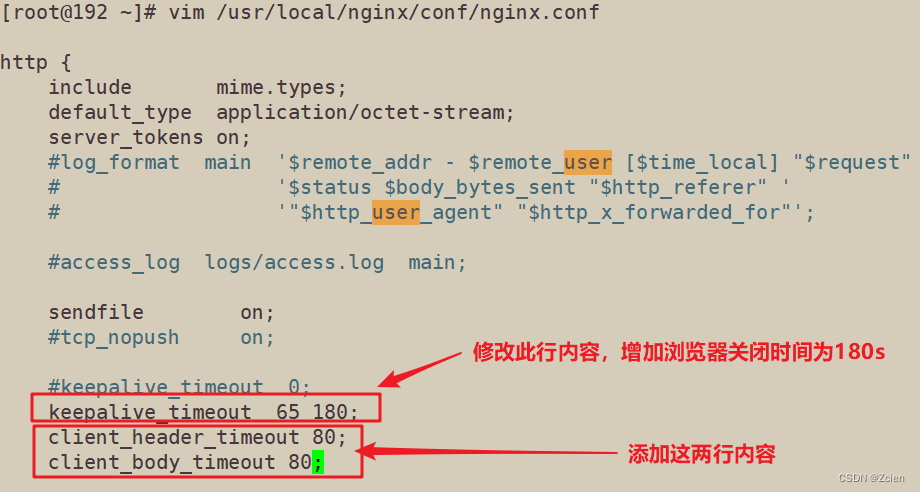
vim /usr/local/nginx/conf/nginx.conf
http {
......
    keepalive_timeout 65 180;
    client_header_timeout 80;
    client_body_timeout 80;
......
}

systemctl restart nginx
keepalive_timeout
指定KeepAlive的超时时间(timeout)。指定每个TCP连接最多可以保持多长时间,服务器将会在这个时间后关闭连接。 Nginx的默认值是65秒,有些浏览器最多只保持 60 秒,所以可以设定为 60 秒。若将它设置为0,就禁止了keepalive 连接。
第二个参数(可选的)指定了在响应头Keep-Alive:timeout=time中的time值。这个头能够让一些浏览器主动关闭连接,这样服务器就不必去关闭连接了。没有这个参数,Nginx 不会发送 Keep-Alive 响应头。
client_header_timeout
客户端向服务端发送一个完整的 request header 的超时时间。如果客户端在指定时间内没有发送一个完整的 request header,Nginx 返回 HTTP 408(Request Timed Out)。
client_body_timeout
指定客户端与服务端建立连接后发送 request body 的超时时间。如果客户端在指定时间内没有发送任何内容,Nginx 返回 HTTP 408(Request Timed Out)。
2、实例操作:连接超时
2.1 修改主配置文件
[root@192 ~]# nginx -t
nginx: the configuration file /usr/local/nginx/conf/nginx.conf syntax is ok
nginx: configuration file /usr/local/nginx/conf/nginx.conf test is successful
[root@192 ~]# systemctl restart nginx.service

2.2 浏览器访问测试

六、更改进程数
1、更改进程数的操作步骤
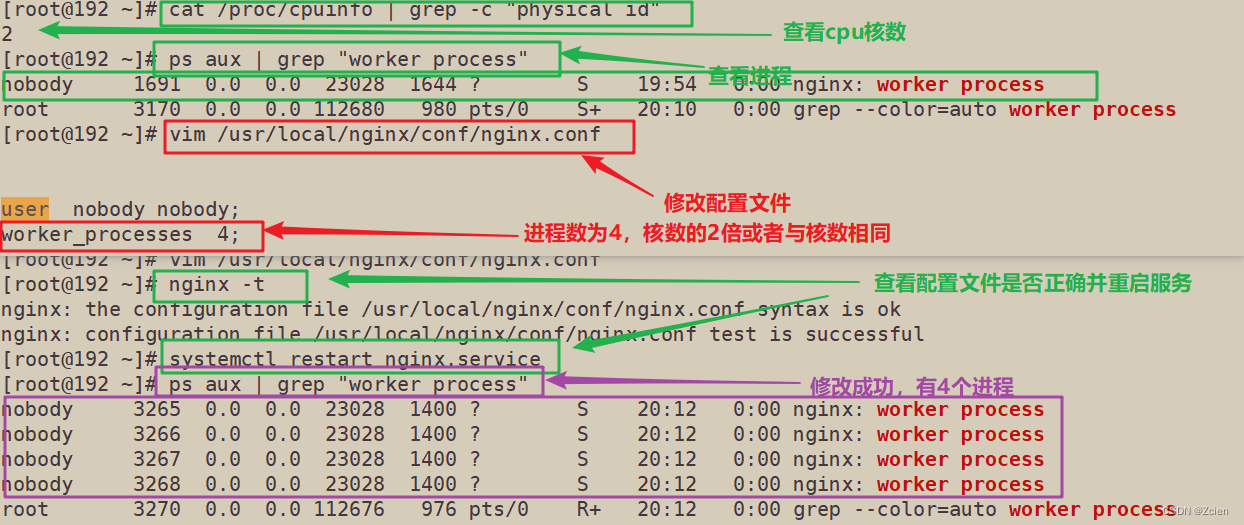
cat /proc/cpuinfo | grep -c "physical id"   #查看cpu核数
ps aux | grep nginx                         #查看nginx主进程中包含几个子进程

vim /usr/local/nginx/conf/nginx.conf
worker_processes  2;                #修改为核数相同或者2倍
worker_cpu_affinity 01 10;          #设置每个进程由不同cpu处理,进程数配为4时0001 0010 0100 1000

systemctl restart nginx
1
2
3
4
5
6
7
8
9
10
11
vim /usr/local/nginx/conf/nginx.conf

worker processes 2;                            #修改工作进程数量为核数相同或者2倍

worker_cpu_ affinity 01 10;                #设置每个进程由不同cpu处理,进程数配为4时的格式:0001 0010 0100 1000

worker_connections 6000;                 #修改每个进程处理的最大连接数

#如提高每个进程的连接数还需执行"ulimit -n 65535"(65535最大值)命令临时修改本地每个进程可以同时打开的最大文件数。

systemctl restart nginx
2、实例操作:更改进程数
[root@192 ~]# cat /proc/cpuinfo | grep -c "physical id"
2
[root@192 ~]# ps aux | grep "worker process"
nobody     1691  0.0  0.0  23028  1644 ?        S    19:54   0:00 nginx: worker process
root       3170  0.0  0.0 112680   980 pts/0    S+   20:10   0:00 grep --color=auto worker process
[root@192 ~]# vim /usr/local/nginx/conf/nginx.conf
[root@192 ~]# nginx -t
nginx: the configuration file /usr/local/nginx/conf/nginx.conf syntax is ok
nginx: configuration file /usr/local/nginx/conf/nginx.conf test is successful
[root@192 ~]# systemctl restart nginx.service
[root@192 ~]# ps aux | grep "worker process"
nobody     3265  0.0  0.0  23028  1400 ?        S    20:12   0:00 nginx: worker process
nobody     3266  0.0  0.0  23028  1400 ?        S    20:12   0:00 nginx: worker process
nobody     3267  0.0  0.0  23028  1400 ?        S    20:12   0:00 nginx: worker process
nobody     3268  0.0  0.0  23028  1400 ?        S    20:12   0:00 nginx: worker process
root       3270  0.0  0.0 112676   976 pts/0    R+   20:12   0:00 grep --color=auto worker process
3、更改进程的最大进程连接数量(worker_connections)不超过65535
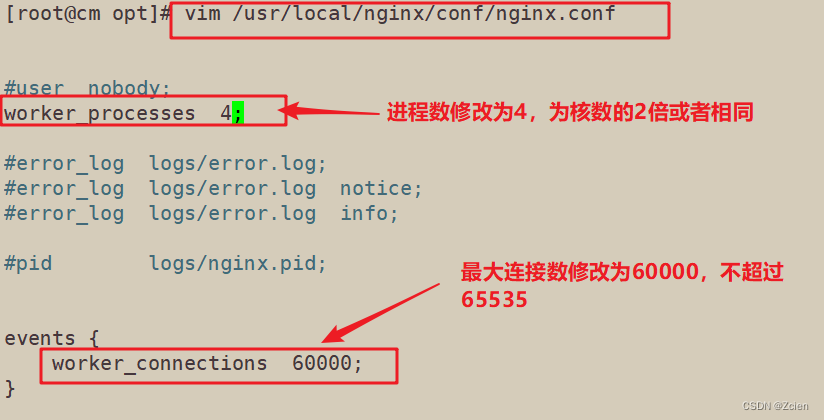
重启服务,并提高系统限制的进程限制数


七、配置网页压缩
Nginx的ngx_http_gzip_module压 缩模块提供对文件内容压缩的功能
允许Nginx服务器将输出内容在发送客户端之前进行压缩,以节约网站带宽,提升用户的访问体验,默认已经安装
可在配置文件中加入相应的压缩功能参数对压缩性能进行优化
1、配置网页压缩的操作步骤
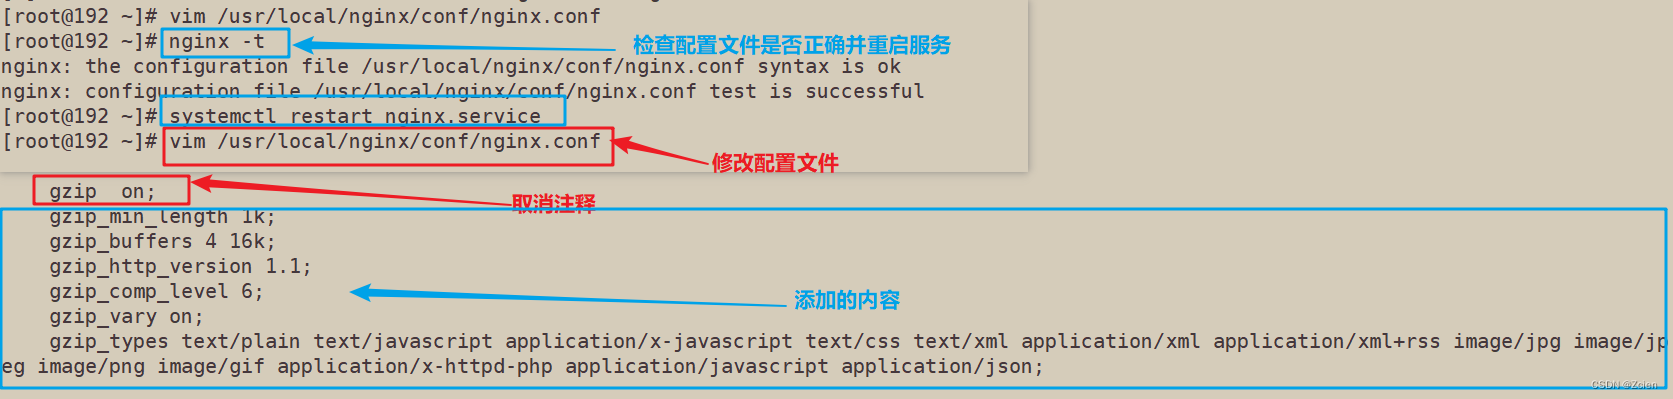
vim /usr/local/nginx/conf/nginx.conf
http {
......
   gzip on;                         #取消注释,开启gzip压缩功能
   gzip_min_length 1k;              #最小压缩文件大小
   gzip_buffers 4 16k;              #压缩缓冲区,大小为4个16k缓冲区
   gzip_http_version 1.1;           #压缩版本(默认1.1,前端如果是squid2.5请使用1.0)
   gzip_comp_level 6;               #压缩比率
   gzip_vary on;                    #支持前端缓存服务器存储压缩页面
   gzip_types text/plain text/javascript application/x-javascript text/css text/xml application/xml application/xml+rss image/jpg image/jpeg image/png image/gif application/x-httpd-php application/javascript application/json;       #压缩类型,表示哪些网页文档启用压缩功能
......
}
在上面的实验中已经修改了网页内容并插入图片,在此省略
cd /usr/local/nginx/html
先将game.jpg文件传到/usr/local/nginx/html目录下
vim index.html
......
<img src="meme.jpg"/>             #网页中插入图片
</body>
</html>

systemctl restart nginx
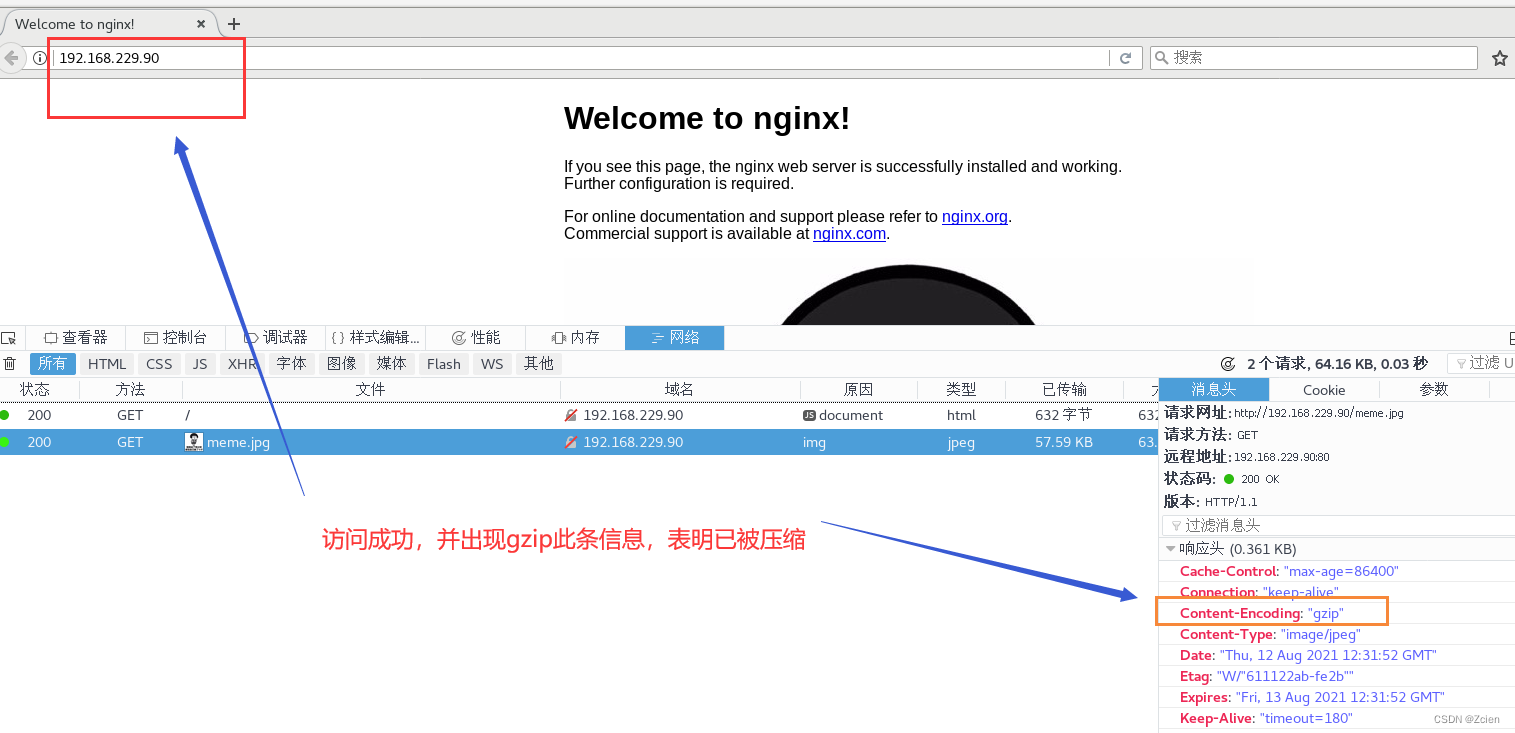
测试:
在Linux系统中,打开火狐浏览器,右击点查看元素
选择 网络 —> 选择 HTML、WS、其他
访问 http://192.168.229.90 ,双击200响应消息查看响应头中包含 Content-Encoding: gzip
2、实例操作:配置网页压缩
2.1 修改配置文件并重启服务
[root@192 ~]# vim /usr/local/nginx/conf/nginx.conf
[root@192 ~]# nginx -t
nginx: the configuration file /usr/local/nginx/conf/nginx.conf syntax is ok
nginx: configuration file /usr/local/nginx/conf/nginx.conf test is successful
[root@192 ~]# systemctl restart nginx.service
2.2 浏览器访问测试
八、配置防盗链
1、配置防盗链的操作步骤
vim /usr/local/nginx/conf/nginx.conf
http {
......
    server {
    ......
        location ~*\.(jpg|gif|swf)$ {
            valid_referers *.ly.com ly.com;
            if ( $invalid_referer ) {
                rewrite ^/ http://www.ly.com/error.png;
                #return 403;
            }
        }
    ......
    }
}
~* .(jpg|gif|swf)$ :这段正则表达式表示匹配不区分大小写,以.jpg 或.gif 或.swf 结尾的文件;
valid_referers :设置信任的网站,可以正常使用图片;
后面的网址或者域名 :referer 中包含相关字符串的网址;
if语句:如果链接的来源域名不在valid_referers所列出的列表中,$invalid_referer为1,则执行后面的操作,即进行重写或返回 403 页面。
网页准备:
Web源主机(192.168.229.90)配置:
cd /usr/local/nginx/html
将game.jpg、error.png文件传到/usr/local/nginx/html目录下
vim index.html
......
<img src="mem.jpg"/>
</body>
</html>
echo "192.168.229.90 www.ly.com" >> /etc/hosts
echo "192.168.229.60 www.weq.com" >> /etc/hosts
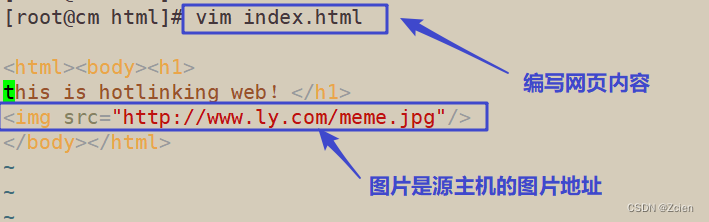
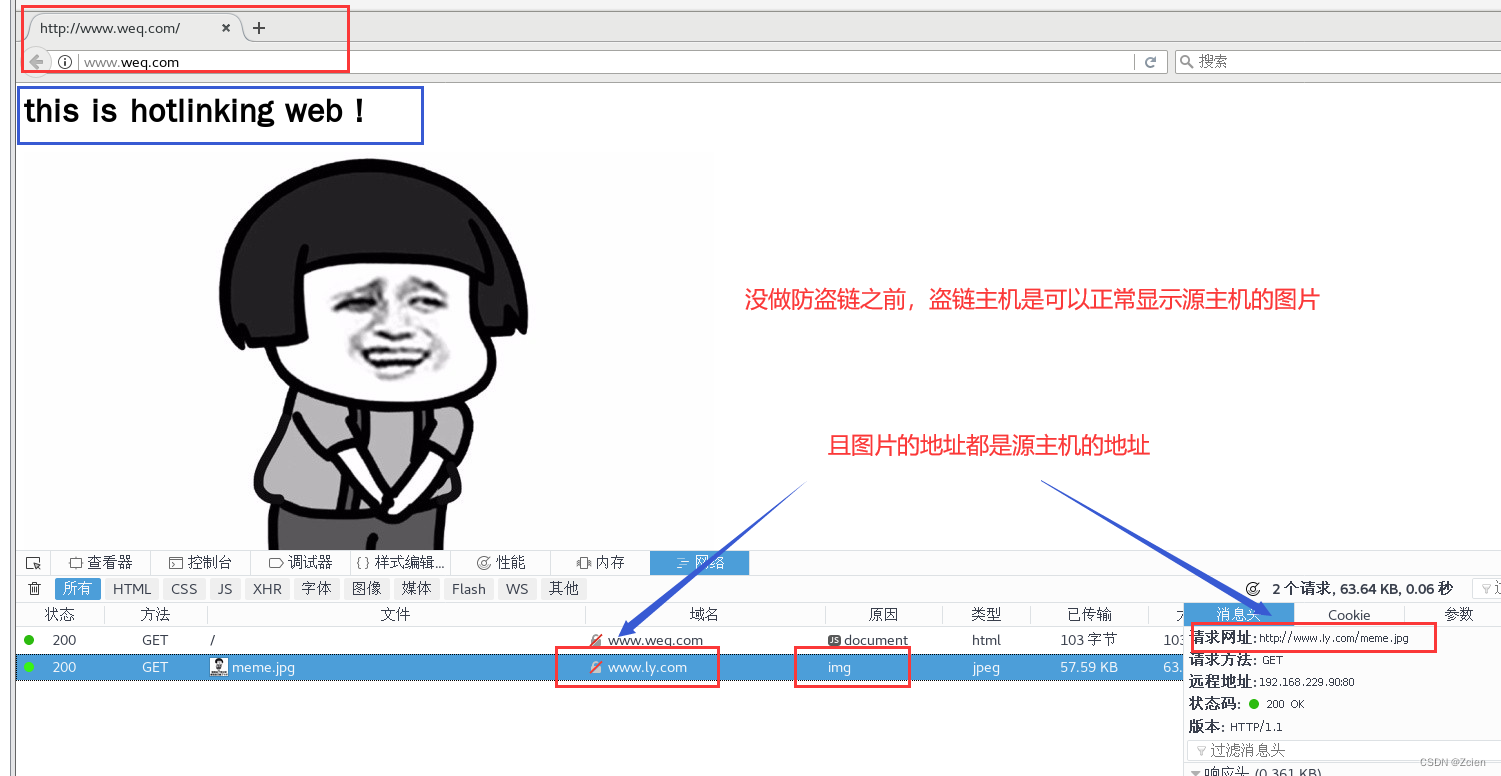
盗链网站主机(192.168.229.60):
cd /usr/local/nginx/html
vim index.html
......
<img src="http://www.ly.com/meme.jpg"/>
</body>
</html>
echo "192.168.229.90 www.ly.com" >> /etc/hosts
echo "192.168.229.60 www.weq.com" >> /etc/hosts
在盗图网站主机上进行浏览器验证
http://www.weq.com
2、实例操作:配置防盗链
2.1 盗链主机网页准备
[root@cm var]# cd /var/www/html/
[root@cm html]# ls
[root@cm html]# vim index.html


<html><body><h1>
this is hotlinking web!</h1>
<img src="http://www.ly.com/meme.jpg"/>
</body></html>
2.2 盗链主机临时添加域名和IP的映射关系
[root@cm html]# vim /etc/hosts

127.0.0.1   localhost localhost.localdomain localhost4 localhost4.localdomain4
::1         localhost localhost.localdomain localhost6 localhost6.localdomain6
192.168.229.60 www.weq.com
192.168.229.90 www.ly.com

2.3 浏览器访问盗链主机的网页(测试时源主机也要做映射)
2.4 修改源主机的nginx主配置文件
[root@192 ~]# vim /usr/local/nginx/conf/nginx.conf
 location ~* \.(gif|jpg|img|jepg|bmp|swf) {
            valid_referers *.ly.com ly.com;
            if ( $invalid_referer ) {
                 rewrite ^/ http://www.ly.com/error.png;
         }
        }

2.5 重启服务,在源主机加入防盗链图片,并添加映射
[root@192 ~]# nginx -t
nginx: the configuration file /usr/local/nginx/conf/nginx.conf syntax is ok
nginx: configuration file /usr/local/nginx/conf/nginx.conf test is successful
[root@192 ~]# systemctl restart nginx.service
[root@192 ~]# vim /etc/hosts

127.0.0.1   localhost localhost.localdomain localhost4 localhost4.localdomain4
::1         localhost localhost.localdomain localhost6 localhost6.localdomain6
192.168.229.60 www.weq.com
192.168.229.90 www.ly.com

2.6 放入防盗链图片
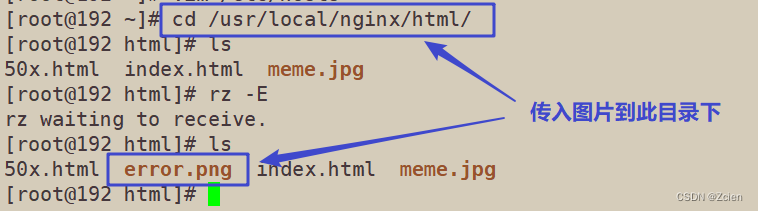
[root@192 ~]# cd /usr/local/nginx/html/
[root@192 html]# ls
50x.html  index.html  meme.jpg
[root@192 html]# rz -E
rz waiting to receive.
[root@192 html]# ls
50x.html  error.png  index.html  meme.jpg


 3223
3223


 被折叠的 条评论
为什么被折叠?
被折叠的 条评论
为什么被折叠?
 到【灌水乐园】发言


