


一、工程结构介绍
1、工程结构

2
、模块说明
yygh_parent
:预约挂号根目录(父工程),管理多个子模块:
common
:公共模块父节点
common_util
:工具类模块,所有模块都可以依赖于它
service_utils
:
service
服务的
base
包,包含
service
服务的公共配置类,所有
service
模块依赖于它
rabbit_utils
:rabbitmq封装工具类
hospital-manage
:医院模拟系统
model:实体类相关模块
service:api接口服务父节点
service_hosp
:医院
api
接口服务
service_cmn
:公共
api
接口服务
service_user
:用户
api
接口服务
service_order
:订单
api
接口服务
service_oss
:文件
api
接口服务
service_msm
:短信
api
接口服务
service_task
:定时任务服务
service_statistics
:统计
api
接口服务
service-client:feign服务调用父节点
service-cmn-client:公共api接口
service-hosp-client:医院api接口
service-order-client:订单api接口
server-gateway:服务网关
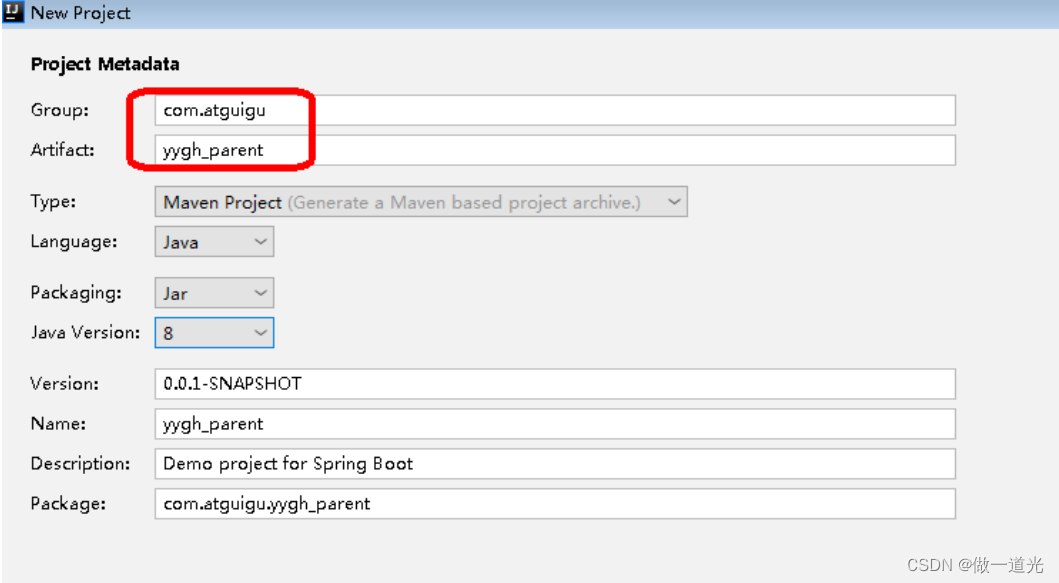
二、创建父工程
1
、创建
sprigboot
工程
yygh_parent
在idea开发工具中,使用
Spring Initializr
快速初始化一个
Spring Boot 模块
,
版本使用:
2.2.1.RELEASE
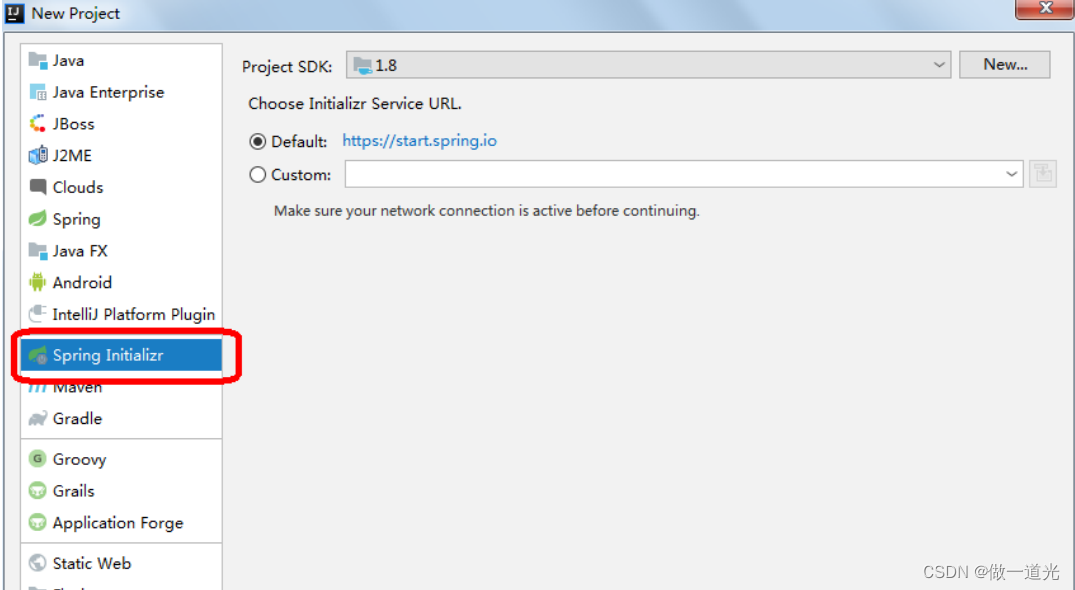
配置:
groupId
:
com.atguigu
artifactId
:
yygh_parent
一直下一步到完成
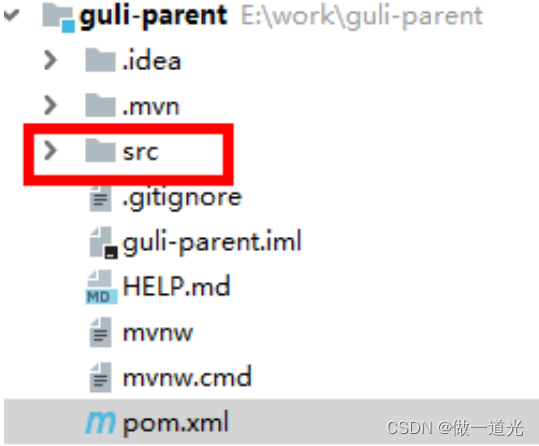
2、删除 src 目录
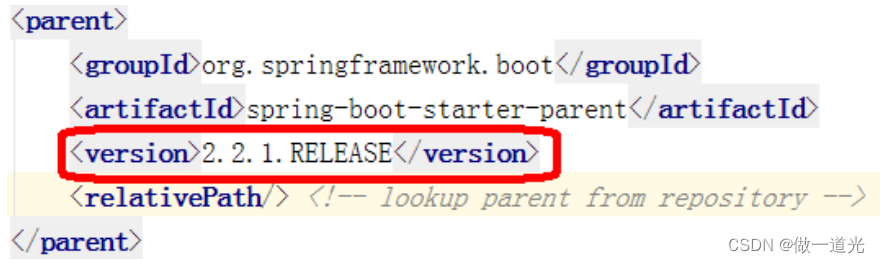
3
、配置
pom.xml
修改版本为
:2.2.1.RELEASE
<artifactId> 节点后面添加 pom类型
<artifactId>
guli-parent
</artifactId>
<packaging>
pom
</packaging>
4、在pom.xml中添加依赖的版本
删除pom.xml中的
<
dependencies
>内容
<dependencies>
 <dependency>
 <groupId>org.springframework.boot</groupId>
 <artifactId>spring-boot-starter</artifactId>
</dependency>

 <dependency>
 <groupId>org.springframework.boot</groupId>
<artifactId>spring-boot-starter-test</artifactId>
 <scope>test</scope>
 </dependency>
 </dependencies>
添加 <
properties
>确定依赖的版本
1
<properties>
2
<java.version>
1.8
</java.version>
3
<cloud.version>
Hoxton.RELEASE
</cloud.version>
4
<alibaba.version>
2.2.0.RELEASE
</alibaba.version>
5
<mybatis-plus.version>
3.3.1
</mybatis-plus.version>
6
<mysql.version>
5.1.46
</mysql.version>
7
<swagger.version>
2.7.0
</swagger.version>
8
<jwt.version>
0.7.0
</jwt.version>
9
<fastjson.version>
1.2.29
</fastjson.version>
10
<httpclient.version>
4.5.1
</httpclient.version>
11
<easyexcel.version>
2.2.0-beta2
</easyexcel.version>
12
<aliyun.version>
4.1.1
</aliyun.version>
13
<oss.version>
3.9.1
</oss.version>
14
<jodatime.version>
2.10.1
</jodatime.version>
15
</properties>
配置 <
dependencyManagement
> 锁定依赖的版本
1
<!--
配置
dependencyManagement
锁定依赖的版本
-->
2
<dependencyManagement>
3
<dependencies>
4
<dependency>
5
<groupId>
org.springframework.cloud
</groupId>
6
<artifactId>
spring-cloud-dependencies
</artifactId>
7
<version>
${cloud.version}
</version>
8
<type>
pom
</type>
9
<scope>
import
</scope>
10
</dependency>
11
12
<dependency>
13
<groupId>
com.alibaba.cloud
</groupId>
14
<artifactId>
spring-cloud-alibaba-dependencies
</artifactId>
15
<version>
${alibaba.version}
</version>
16
<type>
pom
</type>
17
<scope>
import
</scope>
18
</dependency>
19
20
<!--mybatis-plus
持久层
-->
21
<dependency>
22
<groupId>
com.baomidou
</groupId>
23
<artifactId>
mybatis-plus-boot-starter
</artifactId>
24
<version>
${mybatis-plus.version}
</version>
25
</dependency>
26
27
<dependency>
28
<groupId>
mysql
</groupId>
29
<artifactId>
mysql-connector-java
</artifactId>
30
<version>
${mysql.version}
</version>
31
</dependency>
32
33
<!--swagger-->
34
<dependency>
35
<groupId>
io.springfox
</groupId>
36
<artifactId>
springfox-swagger2
</artifactId>
37
<version>
${swagger.version}
</version>
38
</dependency>
39
<!--swagger ui-->
40
<dependency>
41
<groupId>
io.springfox
</groupId>
42
<artifactId>
springfox-swagger-ui
</artifactId>
43
<version>
${swagger.version}
</version>
44
</dependency>
45
46
<dependency>
47
<groupId>
io.jsonwebtoken
</groupId>
48
<artifactId>
jjwt
</artifactId>
49
<version>
${jwt.version}
</version>
50
</dependency>
51
52
<dependency>
53
<groupId>
org.apache.httpcomponents
</groupId>
54
<artifactId>
httpclient
</artifactId>
55
<version>
${httpclient.version}
</version>
56
</dependency>
57
58
<dependency>
59
<groupId>
com.alibaba
</groupId>
60
<artifactId>
fastjson
</artifactId>
61
<version>
${fastjson.version}
</version>
62
</dependency>
63
64
<dependency>
65
<groupId>
com.alibaba
</groupId>
66
<artifactId>
easyexcel
</artifactId>
67
<version>
${easyexcel.version}
</version>
68
</dependency>
69
70
<dependency>
71
<groupId>
com.aliyun
</groupId>
72
<artifactId>
aliyun-java-sdk-core
</artifactId>
73
<version>
${aliyun.version}
</version>
74
</dependency>
75
76
<dependency>
77
<groupId>
com.aliyun.oss
</groupId>
78
<artifactId>
aliyun-sdk-oss
</artifactId>
79
<version>
${oss.version}
</version>
80
</dependency>
81
82
<!--
日期时间工具
-->
83
<dependency>
84
<groupId>
joda-time
</groupId>
85
<artifactId>
joda-time
</artifactId>
86
<version>
${jodatime.version}
</version>
87
</dependency>
88
</dependencies>
89
</dependencyManagement>
一、搭建model模块
1、在父工程yygh_parent下面创建模块model
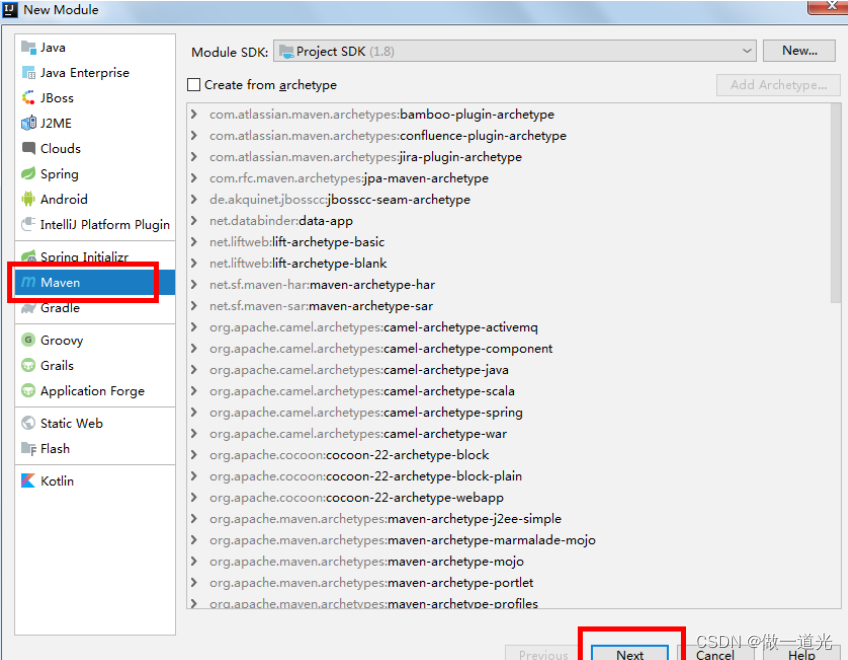
选择
maven
类型,点击下一步

输入模块名称model,下一步完成创建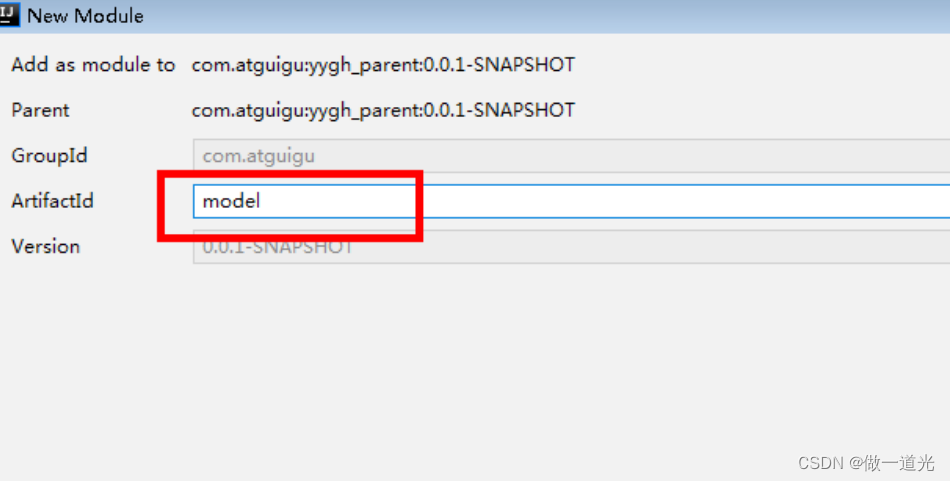
2、添加项目需要的依赖
1
<dependencies>
2
<dependency>
3
<groupId>
org.projectlombok
</groupId>
4
<artifactId>
lombok
</artifactId>
5
</dependency>
6
<!--mybatis-plus-->
7
<dependency>
8
<groupId>
com.baomidou
</groupId>
9
<artifactId>
mybatis-plus-boot-starter
</artifactId>
10
<scope>
provided
</scope>
11
</dependency>
12
<!--swagger-->
13
<dependency>
14
<groupId>
io.springfox
</groupId>
15
<artifactId>
springfox-swagger2
</artifactId>
16
<scope>
provided
</scope>
17
</dependency>
18
<dependency>
19
<groupId>
com.alibaba
</groupId>
20
<artifactId>
easyexcel
</artifactId>
21
<scope>
provided
</scope>
22
</dependency>
23
<dependency>
24
<groupId>
org.springframework.boot
</groupId>
25
<artifactId>
spring-boot-starter-data-mongodb
</artifactId>
26
<scope>
provided
</scope>
27
</dependency>
28
<dependency>
29
<groupId>
com.alibaba
</groupId>
30
<artifactId>
fastjson
</artifactId>
31
<scope>
provided
</scope>
32
</dependency>
33
</dependencies>
3
、创建项目实体类和
VO
类
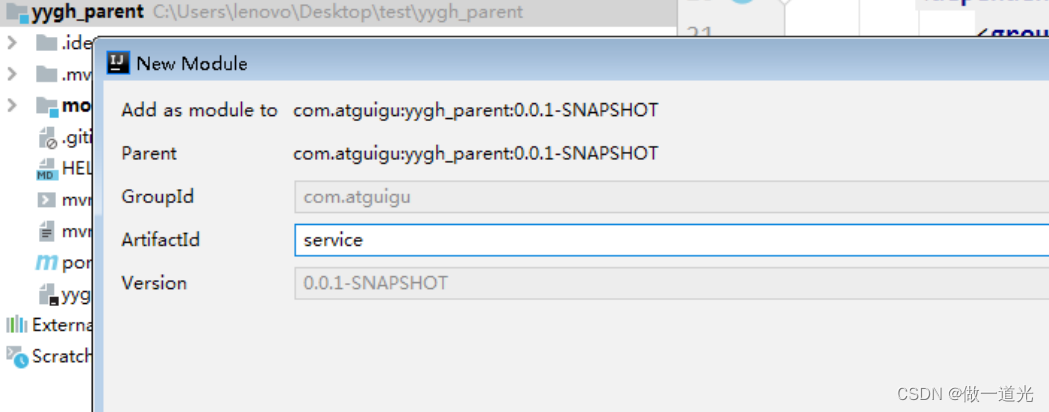
1、在父工程yygh_parent下面创建模块service
选择 maven类型,点击下一步
输入模块名称 service,下一步完成创建
2
、添加模块类型是
pom
<artifactId>
节点后面添加 pom类型
1
<artifactId>
service
</artifactId>
2
<packaging>
pom
</packaging>
3
、添加项目需要的依赖
1
<dependencies>
2
<dependency>
3
<groupId>
com.atguigu
</groupId>
4
<artifactId>
model
</artifactId>
5
<version>
0.0.1-SNAPSHOT
</version>
6
</dependency>
7
<!--web-->
8
<dependency>
9
<groupId>
org.springframework.boot
</groupId>
10
<artifactId>
spring-boot-starter-web
</artifactId>
11
</dependency>
12
<!--mybatis-plus-->
13
<dependency>
14
<groupId>
com.baomidou
</groupId>
15
<artifactId>
mybatis-plus-boot-starter
</artifactId>
16
</dependency>
17
<!--mysql-->
18
<dependency>
19
<groupId>
mysql
</groupId>
20
<artifactId>
mysql-connector-java
</artifactId>
21
</dependency>
22
<!--
开发者工具
-->
23
<dependency>
24
<groupId>
org.springframework.boot
</groupId>
25
<artifactId>
spring-boot-devtools
</artifactId>
26
<optional>
true
</optional>
27
</dependency>
28
<!--
服务调用
feign -->
29
<dependency>
30
<groupId>
org.springframework.cloud
</groupId>
31
<artifactId>
spring-cloud-starter-openfeign
</artifactId>
32
</dependency>
33
<!--
服务注册
-->
34
<dependency>
35
<groupId>
com.alibaba.cloud
</groupId>
36
<artifactId>
spring-cloud-starter-alibaba-nacos-discovery
</artifactId>
37
</dependency>
38
</dependencies>
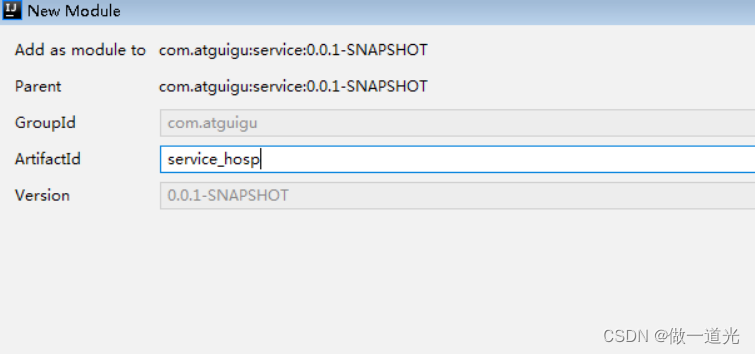
二、搭建医院模块
service_hosp
模块
1
、在父工程
service
模块下面创建子模块
service_hosp
输入模块名称 service_hosp,下一步完成创建


 1177
1177


 被折叠的 条评论
为什么被折叠?
被折叠的 条评论
为什么被折叠?
 到【灌水乐园】发言


