


内置模块
path:
const path = require('path');

// 1.获取路径的信息
// const filepath = '/User/why/abc.txt';

// console.log(path.dirname(filepath));
// console.log(path.basename(filepath));
// console.log(path.extname(filepath));

// 2.join路径拼接
const basepath = '../User/why';
const filename = './abc.txt';
const othername = './why.js';

const filepath1 = path.join(basepath, filename);
// console.log(filepath1);

// 3.resolve路径拼接
// resolve会判断拼接的路径字符串中,是否有以/或./或../开头的路径
// const filepath2 = path.resolve(basepath, filename, othername);
// console.log(filepath2);

const basepath2 = '/User/coderwhy';
// const filename2 = '/why/abc.txt'; // /why/abc.txt
// const filename2 = './why/abc.txt'; // /User/coderwhy/why/abc.txt
// const filename2 = 'why/abc.txt'; // /User/coderwhy/why/abc.txt

const filename2 = '../why/abc.txt'; // /User/coderwhy/why/abc.txt

const result = path.resolve(basepath2, filename2);
console.log(result);
fs(文件模块)
const fs = require('fs');

// 案例: 读取文件的信息
const filepath = "./abc.txt";

// 1.方式一: 同步操作
// const info = fs.statSync(filepath);
// console.log("后续需要执行的代码");
// console.log(info);

// 2.方式二: 异步操作
fs.stat(filepath, (err, info) => {
  if (err) {
    console.log(err);
    return;
  }
  console.log(info);
  console.log(info.isFile()); // 判断是一个文件吗
  console.log(info.isDirectory()); // 判断是一个文件夹吗
});
console.log("后续需要执行的代码");

// 3.方式三: Promise
// fs.promises.stat(filepath).then(info => {
//   console.log(info);
// }).catch(err => {
//   console.log(err);
// });

// console.log("后续需要执行的代码");
文件描述符
const fs = require('fs');

fs.open("./abc.txt", (err, fd) => {
    if (err) {
        console.log(err);
        return;
    }

    // 通过描述符去获取文件的信息
    fs.fstat(fd, (err, info) => {
        console.log(info);
    })
})
文件的读写
flag:写入的方式。encoding:字符的编码;flag的值有很多: https://nodejs.org/dist/latest-v14.x/docs/api/fs.html#fs_file_system_flagsw 打开文件写入,默认值;w+打开文件进行读写,如果不存在则创建文件;r+ 打开文件进行读写,如果不存在那么抛出异常;r打开文件读取,读取时的默认值;a打开要写入的文件,将流放在文件末尾。如果不存在则创建文件;a+打开文件以进行读写,将流放在文件末尾。如果不存在则创建文件encoding选项我们再来看看编码:我之前在简书上写过一篇关于字符编码的文章: https://www.jianshu.com/p/899e749be47c目前基本用的都是UTF-8编码;文件读取:如果不填写encoding,返回的结果是Buffer;
const fs = require('fs');


// 1.文件写入
// const content = "你好啊,李银河";

// fs.writeFile('./abc.txt', content, {flag: "a"}, err => {
//   console.log(err);
// });

// 2.文件读取
fs.readFile("./abc.txt", {encoding: 'utf-8'}, (err, data) => {
  console.log(data);
});
文件夹操作
const fs = require('fs');
const path = require('path');

// 1.创建文件夹
const dirname = './why';
if (!fs.existsSync(dirname)) {
    fs.mkdir(dirname, err => {
        console.log(err);
    });
}

// 2.读取文件夹中的所有文件
// fs.readdir(dirname, (err, files) => {
//   console.log(files);
// });

// function getFiles(dirname) {
//   fs.readdir(dirname, { withFileTypes: true }, (err, files) => {
//     for (let file of files) {
//       // fs.stat(file) 可以, 但是有点麻烦
//       if (file.isDirectory()) {
//         const filepath = path.resolve(dirname, file.name);
//         getFiles(filepath);
//       } else {
//         console.log(file.name);
//       }
//     }
//   });
// }

// getFiles(dirname);

// 3.重命名
fs.rename("./why", "./kobe", err => {
    console.log(err);
})


// 3.文件夹的重命名
events模块
基础方法
Node中的核心API都是基于异步事件驱动的:在这个体系中,某些对象(发射器(Emitters))发出某一个事件;我们可以监听这个事件(监听器 Listeners),并且传入的回调函数,这个回调函数会在监听到事件时调用;发出事件和监听事件都是通过EventEmitter类来完成的,它们都属于events对象。emitter.on(eventName, listener):监听事件,也可以使用addListener;emitter.off(eventName, listener):移除事件监听,也可以使用removeListener;emitter.emit(eventName[, ...args]):发出事件,可以携带一些参数;
const EventEmitter = require("events");

// 1.创建发射器
const emitter = new EventEmitter();

// 2.监听某一个事件
// addListener是on的alias简写
emitter.on('click', (args) => {
  console.log("监听1到click事件", args);
})

const listener2 = (args) => {
  console.log("监听2到click事件", args);
}
emitter.on('click', listener2)

// 3.发出一个事件
setTimeout(() => {
  emitter.emit("click", "coderwhy", "james", "kobe");
  emitter.off("click", listener2);
  emitter.emit("click", "coderwhy", "james", "kobe");
}, 2000);
获取信息
EventEmitter的实例有一些属性,可以记录一些信息:emitter.eventNames():返回当前 EventEmitter对象注册的事件字符串数组;emitter.getMaxListeners():返回当前 EventEmitter对象的最大监听器数量,可以通过setMaxListeners()来修改,默认是10;emitter.listenerCount(事件名称):返回当前 EventEmitter对象某一个事件名称,监听器的个数;emitter.listeners(事件名称):返回当前 EventEmitter对象某个事件监听器上所有的监听器数组;
const EventEmitter = require('events');

// 1.创建发射器
const emitter = new EventEmitter();

// 2.监听某一个事件
// addListener是on的alias简写
emitter.on('click', (args) => {
  console.log("监听1到click事件", args);
})

const listener2 = (args) => {
  console.log("监听2到click事件", args);
}
emitter.on('click', listener2)

emitter.on("tap", (args) => {
  console.log(args);
})

// 3.获取注册的事件
console.log(emitter.eventNames()); // 获取所有的事件 数组形式
console.log(emitter.listenerCount("click")); // 事件次数
console.log(emitter.listeners("click")); // 事件类型
emitter.once(eventName, listener):事件监听一次emitter.prependListener():将监听事件添加到最前面emitter.prependOnceListener():将监听事件添加到最前面,但是只监听一次emitter.removeAllListeners([eventName]):移除所有的监听器
const EventEmitter = require("events");

// 1.创建发射器
const emitter = new EventEmitter();

// 2.监听某一个事件
// addListener是on的alias简写
// 只执行一次
emitter.once('click', (arg1, arg2, arg3) => {
    console.log("监听1到click事件", arg1, arg2, arg3);
})

const listener2 = function(arg1, arg2, arg3) {
    // 特点: 绑定this, 也不绑定arguments数组
    console.log(arguments);
    console.log(this);
    console.log("监听2到click事件", arg1, arg2, arg3);
}

emitter.on('click', listener2)

// 将本次监听放到最前面
emitter.prependListener('click', (arg1, arg2, arg3) => {
    console.log("监听3到click事件", arg1, arg2, arg3);
})

emitter.on("scroll", (args) => {
    console.log("监听到scroll方法");
})


// 3.发出一个事件
setTimeout(() => {
    // emitter.removeAllListeners("click");
    emitter.emit("click", "coderwhy", "james", "kobe");
    emitter.emit("click", "coderwhy", "james", "kobe");
    emitter.emit("scroll", "coderwhy", "james", "kobe");
}, 2000);

console.log(arguments);
console.log(this);
Buffer


编码和解码
解码使用toString()


sharp库
const fs = require('fs');
const sharp = require('sharp');

// 读取文本文件
// fs.readFile("./foo.txt", (err, data) => {
//   console.log(data);
//   console.log(data.toString());
// });

// 读取图片文件
// fs.readFile("./bar.png", (err, data) => {
//   console.log(data);
//   // })
//   fs.writeFile("./foo.png", data, err => {
//     console.log(err);
//   });
// });

// sharp库的使用
sharp('./bar.png')
  .resize(200, 200)
  .toFile('./baz.png');

sharp('./foo.png')
  .resize(300, 300)
  .toBuffer()
  .then(data => {
    fs.writeFile('./bax.png', data, err => console.log(err));
  })


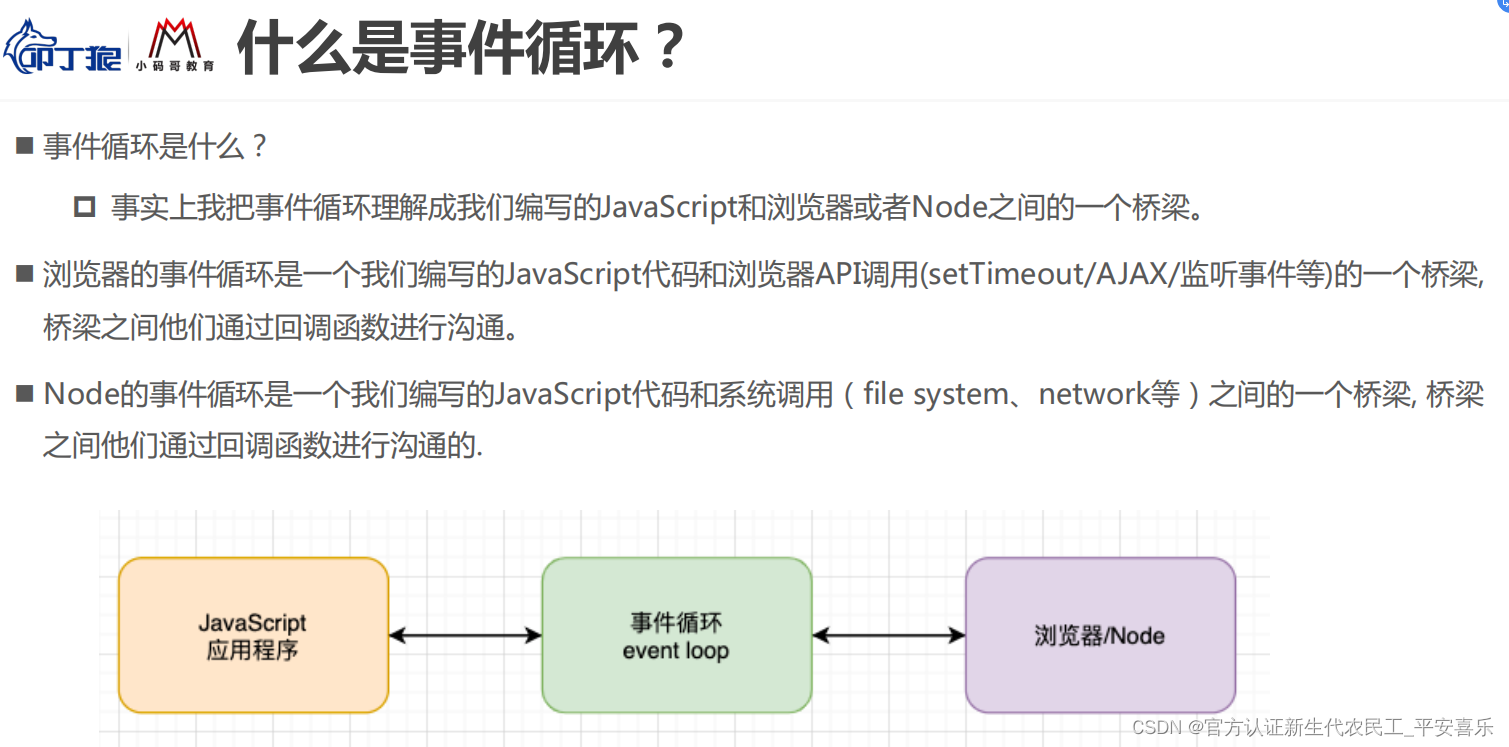
 事件循环和异步IO


Stream


const fs = require('fs');

// 传统的方式
// fs.readFile('./foo.txt', (err, data) => {
//   console.log(data);
// });

// 流的方式读取
const reader = fs.createReadStream("./foo.txt", {
  start: 3,
  end: 10,
  highWaterMark: 2
});

// 数据读取的过程
reader.on("data", (data) => {
  console.log(data);

  reader.pause(); // 暂停

  setTimeout(() => {
    reader.resume(); // 恢复
  }, 1000);
});

reader.on('open', () => {
  console.log("文件被打开");
})

reader.on('close', () => {
  console.log("文件被关闭");
})


const fs = require('fs');

// 传统的写入方式
// fs.writeFile("./bar.txt", "Hello Stream", {flag: "a"}, (err) => {
//   console.log(err);
// });

// Stream的写入方式
const writer = fs.createWriteStream('./bar.txt', {
    flags: "r+",
    start: 4
});

writer.write("你好啊", (err) => {
    if (err) {
        console.log(err);
        return;
    }
    console.log("写入成功");
});

writer.write("李银河", (err) => {
    console.log("第二次写入");
})

// writer.close();
// write("Hello World");
// close();
writer.end("Hello World");

writer.on('close', () => {
    console.log("文件被关闭");
})

const fs = require('fs');

// 传统的写法
// fs.readFile('./bar.txt', (err, data) => {
//   fs.writeFile('./baz.txt', data, (err) => {
//     console.log(err);
//   })
// })

// Stream的写法
const reader = fs.createReadStream("./foo.txt");
const writer = fs.createWriteStream('./foz.txt');

reader.pipe(writer);
writer.close();
HTTP模块


const http = require('http');

// 创建server的两种方式
const server1 = http.createServer((req, res) => {
  res.end("Server1");
});

// server1.listen(8000, () => {
//   console.log("server1启动成功~");
// });

// const server2 = http.createServer((req, res) => {
//   res.end("Server2");
// });

// const server2 = new http.Server((req, res) => {
//   res.end("Server2");
// });

// server2.listen(8001, () => {
//   console.log("server2启动成功~");
// });


// 2.监听方法的使用
server1.listen(8000, () => {
  console.log("server1启动成功~");
  // console.log(server1.address().port);
});


const http = require('http');

// 创建一个web服务器
const server = http.createServer((req, res) => {
  // request对象中封装了客户端给我们服务器传递过来的所有信息
  console.log(req.url);
  console.log(req.method);
  console.log(req.headers);

  res.end("Hello Server");
});

// 启动服务器,并且制定端口号和主机
server.listen(8888, '0.0.0.0', () => {
  console.log("服务器启动成功~");
});


使用url模块下的url.parse方法解析地址 可以拿到一个url对象
querystring模块 parse方法解析 可以拿到对象
const http = require('http');
const url = require('url');
const qs = require('querystring');

// 创建一个web服务器
const server = http.createServer((req, res) => {

  // 最基本的使用方式
  // if (req.url === '/login') {
  //   res.end("欢迎回来~");
  // } else if (req.url === '/users') {
  //   res.end("用户列表~");
  // } else {
  //   res.end("错误请求, 检查~");
  // }

  // /login?username=why&password=123
  const { pathname, query } = url.parse(req.url);
  if (pathname === '/login') {
    console.log(query);
    console.log(qs.parse(query));
    const { username, password } = qs.parse(query);
    console.log(username, password);
    res.end("请求结果~");
  }

  // console.log(req.url);
  // res.end("请求结果~");
});

// 启动服务器,并且制定端口号和主机
server.listen(8888, '0.0.0.0', () => {
  console.log("服务器启动成功~");
});

const http = require('http');
const url = require('url');
const qs = require('querystring');

// 创建一个web服务器
const server = http.createServer((req, res) => {

  const { pathname } = url.parse(req.url);
  if (pathname === '/login') {
    if (req.method === 'POST') {
      // 拿到body中的数据
      req.setEncoding('utf-8');
      req.on('data', (data) => {
        const {username, password} = JSON.parse(data);
        console.log(username, password);
      });

      res.end("Hello World");
    }
  }
});

server.listen(8888, '0.0.0.0', () => {
  console.log("服务器启动成功~");
});


const http = require('http');

// 创建一个web服务器
const server = http.createServer((req, res) => {
  console.log(req.headers);

  req.on('data', (data) => {

  })

  res.end("Hello Server");
});

// 启动服务器,并且制定端口号和主机
server.listen(8888, '0.0.0.0', () => {
  console.log("服务器启动成功~");
});

const http = require('http');

// 创建一个web服务器
const server = http.createServer((req, res) => {

  // 响应结果
  res.write("响应结果一");
  res.end("Hello World");
});

// 启动服务器,并且制定端口号和主机
server.listen(8888, '0.0.0.0', () => {
  console.log("服务器启动成功~");
});

const http = require('http');

// 创建一个web服务器
const server = http.createServer((req, res) => {

  // 设置状态码
  // 方式一: 直接给属性赋值
  // res.statusCode = 400;
  // 方式二: 和Head一起设置
  res.writeHead(503)

  // 响应结果
  res.write("响应结果一");
  res.end("Hello World");
});

// 启动服务器,并且制定端口号和主机
server.listen(8888, '0.0.0.0', () => {
  console.log("服务器启动成功~");
});

const http = require('http');

// 创建一个web服务器
const server = http.createServer((req, res) => {

  // 设置响应的header
  // 设置方式一:
  // res.setHeader("Content-Type", "text/plain;charset=utf8");
  res.writeHead(200, {
    "Content-Type": "text/html;charset=utf8"
  });

  // 响应结果
  res.end("<h2>Hello Server</h2>");
});

// 启动服务器,并且制定端口号和主机
server.listen(8888, '0.0.0.0', () => {
  console.log("服务器启动成功~");
});

const http = require('http');

// http发送get请求
// http.get('http://localhost:8888', (res) => {
//   res.on('data', (data) => {
//     console.log(data.toString());
//   });

//   res.on('end', () => {
//     console.log("获取到了所有的结果");
//   })
// })

// http发送post请求
const req = http.request({
  method: 'POST',
  hostname: 'localhost',
  port: 8888
}, (res) => {
  res.on('data', (data) => {
    console.log(data.toString());
  });

  res.on('end', () => {
    console.log("获取到了所有的结果");
  })
});

req.end();
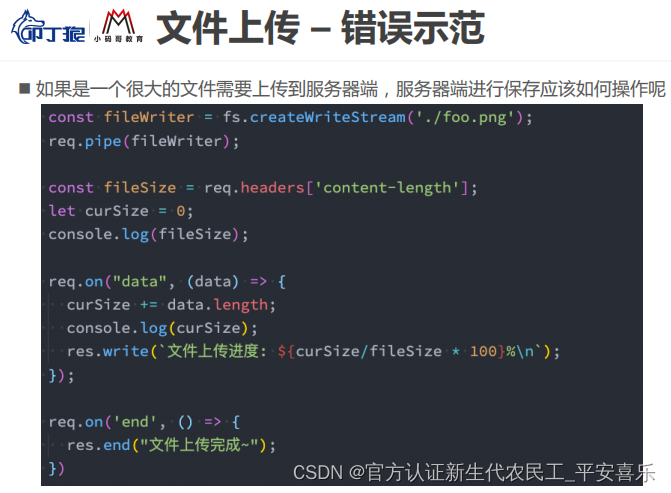
const http = require('http');
const fs = require('fs');

const server = http.createServer((req, res) => {
  if (req.url === '/upload') {
    if (req.method === 'POST') {
      const fileWriter = fs.createWriteStream('./foo.png', {flags: 'a+'});
      // req.pipe(fileWriter);

      req.on('data', (data) => {
        // console.log(data);
        // fileWriter.write(data);
      });

      req.on('end', () => {
        console.log("文件上传成功~");
        res.end("文件上传成功~");
      })
    }
  }
});

server.listen(8000, () => {
  console.log("文件上传服务器开启成功~");
})


const http = require('http');
const fs = require('fs');
const qs = require('querystring');

const server = http.createServer((req, res) => {
  if (req.url === '/upload') {
    if (req.method === 'POST') {
      req.setEncoding('binary');

      let body = '';
      const totalBoundary = req.headers['content-type'].split(';')[1];
      const boundary = totalBoundary.split('=')[1];

      req.on('data', (data) => {
        body += data;
      });

      req.on('end', () => {
        console.log(body);
        // 处理body
        // 1.获取image/png的位置
        const payload = qs.parse(body, "\r\n", ": ");
        const type = payload["Content-Type"];

        // 2.开始在image/png的位置进行截取
        const typeIndex = body.indexOf(type);
        const typeLength = type.length;
        let imageData = body.substring(typeIndex + typeLength);

        // 3.将中间的两个空格去掉
        imageData = imageData.replace(/^\s\s*/, '');

        // 4.将最后的boundary去掉
        imageData = imageData.substring(0, imageData.indexOf(`--${boundary}--`));

        fs.writeFile('./foo.png', imageData, 'binary', (err) => {
          res.end("文件上传成功~");
        })
      })
    }
  }
});

server.listen(8000, () => {
  console.log("文件上传服务器开启成功~");
})
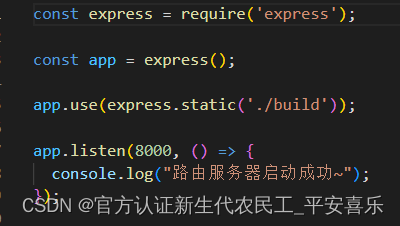
Express框架


const express = require('express');

// express其实是一个函数: createApplication
// 返回app
const app = express();

// 监听默认路径
app.get('/', (req, res, next) => {
  res.end("Hello Express");
})

app.post('/', (req, res, next) => {
  res.send('post')
})

app.post('/login', (req, res, next) => {
  res.end("Welcome Back~");
})

// 开启监听
app.listen(8000, () => {
  console.log("express初体验服务器启动成功~");
});


const express = require('express');

const app = express();

// 自己编写的json解析
// app.use((req, res, next) => {
//   if (req.headers["content-type"] === 'application/json') {
//     req.on('data', (data) => {
//       const info = JSON.parse(data.toString());
//       req.body = info;
//     })

//     req.on('end', () => {
//       next();
//     })
//   } else {
//     next();
//   }
// })


// 使用express提供给我们的body解析
// body-parser: express3.x 内置express框架
// body-parser: express4.x 被分离出去
// body-parser类似功能: express4.16.x 内置成函数
app.use(express.json());
// extended
// true: 那么对urlencoded进行解析时, 它使用的是第三方库: qs
// false: 那么对urlencoded进行解析时, 它使用的是Node内置模块: querystring
app.use(express.urlencoded({ extended: true }));

app.post('/login', (req, res, next) => {
    console.log(req.body);
    res.end("Coderwhy, Welcome Back~");
});

app.post('/products', (req, res, next) => {
    console.log(req.body);
    res.end("Upload Product Info Success~");
});

app.listen(8000, () => {
    console.log("express初体验服务器启动成功~");
});


上传解析↓

保存日志信息


https://www.expressjs.com.cn/4x/api.html#res


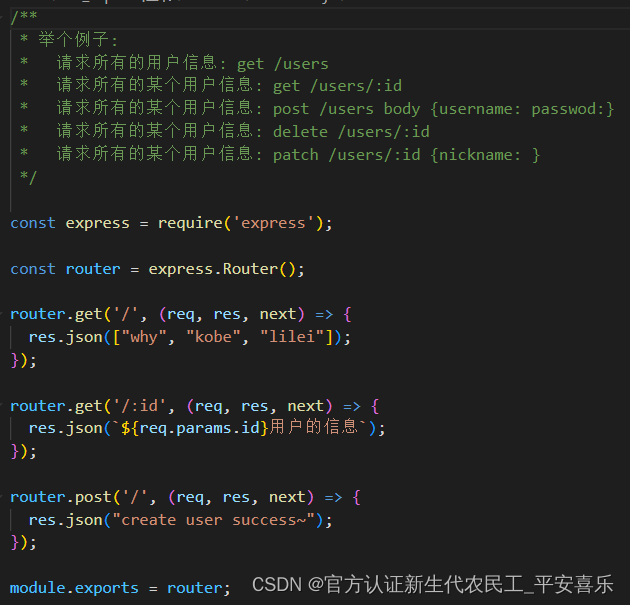
products.js路由js文件导出
在开发中通过 数据库查询的

users.js 路由js文件导出
在开发中通过 数据库查询的
引入


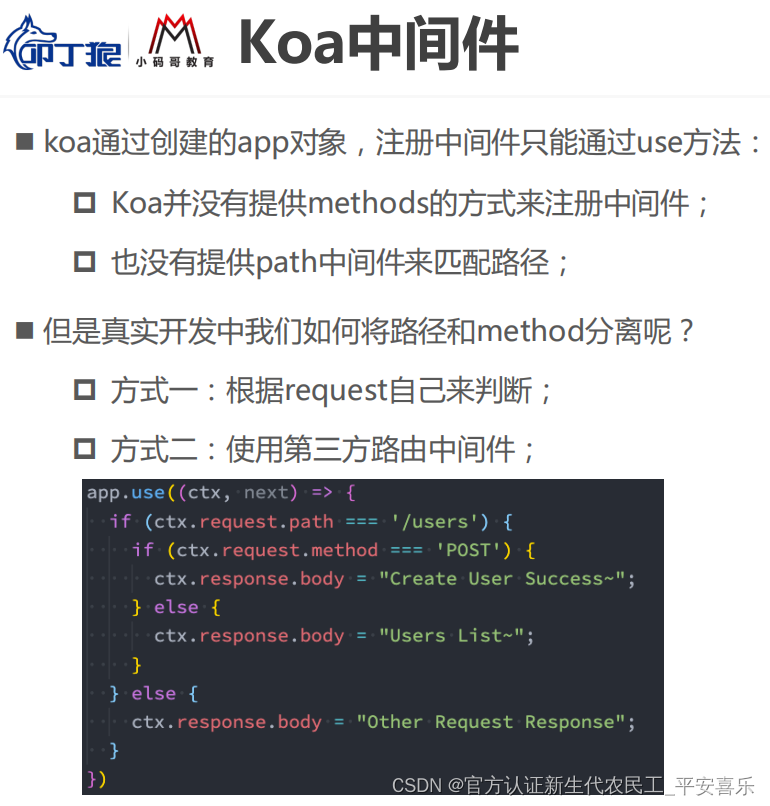
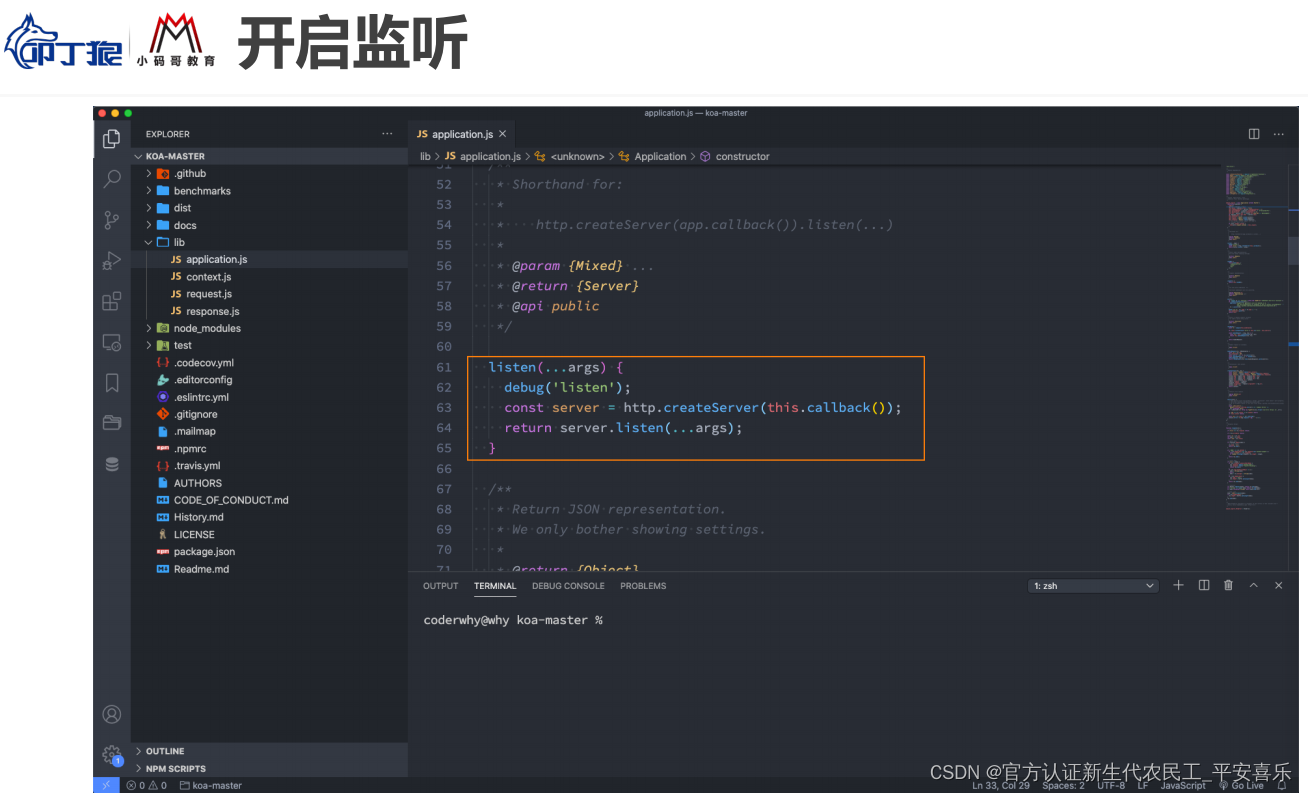
KOA框架学习


user.js

引入


MySQL


# 查看所有的表
SHOW TABLES;# 新建表
CREATE TABLE IF NOT EXISTS `students` (
`name` VARCHAR(10) NOT NULL,
`age` int,
`score` int,
`height` DECIMAL(10,2),
`birthday` YEAR,
`phoneNum` VARCHAR(20) UNIQUE
);# 删除表
DROP TABLE IF EXISTS `moment`;# 查看表的结构
DESC students;
# 查看创建表的SQL语句
SHOW CREATE TABLE `students`;
-- CREATE TABLE `students` (
-- `name` varchar(10) DEFAULT NULL,
-- `age` int DEFAULT NULL,
-- `score` int DEFAULT NULL
-- ) ENGINE=InnoDB DEFAULT CHARSET=utf8mb4 COLLATE=utf8mb4_0900_ai_ci# 完整的创建表的语法
CREATE TABLE IF NOT EXISTS `users`(
id INT PRIMARY KEY AUTO_INCREMENT,
name VARCHAR(20) NOT NULL,
age INT DEFAULT 0,
phoneNum VARCHAR(20) UNIQUE DEFAULT '',
createTime TIMESTAMP
);# 修改表
# 1.修改表的名字
ALTER TABLE `users` RENAME TO `user`;
# 2.添加一个新的列
ALTER TABLE `user` ADD `updateTime` TIMESTAMP;
# 3.修改字段的名称
ALTER TABLE `user` CHANGE `phoneNum` `telPhone` VARCHAR(20);
# 4.修改字段的类型
ALTER TABLE `user` MODIFY `name` VARCHAR(30);
# 5.删除某一个字段
ALTER TABLE `user` DROP `age`;# 补充
# 根据一个表结构去创建另外一张表
CREATE TABLE `user2` LIKE `user`;
# 根据另外一个表中的所有内容,创建一个新的表
CREATE TABLE `user3` (SELECT * FROM `user`);
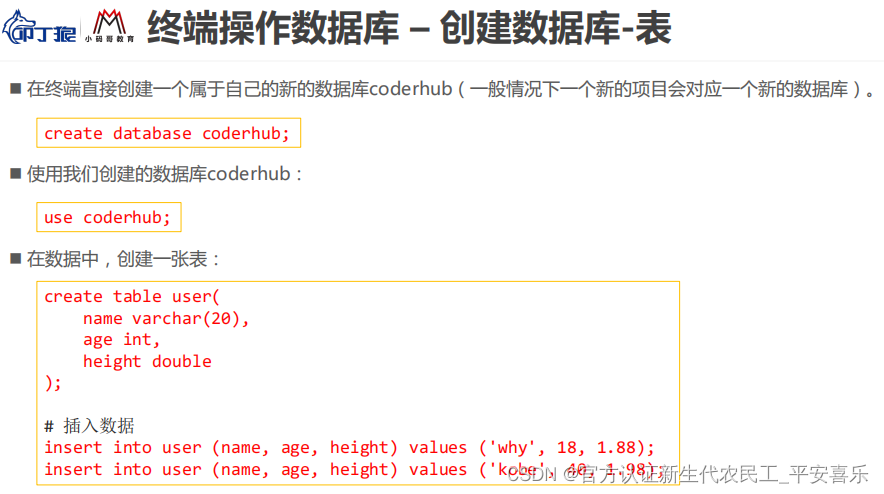
# 查看所有的数据库
SHOW DATABASES;# 选择某一个数据库
USE bili;# 查看当前正在使用的数据库
SELECT DATABASE();# 创建一个新的数据库
-- CREATE DATABASE douyu;
-- CREATE DATABASE IF NOT EXISTS douyu;
-- CREATE DATABASE IF NOT EXISTS huya DEFAULT CHARACTER SET utf8mb4
-- COLLATE utf8mb4_0900_ai_ci;# 删除数据库
DROP DATABASE IF EXISTS douyu;# 修改数据库的编码
ALTER DATABASE huya CHARACTER SET = utf8
COLLATE = utf8_unicode_ci;# DML
# 插入数据
INSERT INTO `user` VALUES (110, 'why', '020-110110', '2020-10-20', '2020-11-11');
INSERT INTO `user` (name, telPhone, createTime, updateTime)
VALUES ('kobe', '000-1111111', '2020-10-10', '2030-10-20');
INSERT INTO `user` (name, telPhone)
VALUES ('lilei', '000-1111112');# 需求:createTime和updateTime可以自动设置值
ALTER TABLE `user` MODIFY `createTime` TIMESTAMP DEFAULT CURRENT_TIMESTAMP;
ALTER TABLE `user` MODIFY `updateTime` TIMESTAMP DEFAULT CURRENT_TIMESTAMP
ON UPDATE CURRENT_TIMESTAMP;INSERT INTO `user` (name, telPhone)
VALUES ('hmm', '000-1111212');INSERT INTO `user` (name, telPhone)
VALUES ('lucy', '000-1121212');
# 删除数据
# 删除所有的数据
DELETE FROM `user`;
# 删除符合条件的数据
DELETE FROM `user` WHERE id = 110;# 更新数据
# 更新所有的数据
UPDATE `user` SET name = 'lily', telPhone = '010-110110';
# 更新符合条件的数据
UPDATE `user` SET name = 'lily', telPhone = '010-110110' WHERE id = 115;# 1.聚合函数的使用
# 求所有手机的价格的总和
SELECT SUM(price) totalPrice FROM `products`;
# 求一下华为手机的价格的总和
SELECT SUM(price) FROM `products` WHERE brand = '华为';
# 求华为手机的平均价格
SELECT AVG(price) FROM `products` WHERE brand = '华为';
# 最高手机的价格和最低手机的价格
SELECT MAX(price) FROM `products`;
SELECT MIN(price) FROM `products`;# 求华为手机的个数
SELECT COUNT(*) FROM `products` WHERE brand = '华为';
SELECT COUNT(*) FROM `products` WHERE brand = '苹果';
SELECT COUNT(url) FROM `products` WHERE brand = '苹果';SELECT COUNT(price) FROM `products`;
SELECT COUNT(DISTINCT price) FROM `products`;# 2.GROUP BY的使用
SELECT brand, AVG(price), COUNT(*), AVG(score) FROM `products` GROUP BY brand;
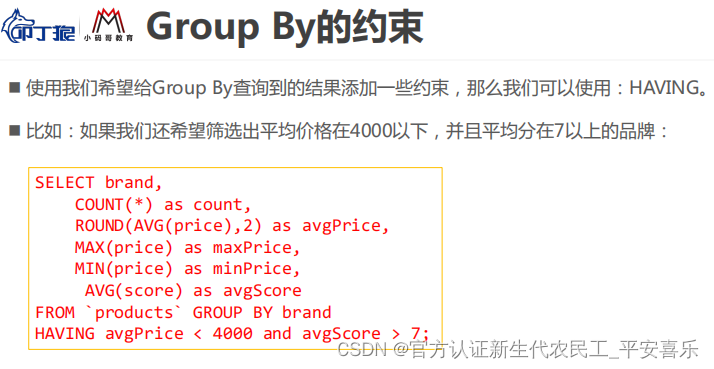
# 3.HAVING的使用
SELECT brand, AVG(price) avgPrice, COUNT(*), AVG(score) FROM `products` GROUP BY brand HAVING avgPrice > 2000;
# 4.需求:求评分score > 7.5的手机的,平均价格是多少?
# 升级:平均分大于7.5的手机,按照品牌进行分类,求出平均价格。
SELECT brand, AVG(price) FROM `products` WHERE score > 7.5 GROUP BY brand;
# 创建products的表
CREATE TABLE IF NOT EXISTS `products` (
id INT PRIMARY KEY AUTO_INCREMENT,
brand VARCHAR(20),
title VARCHAR(100) NOT NULL,
price DOUBLE NOT NULL,
score DECIMAL(2,1),
voteCnt INT,
url VARCHAR(100),
pid INT
);# 1.基本查询
# 查询表中所有的字段以及所有的数据
SELECT * FROM `products`;
# 查询指定的字段
SELECT title, price FROM `products`;
# 对字段结果起一个别名
SELECT title as phoneTitle, price as currentPrice FROM `products`;
# 2.where条件
# 2.1. 条件判断语句
# 案例:查询价格小于1000的手机
SELECT title, price FROM `products` WHERE price < 1000;
# 案例二:价格等于999的手机
SELECT * FROM `products` WHERE price = 999;
# 案例三:价格不等于999的手机
SELECT * FROM `products` WHERE price != 999;
SELECT * FROM `products` WHERE price <> 999;
# 案例四:查询品牌是华为的手机
SELECT * FROM `products` WHERE brand = '华为';# 2.2. 逻辑运算语句
# 案例一:查询1000到2000之间的手机
SELECT * FROM `products` WHERE price > 1000 AND price < 2000;
SELECT * FROM `products` WHERE price > 1000 && price < 2000;
# BETWEEN AND 包含等于
SELECT * FROM `products` WHERE price BETWEEN 1099 AND 2000;# 案例二:价格在5000以上或者是品牌是华为的手机
SELECT * FROM `products` WHERE price > 5000 || brand = '华为';# 将某些值设置为NULL
-- UPDATE `products` SET url = NULL WHERE id >= 85 and id <= 88;
# 查询某一个值为NULL
SELECT * FROM `products` WHERE url IS NULL;
-- SELECT * FROM `products` WHERE url = NULL;
-- SELECT * FROM `products` WHERE url IS NOT NULL;# 2.3.模糊查询
SELECT * FROM `products` WHERE title LIKE '%M%';
SELECT * FROM `products` WHERE title LIKE '%P%';
SELECT * FROM `products` WHERE title LIKE '_P%';
# 3.对结果进行排序
SELECT * FROM `products` WHERE brand = '华为' || brand = '小米' || brand = '苹果';
SELECT * FROM `products` WHERE brand IN ('华为', '小米', '苹果')
ORDER BY price ASC, score DESC;
# 4.分页查询
# LIMIT limit OFFSET offset;
# Limit offset, limit;
SELECT * FROM `products` LIMIT 20 OFFSET 0;
SELECT * FROM `products` LIMIT 20 OFFSET 20;
SELECT * FROM `products` LIMIT 40, 20;# 将联合查询到的数据转成对象(一对多)
SELECT
products.id id, products.title title, products.price price,
JSON_OBJECT('id', brand.id, 'name', brand.name, 'website', brand.website) brand
FROM `products`
LEFT JOIN `brand` ON products.brand_id = brand.id;# 将查询到的多条数据,组织成对象,放入到一个数组中(多对多)
SELECT
stu.id, stu.name, stu.age,
JSON_ARRAYAGG(JSON_OBJECT('id', cs.id, 'name', cs.name, 'price', cs.price))
FROM `students` stu
JOIN `students_select_courses` ssc ON stu.id = ssc.student_id
JOIN `courses` cs ON ssc.course_id = cs.id
GROUP BY stu.id;SELECT * FROM products WHERE price > 6000;
# 1.获取到的是笛卡尔乘积
SELECT * FROM `products`, `brand`;
# 获取到的是笛卡尔乘积进行筛选
SELECT * FROM `products`, `brand` WHERE products.brand_id = brand.id;# 2.左连接
# 2.1. 查询所有的手机(包括没有品牌信息的手机)以及对应的品牌 null
SELECT * FROM `products` LEFT OUTER JOIN `brand` ON products.brand_id = brand.id;# 2.2. 查询没有对应品牌数据的手机
SELECT * FROM `products` LEFT JOIN `brand` ON products.brand_id = brand.id WHERE brand.id IS NULL;
-- SELECT * FROM `products` LEFT JOIN `brand` ON products.brand_id = brand.id WHERE brand_id IS NULL;
# 3.右连接
# 3.1. 查询所有的品牌(没有对应的手机数据,品牌也显示)以及对应的手机数据;
SELECT * FROM `products` RIGHT OUTER JOIN `brand` ON products.brand_id = brand.id;# 3.2. 查询没有对应手机的品牌信息
SELECT * FROM `products` RIGHT JOIN `brand` ON products.brand_id = brand.id WHERE products.brand_id IS NULL;
# 4.内连接
SELECT * FROM `products` JOIN `brand` ON products.brand_id = brand.id;
SELECT * FROM `products` JOIN `brand` ON products.brand_id = brand.id WHERE price = 8699;# 5.全连接
# mysql是不支持FULL OUTER JOIN
SELECT * FROM `products` FULL OUTER JOIN `brand` ON products.brand_id = brand.id;
(SELECT * FROM `products` LEFT OUTER JOIN `brand` ON products.brand_id = brand.id)
UNION
(SELECT * FROM `products` RIGHT OUTER JOIN `brand` ON products.brand_id = brand.id)(SELECT * FROM `products` LEFT OUTER JOIN `brand` ON products.brand_id = brand.id WHERE brand.id IS NULL)
UNION
(SELECT * FROM `products` RIGHT OUTER JOIN `brand` ON products.brand_id = brand.id WHERE products.brand_id IS NULL)
# 1.创建brand的表和插入数据
CREATE TABLE IF NOT EXISTS `brand`(
id INT PRIMARY KEY AUTO_INCREMENT,
name VARCHAR(20) NOT NULL,
website VARCHAR(100),
phoneRank INT
);INSERT INTO `brand` (name, website, phoneRank) VALUES ('华为', 'www.huawei.com', 2);
INSERT INTO `brand` (name, website, phoneRank) VALUES ('苹果', 'www.apple.com', 10);
INSERT INTO `brand` (name, website, phoneRank) VALUES ('小米', 'www.mi.com', 5);
INSERT INTO `brand` (name, website, phoneRank) VALUES ('oppo', 'www.oppo.com', 12);INSERT INTO `brand` (name, website, phoneRank) VALUES ('京东', 'www.jd.com', 8);
INSERT INTO `brand` (name, website, phoneRank) VALUES ('Google', 'www.google.com', 9);
# 2.给brand_id设置引用brand中的id的外键约束
# 添加一个brand_id字段
ALTER TABLE `products` ADD `brand_id` INT;
-- ALTER TABLE `products` DROP `brand_id`;# 修改brand_id为外键
ALTER TABLE `products` ADD FOREIGN KEY(brand_id) REFERENCES brand(id);# 设置brand_id的值
UPDATE `products` SET `brand_id` = 1 WHERE `brand` = '华为';
UPDATE `products` SET `brand_id` = 2 WHERE `brand` = '苹果';
UPDATE `products` SET `brand_id` = 3 WHERE `brand` = '小米';
UPDATE `products` SET `brand_id` = 4 WHERE `brand` = 'oppo';# 3.修改和删除外键引用的id
UPDATE `brand` SET `id` = 100 WHERE `id` = 1;
# 4.修改brand_id关联外键时的action
# 4.1.获取到目前的外键的名称
SHOW CREATE TABLE `products`;
-- CREATE TABLE `products` (
-- `id` int NOT NULL AUTO_INCREMENT,
-- `brand` varchar(20) DEFAULT NULL,
-- `title` varchar(100) NOT NULL,
-- `price` double NOT NULL,
-- `score` decimal(2,1) DEFAULT NULL,
-- `voteCnt` int DEFAULT NULL,
-- `url` varchar(100) DEFAULT NULL,
-- `pid` int DEFAULT NULL,
-- `brand_id` int DEFAULT NULL,
-- PRIMARY KEY (`id`),
-- KEY `brand_id` (`brand_id`),
-- CONSTRAINT `products_ibfk_1` FOREIGN KEY (`brand_id`) REFERENCES `brand` (`id`)
-- ) ENGINE=InnoDB AUTO_INCREMENT=109 DEFAULT CHARSET=utf8mb4 COLLATE=utf8mb4_0900_ai_ci# 4.2.根据名称将外键删除掉
ALTER TABLE `products` DROP FOREIGN KEY products_ibfk_1;# 4.2.重新添加外键约束
ALTER TABLE `products` ADD FOREIGN KEY (brand_id) REFERENCES brand(id)
ON UPDATE CASCADE
ON DELETE RESTRICT;
UPDATE `brand` SET `id` = 100 WHERE `id` = 1;# 1.基本数据的模拟
CREATE TABLE IF NOT EXISTS students(
id INT PRIMARY KEY AUTO_INCREMENT,
name VARCHAR(20) NOT NULL,
age INT
);CREATE TABLE IF NOT EXISTS courses(
id INT PRIMARY KEY AUTO_INCREMENT,
name VARCHAR(20) NOT NULL,
price DOUBLE
);INSERT INTO `students` (name, age) VALUES('why', 18);
INSERT INTO `students` (name, age) VALUES('tom', 22);
INSERT INTO `students` (name, age) VALUES('lilei', 25);
INSERT INTO `students` (name, age) VALUES('lucy', 16);
INSERT INTO `students` (name, age) VALUES('lily', 20);INSERT INTO `courses` (name, price) VALUES ('英语', 100);
INSERT INTO `courses` (name, price) VALUES ('语文', 666);
INSERT INTO `courses` (name, price) VALUES ('数学', 888);
INSERT INTO `courses` (name, price) VALUES ('历史', 80);
INSERT INTO `courses` (name, price) VALUES ('物理', 888);
INSERT INTO `courses` (name, price) VALUES ('地理', 333);
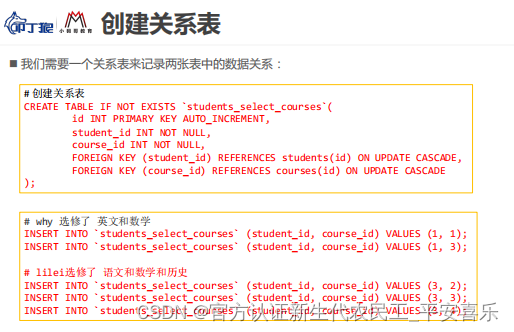
# 2.建立关系表
CREATE TABLE IF NOT EXISTS `students_select_courses`(
id INT PRIMARY KEY AUTO_INCREMENT,
student_id INT NOT NULL,
course_id INT NOT NULL,
FOREIGN KEY (student_id) REFERENCES students(id) ON UPDATE CASCADE,
FOREIGN KEY (course_id) REFERENCES courses(id) ON UPDATE CASCADE
);# 3.学生选课
# why选择了英文、数学、历史
INSERT INTO `students_select_courses` (student_id, course_id) VALUES (1, 1);
INSERT INTO `students_select_courses` (student_id, course_id) VALUES (1, 3);
INSERT INTO `students_select_courses` (student_id, course_id) VALUES (1, 4);
INSERT INTO `students_select_courses` (student_id, course_id) VALUES (3, 2);
INSERT INTO `students_select_courses` (student_id, course_id) VALUES (3, 4);
INSERT INTO `students_select_courses` (student_id, course_id) VALUES (5, 2);
INSERT INTO `students_select_courses` (student_id, course_id) VALUES (5, 3);
INSERT INTO `students_select_courses` (student_id, course_id) VALUES (5, 4);
# 4.查询的需求
# 4.1. 查询所有有选课的学生,选择了哪些课程
SELECT stu.id id, stu.name stuName, stu.age stuAge, cs.id csId, cs.name csName, cs.price csPrice
FROM `students` stu
JOIN `students_select_courses` ssc ON stu.id = ssc.student_id
JOIN `courses` cs ON ssc.course_id = cs.id;
# 4.2. 查询所有的学生的选课情况
SELECT stu.id id, stu.name stuName, stu.age stuAge, cs.id csId, cs.name csName, cs.price csPrice
FROM `students` stu
LEFT JOIN `students_select_courses` ssc ON stu.id = ssc.student_id;# 4.3. 哪些学生是没有选课
SELECT stu.id id, stu.name stuName, stu.age stuAge, cs.id csId, cs.name csName, cs.price csPrice
FROM `students` stu
LEFT JOIN `students_select_courses` ssc ON stu.id = ssc.student_id
LEFT JOIN `courses` cs ON ssc.course_id = cs.id
WHERE cs.id IS NULL;# 4.4. 查询哪些课程是没有被选择的
SELECT stu.id id, stu.name stuName, stu.age stuAge, cs.id csId, cs.name csName, cs.price csPrice
FROM `students` stu
RIGHT JOIN `students_select_courses` ssc ON stu.id = ssc.student_id
RIGHT JOIN `courses` cs ON ssc.course_id = cs.id
WHERE stu.id IS NULL;;# 4.5. 某一个学生选了哪些课程(why)
SELECT stu.id id, stu.name stuName, stu.age stuAge, cs.id csId, cs.name csName, cs.price csPrice
FROM `students` stu
LEFT JOIN `students_select_courses` ssc ON stu.id = ssc.student_id
LEFT JOIN `courses` cs ON ssc.course_id = cs.id
WHERE stu.id = 2;


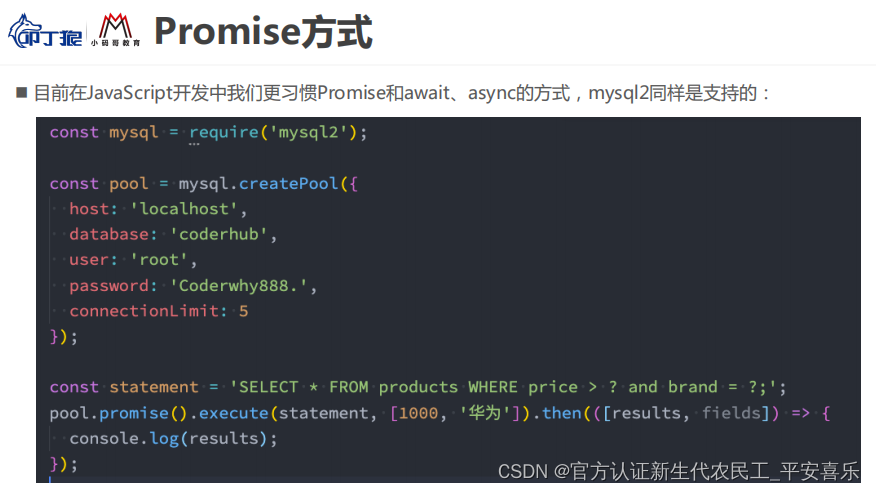
Node使用MySQL


mysql2


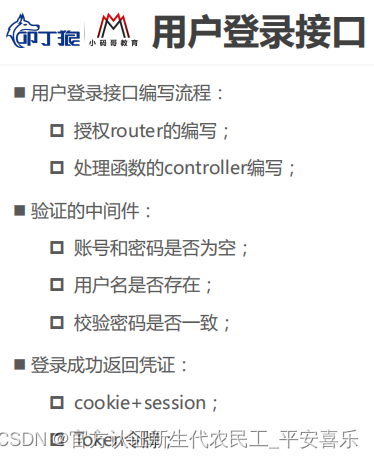
coderhub实战


使用dotenv库


密码加密使用库 crypto


 466
466


 被折叠的 条评论
为什么被折叠?
被折叠的 条评论
为什么被折叠?
 到【灌水乐园】发言


