


 文章详细描述了在微信小程序中如何使用uniCloud云函数进行数据增删改查,以及页面之间的跳转、列表展示、滚动加载等技术。展示了获取课程信息、添加和编辑文章的功能以及使用uni-icons和uni-swiper-dot组件的实例。
点击提交后跳转页面并刷新 uni.reLaunch
//点击提交
onSubmit(e){
	console.log(e)
	let detail = e.detail.value;
	uniCloud.callFunction({
		name:"art_add_row",
		data:{
			detail,
			picurls:this.picurls
		}
	}).then(res=>{
		uni.showToast({
			title:"发布成功"
		})
		setTimeout(()=>{
			uni.reLaunch({
				url:"/pages/index/index"
			})
		},800)
	})
},
页面跳转(比如跳转到课程详情)
//点击去修改
toEdit(){
	uni.navigateTo({
		url:`/pages/edit/edit?id=${id}`
	})
},
// 点击删除按钮
onRemove(){
	uni.showModal({
		content:"是否确认删除?",
		success:res=>{
			if(res.confirm){
				this.removeFun();
			}
		}
	})
},
removeFun(){
	uniCloud.callFunction({
		name:"art_remove_row",
		data:{
			id
		}
	}).then(res=>{
		uni.showToast({
			title:"删除成功"
		})
		setTimeout(()=>{
			uni.reLaunch({
				url:"/pages/index/index"
			})
		},800)
	})
},
获取课程信息
//获取文章
getDetail(){
	uniCloud.callFunction({
		name:"art_get_row",
		data:{
			id
		}
	}).then(res=>{
		this.formValue=res.result.data[0]
		console.log(this.formValue)
		if(!this.formValue.picurls) return;
		let urls=this.formValue.picurls.map(item=>{
			return {url:item}
		})
		this.imageValue=urls;
	})
},
data() {
	return {
		formValue:{
			title:"",
			author:"",
			content:""
		},
		detail:{},
		imageValue:[],
		picurls:[]
	};
},
//获取文章(要放在methods里)
getDetail(){
	uniCloud.callFunction({
		name:"art_get_row",
		data:{
			id
		}
	}).then(res=>{
		this.formValue=res.result.data[0]
		console.log(this.formValue)
		if(!this.formValue.picurls) return;
		let urls=this.formValue.picurls.map(item=>{
			return {url:item}
		})
		this.imageValue=urls;
	})
},
首页文章展示(比如每一个课程的展示也可以采用)
<template>
	<view class="home">
		<view class="content">
			<view @click="goDetail(item._id)" class="item" v-for="item in listArr" :key="item._id">
				<view class="text">
					<view class="title">{{item.title}}</view>
					<view class="info">
						<text>{{item.author}}</text>
						<text>
							<uni-dateformat
							:date="item.posttime"
							format="yyyy-MM-dd"
							:threshold="[60000, 1800000]">
							</uni-dateformat>
						</text>
					</view>
				</view>
				<view class="pic">
					<image v-if="item.picurls && item.picurls.length" :src="item.picurls[0]" mode="aspectFill"></image>
					<image v-else src="../../static/article.jpg" mode="aspectFill"></image>
				</view>
			</view>
		</view>

		<view class="goAdd" @click="goAdd">
			<uni-icons type="plusempty" size="30" color="#fff"></uni-icons>
		</view>

	</view>
</template>

<script>
	export default {
		data() {
			return {
				listArr:[]
			}
		},
		onLoad() {
			this.getData();
			// console.log(this.listArr);
		},
		// 触底方法
		onReachBottom(){
			this.getData();
		},
		// 下拉刷新
		onPullDownRefresh() {
			this.listArr=[];
			this.getData();
		},
		methods: {
			//跳转到详情页
			goDetail(id){
				console.log(id);
				uni.navigateTo({
					url:`/pages/detail/detail?id=${id}`
				})
			},

			//获取数据库的文章列表
			getData(){
				uniCloud.callFunction({
					name:"art_get_all",
					data:{
						skip:this.listArr.length
					}
				}).then(res=>{
					console.log(res);
					let nsList = [...this.listArr,...res.result.data];
					this.listArr=nsList;
					uni.stopPullDownRefresh();
				})
			},

			//点击跳转到新增文章页面
			goAdd(){
				uni.navigateTo({
					url:"/pages/add/add"
				})
			}

		}
	}
</script>

<style lang="scss" scoped>
	.home{
		.content{
			padding: 30rpx;
			.item{
				display: flex;
				justify-content: space-between;
				padding: 20rpx 0;
				border-bottom: 1rpx solid #eee;
				.text{
					flex: 1;
					display: flex;
					flex-direction: column;
					justify-content: space-between;
					padding-right: 20rpx;
					.title{
						font-size: 40rpx;
						color: #333;
						text-overflow: -o-ellipsis-lastline;
						overflow: hidden;
						text-overflow: ellipsis;
						display: -webkit-box;
						-webkit-line-clamp: 2;
						line-clamp: 2;
						-webkit-box-orient: vertical;
					}
					.info{
						font-size: 28rpx;
						color: #888;
						text{
							padding-right: 20rpx;
						}
					}
				}
				.pic{
					width: 260rpx;
					height: 180rpx;
					image{
						width: 100%;
						height: 100%;
					}
				}
			}
		}

		.goAdd{
			width: 100rpx;
			height: 100rpx;
			background: #2B9939;
			color: #fff;
			display: flex;
			justify-content: center;
			align-items: center;
			border-radius: 50%;
			font-size: 66rpx;
			position: fixed;
			right: 60rpx;
			bottom: 100rpx;
			box-shadow: 0 0 20rpx rgba(43,153,57,0.8);
		}
	}


</style>
关于 res:

关于map函数:
map函数原型: map(fun, list)
意思是用 fun 函数处理 list 列表中的每个元素然后包装成一个新的列表并返回。
var a = [
'Hydrogen',
'Helium',
'Lithium',
'Beryllium'
];
//获取每个元素的长度,组成一个数组,方法1
var b = a.map(function(s){return s.length});
//方法2
var c = a.map(s => s.length)背景铺满整个屏幕:
小程序页面的根元素是page,知道这个就好办了。
<style lang="scss" scoped>
	page{
		height: 100%;
	}
	.index{
		background: linear-gradient(rgba(255, 255, 255,0.2), rgba(255, 255, 255, 1)), url("../../static/orange_bgc.jpg") no-repeat 0% 20%/ cover;
		background-attachment: fixed;
		width: 100%;
		height: 100%;
    }
</style>
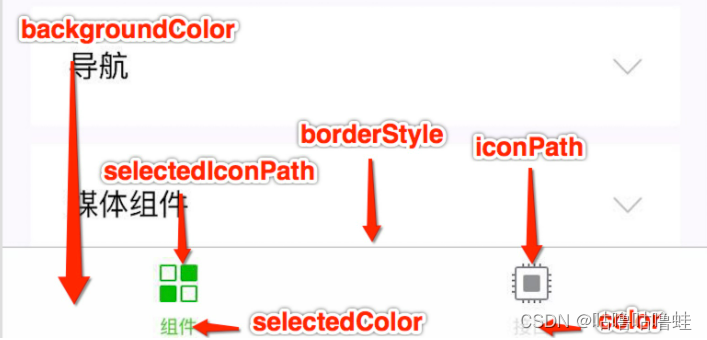
底部导航栏:
轮播图:
bug预警:第一次用,想用插件uni-swiper-dot改变轮播图指示点的样式,然后在scss里把swiper标签放在了uni-swiper-dot里面,结果发现image的宽高无论如何都改变不了,最后在浏览器开发者模式中看elements才发现uni-swiper-dot最然套在swiper标签外面,但压根不是一块的,渲染时直接渲染swiper,然后我就把scss中的uni-swiper-dot删掉了,然后轮播图宽高就生效了。
// template标签
		<uni-swiper-dot @clickItem=clickItem :info="info" :current="current" :mode="mode" :dotsStyles="dotsStyles">
			<swiper circular="true" autoplay="true" style="height: 400rpx;" @change="change" :current="swiperDotIndex">
				<swiper-item v-for="(item, index) in info" :key="index">
					<image class="advertisement" :src="item.url" mode="aspectFill"></image>
				</swiper-item>
			</swiper>
		</uni-swiper-dot>

// js
<script>
	export default {
		data() {

			return {
				info: [{
						url: "../../static/adv1.jpg"
					},
					{
						url: '../../static/adv2.jpg'
					},
					{
						url: '../../static/adv3.jpg'
					}
				],
				current: 0,
				mode: 'round',
				swiperDotIndex: 0,
				dotsStyles:{
					backgroundColor: 'rgba(255, 90, 95,0.5)',
					border: '1rpx rgba(255, 90, 95,0.5) solid',
					color: '#fff',
					selectedBackgroundColor: '#F06033',
					selectedBorder: '2rpx #F06033 solid'
				}
			}
		},
		onLoad() {

		},
		methods: {
			change(e) {
				this.current = e.detail.current
			},
			clickItem(e) {
				this.swiperDotIndex = e
			}
		}
	}
</script>

// style
		swiper{
			width: 100%;
			margin: 0 auto;
			margin-top: 8rpx;
			swiper-item{
				display: flex;
				flex-direction: column;
				justify-content: center;
				align-items: center;
				height: 200rpx;
				image{
					width: 100%;
					border-radius: 20rpx;
				}
			}
		}
轮播图image左右内边距生效办法:
box-sizing: border-box;

//width = border + padding + 内容的宽度
//height = border + padding + 内容的高度
在页面中使用自定义组件时@click失效,解决方案:@click.native
图片和文本同一行居中(纵向)对齐:
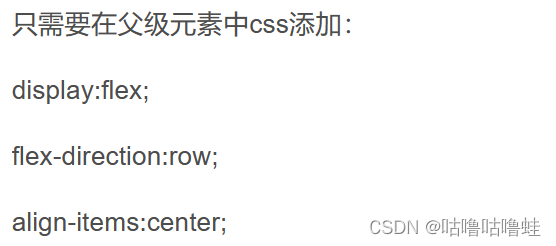
image元素加 margin: 0 auto 不生效,解决方法:
image{
	display: block;
    margin: 0 auto;
}
uniapp背景撑满全屏:
position: fixed;
top: 80rpx; // 根据顶部导航栏高度自己设置
right: 0;
bottom: 0;
left: 0;
选项卡:
<templete>
	<!-- 选项卡 -->
	<view class="nav">
	    <view :class="navIndex==1?'activite':''" @click="checkIndex(1)">{{navList[0]}}                    </view>
		<view :class="navIndex==2?'activite':''" @click="checkIndex(2)">{{navList[1]}}</view>
	</view>
	<!-- 选项卡下的内容 -->
	<view class="content" v-if="navIndex==1">课程介绍</view>
	<view class="content" v-if="navIndex==2">教师介绍</view>
</templete>

<script>
	export default {
		data() {
			return {
				navIndex:1,
				navList:["课程介绍","教师介绍"],
				listIndex:0
			};
		},
		methods:{
			checkIndex(e){
				this.navIndex = e;
			}
		}
	}
</script>

<style lang="scss" scoped>
	.nav{
		width: 90%;
		margin: 20rpx auto;
		display: flex;
		justify-content: space-between;
		align-items: center;
		view{
			padding-bottom: 10rpx;
		}
	}
	.activite{
	   font-weight: bold;
	   border-bottom: 6rpx solid #FF9000;
	}
</style>
如果想要改变插件的样式,需要在插件中进行更改(如下图),直接在应插件的页面对标签进行行内样式更改或使用分类选择器进行样式更改可能无效。

引用插件报错考虑问题:插件没有安装到uni-modules就进行使用
联表查询:(下面使用的是 jql 语法,比 MongoDB 更短更容易理解)
// 使用getTemp先过滤处理获取临时表再联表查询,推荐用法
const order = db.collection('order').where('_id=="1"').getTemp() // 注意结尾的方法是getTemp,对order表过滤得到临时表
const res = await db.collection(order, 'book').get() // 将获取的order表的临时表和book表进行联表查询
// 客户端联表查询
const db = uniCloud.database()
const order = db.collection('order').field('book_id,quantity').getTemp() // 临时表field方法内需要包含关联字段,否则无法建立关联关系
const book = db.collection('book').field('_id,title,author').getTemp() // 临时表field方法内需要包含关联字段,否则无法建立关联关系
db.collection(order, book) // 注意collection方法内需要传入所有用到的表名,用逗号分隔,主表需要放在第一位
.where('book_id.title == "三国演义"') // 查询order表内书名为“三国演义”的订单
.get()
.then(res => {
console.log(res);
}).catch(err => {
console.error(err)
})
JS计算精度问题:
方法①:先将金额变为整数,计算完后再转化为小数
方法②:使用toFixed()方法,四舍五入
微信开发者工具报错:[ project.config.json 文件内容错误] project.config.json: libVersion 字段需为 string, string(env: Windows,mp,1.06.2401020; lib: 3.3.4)
解决办法:manifest.json中加入如下代码——
"mp-weixin" : {
  "libVersion": "latest",
}
switchTab踩坑:switchTab不能带参数传递!
解决办法:用缓存存储id,在tabbar页面直接用
使用自定义组件:
<script>
  //引入组件
  import Login from "components/add/add.vue"
  export default {
    //注册组件
    components: {
      Add
    }
  }
</script>
点击跳转到对应头部导航栏 navIndex,可以用getApp.gloabalData.XXX=XXX进行全局变量的设置,然后在跳转后的页面的onShow()方法中对this.navIndex用全局变量进行赋值。
获取今天星期几:
getWeekDay() {
	const weekdays = ['星期日', '星期一', '星期二', '星期三', '星期四', '星期五', '星期六'];
	const today = new Date();
	const index = today.getDay();
	return weekdays[index];
}
查询某个字段包含某个字符或另一个字符:(灵机一动试出来的,查了好久没查到想要的效果,还是自己脑子好使嘿嘿) 【 呃,第二天我发现这样写结果不对,自己脑子也不好使】
time: new RegExp(event.today[2]|'天','g') let res = db.collection('lesson').where(
dbCmd.or({time: new RegExp(event.today[2],'g')},{time: new RegExp('天','g')}).and({teacherId:event.teacherId,state:2})
).get()
//最终用的是这种写法


 2880
2880


 被折叠的 条评论
为什么被折叠?
被折叠的 条评论
为什么被折叠?
 到【灌水乐园】发言


