


v1.0---v7.0 都是yolov5
detect.py runs inference on a variety of sources, downloading models automatically from the latest YOLOv5 release and saving results to runs/detect.
$ python detect.py --source 0  # webcam
                            file.jpg  # image
                            file.mp4  # video
                            path/  # directory
                            path/*.jpg  # glob
                            'https://youtu.be/NUsoVlDFqZg'  # YouTube video
                            'rtsp://example.com/media.mp4'  # RTSP, RTMP, HTTP stream
命令行启动 用python打开detect文件,--source 0意思是将0赋值给source变量中
可以指定文件夹,指定图片,视频,YouTube视频,手机摄像头(以链接的形式)
示例:To run inference on example images in data/images:
运行图片位于data/images下的参考案例:
$ python detect.py --source data/images --weights yolov5s.pt --conf 0.25

Namespace(agnostic_nms=False, augment=False, classes=None, conf_thres=0.25, device='', exist_ok=False, img_size=640, iou_thres=0.45, name='exp', project='runs/detect', save_conf=False, save_txt=False, source='data/images/', update=False, view_img=False, weights=['yolov5s.pt'])
YOLOv5 v4.0-96-g83dc1b4 torch 1.7.0+cu101 CUDA:0 (Tesla V100-SXM2-16GB, 16160.5MB)

Fusing layers...
Model Summary: 224 layers, 7266973 parameters, 0 gradients, 17.0 GFLOPS
image 1/2 /content/yolov5/data/images/bus.jpg: 640x480 4 persons, 1 bus, Done. (0.010s)
image 2/2 /content/yolov5/data/images/zidane.jpg: 384x640 2 persons, 1 tie, Done. (0.011s)
Results saved to runs/detect/exp2
Done. (0.103s)
--source data/images 文件来源为 data/images
--weights yolov5s.pt 模型权重为 yolov5s.pt
--conf 0.25 置信度为0.25 意思为只有大于等于0.25的才能显示
参数解释:
def parse_opt():
    parser = argparse.ArgumentParser()
    parser.add_argument('--weights', nargs='+', type=str, default=ROOT / 'yolov5s.pt', help='model path or triton URL')
    parser.add_argument('--source', type=str, default=ROOT / 'data/images', help='file/dir/URL/glob/screen/0(webcam)')
    parser.add_argument('--data', type=str, default=ROOT / 'data/coco128.yaml', help='(optional) dataset.yaml path')
    parser.add_argument('--imgsz', '--img', '--img-size', nargs='+', type=int, default=[640], help='inference size h,w')
    parser.add_argument('--conf-thres', type=float, default=0.25, help='confidence threshold')
    parser.add_argument('--iou-thres', type=float, default=0.45, help='NMS IoU threshold')
    parser.add_argument('--max-det', type=int, default=1000, help='maximum detections per image')
    parser.add_argument('--device', default='', help='cuda device, i.e. 0 or 0,1,2,3 or cpu')
    parser.add_argument('--view-img', action='store_true', help='show results')
    parser.add_argument('--save-txt', action='store_true', help='save results to *.txt')
    parser.add_argument('--save-conf', action='store_true', help='save confidences in --save-txt labels')
    parser.add_argument('--save-crop', action='store_true', help='save cropped prediction boxes')
    parser.add_argument('--nosave', action='store_true', help='do not save images/videos')
    parser.add_argument('--classes', nargs='+', type=int, help='filter by class: --classes 0, or --classes 0 2 3')
    parser.add_argument('--agnostic-nms', action='store_true', help='class-agnostic NMS')
    parser.add_argument('--augment', action='store_true', help='augmented inference')
    parser.add_argument('--visualize', action='store_true', help='visualize features')
    parser.add_argument('--update', action='store_true', help='update all models')
    parser.add_argument('--project', default=ROOT / 'runs/detect', help='save results to project/name')
    parser.add_argument('--name', default='exp', help='save results to project/name')
    parser.add_argument('--exist-ok', action='store_true', help='existing project/name ok, do not increment')
    parser.add_argument('--line-thickness', default=3, type=int, help='bounding box thickness (pixels)')
    parser.add_argument('--hide-labels', default=False, action='store_true', help='hide labels')
    parser.add_argument('--hide-conf', default=False, action='store_true', help='hide confidences')
    parser.add_argument('--half', action='store_true', help='use FP16 half-precision inference')
    parser.add_argument('--dnn', action='store_true', help='use OpenCV DNN for ONNX inference')
    parser.add_argument('--vid-stride', type=int, default=1, help='video frame-rate stride')
    opt = parser.parse_args()
    opt.imgsz *= 2 if len(opt.imgsz) == 1 else 1  # expand
    print_args(vars(opt))
    return opt
parser.add_argument('--weights', nargs='+', type=str, default=ROOT / 'yolov5s.pt', help='model path or triton URL')
权重文件为str(字符串)格式,默认为根目录下的yolov5s.pt,其他权重文件可以去github上下载后放到根目录下即可。权重文件越大,检测置信度越高。(s,m,l,x)
parser.add_argument('--source', type=str, default=ROOT / 'data/images', help='file/dir/URL/glob/screen/0(webcam)')
文件来源参数为str格式,默认为‘data/images’(根目录下data文件下的images文件中的图片)
也可以自己指定单个图片路径,或者将图片放到项目下面
mac下遇到的问题设置环境变量为True
import os (引入操作系统)
os.environ['KMP_DUPLICATE_LIB_OK'] = 'True' (调用环境变量设置为True)
打开detect.py并运行

执行结果

上面的是参数设置以及所用的设备参数
下面是每张图片的大小,监测到的种类及数量和所用时间
检测结果存放在 runs\detect\exp3中
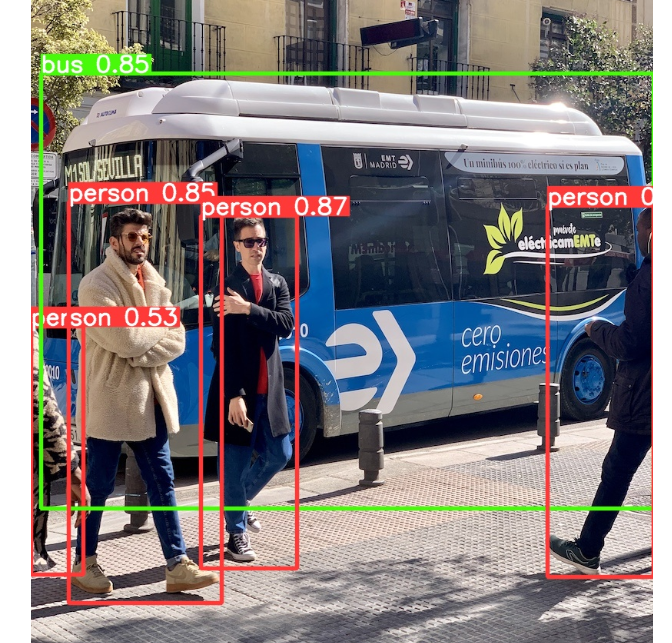


右上角的数字为置信度
下载神器lux:
- 先到github上下载,网址:https://github.com/iawia002/lux/releases/tag/v0.12.0
选择对应版本

下载解压

输入cmd

输入格式:annie 视频地址

文件就保存在annie.exe相同目录下
一般视频都默认下载到当前目录,如果你想下载到其它目录,需要在下载时候,加一个-o参数,后面带上文件夹路径即可。
#比如下载到桌面C:\Users\Rats\Desktop文件夹,Linux路径写法为/root/Rats
annie -o C:\Users\Rats\Desktop -f 80 https://v.qq.com/x/page/e3007rfgmpg.html
将下载好的视频复制到“data/video/广州夜幕下的城中村街道 逛街[0].mp4”
修改source参数
parser.add_argument('--source', type=str, default=ROOT / 'data/video/广州夜幕下的城中村街道 逛街[0].mp4', help='file/dir/URL/glob/screen/0(webcam)')运行detect.py 结果如下


 34万+
34万+


 被折叠的 条评论
为什么被折叠?
被折叠的 条评论
为什么被折叠?
 到【灌水乐园】发言


