


文章目录
1. 初识Mybatis
Mybatis简介
Mybatis是一个半自动的持久化层ORM框架。
-
半自动化:Mybatis与Hibernate对比
- Mybatis是一个半自动框架【需要手写SQL,为SQL优化提供了可能。】
- Hibernate是全自动化【无需手写SQL】
-
持久化层:
数据可以持久化,将数据不仅仅放在内存中,而是保存在数据库中。也就是我们常说的DAO层。Mybatis可以帮助我们更方便地从数据库中取出数据、插入数据等。 -
ORM框架:遵循对象关系映射。
-
Mybatis与JDBC的对比
- JDBC中SQL与java代码耦合度高。
- Mybatis将SQL与java代码解耦。
2. 搭建Mybatis框架
- 准备工作
- 创建数据库(这里以Employee表为例)

- 准备Maven工程
关于Maven工程的创建可以参考我的上一篇文章。
- 创建数据库(这里以Employee表为例)
框架搭建
- 使用maven导入jar包。
<dependencies>
        <!--导入MyBatis的jar包-->
        <dependency>
            <groupId>org.mybatis</groupId>
            <artifactId>mybatis</artifactId>
            <version>3.5.6</version>
        </dependency>
        <!--junit-->
        <dependency>
            <groupId>junit</groupId>
            <artifactId>junit</artifactId>
            <version>4.12</version>
            <scope>test</scope>
        </dependency>
<!--        导入Mysql驱动-->
        <!-- https://mvnrepository.com/artifact/mysql/mysql-connector-java -->
        <dependency>
            <groupId>mysql</groupId>
            <artifactId>mysql-connector-java</artifactId>
            <version>8.0.28</version>
        </dependency>
    </dependencies>
- 编写核心配置文件
-
位置:
resources下 -
名称:推荐使用
mybatis-config.xml -
示例代码
-
<?xml version="1.0" encoding="UTF-8" ?>
<!DOCTYPE configuration
PUBLIC "-//mybatis.org//DTD Config 3.0//EN"
"http://mybatis.org/dtd/mybatis-3-config.dtd">
<configuration>
<environments default="development">
<environment id="development">
<transactionManager type="JDBC"/>
<dataSource type="POOLED">
<property name="driver" value="com.mysql.cj.jdbc.Driver"/>
<property name="url" value="jdbc:mysql://localhost:3306/mybatis?useUnicode=true&characterEncoding=utf-8"/>
<property name="username" value="root"/>
<property name="password" value="root"/>
</dataSource>
</environment>
</environments>
<mappers>
<mapper resource="mapper/EmployeeMapper.xml"/>
</mappers>
</configuration>
- 编写POJO、接口。
现在创建普通java对象pojo。之后创建mapper映射,即编写与数据库交互的接口。我们先添加一个:selectEmyById。下面我们通过写映射文件与数据库进行交互。不需要我们手写DAO了。
当前结构如图所示: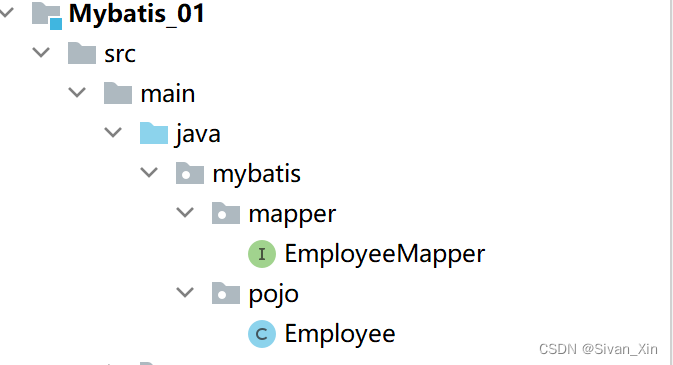
- 书写映射文件
-
映射文件作用:主要作用为Mapper接口书写Sql语句
-
映射文件位置:
resources/mapper名称:XXXMapper.xml,与接口名一致。 -
示例代码
<?xml version="1.0" encoding="UTF-8" ?>
<!DOCTYPE mapper
        PUBLIC "-//mybatis.org//DTD Mapper 3.0//EN"
        "http://mybatis.org/dtd/mybatis-3-mapper.dtd">
		<!-- 映射文件namespace与接口全类名一致 -->
<mapper namespace="mybatis.mapper.EmployeeMapper">
    	<!-- 映射文件SQL的Id与接口的方法名一致 -->
    <select id="selectEmpById" resultType="mybatis.pojo.Employee">
        SELECT
            id,last_name 'lastName' ,email,salary
        FROM
            tbl_employee
        WHERE
            id = #{id}
    </select>
</mapper>
注意:
SELECT语句中查询的属性名应该与Employee的属性一致(使用别名),如果不一致,可能出现最终查询值为null的情况。后面可以通过设置<setting>标签,来避免设置别名的情况。
- 测试程序
- 示例代码
	//1. 获取到sqlSessionFactory
	String resource = "mybatis-config.xml";
	InputStream inputStream = Resources.getResourceAsStream(resource);
	SqlSessionFactory sqlSessionFactory = new SqlSessionFactoryBuilder().build(inputStream);
	//2. 使用sqlSessionFactory获取sqlSession
	SqlSession sqlSession = sqlSessionFactory.openSession();
	//3. 获取EmployeeMapper的代理对象【com.sun.proxy.$Proxy6】
	EmployeeMapper employeeMapper = sqlSession.getMapper(EmployeeMapper.class);
	System.out.println("employeeMapper.getClass().getName() = " + employeeMapper.getClass().getName());

	Employee employee = employeeMapper.selectEmpById(1);
	System.out.println("employee = " + employee);
添加Log4j日志框架
- 使用maven导入jar包
  <!-- log4j -->
  <dependency>
      <groupId>log4j</groupId>
      <artifactId>log4j</artifactId>
      <version>1.2.17</version>
  </dependency>
- 编写配置文件
- 配置文件位置:
resources - 配置文件名称:
log4j.xml - 示例代码
<?xml version="1.0" encoding="UTF-8" ?>
<!DOCTYPE log4j:configuration SYSTEM "log4j.dtd">

<log4j:configuration xmlns:log4j="http://jakarta.apache.org/log4j/">

    <appender name="STDOUT" class="org.apache.log4j.ConsoleAppender">
        <param name="Encoding" value="UTF-8" />
        <layout class="org.apache.log4j.PatternLayout">
            <param name="ConversionPattern" value="%-5p %d{MM-dd HH:mm:ss,SSS} %m  (%F:%L) \n" />
        </layout>
    </appender>
    <logger name="java.sql">
        <level value="debug" />
    </logger>
    <logger name="org.apache.ibatis">
        <level value="info" />
    </logger>
    <root>
        <level value="debug" />
        <appender-ref ref="STDOUT" />
    </root>
</log4j:configuration>
- 配置文件位置:
3. Mybatis核心配置文件解析【Mybatis-config.xml】
MyBatis 的配置文件包含了会深深影响 MyBatis 行为的设置和属性信息。
-
configuration:根标签,没有实际语义,所有子标签需要设置在根标签内部。
-
properties:定义或引入外部属性文件。实现代码与数据库连接的解耦。
- 示例代码
  <?xml version="1.0" encoding="UTF-8" ?>
  <!DOCTYPE configuration
          PUBLIC "-//mybatis.org//DTD Config 3.0//EN"
          "http://mybatis.org/dtd/mybatis-3-config.dtd">
  <configuration>
  <!--  使用properties标签引入配置文件-->
      <properties resource="db.properties">
      </properties>
      <environments default="development">
          <environment id="development">
              <transactionManager type="JDBC"/>
              <dataSource type="POOLED">
                  <property name="driver" value="${driver}"/>
                  <property name="url" value="${url}"/>
                  <property name="username" value="${username}"/>
                  <property name="password" value="${password}"/>
              </dataSource>
          </environment>
      </environments>
      <mappers>
          <mapper resource="mapper/EmployeeMapper.xml"/>
      </mappers>
  </configuration>
	  //编写配置文件——db.properties
	  driver=com.mysql.cj.jdbc.Driver
	  url=jdbc:mysql://localhost:3306/mybatis?useUnicode=true&characterEncoding=utf-8
	  username=root
	  password=root
-
settings:这是 MyBatis 中极为重要的调整设置,它们会改变 MyBatis 的运行时行为。
比如:mapUnderscoreToCamelCase:是否开启驼峰命名自动映射。默认值false,如设置true会自动将last_name对应到lastName。- 示例代码
<settings> <setting name="mapUnderscoreToCamelCase" value="true"/> </settings> -
typeAliases:类型别名可为 Java 类型设置一个缩写名字。
-
示例代码
<typeAliases> <!-- 为Employee定义别名--> <typeAlias type="mybatis.pojo.Employee" alias="employee"> </typeAlias> <!-- 为指定包下所有的类定义别名,默认将类名作为别名,不区分大小写【推荐使用小写字母】--> <package name="mybatis.pojo"/> </typeAliases> -
Mybatis自定义别名
别名 类型 _int int integer或int Integer string String list或arraylist ArrayList map或hashmap HashMap
-
-
environments:设置数据库连接环境。
-
mappers:设置映射文件路径
-
示例代码
<mappers>
    <!--使用相对于类路径的资源引用(resource文件下)  -->
        <mapper resource="mapper/EmployeeMapper.xml"/>

        <!--另一种方式: 要求:接口的包名全类名与映射文件的包名全类名需要一致,都是mapper-->
       <package name="mybatis.mapper"/>
    </mappers>
注意:
核心配置中的子标签,是有顺序要求的。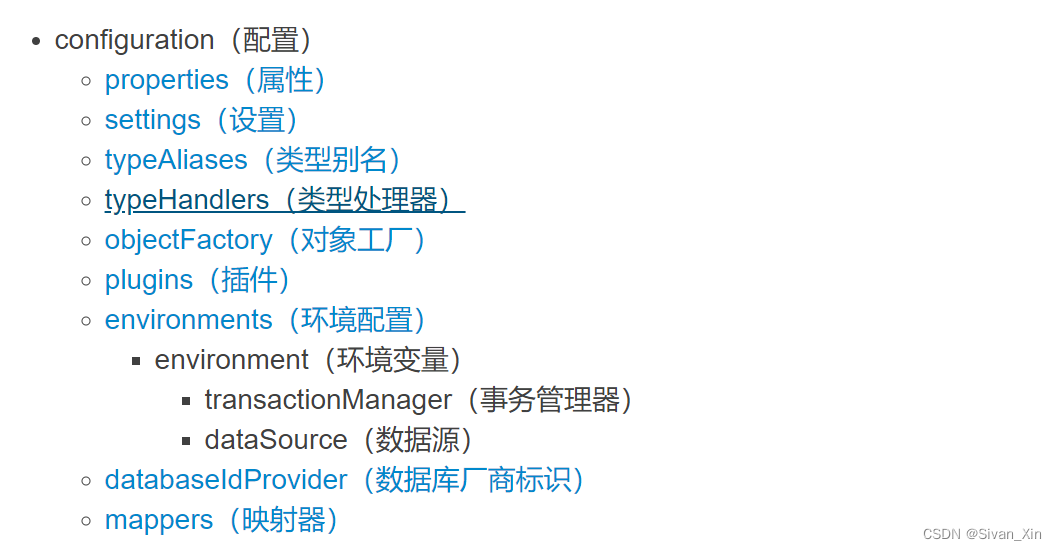
-
4. Mybatis映射文件详解【XXXMapper.xml】
MyBatis 的真正强大在于它的语句映射,这是它的魔力所在。如果拿它跟具有相同功能的 JDBC 代码进行对比,你会立即发现省掉了将近 95% 的代码。
映射文件中的标签
-
根标签
- mapper:mapper中的namespace要求与接口的全类名一致。
-
子标签
- insert标签:定义添加SQL
- delete标签:定义删除SQL
- update标签:定义修改SQL
- select标签:定义查询SQL
- sql标签:定义可重用的SQL语句块
- cache标签:设置当前命名空间的缓存配置
- cache-ref标签:设置其他命名空间的缓存配置
- resultType标签:设置期望结果集返回类型【全类名或别名】
- 如果返回的是集合,那应该设置为集合包含的类型,而不是集合本身的类型。
- resultType 和 resultMap 之间只能同时使用一个。
- resultMap标签: 描述如何从数据库结果集中加载对象
- resultType解决不了的问题(比如多表查询时,返回多个结果集),使用resultMap。
获取主键自增数据
useGeneratedKeys标签:获取主键自增的属性—true,配合keyProperty标签:设置存储属性值。
<insert id="InsertEmp" useGeneratedKeys="true"
    keyProperty="id">
	INSERT INTO
            tbl_employee(last_name,email,salary)
        	VALUES(#{lastName},#{email},#{salary});
    </insert>
获取数据库受影响行数
直接让接口中的方法返回一个值即可。
- int:返回对数据库影响行数。
- boolean:返回对数据库是否有影响。
5. Mbatis中参数传递问题
这一部分我们主要讲编写在映射文件中的SQL,所传入的参数问题。
INSERT INTO
 tbl_employee(last_name,email,salary)
VALUES(#{lastName},#{email},#{salary})
单个普通参数
可以任意使用,不需要考虑数据类型和参数名称。
多个普通参数
Mybatis底层会封装成Map,key为param1、param2 或者 arg0、arg1。
传入多个普通参数时,有两个办法:
-
直接在参数传递处写param即可。
-
命名参数:在接口处的形参之前,加上注解
- 代码示例
public void Update(@Param("id") int id, @Param("lastName") String lastName);命名参数底层源码分析:
-
源码分析
- MapperMethod对象:142行代码【命名参数底层代码入口】
- 命名参数底层封装map为ParamMap,ParamMap继承HashMap
- ParamNameResolver对象:130行代码,命名参数底层实现逻辑
//130行 final Map<String, Object> param = new ParamMap<>(); int i = 0; for (Map.Entry<Integer, String> entry : names.entrySet()) { param.put(entry.getValue(), args[entry.getKey()]); // add generic param names (param1, param2, ...) final String genericParamName = GENERIC_NAME_PREFIX + (i + 1); // ensure not to overwrite parameter named with @Param //支持param1、param2的逻辑 if (!names.containsValue(genericParamName)) { param.put(genericParamName, args[entry.getKey()]); } i++; } return param; -
POJO参数
当接口处的参数属于pojo时,可以直接传入pojo。其参数传递处为pojo属性名。 -
Map参数
当接口处的参数属于Map时,直接使用Map入参,Map的key即为传入的参数。value为传入的值。 -
Collection|List|Array等参数
参数名:collection、list、array
参数传递中#与$的区别
-
【#】:底层执行SQL使用
PreparedStatement对象,入参使用SQL拼接方式,预编译SQL,相对安全。 -
【$】:底层执行SQL使用
Statement对象,入参使用占位符方式,存在SQL注入问题。
查询SQL:
SELECT col1,col2
FROM table1
WHERE col = ? AND col2 = ?
GROUP BY ? , ORDER BY ? , LIMIT ? , ? ;
- #:sql占位符位置均可以使用# 。
- $:其余位置使用。比如FROM中的动态化表名。
6. Select查询返回结果的几种情况
-
查询单行数据返回单行结果
示例代码:
//根据id获取雇员信息。 public Employee selectEmpById (int id);<select id="selectEmpById" resultType="mybatis.pojo.Employee"> SELECT id,last_name ,email,salary FROM tbl_employee WHERE id = #{id} </select> -
查询多行数据返回对象集合
如果返回的是集合,
resultType应该设置为集合包含的类型,而不是集合本身的类型。示例代码:
public List<Employee> selectTbl(String tblName);<select id="selectTbl" resultType="mybatis.pojo.Employee"> SELECT id,last_name ,email,salary FROM ${tblName} </select> -
查询单行数据返回Map集合
Map<String key,Object value>:字段作为Map的key,查询结果作为Map的Value。
示例代码:/** * 查询单行数据返回Map集合 */ public Map<String,Object> selectEmpReturnMap (int id);<select id="selectEmpReturnMap" resultType="map"> SELECT id,last_name,email,salary FROM tbl_employee WHERE id = #{id} </select> -
查询多行数据返回Map集合
Map<Integer key,Employee value>:对象id作为key,对象本身作为value。
示例代码:/** * 查询多行数据返回Map * Map<Integer,Object> * Map<Integer,Employee> * 对象Id作为:key * 对象作为:value * @return */ @MapKey("id") public Map<Integer,Employee> selectEmpsReturnMap();<select id="selectEmpsReturnMap" resultType="map"> SELECT id, last_name, email, salary FROM tbl_employee </select>
7. Mybatis中的自动映射与自定义映射
自动映射/自定义映射可以在映射文件【XXXMapper.xml】中进行配置。
-
自动映射:
resultType
即自动将表中的字段与类中的属性进行关联映射。后面接SQL所查询POJO类的全类名。 -
自定义映射:
resultMap
当resultType解决不了的问题时,使用resultMap:- 属性名和字段名未对应,不采取驼峰式自动命名和别名的形式。
- 多表查询问题时,此时返回类型较为复杂。
ResultMap相关标签及属性
-
resultMap标签:自定义映射标签
- id属性:定义唯一标识
- type属性:设置映射类型
-
resultMap子标签
-
id标签:定义主键字段与属性关联关系
-
result标签:定义非主键字段与属性关联关系
- column属性:定义表中字段名称
- property属性:定义类中属性名称
-
association标签:定义一对一的关联关系
- property:定义关联关系属性(类的属性名)
- javaType:定义关联关系属性的类型(全类名)
- select:设置分步查询的SQL所在的全路径
- colunm:设置分步查询的SQL中需要的参数(字段名)
- fetchType:设置局部延迟加载【懒加载】是否开启
-
collection标签:定义一对多的关联关系
- property:定义关联关系属性(类的属性名)
- ofType:定义关联关系属性的类型(全类名)
- select:设置分步查询的SQL所在的全路径
- colunm:设置分步查询的SQL中需要的参数(字段名)
- fetchType:设置局部延迟加载【懒加载】是否开启
-
自定义映射
级联映射
<resultMap id="EmpAndDepResultMap" type="employee">
<!--        定义主键字段与属性关联关系 -->
        <id column="id" property="id"></id>
<!--        定义其他字段与属性关联关系-->
        <result column="last_name" property="lastName"></result>
        <result column="email" property="email"></result>
        <result column="salary" property="salary"></result>
<!--        级联映射关系             -->
        <result column="dept_id" property="dept.deptId"></result>
        <result column="dept_name" property="dept.deptName"></result>
    </resultMap>
    <select id="selectEmpAndDptById" resultMap="EmpAndDepResultMap">
        SELECT e.email,
               e.id,
               e.last_name,
               e.salary,
               d.dept_id,
               d.dept_name
        FROM
            tbl_employee e
        JOIN
                tbl_dept d
        ON
            e.dept_id  = d.dept_id
        WHERE
            e.id = #{id}
    </select>
association映射
- 特点:解决一对一映射关系(一个员工对应一个部门)
<resultMap id="EmpAndDepResultMap01" type="employee">
        <!--        定义主键字段与属性关联关系 -->
        <id column="id" property="id"></id>
        <!--        定义其他字段与属性关联关系-->
        <result column="last_name" property="lastName"></result>
        <result column="email" property="email"></result>
        <result column="salary" property="salary"></result>

        <association property="dept" javaType="Mybatis.pojo.Dept">
            <id column="dept_id" property="deptId"></id>
            <result column="dept_name" property="deptName"></result>
        </association>
    </resultMap>
collection映射
- 定义一对多的映射关系(一个部门对应多个员工)
<resultMap id="selectDepAndEmpByIdResultMap" type="dept">
        <id property="deptId" column="dept_id"></id>
        <result property="deptName" column="dept_name"></result>
        <!--    使用collection进行一对多映射-->
        <collection property="empList"
                    ofType="Mybatis.pojo.Employee">
            <id column="id" property="id"></id>
            <result column="last_name" property="lastName"></result>
            <result column="email" property="email"></result>
            <result column="salary" property="salary"></result>
        </collection>
</resultMap>
8. 延迟加载【懒加载】
-
需要即加载,不需要暂时不加载
-
优势:提升程序运行效率
-
全局设置
<!-- 开启延迟加载 --> <setting name="lazyLoadingEnabled" value="true"/> <!-- 设置加载的数据是按需加载3.4.2及以后的版本该步骤可省略--> <setting name="aggressiveLazyLoading" value="false"/> -
局部设置
- collection、association中的fetchType标签
- eager:关闭局部延迟加载
- lazy:开启局部延迟加载
- collection、association中的fetchType标签
-
9. 分步查询
-
为什么使用分步查询?
- 将多表连接查询,改为【分步单表查询】,从而提高程序运行效率
-
示例代码(一对一)
EmployeeMapper
/**
 * 通过员工id获取员工信息及员工所属的部门信息【分步查询】
        1. 先通过员工id获取员工信息【id、last_name、email、salary、dept_id】
 */
public Employee selectEmpAndDeptByEmpIdAssociationStep(int empId);
DeptMapper //2. 再通过部门id获取部门信息【dept_id、dept_name】 public Dept selectDeptById(int id);EmployeeMapper.xml <resultMap id="EmpAndDepResultMap02" type="employee"> <id column="id" property="id"></id> <result column="last_name" property="lastName"></result> <result column="email" property="email"></result> <result column="salary" property="salary"></result> <association property="dept" select="Mybatis.mapper.DeptMapper.selectDeptById" column="dept_id"> </association> </resultMap> <select id="selectEmpAndDeptByEmpIdAssociationStep" resultMap="EmpAndDepResultMap02"> select id, last_name, email, salary, dept_id from tbl_employee where id=#{empId} </select>DeptMapper.xml <select id="selectDeptById" resultType="dept"> select dept_id, dept_name from tbl_dept WHERE dept_id = #{id} </select> -
示例代码(一对多)
通过部门id获取部门信息,及部门所属员工信息【分步查询】
1. 通过部门id获取部门信息
2. 通过部门id获取员工信息
public Dept selectDeptAndEmpByDeptIdStep(int deptId);
  <!--    1. 通过部门id获取部门信息-->
      <select id="selectDeptAndEmpByDeptIdStep" resultMap="deptAndEmpResultMapStep">
          select
              dept_id,
              dept_name
          from
              tbl_dept
          where
              dept_id=#{deptId}
      </select>
public List<Employee> selectEmpByDeptId(int deptId);
<!--   2. 通过部门id获取员工信息 -->
  <select id="selectEmpByDeptId" resultType="employee">
      select
          id,
          last_name,
          email,
          salary,
          dept_id
      from
          tbl_employee
      where
          dept_id=#{deptId}
  </select>
分步查询SQL中需要多个参数时,column封装为map。k=传入参数名 v=字段名。语法:{k1=v1,k2=v2}
10. Mybatis的动态SQL
动态SQL概述
动态SQL即SQL语句可动态化。Mybatis的动态SQL中支持OGNL表达式语言,OGNL( Object Graph Navigation Language )对象图导航语言。
动态SQL中的常用标签
-
if标签:用于完成简单的判断。
-
where标签:用于解决where关键字及where后第一个and或or的问题。
-
trim标签: 可以在条件判断完的SQL语句前后添加或者去掉指定的字符。
-
prefix: 添加前缀
-
prefixOverrides: 去掉前缀
-
suffix: 添加后缀
-
suffixOverrides: 去掉后缀
-
-
set标签:主要用于解决set关键字及多出一个【,】问题。
-
choose标签:类似java中if-else【switch-case】结构
-
foreach标签:类似java中增强for循环
- collection: 要迭代的集合
- item: 当前从集合中迭代出的元素
- separator: 元素与元素之间的分隔符
- open: 开始字符
- close:结束字符
-
sql标签:提取可重用SQL片段
示例代码
-
演示if-where标签的使用,if 进行条件判断,where 解决and/or问题。
<!-- 按条件查询员工信息【条件不确定】--> <select id="selectEmpByOpr" resultType="employee"> <include refid="select_employee"></include> <where> <if test="id != null"> and id = #{id} </if> <if test="lastName != null"> and last_name = #{lastName} </if> <if test="email != null"> and email = #{email} </if> <if test="salary != null"> and salary = #{salary} </if> </where> </select> -
演示trim标签的使用,解决前后缀问题。
<select id="selectEmpByOprTrim" resultType="employee"> <include refid="select_employee"></include> <trim prefix="where" suffixOverrides="and"> <if test="id != null"> id = #{id} and </if> <if test="lastName != null"> last_name = #{lastName} and </if> <if test="email != null"> email = #{email} and </if> <if test="salary != null"> salary = #{salary} </if> </trim> </select> -
演示set标签的使用,解决
,问题<update id="updateEmpByOpr"> update tbl_employee <set> <if test="lastName != null"> last_name=#{lastName}, </if> <if test="email != null"> email=#{email}, </if> <if test="salary != null"> salary=#{salary} </if> </set> where id = #{id} </update> -
演示choose标签,when相当于if-else,otherwise表示否则。
<select id="selectEmpByOneOpr" resultType="employee"> select <include refid="emp_col"></include> from tbl_employee <where> <choose> <when test="id != null"> id = #{id} </when> <when test="lastName != null"> last_name = #{lastName} </when> <when test="email != null"> email = #{email} </when> <when test="salary != null"> salary = #{salary} </when> <otherwise> 1=1 </otherwise> </choose> </where> </select> -
演示foreach标签,解决查询多个id的循环问题。
//foreach标签中的collection属性为集合,item属性为每次循环的对象 item collection for(int id : ids){ }<select id="selectEmpByIds" resultType="employee"> select id, last_name, email, salary from tbl_employee <where> id in( <foreach collection="ids" item="id" separator=","> #{id} </foreach> ) </where> </select> -
使用foreach批量添加员工信息。
<insert id="batchInsertEmp"> INSERT INTO tbl_employee(last_name,email,salary) VALUES <foreach collection="employees" item="emp" separator=","> (#{emp.lastName},#{emp.email},#{emp.salary}) </foreach> </insert> </mapper> -
sql标签的使用,提取重用的sql片段
<sql id="emp_col">
        id,
        last_name,
        email,
        salary
    </sql>
    <sql id="select_employee">
        select
            id,
            last_name,
            email,
            salary
        from
            tbl_employee
    </sql>

<!-- 如果想要在查询中使用片段,使用以下代码: -->
<include refid="emp_col"></include>
11. Mybatis中的缓存机制
Mybatis中的缓存
-
使用缓存的优势
- 提高查询效率
- 降低服务器压力
-
缓存的类型
- 一级缓存
- 二级缓存
- 第三方缓存
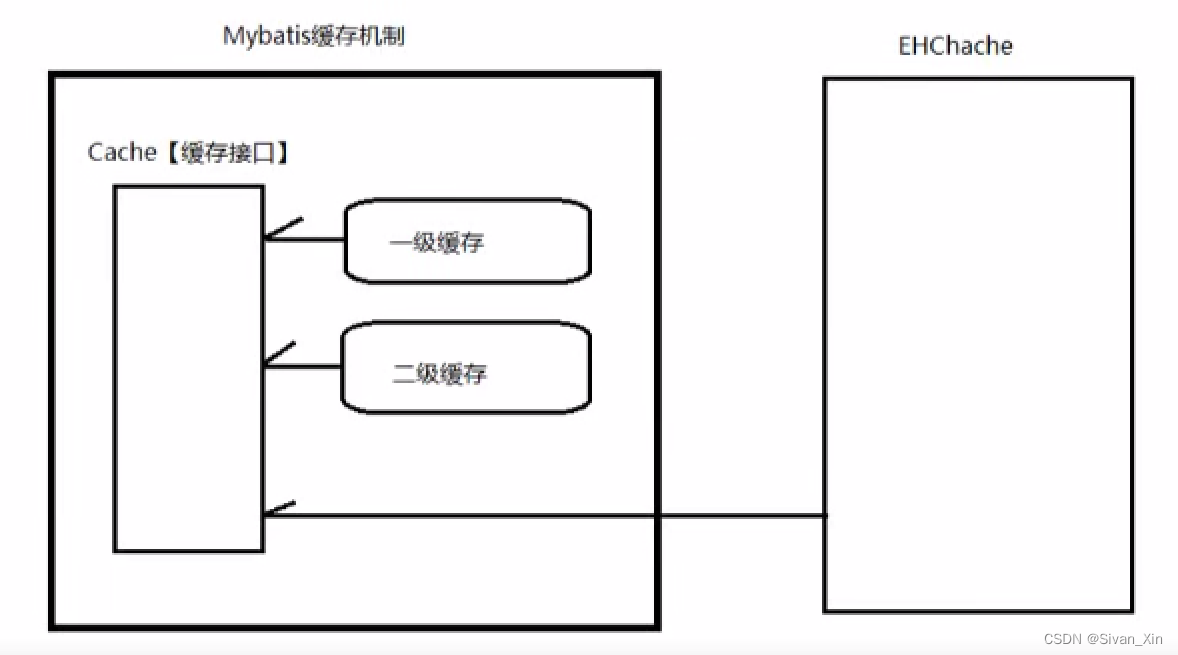
一级缓存
一级缓存,也叫做本地缓存(sqlSession级别的缓存)
-
特点
一级缓存默认开启,不能关闭,但是可以清空。
-
缓存失效的情况
-
不同的sqlSession代表不同的一级缓存。
-
同一个sqlSession两次查询数据库进行增删改操作【默认清空了一级缓存】
-
同一个sqlSession但是查询条件不同。
-
同一个sqlSession两次查询期间手动清空了缓存。【
sqlSession.clearCache();】 -
同一个sqlSession两次查询期间提交了事务。 【
sqlSession.commit();】
-
-
缓存原理
- 第一次获取数据时,先从数据库中加载数据,将数据缓存到Mybatis的一级缓存中。【底层使用Map实现,key:hashCode+查询的SqlId+编写的sql查询语句+参数】
- 以后再获取数据时,先从一级缓存中获取数据,如果数据失效,再从数据库中获取。
二级缓存
二级缓存,也叫全局作用域缓存(sqlSessionFactory缓存)。
-
特点
-
二级缓存默认关闭,需要开启才能使用。
-
二级缓存需要提交sqlSession或关闭sqlSession时,才会缓存。
-
-
二级缓存使用步骤
- 配置文件中开启二级缓存<setting name=“cacheEnabled” value=“true”/>
- 需要使用二级缓存的映射文件处使用cache配置缓存<cache/>
- POJO需要实现Serializable接口,实现属性UID。
- 关闭sqlSession或提交sqlSession时,将数据缓存到二级缓存。
-
二级缓存相关属性
在映射文件处的<cache/>标签中配置。
- eviction=“FIFO”:缓存清除【回收】策略。
- LRU – 最近最少使用的:移除最长时间不被使用的对象。
- FIFO – 先进先出:按对象进入缓存的顺序来移除它们。
- flushInterval:刷新间隔,单位毫秒
- size:引用数目,正整数
- readOnly:只读,true/false
- eviction=“FIFO”:缓存清除【回收】策略。
-
二级缓存的失效情况
-
在两次查询之间,执行增删改操作,会同时清空一级缓存和二级缓存。
-
sqlSession.clearCache():只是用来清除一级缓存。
-
-
二级缓存底层原理
-
第一次获取数据时,先从数据库中获取数据,将数据缓存至一级缓存;当提交或关闭SqlSession时,将数据缓存至二级缓存。
-
以后再次获取数据时,先从一级缓存中获取数据,如一级缓存没有指定数据,再去二级缓存中获取数据。如二级缓存也没有指定数据时,需要去数据库中获取数据,…
-
第三方缓存
第三方缓存:EhCache,是一个纯Java的进程内缓存框架。
-
使用步骤
-
maven中导入jar包
<!-- mybatis-ehcache --> <dependency> <groupId>org.mybatis.caches</groupId> <artifactId>mybatis-ehcache</artifactId> <version>1.0.3</version> </dependency> <!-- slf4j-log4j12 --> <dependency> <groupId>org.slf4j</groupId> <artifactId>slf4j-log4j12</artifactId> <version>1.6.2</version> <scope>test</scope> </dependency> -
编写配置文件【ehcache.xml】
<?xml version="1.0" encoding="UTF-8"?> <ehcache xmlns:xsi="http://www.w3.org/2001/XMLSchema-instance" xsi:noNamespaceSchemaLocation="../config/ehcache.xsd"> <!-- 磁盘保存路径 --> <diskStore path="D:\mybatis\ehcache" /> <defaultCache maxElementsInMemory="512" maxElementsOnDisk="10000000" eternal="false" overflowToDisk="true" timeToIdleSeconds="120" timeToLiveSeconds="120" diskExpiryThreadIntervalSeconds="120" memoryStoreEvictionPolicy="LRU"> </defaultCache> </ehcache> -
加载第三方缓存到映射文件
<cache type=“mybatis.caches.ehchche.EhcacheCache”>
-
开始使用
-
-
注意事项
- 第三方缓存,需要建立在二级缓存基础上【需要开启二级缓存,第三方缓存才能生效】
- 如何让第三方缓存失效【将二级缓存设置失效即可】
12. Mybatis的逆向工程
- 正向工程:应用程序中的代码影响数据库表中的数据。【java对象影响表】
- 逆向工程:数据库中的表影响程序中的代码【表影响java对象(POJO、Mapper、Mapper.xml)】
MBG
Mybatis Generator:简称MBG,是一个专门为Mybatis框架使用者定制的代码生成器,可以快速的根据表生成对应的映射文件、接口、以及POJO类。
- 目前只可以生成单表CRUD【生成单表QBC风格CRUD】,表连接等复杂SQL需要手动解决。
官方文档:MyBatis Generator Core – Introduction to MyBatis Generator
MBG基本使用
使用步骤:
-
导入jar包
<!-- https://mvnrepository.com/artifact/org.mybatis.generator/mybatis-generator-core --> <dependency> <groupId>org.mybatis.generator</groupId> <artifactId>mybatis-generator-core</artifactId> <version>1.3.6</version> </dependency> -
编写配置文件
- 配置文件名称:
mbg.xml - 配置文件位置:
resources
<!DOCTYPE generatorConfiguration PUBLIC "-//mybatis.org//DTD MyBatis Generator Configuration 1.0//EN" "http://mybatis.org/dtd/mybatis-generator-config_1_0.dtd"> <generatorConfiguration> <!--id属性:设置一个唯一标识 targetRuntime属性值说明: MyBatis3Simple:基本的增删改查 Mybatis3:带条件的增删改查【QBC风格(Query By Criteria)】 --> <context id="simple" targetRuntime="MyBatis3Simple"> <!--定义生成的java类的编码格式--> <property name="javaFileEncoding" value="UTF-8"/> <!-- 设置连接数据库的相关信息--> <jdbcConnection driverClass="com.mysql.cj.jdbc.Driver" connectionURL="jdbc:mysql://localhost:3306/mybatis?useUnicode=true&characterEncoding=utf-8" userId="root" password="root"> <!-- 如果使用的是MySQL8,要在jdbcConnection中添加以下标签:--> <property name="nullCatalogMeansCurrent" value="true" /> </jdbcConnection> <!-- 设置javaBean【POJO】的生成策略--> <javaModelGenerator targetPackage="mybatis.pojo" targetProject="src/main/java"/> <!-- SQL映射文件的生成策略XXXMapper.xml--> <sqlMapGenerator targetPackage="mapper" targetProject="src/main/resources"/> <!-- 设置Mapper接口的生成策略--> <javaClientGenerator type="XMLMAPPER" targetPackage="mybatis.mapper" targetProject="src/main/java"/> <!-- 逆向分析的表--> <table tableName="tbl_employee" domainObjectName="Employee" /> <table tableName="tbl_dept" domainObjectName="Department"/> </context> </generatorConfiguration> - 配置文件名称:
-
运行程序,即可检查生成的代码。
   List<String> warnings = new ArrayList<String>();
   boolean overwrite = true;
   File configFile = new File("generatorConfig.xml");
   ConfigurationParser cp = new ConfigurationParser(warnings);
   Configuration config = cp.parseConfiguration(configFile);
   DefaultShellCallback callback = new DefaultShellCallback(overwrite);
   MyBatisGenerator myBatisGenerator = new MyBatisGenerator(config, callback, warnings);
   myBatisGenerator.generate(null);
QBC风格
Query By Criteria,根据标准查询。即条件都是定义好的,只需要调用相对应的方法,就可以生成标准的条件。
实现QBC风格,只需要将配置文件中的:<context id="simple" targetRuntime="MyBatis3Simple">
改为<context id="simple" targetRuntime="MyBatis3">
- 代码示例
public void test1() {
    try {
        InputStream is = Resources.getResourceAsStream("mybatis-config.xml");
        SqlSessionFactory factory = new SqlSessionFactoryBuilder().build(is);
        SqlSession sqlSession = factory.openSession(true);
        EmpMapper mapper = sqlSession.getMapper(EmpMapper.class);
        //创建条件对象
        EmpExample example = new EmpExample();
        // 给条件对象赋值对应的标准条件
        example.createCriteria().andEmpNameEqualTo("张三");
        // 在SQL语句中直接调用该对象
        List<Emp> empList = mapper.selectByExample(example);
        empList.forEach(emp -> System.out.println(emp));
    } catch (IOException e) {
        e.printStackTrace();
    }
}
13. Mybatis的分页插件
- 为什么要分页?
- 提高用户体验。
- 降低服务器端的压力。
设计Page类
回顾SQL语句:
LIMIT(x,y)
x就是开始的页数。y是每页显示的数量。
如果要自己手动实现分页,则需要设计Page类。
- pageNum:当前页码。
- pages:总页数。
- total:总数据数量。
- pageSize:每页显示数据数量。
- List:当前页显示数据集合。
PageHelper分页插件
PageHelper是Mybatis中非常方便的第三方分页插件。
官方文档:Mybatis-PageHelper/README_zh.md at master · pagehelper/Mybatis-PageHelper · GitHub
使用步骤:
-
导入jar包。
<!-- https://mvnrepository.com/artifact/com.github.pagehelper/pagehelper --> <dependency> <groupId>com.github.pagehelper</groupId> <artifactId>pagehelper</artifactId> <version>5.2.0</version> </dependency> -
在
myabtis-config.xml中配置分页插件。<plugins> <!-- 配置PageHelper 分页插件 --> <plugin interceptor="com.github.pagehelper.PageInterceptor"></plugin> </plugins> -
查询之前,使用PageHelper开启分页。
-
pageHelper.startPage(1,3)——>(当前页码,每页的数据量)
-
示例代码
public void text() throws Exception{
        String resource = "mybatis-config.xml";
        InputStream inputStream = Resources.getResourceAsStream(resource);
        SqlSessionFactory sqlSessionFactory = new SqlSessionFactoryBuilder().build(inputStream);
        SqlSession sqlSession = sqlSessionFactory.openSession();
        EmployeeMapper mapper = sqlSession.getMapper(EmployeeMapper.class);

        //使用分页
        Page<Object> page = PageHelper.startPage(1, 4);

        for (Employee employee : mapper.selectAll()) {
            System.out.println(employee);
        }
        System.out.println(page.getPageNum() + "/" + page.getPages());
        System.out.println("总页数:"+ page.getPages());
        System.out.println("总数据量:" + page.getTotal());
        System.out.println("返回结果的集合"+page.getResult());
        for (Object o : page.getResult()) {
            System.out.println("o = " + o);
        }
    }
-
-
查询之后,可以使用更强大的PageInfo实现后续分页效果。
public void text1() throws Exception{
        String resource = "mybatis-config.xml";
        InputStream inputStream = Resources.getResourceAsStream(resource);
        SqlSessionFactory sqlSessionFactory = new SqlSessionFactoryBuilder().build(inputStream);
        SqlSession sqlSession = sqlSessionFactory.openSession();
        EmployeeMapper mapper = sqlSession.getMapper(EmployeeMapper.class);

        //使用分页
        Page<Object> page = PageHelper.startPage(1, 4);

        List<Employee> employees = mapper.selectAll();

        //设置页码
        PageInfo<Employee> pageInfo = new PageInfo<>(employees,5);
    	//方法演示
        System.out.println("导航页的第一个页码:"+pageInfo.getNavigateFirstPage());
        System.out.println("导航页的最后一个页码:"+pageInfo.getNavigateLastPage());
        System.out.println("导航页的总页码:"+ pageInfo.getNavigatePages());
        /*
            分页页码逻辑:
            当前页码1:1 2 3 4 5
            当前页码4:2 3 4 5 6
            当前页码5:3 4 5 6 7
         */

    }


 367
367


 被折叠的 条评论
为什么被折叠?
被折叠的 条评论
为什么被折叠?
 到【灌水乐园】发言


