


目录
一、集成Druid
在昨天的基础上
参考网址
https://github.com/alibaba/druid/tree/master/druid-spring-boot-starter
添加pom依赖
     <!--添加druid相关的依赖-->
        <dependency>
            <groupId>com.alibaba</groupId>
            <artifactId>druid-spring-boot-starter</artifactId>
            <version>1.1.10</version>
        </dependency>
配置
application.yml
mybatis:
    mapper-locations: classpath:mappers/*xml
    type-aliases-package: com.cdl.springboot04.model
server:
    port: 8080
    servlet:
        context-path: /springboot04
spring:
    application:
        name: springboot04
    datasource:
        driver-class-name: com.mysql.jdbc.Driver
        name: defaultDataSource
        password: 123456
        url: jdbc:mysql://localhost:3306/mysql?useUnicode=true&characterEncoding=UTF-8&useSSL=false
        username: root
        type: com.alibaba.druid.pool.DruidDataSource
        druid:
            #2.连接池配置
            #初始化连接池的连接数量 大小,最小,最大
            initial-size: 5
            min-idle: 5
            max-active: 20
            #配置获取连接等待超时的时间
            max-wait: 60000
            #配置间隔多久才进行一次检测,检测需要关闭的空闲连接,单位是毫秒
            time-between-eviction-runs-millis: 60000
            # 配置一个连接在池中最小生存的时间,单位是毫秒
            min-evictable-idle-time-millis: 30000
            validation-query: SELECT 1 FROM DUAL
            test-while-idle: true
            test-on-borrow: true
            test-on-return: false
            # 是否缓存preparedStatement,也就是PSCache  官方建议MySQL下建议关闭   个人建议如果想用SQL防火墙 建议打开
            pool-prepared-statements: true
            max-pool-prepared-statement-per-connection-size: 20
            # 配置监控统计拦截的filters,去掉后监控界面sql无法统计,'wall'用于防火墙
            filter:
                stat:
                    merge-sql: true
                    slow-sql-millis: 5000
            #3.基础监控配置
            web-stat-filter:
                enabled: true
                url-pattern: /*
                #设置不统计哪些URL
                exclusions: "*.js,*.gif,*.jpg,*.png,*.css,*.ico,/druid/*"
                session-stat-enable: true
                session-stat-max-count: 100
            stat-view-servlet:
                enabled: true
                url-pattern: /druid/*
                reset-enable: true
                #设置监控页面的登录名和密码
                login-username: admin
                login-password: admin
                allow: 127.0.0.1
                #deny: 192.168.1.100
    freemarker:
        cache: false
        charset: utf-8
        expose-request-attributes: true
        expose-session-attributes: true
        suffix: .ftl
        template-loader-path: classpath:/templates/
#    resources:
#       static-locations: classpath:/static/# 应用服务 WEB 访问端口
    mvc:
        static-path-pattern: classpath:/static/
pagehelper:
    reasonable: true
    supportMethodsArguments: true
    page-size-zero: true
    helper-dialect: mysql
    logging:
        level:
            com.cdl.springboot04: debug
运行启动类
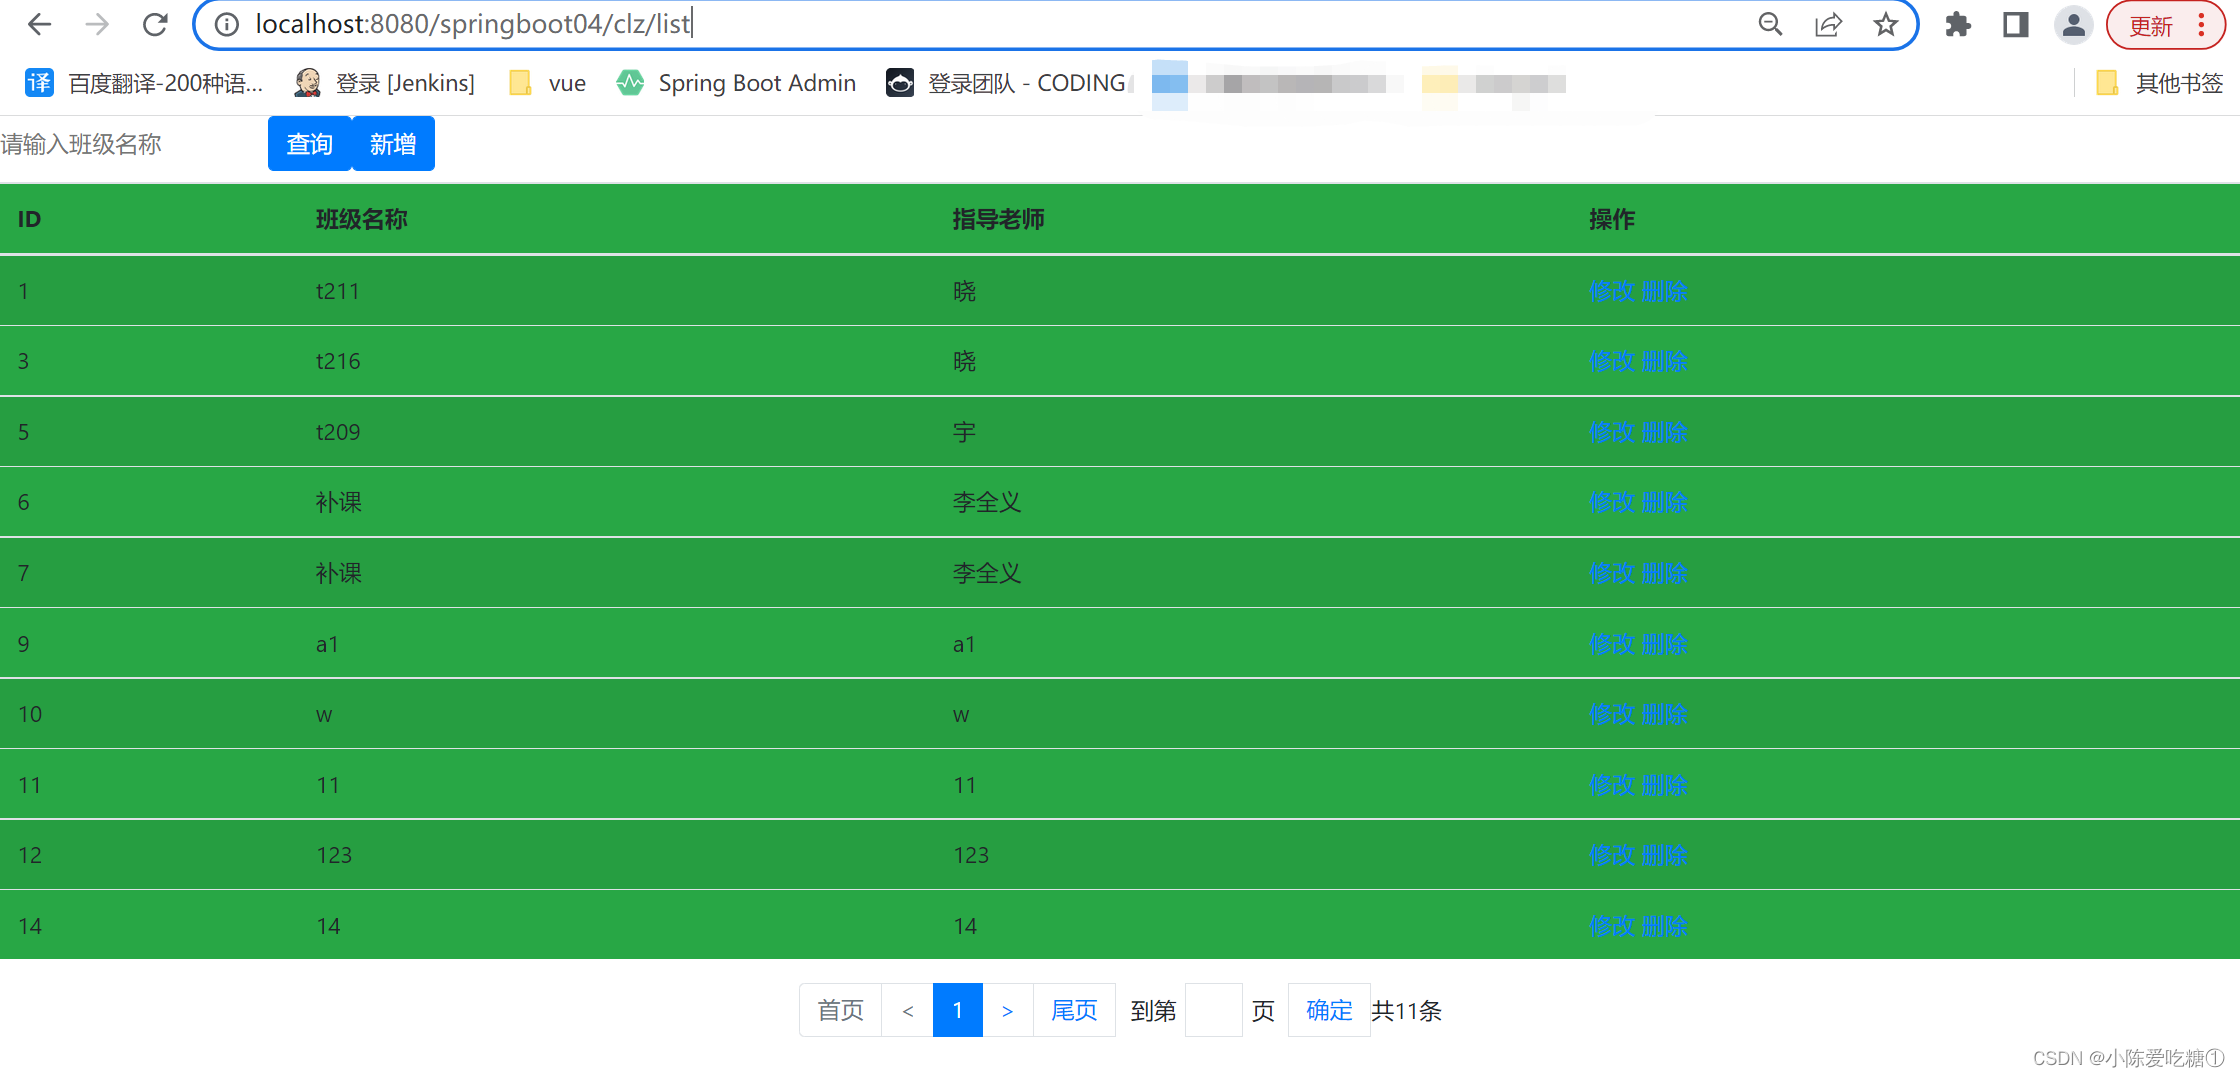
打开我们的班级列表
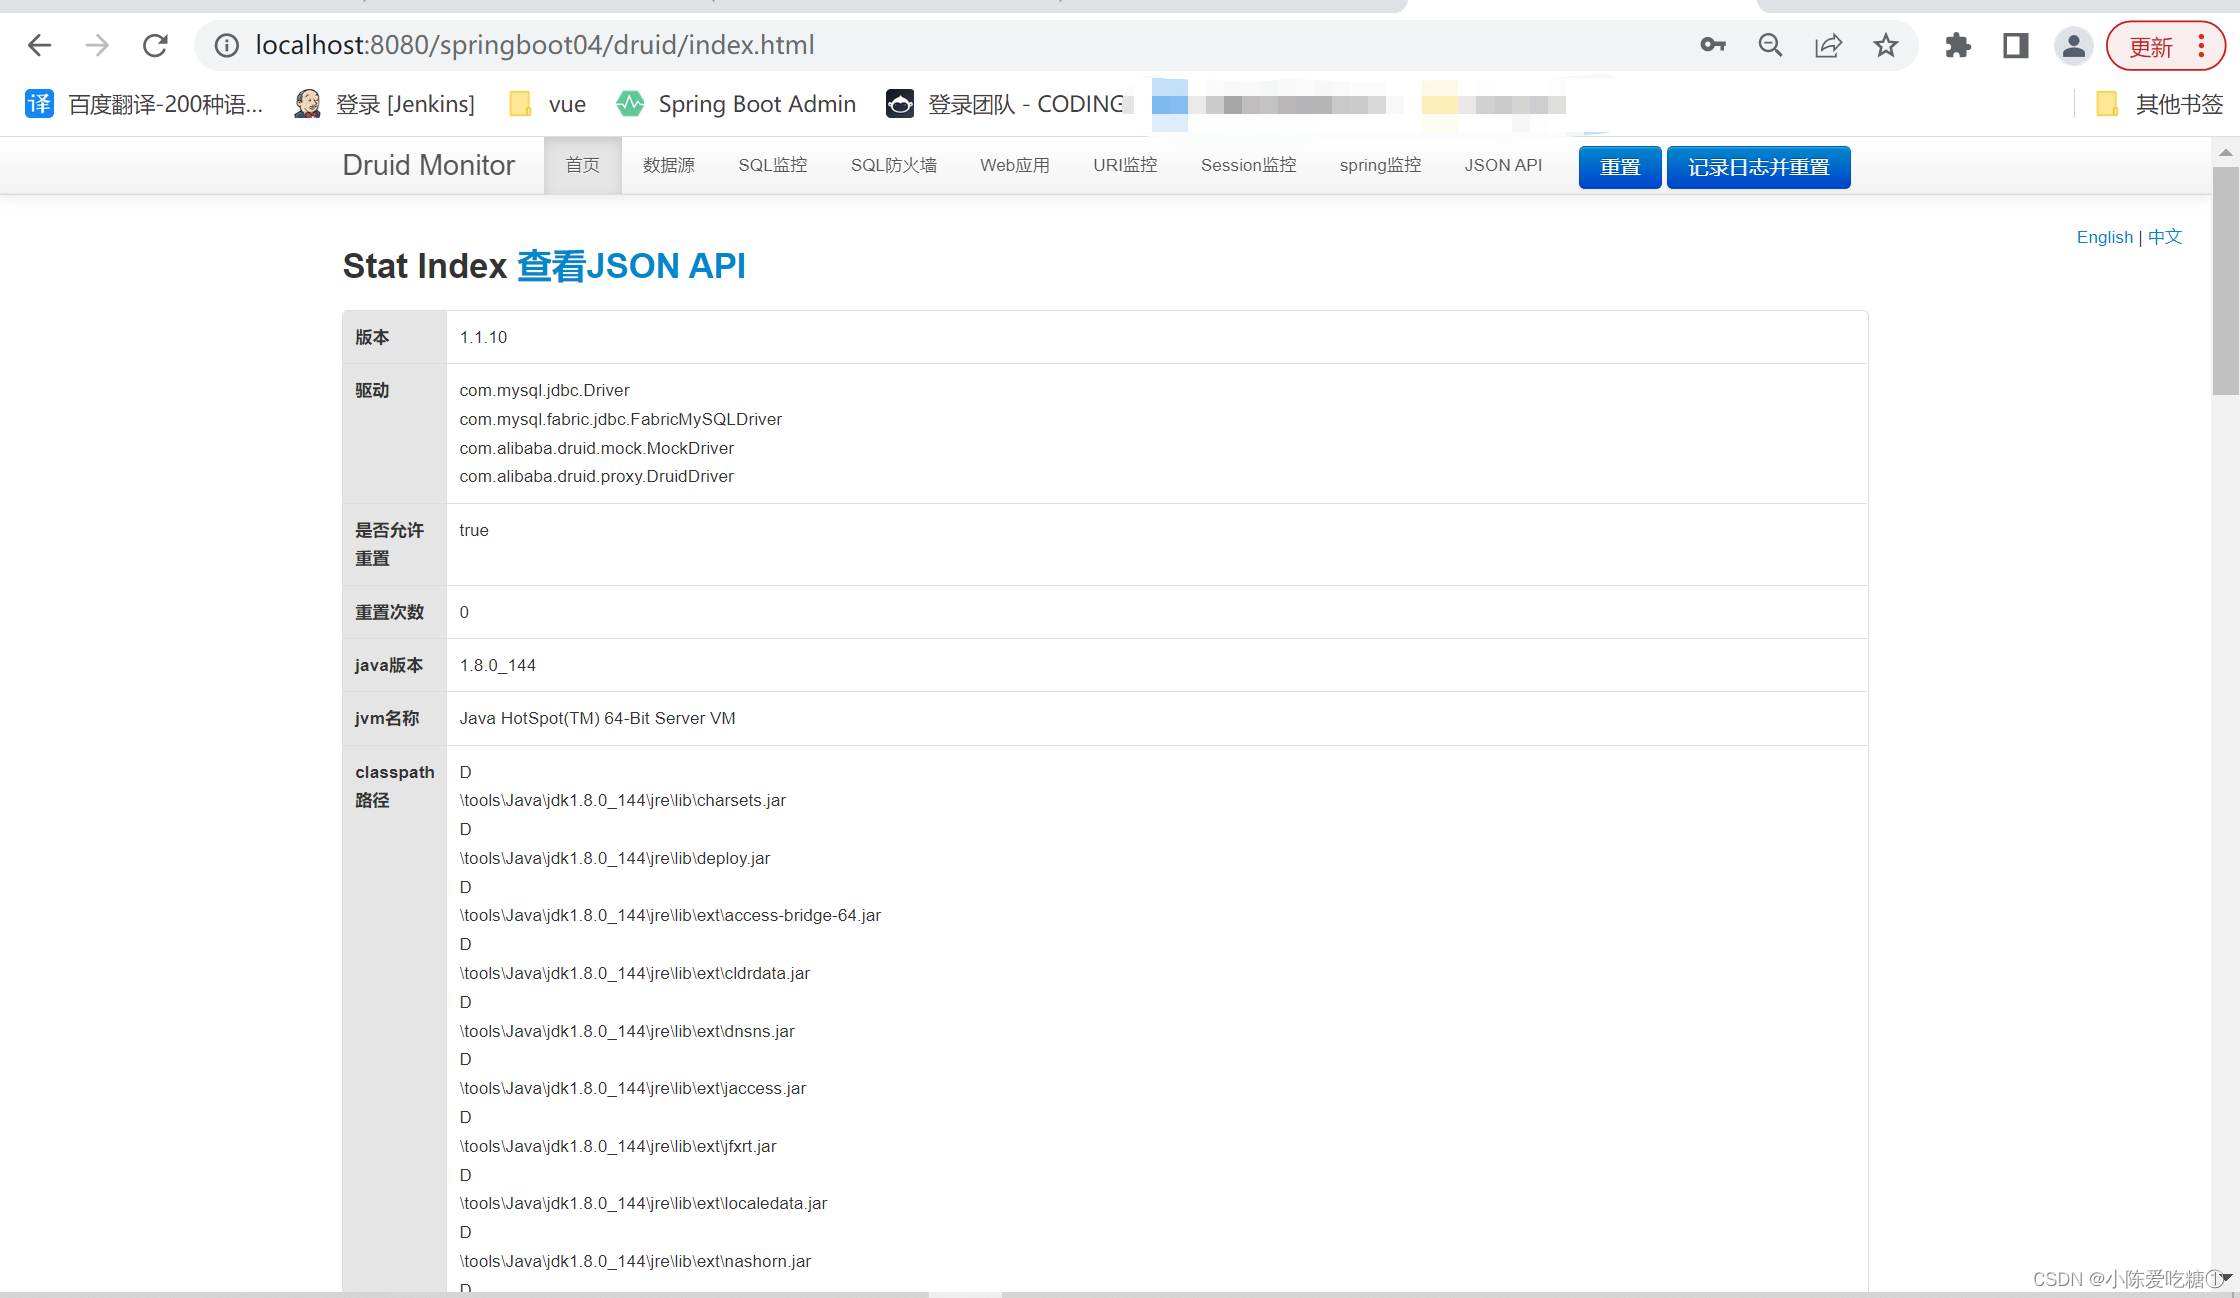
通过手动输入druid的登录界面

登录之后
当我们对班级列表进行操作时,例如增加

此时SQL监控,URL监控
若增加一个重复的id 则URL监控就显示error


二、集成redis之非注解式开发
添加需要的pom依赖
<!--添加redis集成相关依赖-->
<dependency>
    <groupId>org.springframework.boot</groupId>
    <artifactId>spring-boot-starter-data-redis</artifactId>
</dependency>
pom.xml
<?xml version="1.0" encoding="UTF-8"?>
<project xmlns="http://maven.apache.org/POM/4.0.0" xmlns:xsi="http://www.w3.org/2001/XMLSchema-instance"
         xsi:schemaLocation="http://maven.apache.org/POM/4.0.0 https://maven.apache.org/xsd/maven-4.0.0.xsd">
    <modelVersion>4.0.0</modelVersion>
    <groupId>com.cdl</groupId>
    <artifactId>springboot04</artifactId>
    <version>0.0.1-SNAPSHOT</version>
    <name>springboot04</name>
    <description>Demo project for Spring Boot</description>

    <properties>
        <java.version>1.8</java.version>
        <project.build.sourceEncoding>UTF-8</project.build.sourceEncoding>
        <project.reporting.outputEncoding>UTF-8</project.reporting.outputEncoding>
        <spring-boot.version>2.3.7.RELEASE</spring-boot.version>
    </properties>

    <dependencies>
        <dependency>
            <groupId>org.springframework.boot</groupId>
            <artifactId>spring-boot-starter-freemarker</artifactId>
        </dependency>
        <dependency>
            <groupId>org.springframework.boot</groupId>
            <artifactId>spring-boot-starter-jdbc</artifactId>
        </dependency>
        <dependency>
            <groupId>org.springframework.boot</groupId>
            <artifactId>spring-boot-starter-web</artifactId>
        </dependency>
        <dependency>
            <groupId>org.mybatis.spring.boot</groupId>
            <artifactId>mybatis-spring-boot-starter</artifactId>
            <version>2.1.4</version>
        </dependency>

        <dependency>
            <groupId>mysql</groupId>
            <artifactId>mysql-connector-java</artifactId>
            <version>5.1.44</version>
        </dependency>
        <!--支持aop-->
        <dependency>
            <groupId>org.springframework</groupId>
            <artifactId>spring-aspects</artifactId>
            <version>5.0.2.RELEASE</version>
        </dependency>
        <!--支持  pageHelper-->
        <dependency>
            <groupId>com.github.pagehelper</groupId>
            <artifactId>pagehelper-spring-boot-starter</artifactId>
            <version>1.2.3</version>
        </dependency>
        <!--添加druid相关的依赖-->
        <dependency>
            <groupId>com.alibaba</groupId>
            <artifactId>druid-spring-boot-starter</artifactId>
            <version>1.1.10</version>
        </dependency>
        <!--添加redis集成相关依赖-->
        <dependency>
            <groupId>org.springframework.boot</groupId>
            <artifactId>spring-boot-starter-data-redis</artifactId>
        </dependency>

        <dependency>
            <groupId>org.projectlombok</groupId>
            <artifactId>lombok</artifactId>
            <optional>true</optional>
        </dependency>
        <dependency>
            <groupId>org.springframework.boot</groupId>
            <artifactId>spring-boot-starter-test</artifactId>
            <scope>test</scope>
            <exclusions>
                <exclusion>
                    <groupId>org.junit.vintage</groupId>
                    <artifactId>junit-vintage-engine</artifactId>
                </exclusion>
            </exclusions>
        </dependency>

    </dependencies>

    <dependencyManagement>
        <dependencies>
            <dependency>
                <groupId>org.springframework.boot</groupId>
                <artifactId>spring-boot-dependencies</artifactId>
                <version>${spring-boot.version}</version>
                <type>pom</type>
                <scope>import</scope>
            </dependency>
        </dependencies>

    </dependencyManagement>

    <build>
        <plugins>
            <plugin>
                <groupId>org.apache.maven.plugins</groupId>
                <artifactId>maven-compiler-plugin</artifactId>
                <version>3.8.1</version>
                <configuration>
                    <source>1.8</source>
                    <target>1.8</target>
                    <encoding>UTF-8</encoding>
                </configuration>
            </plugin>
            <plugin>
                <groupId>org.springframework.boot</groupId>
                <artifactId>spring-boot-maven-plugin</artifactId>
                <version>2.3.7.RELEASE</version>
                <configuration>
                    <mainClass>com.cdl.springboot04.Springboot04Application</mainClass>
                </configuration>
                <executions>
                    <execution>
                        <id>repackage</id>
                        <goals>
                            <goal>repackage</goal>
                        </goals>
                    </execution>
                </executions>
            </plugin>
        </plugins>
    </build>

</project>
配置
application.yml
mybatis:
    mapper-locations: classpath:mappers/*xml
    type-aliases-package: com.cdl.springboot04.model
server:
    port: 8080
    servlet:
        context-path: /springboot04
spring:
    application:
        name: springboot04
    datasource:
        driver-class-name: com.mysql.jdbc.Driver
        name: defaultDataSource
        password: 123456
        url: jdbc:mysql://localhost:3306/mysql?useUnicode=true&characterEncoding=UTF-8&useSSL=false
        username: root
        type: com.alibaba.druid.pool.DruidDataSource
        druid:
            #2.连接池配置
            #初始化连接池的连接数量 大小,最小,最大
            initial-size: 5
            min-idle: 5
            max-active: 20
            #配置获取连接等待超时的时间
            max-wait: 60000
            #配置间隔多久才进行一次检测,检测需要关闭的空闲连接,单位是毫秒
            time-between-eviction-runs-millis: 60000
            # 配置一个连接在池中最小生存的时间,单位是毫秒
            min-evictable-idle-time-millis: 30000
            validation-query: SELECT 1 FROM DUAL
            test-while-idle: true
            test-on-borrow: true
            test-on-return: false
            # 是否缓存preparedStatement,也就是PSCache  官方建议MySQL下建议关闭   个人建议如果想用SQL防火墙 建议打开
            pool-prepared-statements: true
            max-pool-prepared-statement-per-connection-size: 20
            # 配置监控统计拦截的filters,去掉后监控界面sql无法统计,'wall'用于防火墙
            filter:
                stat:
                    merge-sql: true
                    slow-sql-millis: 5000
            #3.基础监控配置
            web-stat-filter:
                enabled: true
                url-pattern: /*
                #设置不统计哪些URL
                exclusions: "*.js,*.gif,*.jpg,*.png,*.css,*.ico,/druid/*"
                session-stat-enable: true
                session-stat-max-count: 100
            stat-view-servlet:
                enabled: true
                url-pattern: /druid/*
                reset-enable: true
                #设置监控页面的登录名和密码
                login-username: admin
                login-password: admin
                allow: 127.0.0.1
                #deny: 192.168.1.100
    freemarker:
        cache: false
        charset: utf-8
        expose-request-attributes: true
        expose-session-attributes: true
        suffix: .ftl
        template-loader-path: classpath:/templates/
#    resources:
#       static-locations: classpath:/static/# 应用服务 WEB 访问端口
    mvc:
        static-path-pattern: classpath:/static/
    redis:
        host: 192.168.26.128
        port: 6379
        database: 0
        password: 123456
pagehelper:
    reasonable: true
    supportMethodsArguments: true
    page-size-zero: true
    helper-dialect: mysql
    logging:
        level:
            com.cdl.springboot04: debug

新建一个包 config 配置类
RedisConfig
package com.cdl.springboot04.config;

import org.springframework.context.annotation.Bean;
import org.springframework.context.annotation.Configuration;
import org.springframework.data.redis.connection.RedisConnectionFactory;
import org.springframework.data.redis.core.RedisTemplate;
import org.springframework.data.redis.serializer.GenericJackson2JsonRedisSerializer;
import org.springframework.data.redis.serializer.StringRedisSerializer;

/**
 * @author CDL
 * @site www.cdl.com
 *
 * @Configuration:凡是被@Configuration注解所标记,就代表当前这个类为配置类
 * 而配置类等价于ssm阶段中spring-*.xml这一类的配置文件
 *
 * spring-*.xml中:
 * @Bean:<bean  id="" class=""></bean>代表某个类交给spring进行管理
 *
 *
 *
 */
@Configuration
public class RedisConfig {
    @Bean
    public RedisTemplate<String,Object> getRedisTemplate(RedisConnectionFactory connectionFactory){
        RedisTemplate<String,Object> redisTemplate = new RedisTemplate<>();

        //配置序列化器  针对于key 针对于value
        redisTemplate.setKeySerializer(new StringRedisSerializer());
        redisTemplate.setHashKeySerializer(new StringRedisSerializer());
        redisTemplate.setValueSerializer(new GenericJackson2JsonRedisSerializer());
        redisTemplate.setHashValueSerializer(new GenericJackson2JsonRedisSerializer());
//        redisTemplate.afterPropertiesSet();根据redis的版本考虑要不要让其生效

        //ConnectionFactory是包含了redis的连接信息
        redisTemplate.setConnectionFactory(connectionFactory);
        return redisTemplate;
    }
}
在service层ClazzBizImpl.java使用
ClazzBizImpl.java
package com.cdl.springboot04.biz.impl;

import com.cdl.springboot04.biz.ClazzBiz;
import com.cdl.springboot04.mapper.ClazzMapper;
import com.cdl.springboot04.model.Clazz;
import com.cdl.springboot04.util.PageBean;
import org.springframework.beans.factory.annotation.Autowired;
import org.springframework.data.redis.core.RedisTemplate;
import org.springframework.stereotype.Service;

import java.util.List;
import java.util.Map;

/**
 * @author CDL
 * @site www.cdl.com
 * @company xxx公司
 * @create  2022-08-17 15:13
 */
@Service
public class ClazzBizImpl implements ClazzBiz {
    @Autowired
    private ClazzMapper clazzMapper;
    @Autowired
    private RedisTemplate<String,Object> redisTemplate;
    @Override
    public int deleteByPrimaryKey(Integer cid) {
//        System.out.println("不做任何操作...");
        return clazzMapper.deleteByPrimaryKey(cid);
//        return 0;
    }

    @Override
    public int insert(Clazz record) {
        return clazzMapper.insert(record);
    }

    @Override
    public int insertSelective(Clazz record) {
        return clazzMapper.insertSelective(record);
    }

    @Override
    public Clazz selectByPrimaryKey(Integer cid) {
        return clazzMapper.selectByPrimaryKey(cid);
    }

    @Override
    public int updateByPrimaryKeySelective(Clazz record) {
        return clazzMapper.updateByPrimaryKeySelective(record);
    }

    @Override
    public int updateByPrimaryKey(Clazz record) {
        return clazzMapper.updateByPrimaryKey(record);
    }

    @Override
    public List<Clazz> listPager(Clazz clazz, PageBean pageBean) {
        //将班级缓存到redis中
        List<Clazz> clzs = clazzMapper.listPager(clazz);
       // redisTemplate.opsForValue().set("clz:1",clzs.get(0));
        redisTemplate.opsForValue().set("clzs",clzs);
       // redisTemplate.opsForHash().entries();
        return clzs;
    }

    @Override
    public List<Map> listMapPager(Clazz clazz, PageBean pageBean) {
        if(true)
            throw new RuntimeException("查询班级信息异常,异常存在于ClazzBizImpl.list。。。。");
        return clazzMapper.listMapPager(clazz);
    }
}
运行:

此时:可见已经缓存进去了

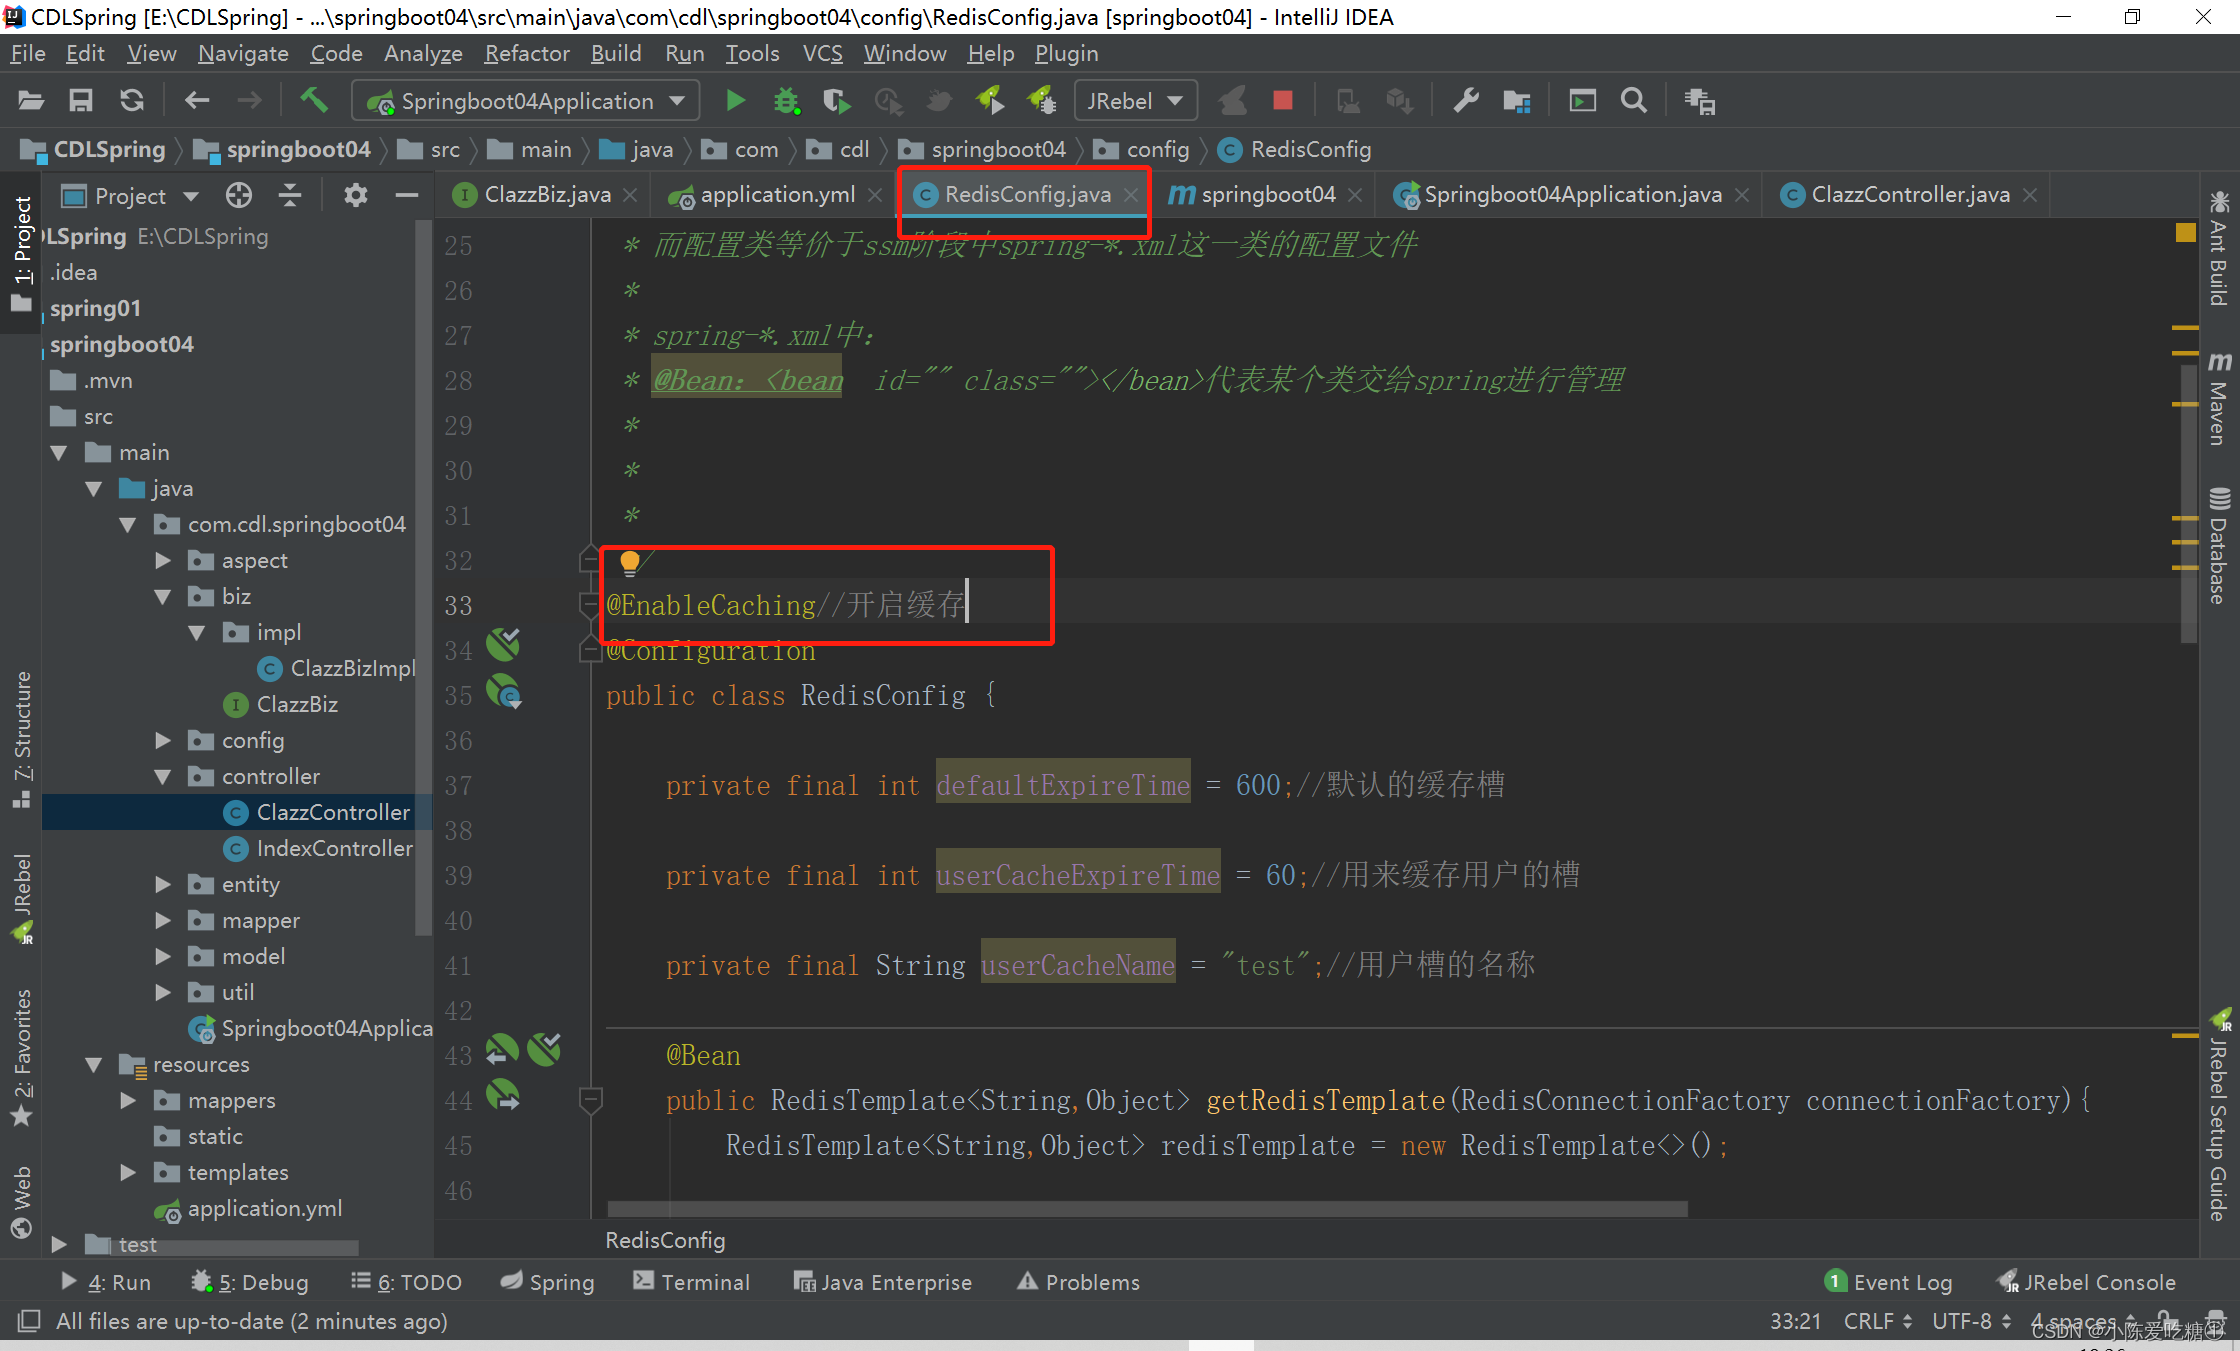
三、集成redis之注解缓存开发
还要在配置类配置缓存管理器
RedisConfig
package com.cdl.springboot04.config;

import org.springframework.context.annotation.Bean;
import org.springframework.context.annotation.Configuration;
import org.springframework.data.redis.cache.RedisCacheConfiguration;
import org.springframework.data.redis.cache.RedisCacheManager;
import org.springframework.data.redis.connection.RedisConnectionFactory;
import org.springframework.data.redis.core.RedisTemplate;
import org.springframework.data.redis.serializer.GenericJackson2JsonRedisSerializer;
import org.springframework.data.redis.serializer.RedisSerializationContext;
import org.springframework.data.redis.serializer.StringRedisSerializer;

import java.time.Duration;
import java.util.HashMap;
import java.util.HashSet;
import java.util.Map;
import java.util.Set;

/**
 * @author CDL
 * @site www.cdl.com
 *
 * @Configuration:凡是被@Configuration注解所标记,就代表当前这个类为配置类
 * 而配置类等价于ssm阶段中spring-*.xml这一类的配置文件
 *
 * spring-*.xml中:
 * @Bean:<bean  id="" class=""></bean>代表某个类交给spring进行管理
 *
 *
 *
 */
@Configuration
public class RedisConfig {

    private final int defaultExpireTime = 600;//默认的缓存槽

    private final int userCacheExpireTime = 60;//用来缓存用户的槽

    private final String userCacheName = "test";//用户槽的名称

    @Bean
    public RedisTemplate<String,Object> getRedisTemplate(RedisConnectionFactory connectionFactory){
        RedisTemplate<String,Object> redisTemplate = new RedisTemplate<>();

        //配置序列化器  针对于key 针对于value
        redisTemplate.setKeySerializer(new StringRedisSerializer());
        redisTemplate.setHashKeySerializer(new StringRedisSerializer());
        redisTemplate.setValueSerializer(new GenericJackson2JsonRedisSerializer());
        redisTemplate.setHashValueSerializer(new GenericJackson2JsonRedisSerializer());
//        redisTemplate.afterPropertiesSet();根据redis的版本考虑要不要让其生效

        //ConnectionFactory是包含了redis的连接信息
        redisTemplate.setConnectionFactory(connectionFactory);
        return redisTemplate;
    }

    @Bean//配置缓存管理器
    public RedisCacheManager redis(RedisConnectionFactory connectionFactory){
        RedisCacheConfiguration defaultCacheConfig = RedisCacheConfiguration.defaultCacheConfig();
        // 设置缓存管理器管理的缓存的默认过期时间
        defaultCacheConfig = defaultCacheConfig.entryTtl(Duration.ofSeconds(defaultExpireTime))
                // 设置 key为string序列化
                .serializeKeysWith(RedisSerializationContext.SerializationPair.fromSerializer(new StringRedisSerializer()))
                // 设置value为json序列化
                .serializeValuesWith(RedisSerializationContext.SerializationPair.fromSerializer(new GenericJackson2JsonRedisSerializer()))
                // 不缓存空值
                .disableCachingNullValues();

        Set<String> cacheNames = new HashSet<>();
        cacheNames.add(userCacheName);

        // 对每个缓存空间应用不同的配置
        Map<String, RedisCacheConfiguration> configMap = new HashMap<>();
        configMap.put(userCacheName, defaultCacheConfig.entryTtl(Duration.ofSeconds(userCacheExpireTime)));

        RedisCacheManager cacheManager = RedisCacheManager.builder(connectionFactory)
                .cacheDefaults(defaultCacheConfig)
                .initialCacheNames(cacheNames)
                .withInitialCacheConfigurations(configMap)
                .build();

        return cacheManager;
    }
}
将非注解式缓存的Java代码注掉

RedisConfig
package com.cdl.springboot04.config;

import org.springframework.cache.annotation.EnableCaching;
import org.springframework.context.annotation.Bean;
import org.springframework.context.annotation.Configuration;
import org.springframework.data.redis.cache.RedisCacheConfiguration;
import org.springframework.data.redis.cache.RedisCacheManager;
import org.springframework.data.redis.connection.RedisConnectionFactory;
import org.springframework.data.redis.core.RedisTemplate;
import org.springframework.data.redis.serializer.GenericJackson2JsonRedisSerializer;
import org.springframework.data.redis.serializer.RedisSerializationContext;
import org.springframework.data.redis.serializer.StringRedisSerializer;

import java.time.Duration;
import java.util.HashMap;
import java.util.HashSet;
import java.util.Map;
import java.util.Set;

/**
 * @author CDL
 * @site www.cdl.com
 *
 * @Configuration:凡是被@Configuration注解所标记,就代表当前这个类为配置类
 * 而配置类等价于ssm阶段中spring-*.xml这一类的配置文件
 *
 * spring-*.xml中:
 * @Bean:<bean  id="" class=""></bean>代表某个类交给spring进行管理
 *
 *
 *@EnableCaching 替代了下面的配置
 *  <cache:annotation-driven cache-manager="redisCacheManager" key-generator="cacheKeyGenerator"/>
 */
@EnableCaching//开启缓存
@Configuration
public class RedisConfig {

    private final int defaultExpireTime = 600;//默认的缓存槽

    private final int userCacheExpireTime = 60;//用来缓存用户的槽

    private final String userCacheName = "test";//用户槽的名称

    @Bean
    public RedisTemplate<String,Object> getRedisTemplate(RedisConnectionFactory connectionFactory){
        RedisTemplate<String,Object> redisTemplate = new RedisTemplate<>();

        //配置序列化器  针对于key 针对于value
        redisTemplate.setKeySerializer(new StringRedisSerializer());
        redisTemplate.setHashKeySerializer(new StringRedisSerializer());
        redisTemplate.setValueSerializer(new GenericJackson2JsonRedisSerializer());
        redisTemplate.setHashValueSerializer(new GenericJackson2JsonRedisSerializer());
//        redisTemplate.afterPropertiesSet();根据redis的版本考虑要不要让其生效

        //ConnectionFactory是包含了redis的连接信息
        redisTemplate.setConnectionFactory(connectionFactory);
        return redisTemplate;
    }

    @Bean//配置缓存管理器
    public RedisCacheManager redis(RedisConnectionFactory connectionFactory){
        RedisCacheConfiguration defaultCacheConfig = RedisCacheConfiguration.defaultCacheConfig();
        // 设置缓存管理器管理的缓存的默认过期时间
        defaultCacheConfig = defaultCacheConfig.entryTtl(Duration.ofSeconds(defaultExpireTime))
                // 设置 key为string序列化
                .serializeKeysWith(RedisSerializationContext.SerializationPair.fromSerializer(new StringRedisSerializer()))
                // 设置value为json序列化
                .serializeValuesWith(RedisSerializationContext.SerializationPair.fromSerializer(new GenericJackson2JsonRedisSerializer()))
                // 不缓存空值
                .disableCachingNullValues();

        Set<String> cacheNames = new HashSet<>();
        cacheNames.add(userCacheName);

        // 对每个缓存空间应用不同的配置
        Map<String, RedisCacheConfiguration> configMap = new HashMap<>();
        configMap.put(userCacheName, defaultCacheConfig.entryTtl(Duration.ofSeconds(userCacheExpireTime)));

        RedisCacheManager cacheManager = RedisCacheManager.builder(connectionFactory)
                .cacheDefaults(defaultCacheConfig)
                .initialCacheNames(cacheNames)
                .withInitialCacheConfigurations(configMap)
                .build();

        return cacheManager;
    }
}
测试查询单个能不能缓存进去
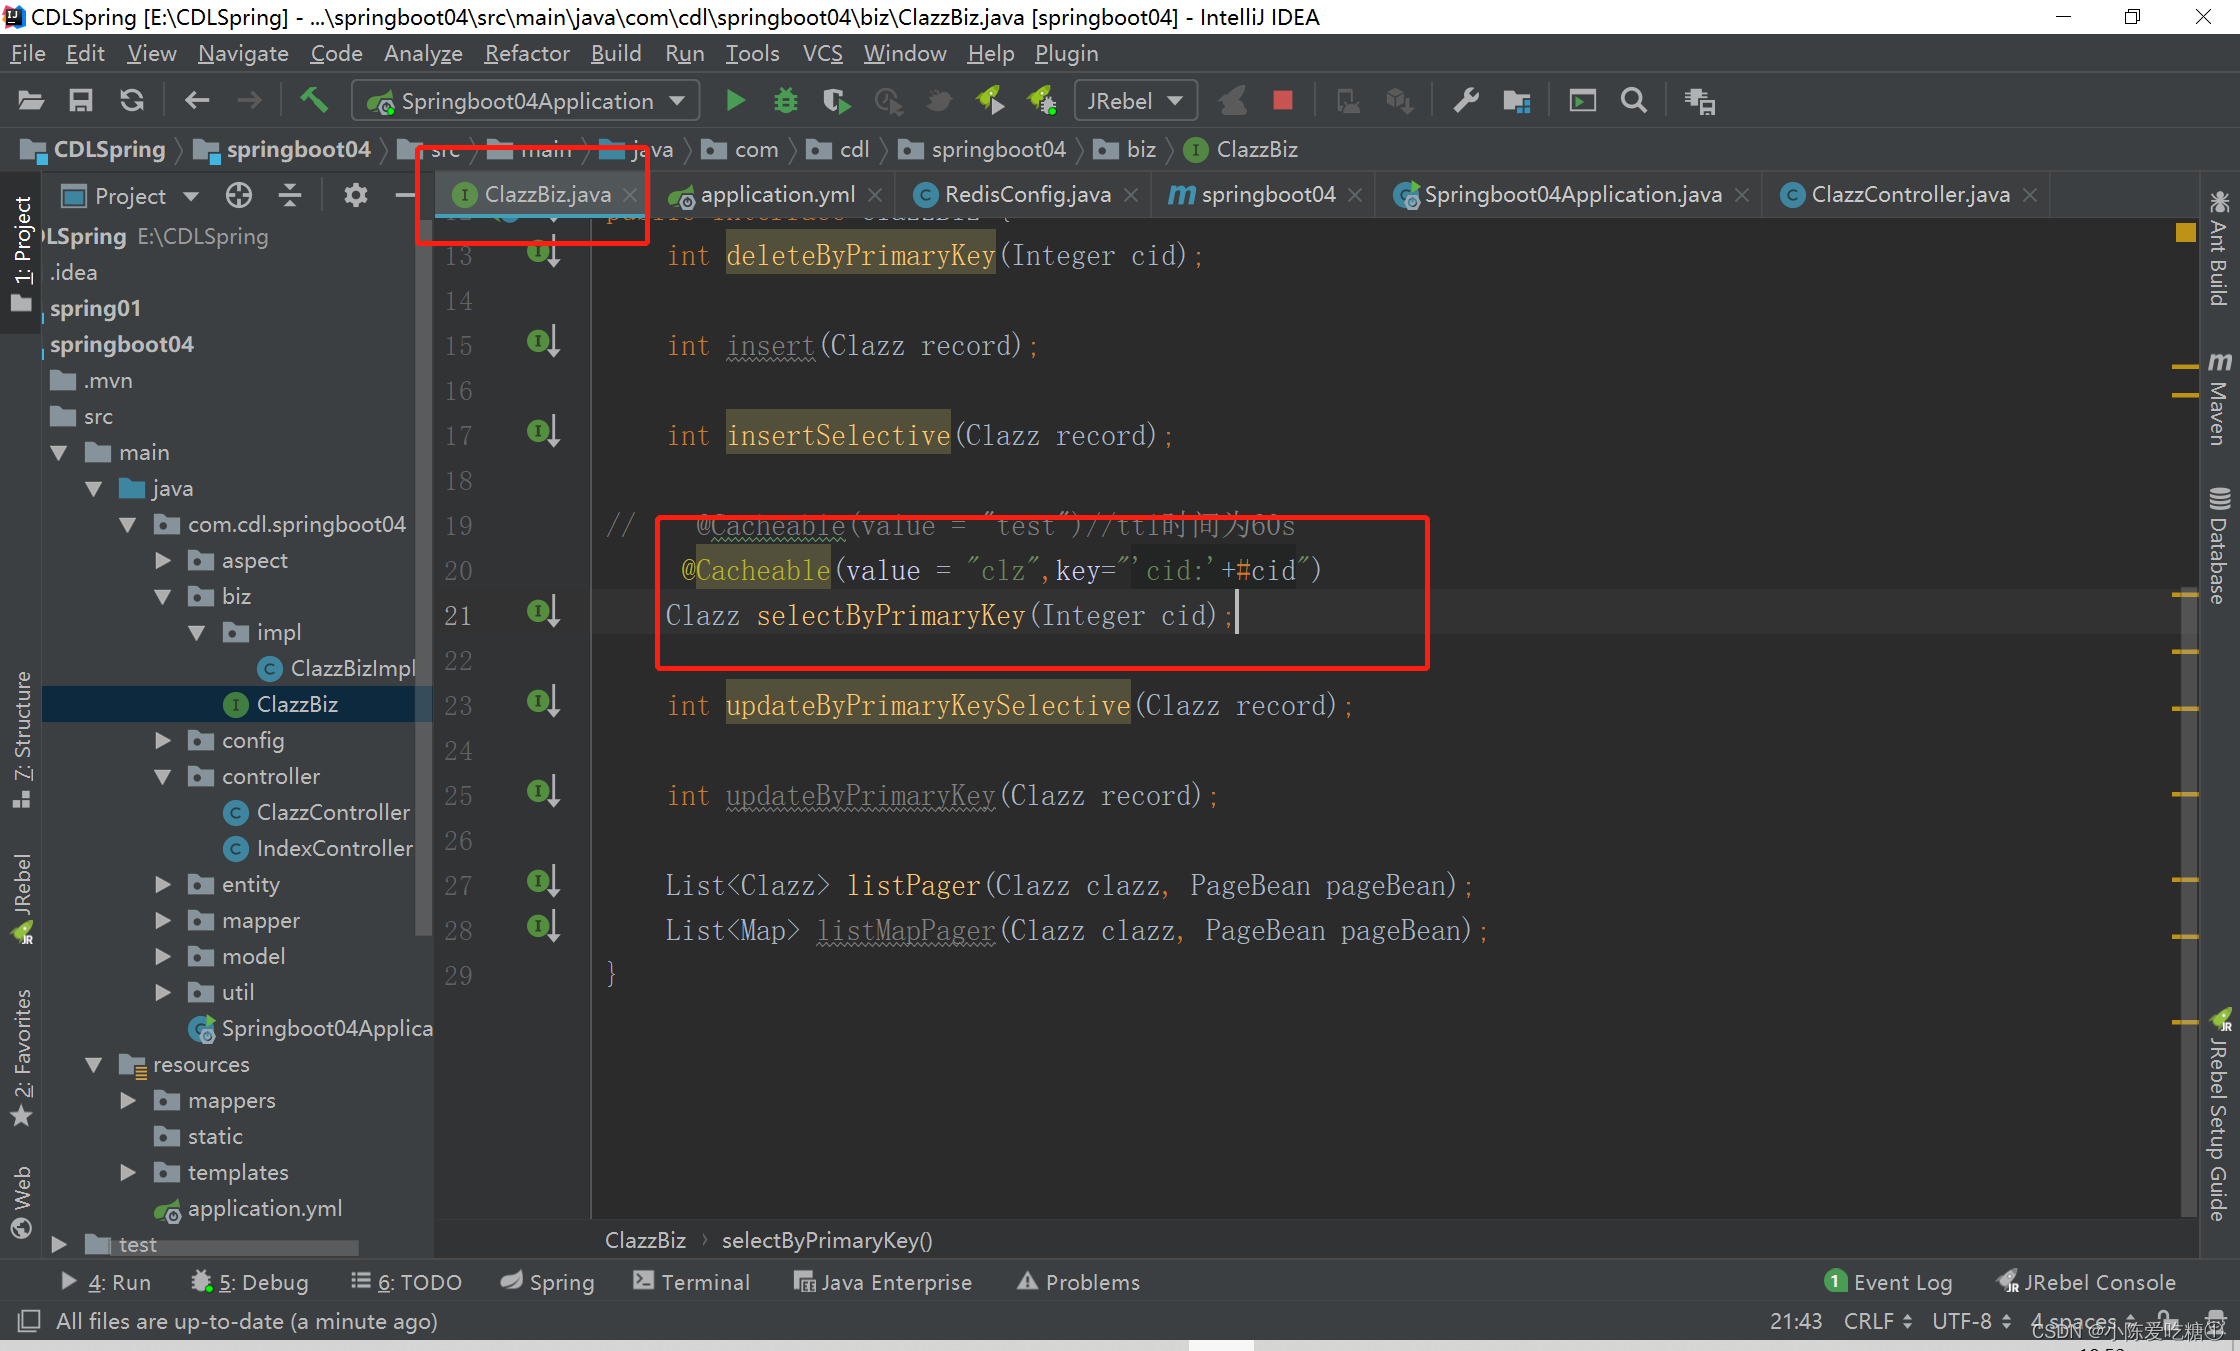
给查询单个的方法添加注解
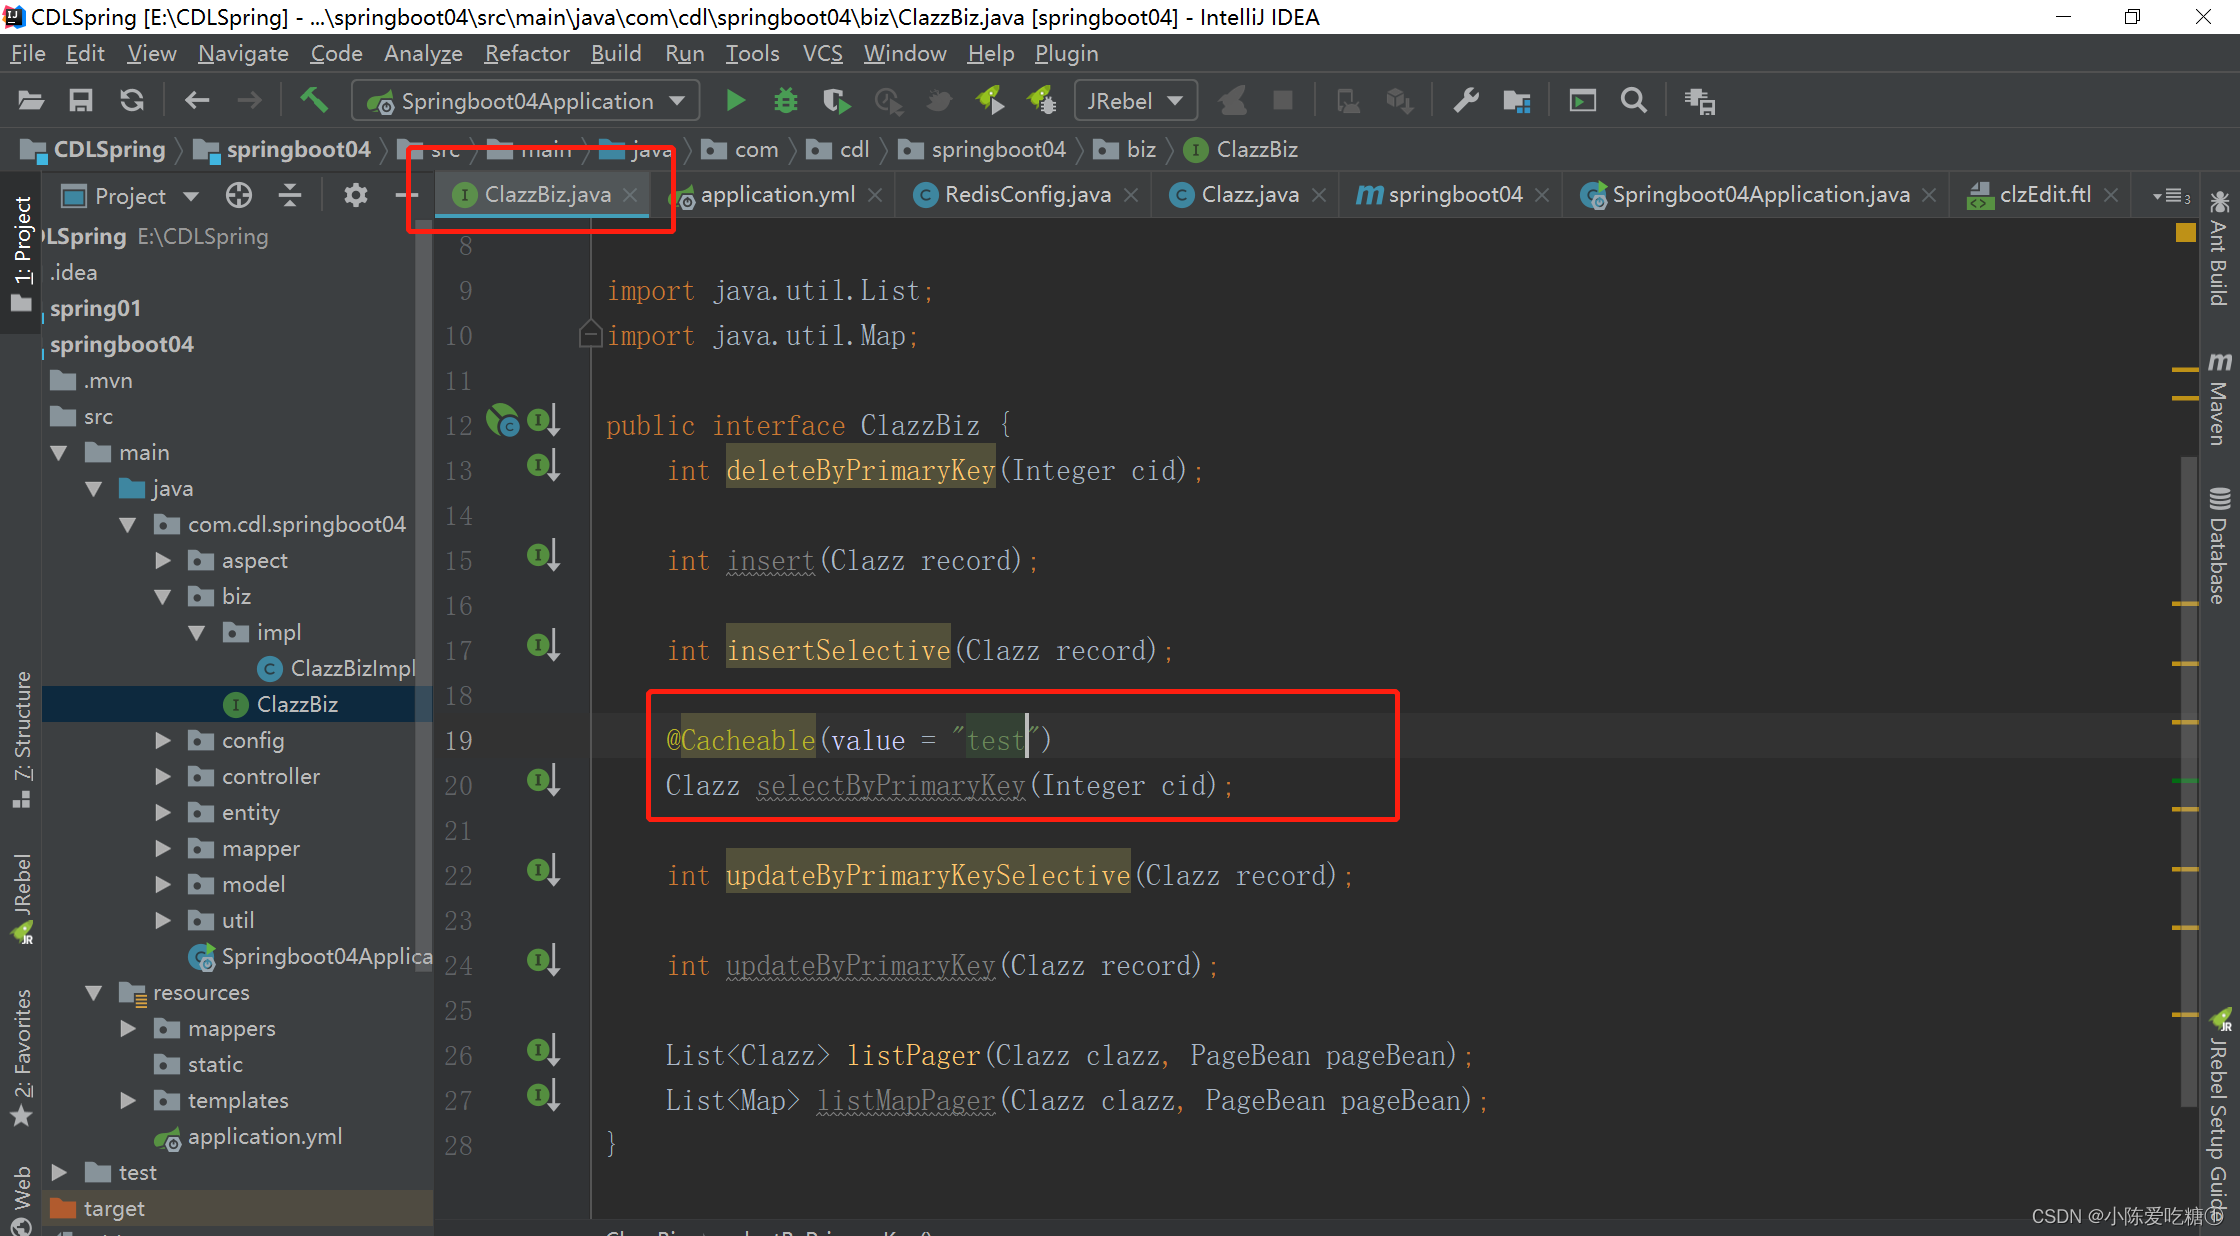
在ClazzController中添加一个查询单个的方法
  @ResponseBody
    @RequestMapping("/load")
    public Clazz load(Clazz clazz, HttpServletRequest request){
        return clazzBiz.selectByPrimaryKey(clazz.getCid());
    }
启动前先将redis中的数据清空

访问数据

缓存成功
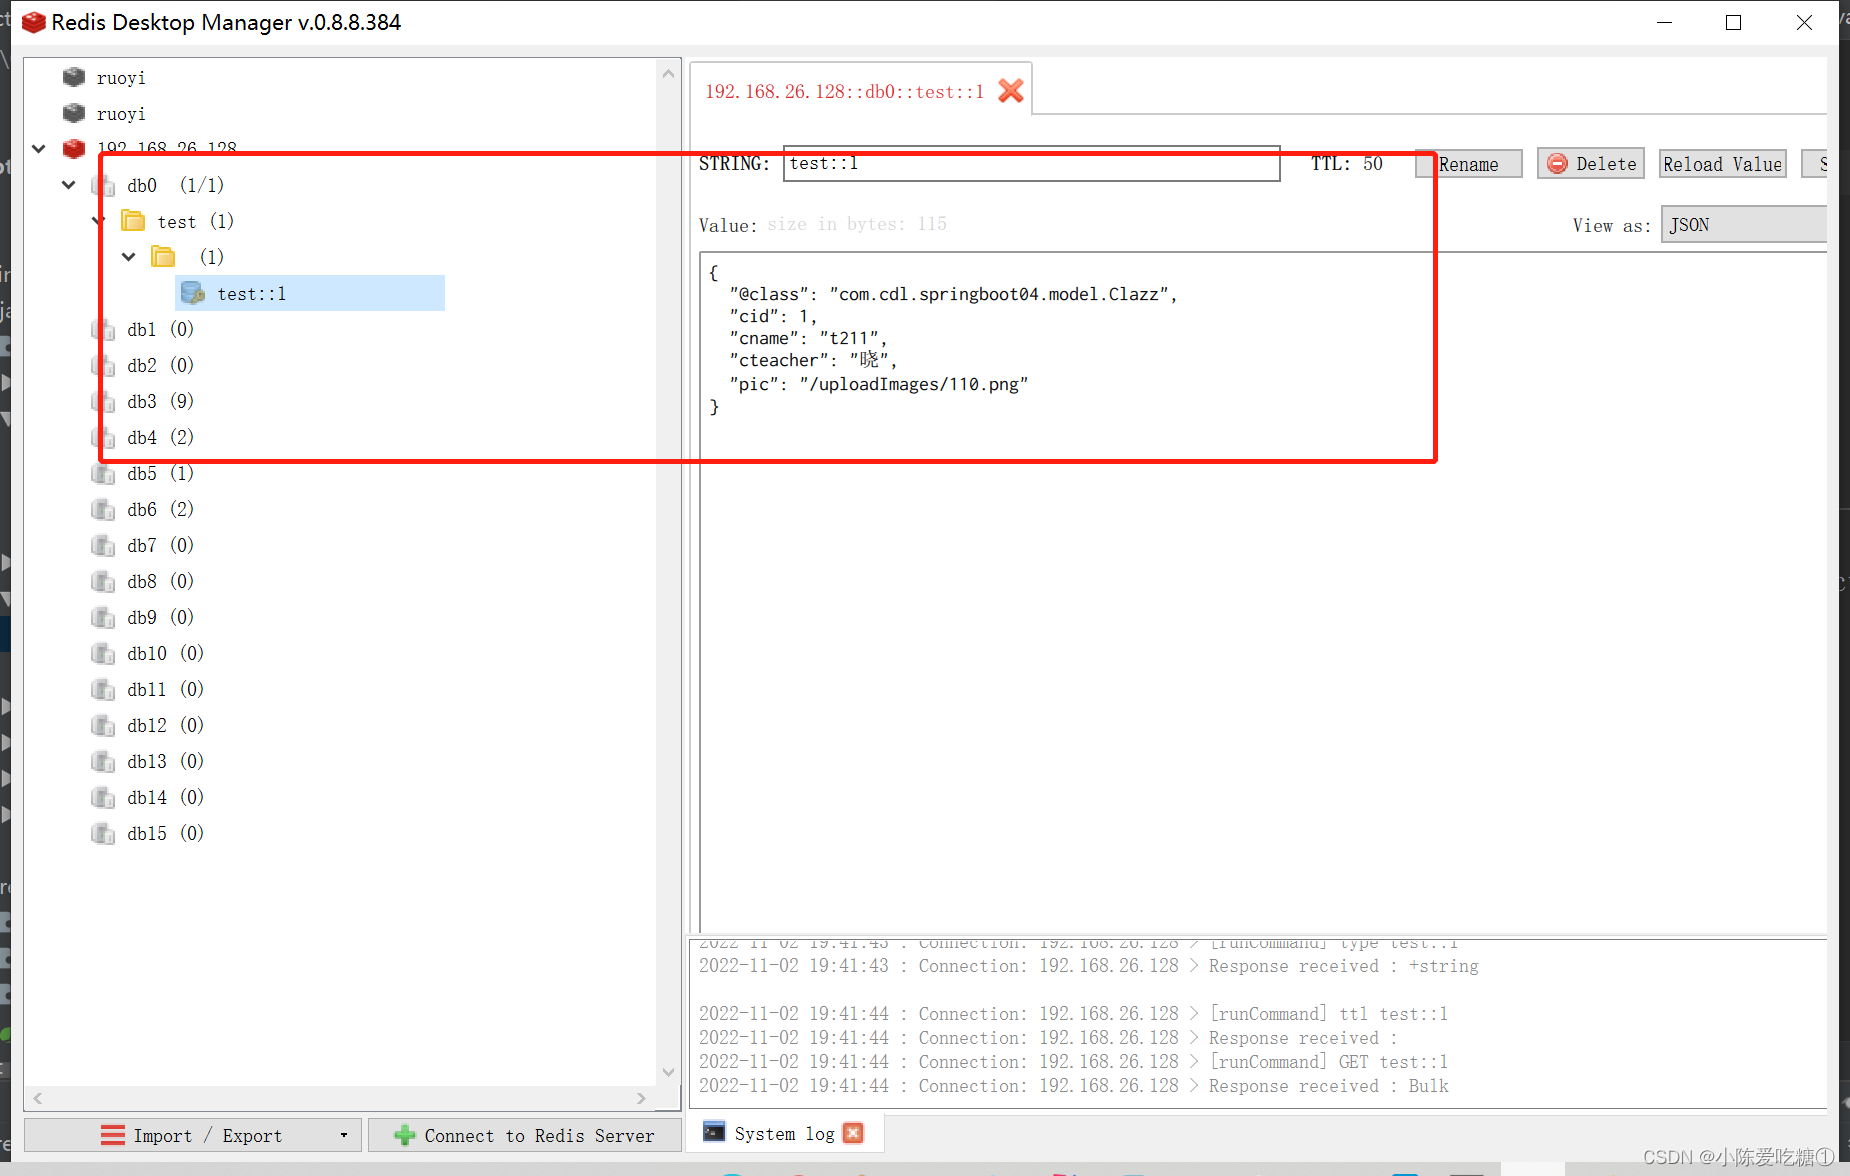
换个槽看下 时间
查看单个

缓存


 304
304


 被折叠的 条评论
为什么被折叠?
被折叠的 条评论
为什么被折叠?
 到【灌水乐园】发言


