


前言:
进入神经网络-深度学习课程后,张量Tensor的概念、操作是必须要掌握的内容,本文整理了张量的常见操作,适合初学者。若想了解更多张量的操作,可以查看官方文档:主页 - PyTorch中文文档 (pytorch-cn.readthedocs.io)
如有不妥 请多多指出!
1. 何为张量?
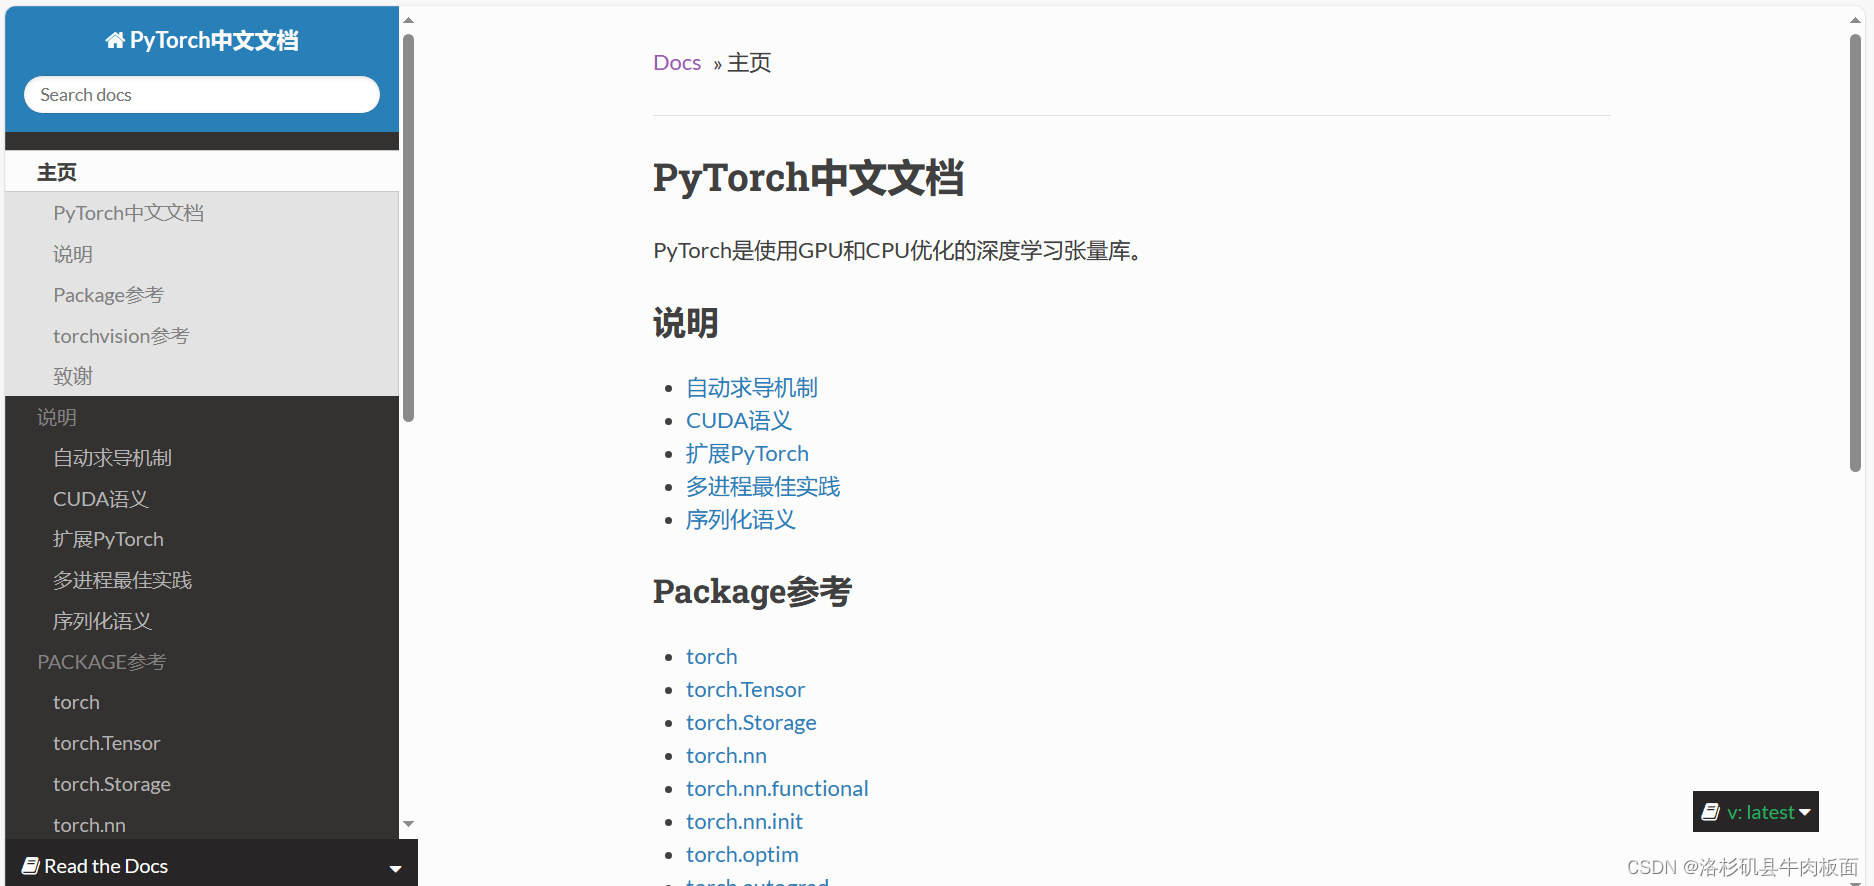
张量是什么?初学者可以使用向量、矩阵的概念类比。在深度学习中,数据通常用张量(Tensor)的形式来存储。你可以认为张量就是高阶矩阵;如果你熟悉Numpy,那么张量是类似于Numpy的多维数组(ndarray)的概念,它可以具有任意多的维度。
例如,一个三维张量[2,2,5],每一维(或 轴(axis))的元素数量分别为2,2,5。
第0维元素数量为2,第1维元素数量为2,第2维元素数量为5。图1给出了三三维张量可视化表示。(图片来源于百度pp飞浆-AI Studio平台)
图1 三维张量可视化表示
张量中元素的类型:布尔型、整数型、浮点数、复数等。必须保证同一张量中所有元素的数据类型相同。因此给张量定义一个数据类型stype来表示其元素的类型。
2. 创建张量
2.1 指定数据创建张量。 通过给定Python列表数据,创建任意维度的张量
(1)通过指定的Python列表数据[2.0,3.0,4.0],创建一维张量
import torch as tc #导入pytorch包
                   #创建一维Tensor
ndim_1Tensor = tc.Tensor([2.0,3.0,4.0])
print(ndim_1Tensor)


>>输出
>>tensor([2., 3., 4.])(2)创建类似矩阵(matrix)的二维张量
ndim_2_Tensor = tc.Tensor([
    [1.0,2.0,3.0],
    [4.0,5.0,6.0]
])
print(ndim_2_Tensor)

>>输出
>>tensor([[1., 2., 3.],
[4., 5., 6.]])(3)同理,可创建维度为3,4...N的复杂多维张量
ndim_3_Tensor = tc.Tensor([
    [[1,2,3,4,5],
     [6,7,8,9,10]],
    [[11,12,13,14,15],
     [16,17,18,19,20]]
])
print(ndim_3_Tensor)

>>输出
>>tensor([[[ 1.,  2.,  3.,  4.,  5.],
         [ 6.,  7.,  8.,  9., 10.]],

        [[11., 12., 13., 14., 15.],
[16., 17., 18., 19., 20.]]])注意,张量在任何一个维度上的元素数量必须相等。以下为错误示例:
#尝试定义在不同维度上元素数量不等的Tensor
import torch as tc #导入pytorch包
ndim_2_Tensor = tc.Tensor([
    [1.0 , 2.0],
    [4.0 ,5.0 ,6.0]
])

>>输出
>>ValueError:
   Faild to convert input data to a regular ndarray :
  - Usually this means the input data contains nested lists with different lengths.
结果显示报错, 可见,目标要创建二维张量,但是第0维上的元素个数为2,第一维上的元素个数为3,这种定义情况会抛出异常。不符合张量创建的要求,故报错。
2.2 指定形状创建
以下代码分别使用torch.zeros , torch.ones 和torch.full创建张量。
#指定形状创建Tensor
import torch as tc
m,n = 3,2

#使用torch.zeros创建数据全部为0,形状为[m,n]的二维张量
zeros_Tensor = tc.zeros([m,n])

#使用torch.ones创建数据全部为1,形状为[m,n]的二维张量
ons_Tensor = tc.ones([m,n])

#使用torch.full创建数据全部为指定值,形状为[m,n]的Tensor,指定数据全为6
full_Tensor = tc.full([m,n],6)

print('zeros_Tensor:','\n',zeros_Tensor) #数据全为0的3*2张量
print('ons_Tensor:','\n',ons_Tensor) #数据全为1的3*2张量
print('full_Tensor:','\n',full_Tensor) #数据全为指定数字6的3*2张量

>>输出
>>
zeros_Tensor:
 tensor([[0., 0.],
        [0., 0.],
        [0., 0.]])

ons_Tensor:
 tensor([[1., 1.],
        [1., 1.],
        [1., 1.]])

full_Tensor:
 tensor([[6, 6],
        [6, 6],
        [6, 6]])
2.3 指定区间创建
以下代码使用torch.arange , torch.linspace 创建张量。
#指定区间创建张量
import torch as tc

#使用torch.arange创建步长step分隔数值区间[start,end)的一维张量
arange_Tensor = tc.arange(start=1,end=5,step=1)

#使用tc.linspace创建以元素个数steps均匀分隔数值区间[start,end]的一维张量
linspace_Tensor = tc.linspace(start=1,end=10,steps=5)

print('arange_Tensor:','\n',arange_Tensor) #特别注意数值区间为[)左闭右开
print('linspace_Tensor:','\n',linspace_Tensor) #注意生成的数据类型为浮点数类型

>>输出
>>
arange_Tensor:
 tensor([1, 2, 3, 4])
linspace_Tensor:
 tensor([ 1.0000,  3.2500,  5.5000,  7.7500, 10.0000])
3. 张量的属性
3.1 张量的形状
张量具有如下形状的属性:
> Tensor.ndim : 获取张量维度数。例如向量的维度=1,矩阵的维度=2。
> Tensor.shape : 获取张量维度。
> Tensor.size : 同shape,获取张量维度。
> Tensor.shape[n] : 张量第n维度的大小。
图2展示了ndim,shape,size,shape[n]属性可视化图。
创建一个四维张量(图片来源于百度飞浆平台):

图2 四种属性可视化展示
接下来创建四维张量,展示出ndim,shape,size,shape[n]属性:
#创建四维张量
import torch as tc

#创建四维张量ndim_4_Tensor
ndim_4_Tensor = tc.ones([2,3,4,5])

print('张量的总维度数:',ndim_4_Tensor.ndim) #输出张量的总维度
print('张量的维度:',ndim_4_Tensor.shape)
print('同样可以获取张量的维度 :',ndim_4_Tensor.size())
    #shape和size都可以获得张量的维度
print('沿第0轴的元素数',ndim_4_Tensor.shape[0]) #第0维的维度
print('沿张量最后一个轴的元素数:',ndim_4_Tensor.shape[-1])#最后一维的维度

>>输出
>>
张量的总维度数: 4
张量的维度: torch.Size([2, 3, 4, 5])
同样可以获取张量的维度 : torch.Size([2, 3, 4, 5])
沿第0轴的元素数 2
沿张量最后一个轴的元素数: 5
3.2 形状的改变
#形状的改变  reshape
import torch as tc

#定义一个shape为[3,2,5]的三维张量
ndim_3_Tensor = tc.Tensor([
    [[1,2,3,4,5],
     [6,7,8,9,10]],
    [[11,12,13,14,15],
     [16,17,18,19,20]],
    [[21,22,23,24,25],
     [26,27,28,29,30]]
])
print('The shape of ndim_3_Tensor:',ndim_3_Tensor.shape) #输出ndim_3_Tensor张量的形状

#torch.reshape可保持张良数据不变,改变张量数据形状
reshape_Tensor = tc.reshape(ndim_3_Tensor,(2,5,3))  #将原张量的形状改为[2,5,3]
print('After reshape:','\n',reshape_Tensor)

>>输出
>>
The shape of ndim_3_Tensor: torch.Size([3, 2, 5])
After reshape:
 tensor([[[ 1.,  2.,  3.],
         [ 4.,  5.,  6.],
         [ 7.,  8.,  9.],
         [10., 11., 12.],
         [13., 14., 15.]],

        [[16., 17., 18.],
         [19., 20., 21.],
         [22., 23., 24.],
         [25., 26., 27.],
         [28., 29., 30.]]])
从输出结果看,将张量从[3, 2, 5]的形状reshape为[2, 5, 3]的形状时,张量内的数据不会发生改变,元素顺序也没有发生改变,只有数据形状发生了改变。
使用reshape时存在的技巧:
> -1 表示此维度的值是由其他张量的元素总数和剩余维度推断出来的。故只有一个维度可设置 为-1。
#reshape 技巧 -1
import torch as tc
new_Tensor1 = ndim_3_Tensor.reshape([-1])
print('New Tensor 1 shape:',new_Tensor1.shape) #输出张量数据总数

new_Tensor2 = ndim_3_Tensor.reshape([-1,5,3])#-1对应张量数据总数除以其他维数
print('New Tensor 2 shape:',new_Tensor2.shape)

>>输出
>>
New Tensor 1 shape: torch.Size([30])
New Tensor 2 shape: torch.Size([2, 5, 3])
3.3 插入维度
torch.unsqueeze可将张量中的一个维度插入尺寸为1的维度:
#unsqueeze 将张量中的一个维度插入尺寸为1的维度
ones_Tensor = tc.ones([5,10])
    #在第0列插入尺度为1的维度
new_Tensor1 = tc.unsqueeze(ones_Tensor,axis=0)
print('new Tensor 1 shape:',new_Tensor1.shape)

    #在第1列插入尺度为1的维度
new_Tensor2 = tc.unsqueeze(ones_Tensor,axis=1)
print('new Tensor 2 shape:',new_Tensor2.shape)

>>输出
>>
new Tensor 1 shape: torch.Size([1, 5, 10])
new Tensor 2 shape: torch.Size([5, 1, 10])注意,axis=n,在torch库中,n的数据类型一定为int型。在paddle库中,n可以是list类型,即可以添加多个维度。
3.4 张量的数据类型
在torch中,张量默认的数据类型是32位浮点型。以下代码展示将浮点型转化为其他数据类型:
#张量的数据类型
import torch as tc
T = tc.tensor([2.3,4.5])

print('默认类型:',T.dtype) #32位浮点型
print('转换类型:')
print('.long() :',T.long().dtype)#64位整型
print('.int() :',T.int().dtype) #32位整型
print('.float() :',T.float().dtype)#32位浮点型

>>输出
>>
默认类型: torch.float32
转换类型:
.long() : torch.int64
.int() : torch.int32
.float() : torch.float32下面展示Numpy与Tensor相互转换的几种方式:(本段内容借鉴文章【Pytorch】numpy数组与tensor互相转换的多种方法)
1.Numpy数组转化为tensor类型
#numpy数组转化为tensor
import torch as tc
import numpy as np

ary1 = np.array([1,2,3],dtype=np.float32)
ary2 = np.array([4,5,6])
print(ary1.dtype)
print('numpy array的默认数据类型为:',ary2.dtype)

Tensor1 =tc.tensor(ary2)
Tensor2 =tc.Tensor(ary2)
tensor_ = tc.tensor(ary2)
n = tc.from_numpy(ary2)

print('输出类型:')
print(Tensor1.dtype,';',Tensor1)
print(Tensor2.dtype,';',Tensor2)
print(tensor_.dtype,';',tensor_)
print(n.dtype,';',n)

>>输出
>>
float32
numpy array的默认数据类型为: int32
输出类型:
torch.int32 ; tensor([4, 5, 6], dtype=torch.int32)
torch.float32 ; tensor([4., 5., 6.])
torch.int32 ; tensor([4, 5, 6], dtype=torch.int32)
torch.int32 ; tensor([4, 5, 6], dtype=torch.int32)
2. torch中的tensor转化为numpy数组
#tensor转化为numpy数组
import torch as tc
import numpy as np

a_ = tc.ones(5) #生成维度为5的数值为1的张量
b_ =a_.numpy() #转化为数组类型
b_[0] = 4 #将下标为0,2的维数变为4,9
b_[2] = 9

print('张量类型a_ :',a_)
print('数组类型b_ :',b_)

>>输出
>>
张量类型a_ : tensor([4., 1., 9., 1., 1.])
数组类型b_ : [4. 1. 9. 1. 1.]
可以看出,当Tensor类型转换为Numpy数组类型时,内存是共享的,当对b_进行操作变化,a_也会变化。
4. 张量的索引与切片
4.1 索引和切片
(此段内容借鉴文章:[PyTroch系列-17]:PyTorch基础 - 张量的索引与切片)
(1) 元素索引
正数:正向编码,从开始第一元素开始编号,从0开始到正无穷, 0表示启第一个元素
负数:反向编码,从最后一个元素开始编号,从-1开始,到负无穷,-1表示最后一个元素
(2) 步长step:
正数:表示索引的增长方向是正向的。
负数:表示索引的增长方向是逆向的。
Pytorch不支持负数步长,Tensorflow支持
(3) 开闭区间[ )左闭右开
start:闭合,包含start索引的元素
end:开合,不包含end索引的元素
针对一维张量,对单个轴进行索引和切片。以下代码是一些常见操作:
#对单个轴进行索引和切片
import torch as tc
#定义1个一维Tensor
ndim_1_Tensor = tc.tensor([0,1,2,3,4,5,6,7,8,9])

print('原张量:',ndim_1_Tensor)
print('第一个元素:',ndim_1_Tensor[0])
print('最后一个元素:',ndim_1_Tensor[-1])
print('所有元素:',ndim_1_Tensor[:])
print('前三位:',ndim_1_Tensor[:3])
print('间隔3位:',ndim_1_Tensor[::3])

>>输出
>>
原张量: tensor([0, 1, 2, 3, 4, 5, 6, 7, 8, 9])
第一个元素: tensor(0)
最后一个元素: tensor(9)
所有元素: tensor([0, 1, 2, 3, 4, 5, 6, 7, 8, 9])
前三位: tensor([0, 1, 2])
间隔3位: tensor([0, 3, 6, 9])针对二维及以上维度的张量,在多个维度上进行索引或切片。
索引或切片的第一个值对应第0维,第二个值对应第1维,以此类推。若某个维度上未指定索引,则默认为":"
#定义1个二维Tensor
import torch as tc

ndim_2_Tensor = tc.tensor([
    [0,1,2,3],
    [4,5,6,7],
    [8,9,10,11]
])

print('Origin Tensor',ndim_2_Tensor)
print('First row',ndim_2_Tensor[0])
print('First row',ndim_2_Tensor[0, : ])
print('First column:',ndim_2_Tensor[: ,0])
print('Last column:',ndim_2_Tensor[:,-1])
print('All element:','\n',ndim_2_Tensor[:])

>>输出
>>
Origin Tensor tensor([[ 0,  1,  2,  3],
        [ 4,  5,  6,  7],
        [ 8,  9, 10, 11]])
First row tensor([0, 1, 2, 3])
First row tensor([0, 1, 2, 3])
First column: tensor([0, 4, 8])
Last column: tensor([ 3,  7, 11])
All element:
 tensor([[ 0,  1,  2,  3],
        [ 4,  5,  6,  7],
        [ 8,  9, 10, 11]])
First row and second column: tensor(1)
4.2 修改张量
注意,慎重通过索引或切片操作来修改张量,此操作仅会原地修改该张量的数值,且原值不会被保存,如果被修改的张量参与梯度计算,将仅会使用修改后的数值,这会给梯度计算引入风险。
#修改张量
import torch as tc

#定义1个二维Tensor
ndim_2_Tensor = tc.ones([2,3])
print('Origin Tensor:','\n',ndim_2_Tensor)

#修改第一维为0
ndim_2_Tensor[0] = 0
print('第一维修改为0后的张量:','\n',ndim_2_Tensor)

#修改第一维为2.1
ndim_2_Tensor[0:1]= 2.1
print('修改第一维为2.1的张量','\n',ndim_2_Tensor)

#修改全部Tensor
ndim_2_Tensor[...] = 3
print('修改全部数据后的张量:','\n',ndim_2_Tensor)

>>输出
>>Origin Tensor:
 tensor([[1., 1., 1.],
        [1., 1., 1.]])
第一维修改为0后的张量:
 tensor([[0., 0., 0.],
        [1., 1., 1.]])
修改第一维为2.1的张量
 tensor([[2.1000, 2.1000, 2.1000],
        [1.0000, 1.0000, 1.0000]])
修改全部数据后的张量:
 tensor([[3., 3., 3.],
        [3., 3., 3.]])
5. 张量的运算
张量支持数学运算、逻辑运算、矩阵运算等100余种运算操作。以加法为例。
5.1 数学运算
#张量的运算
import torch as tc

#定义两个Tensor
x = tc.tensor([[1.1,2.2],[3.3,4.4]])
y = tc.tensor([[5.5,6.6],[7.7,8.8]])

#方法1 对应位置算子相加,并将各个位置的输出元素保存到返回结果中
print('Method 1:','\n',tc.add(x,y))

#方法2
print('Method 2:','\n',x.add(y))

>>输出
>> Method 1:
 tensor([[ 6.6000,  8.8000],
        [11.0000, 13.2000]])
Method 2:
 tensor([[ 6.6000,  8.8000],
        [11.0000, 13.2000]])
张量类的基础数学函数如下:
x.abs()                       # 逐元素取绝对值
x.ceil()                      # 逐元素向上取整
x.floor()                     # 逐元素向下取整
x.round()                     # 逐元素四舍五入
x.exp()                       # 逐元素计算自然常数为底的指数
x.log()                       # 逐元素计算x的自然对数
x.reciprocal()                # 逐元素求倒数
x.square()                    # 逐元素计算平方
x.sqrt()                      # 逐元素计算平方根
x.sin()                       # 逐元素计算正弦
x.cos()                       # 逐元素计算余弦
x.add(y)                      # 逐元素加
x.subtract(y)                 # 逐元素减
x.multiply(y)                 # 逐元素乘(积)
x.divide(y)                   # 逐元素除
x.mod(y)                      # 逐元素除并取余
x.pow(y)                      # 逐元素幂
x.max()                       # 指定维度上元素最大值,默认为全部维度
x.min()                       # 指定维度上元素最小值,默认为全部维度
x.prod()                      # 指定维度上元素累乘,默认为全部维度
x.sum()                       # 指定维度上元素的和,默认为全部维度
5.2 逻辑运算
张量类的逻辑运算函数如下:
x.isfinite()              # 判断Tensor中元素是否是有限的数字,即不包括inf与nan
x.equal_all(y)            # 判断两个Tensor的全部元素是否相等,并返回形状为[1]的布尔类Tensor
x.equal(y)                # 判断两个Tensor的每个元素是否相等,并返回形状相同的布尔类Tensor
x.not_equal(y)            # 判断两个Tensor的每个元素是否不相等
x.less_than(y)            # 判断Tensor x的元素是否小于Tensor y的对应元素
x.less_equal(y)           # 判断Tensor x的元素是否小于或等于Tensor y的对应元素
x.greater_than(y)         # 判断Tensor x的元素是否大于Tensor y的对应元素
x.greater_equal(y)        # 判断Tensor x的元素是否大于或等于Tensor y的对应元素
x.allclose(y)             # 判断两个Tensor的全部元素是否接近
5.3 矩阵运算
x.t()                         # 矩阵转置
x.transpose([1, 0])           # 交换第 0 维与第 1 维的顺序
x.norm('fro')                 # 矩阵的弗罗贝尼乌斯范数
x.dist(y, p=2)                # 矩阵(x-y)的2范数
x.matmul(y)                   # 矩阵乘法


 1266
1266


 被折叠的 条评论
为什么被折叠?
被折叠的 条评论
为什么被折叠?
 到【灌水乐园】发言


