


 本文详细讲解了CSS盒子模型的概念,涉及文档流、边框、内边距、外边距的设置,以及如何影响元素的布局和设计。通过实例和练习,帮助读者掌握基本的网页布局技巧。
二白今天这篇文章就是来和大家详细聊聊CSS盒子模型,CSS盒子模型在CSS中算是比较重要的部分了,他已经开始涉及到网页布局和设计了,对于这一块内容要引起重视,多加练习,希望大家读完有所收获,那我辛苦码字也就值了。
一、文档流
在说盒子模型之前,我们先聊聊文档流
文档流:
网页是一个多层的结构,一层叠着一层,网页的最底层,我们叫文档流
我们所创建的标签,默认都是在文档流中
标签特点的分类前提条件:标签必须在文档流中
块标签,行内标签,行内块标签,一旦标签脱离文档流,
就不再区分块、行内、行内块标签了,各自的特点也就不存在了
也就是说块标签不会独占一行了,行内标签也可以设置宽高了,行内块标签三像素问题也没有了
那么标签如何脱离文档流呢?
设置标签浮动、绝对定位、弹性盒子等等
这样就引出了我们今天要讲的主题——盒子模型
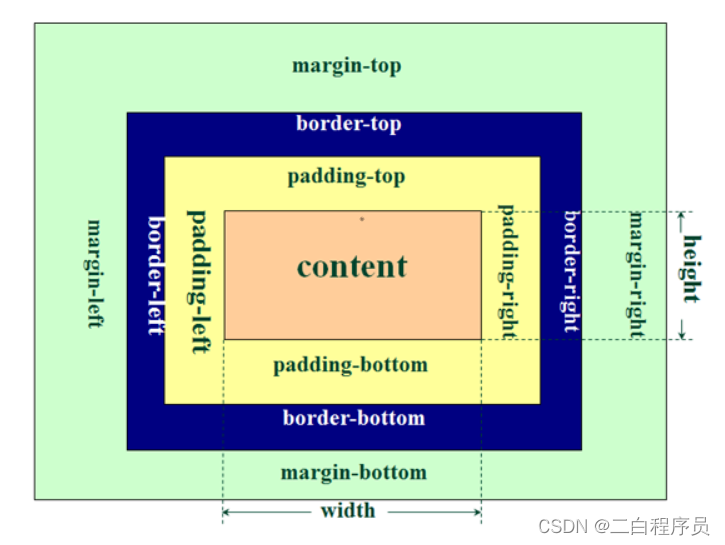
二、盒子模型
网页页面布局的过程可以看作在页面空间中摆放盒子的过程。通过调整盒子的边框、边界等参数控制各个盒子,实现对整个网页的布局。
盒模型由内到外依次分为内容(content)、填充(padding)、边框(border)和边界(margin)4部分。
举个例子,把元素布局到页面,就像想买个桌子,放到家里,要知道桌子的大小,形状,然后才能放到家里,所以我们把所有的元素都想成盒子,矩形。
盒模型、盒子模型、框模型(box model) 空调快递
内容区(content) 放内容的区域 空调
内边距(padding) 内容区与边框之间的距离 泡沫
边框(border) 边框分割开盒子里面和外面 纸箱子
外边距(margin) 控制盒子的位置 快递的位置描述
影响盒模型大小的部分:内容区,内边距,边框,跟外边距无关
图示:
三、盒子模型_边框
边框(border)元素设置边框
边框属于盒子边缘,边框里面属于盒子内部,出了边框都是盒子的外部
设置边框必须指定三个样式
设置边框:简写
1、单独设置一边的边框
border-XXX:宽度 颜色 样式 ;
xxx:left,right,top,bottom
2、去除某一边的边框
border-xxx:none;
border:10px red double ;
border-left:10px red solid ;
border-right:10px red solid ;
border-top:10px red solid ;
border-bottom:10px red solid ;
border-bottom: none;
设置边框的宽度
1、可以写个值
4个值 上 右 下 左
3个值 上 左右 下
2个值 上下 左右
1个值 上下左右
2、可以单独设置某一边的宽度
border-XXX-width: 40px;
XXX:top、right、bottom、left
3、边框大小设置 可选 默认是1-3px
border-width: 10px;
border-bottom-width: 40px;
border-top-width: 40px;
border-left-width: 40px;
border-right-width: 40px; */
设边框的颜色
1、也可以写多个值,规则跟border-width一样
2、也可以单独设置某一边的颜色
3、border-color 可选值 默认颜色黑色
4、自制小箭头
border-color: green;
border-color: transparent transparent green transparent;
border-color: rgba(0,0,0,0) rgba(0,0,0,0) green rgba(0,0,0,0) ;
border-top-color: red;
border-bottom-color: blue;
border-left-color: black;
border-right-color: pink;
设置边框的样式
border-style: ;
可选值:
none 没有边框线, 默认值
solid 实线
double 双线
dashed 虚线
dotted 点状的虚线
四、盒子模型_内边距
设置内边距
1、可以单独设置某一边的内边距
padding-XXX: ;
xxx:top,bottom,right,left
2、padding后也可以跟多个值,规则跟border-width一样
3、内边距是盒子内部的,会影响到盒子的大小
padding:10px 40px;
padding-top: 40px;
padding-bottom: 40px;
padding-left: 40px;
padding-right: 40px;
五、外边距
设置外边距
1、 margin-top:; 正值,元素会向下移动,负值:元素向上
margin-left:50px ;正值, 元素会向右移动 负值:元素向左
margin-bottom: ; 正值, 元素本身不动,其下方元素向下移动,负值,其下方元素向上移动
margin-right: ; 块元素独占一行,设置右外边距是没有效果的
2、margin 同时设置
后面也可以跟多个值,规则跟border-width一样
六、水平布局
元素的水平方向的布局
元素在其父元素中水平方向的位置由一下几个属性共同决定
margin-left border-left padding-left width padding-right border-right margin-right
一个元素在其父元素中,水平布局必须要满足以下的等式
margin-left + border-left + padding-left + width + padding-right + border-right + margin-right
=父元素内容区的宽度(必须满足)
举例:子元素 inner七个元素的值如下
0 +0 + 0+ 200 + 0 + 0 + 0 =600 ??不成立
以上等式必须满足,如果相加结果等式不成立,则称为过度约束,则浏览器会让等式自动调整
-调整的情况
1:如果七个值中没有auto情况,则浏览器会调整margin-right值以使等式满足
0 +0 + 0+ 200 + 0 + 0 + 400 =600
2:这7个值中width,margin-left,margin-right,这三个值可以设置auto
如果有设置auto,则浏览器会自动调整auto的值,以使等式成立
0 +0 + 0+ auto + 0 + 0 + 0 =600 auto=600
0 +0 + 0+ auto + 0 + 0 + 200 =600 auto=400
3:如果将一个宽度和一个外边距设置为auto,则宽度会调整到最大
4:如果三个值都是auto,也只会调整宽度
5:如果将两个外边距设为auto,宽度固定,则两侧外边距会设置为相同的值
会使元素自动在父元素中居中,所以我们经常将左右外边距设置为auto
七、设置圆
设置圆角
border-radius: 10px;
border-radius: 50%; 设置圆形
设置某一个角的圆角效果
border-top-left-radius:50px ;
border-bottom-right-radius: 50px;
border-top-right-radius: 50px;
border-bottom-left-radius: 50px;
二白今天就说到这,再往后可能不算是html入门知识了,需要我们深入的学习
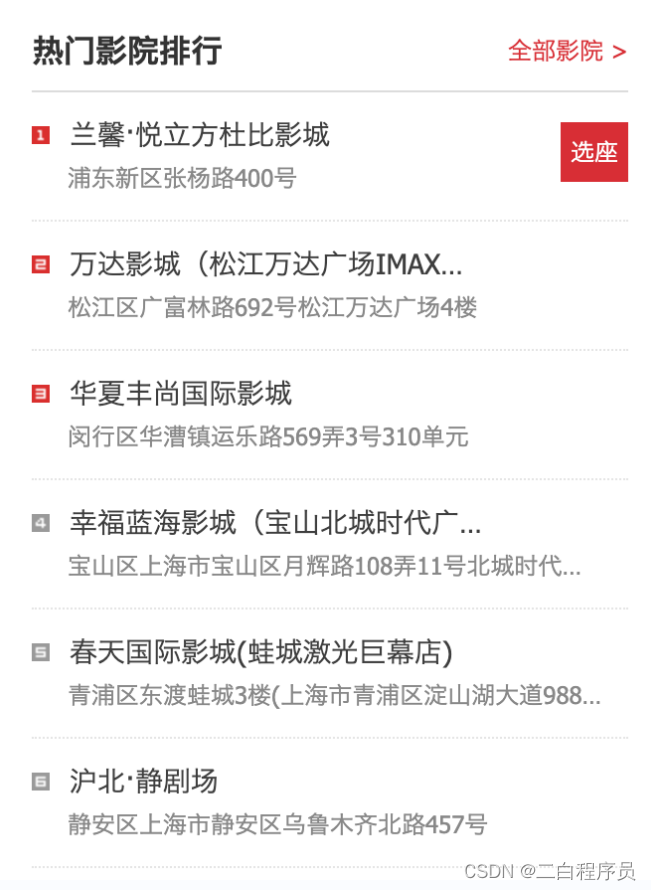
分享练习:
需求图:
二白的代码:
<!DOCTYPE html>
<html lang="en">
<head>
<meta charset="UTF-8">
<meta name="viewport" content="width=device-width, initial-scale=1.0">
<title>Document</title>
<style>
.all {
width: 300px;
height: 400px;
}
h3 {
width: 300px;
height: 30px;
line-height: 30px;
border-bottom-style: dotted;
border-bottom-color: grey;
padding-top: 10px;
}
.red {
/* display: inline-block; */
line-height: 30px;
font-size: 16px;
text-decoration: none;
color: red;
float: right;
}
.jx {
border: 3px solid red;
background-color: red;
color: white;
font-size: 6px;
}
.big {
text-indent: 2em;
}
.small {
display: inline-block;
color: gray;
font-size: 12px;
text-indent: 2em;
}
.zuo {
display: inline-block;
width: 300px;
height: 30px;
border-bottom-style: dotted;
border-bottom-color: gray;
padding-bottom: 20px;
padding-top: 10px;
}
.bottom {
text-decoration: none;
display: none;
float: right;
width: 30px;
height: 30px;
font-size: 10px;
background-color: red;
color: white;
text-align: center;
line-height: 30px;
}
.grey{
background-color: gray;
border: 3px solid gray;
color: white;
font-size: 6px;
}
.zuo:hover .bottom {
display: block;
}
</style>
</head>
<body>
<div class="all">
<h3>热门影院排行 <a class="red" href="#">全部影院 ></a></h3>
<div class="zuo"><span class="jx">1<a href="#" class="bottom">选座</a></span>
<span class="big">兰馨·悦立方杜比影城</span>
<br><span class="small">浦东新区张杨路400号</span>
</div>
<div class="zuo"><span class="jx">2<a href="#" class="bottom">选座</a></span>
<span class="big">兰馨·悦立方杜比影城</span>
<br><span class="small">浦东新区张杨路400号</span>
</div>
<div class="zuo"><span class="jx">3<a href="#" class="bottom">选座</a></span>
<span class="big">兰馨·悦立方杜比影城</span>
<br><span class="small">浦东新区张杨路400号</span>
</div>
<div class="zuo"><span class="grey">4<a href="#" class="bottom">选座</a></span>
<span class="big">兰馨·悦立方杜比影城</span>
<br><span class="small">浦东新区张杨路400号</span>
</div>
<div class="zuo"><span class="grey">5<a href="#" class="bottom">选座</a></span>
<span class="big">兰馨·悦立方杜比影城</span>
<br><span class="small">浦东新区张杨路400号</span>
</div>
<div class="zuo"><span class="grey">6<a href="#" class="bottom">选座</a></span>
<span class="big">兰馨·悦立方杜比影城</span>
<br><span class="small">浦东新区张杨路400号</span>
</div>
</div>
</body>
</html>运行截图:
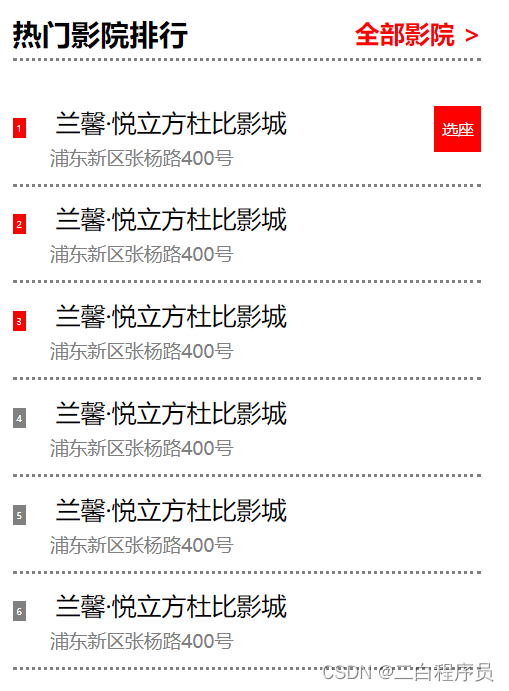
二白比较懒,文字就没有完全一样的打上去了,感兴趣的小伙伴可以自己动手试试哦~


 965
965


 被折叠的 条评论
为什么被折叠?
被折叠的 条评论
为什么被折叠?
 到【灌水乐园】发言


