实习笔记
基础
纯代码搭建步骤
删除Main.storyboard文件
删除info.plist中的如下内容
删除项目info里的
- 删除
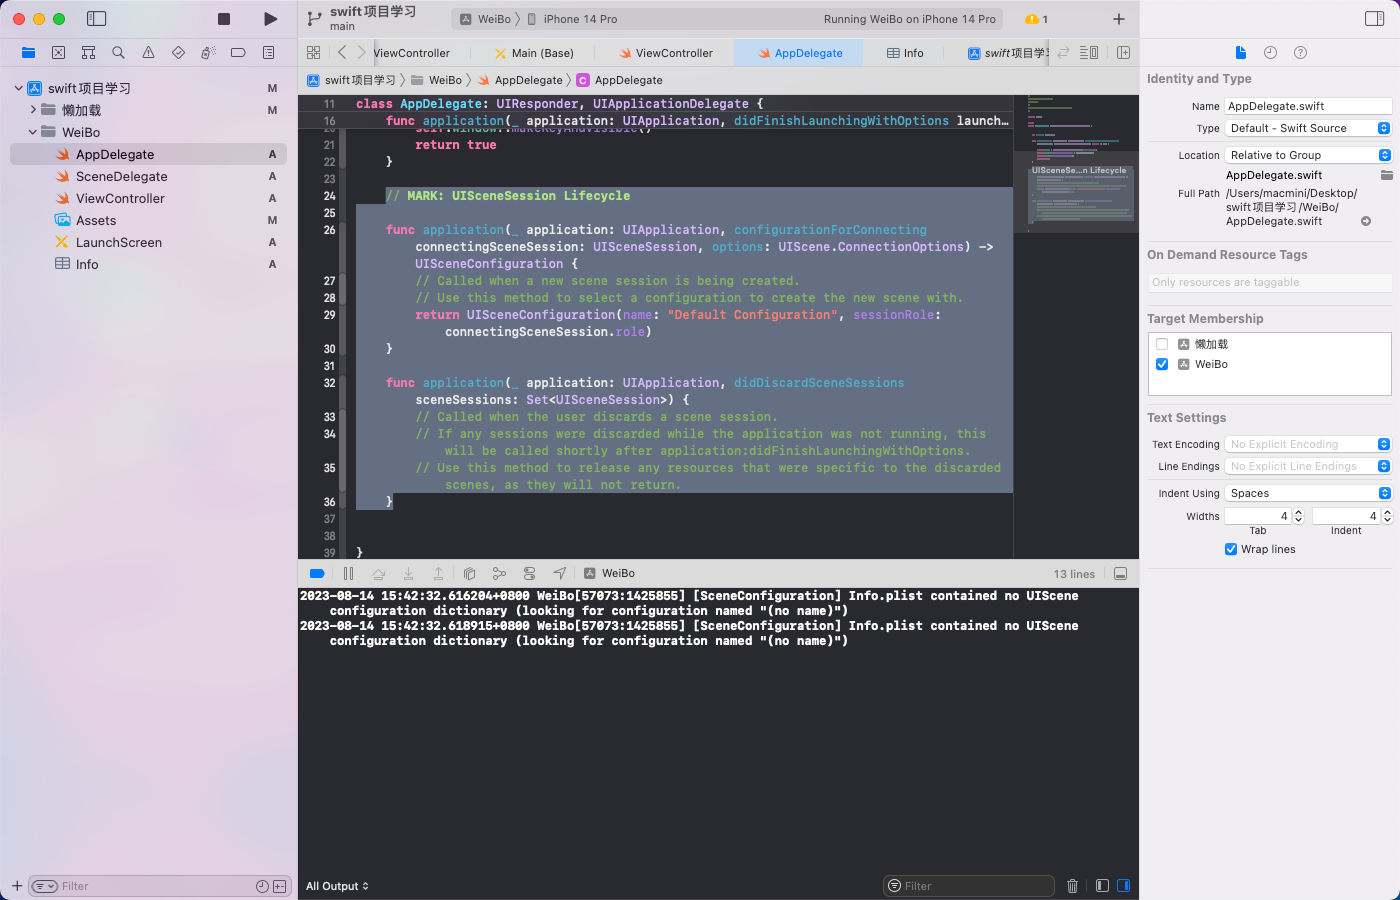
AppDelegate.swift中的如下代码
- 在
AppDelegate.swift中添加var window: UIWindow? func application(_ application: UIApplication, didFinishLaunchingWithOptions launchOptions: [UIApplication.LaunchOptionsKey: Any]?) -> Bool { self.window = UIWindow(frame: UIScreen.main.bounds) self.window?.rootViewController = ViewController() self.window?.makeKeyAndVisible() return true }
界面搭建
先创建界面需要的属性
属性的初始化
UI组件初始化
界面的布局(在此之前把UI组件addSubview进父视图)
给组件添加约束
添加响应事件
代码管理(git命令行)
本地仓库关联远程仓库
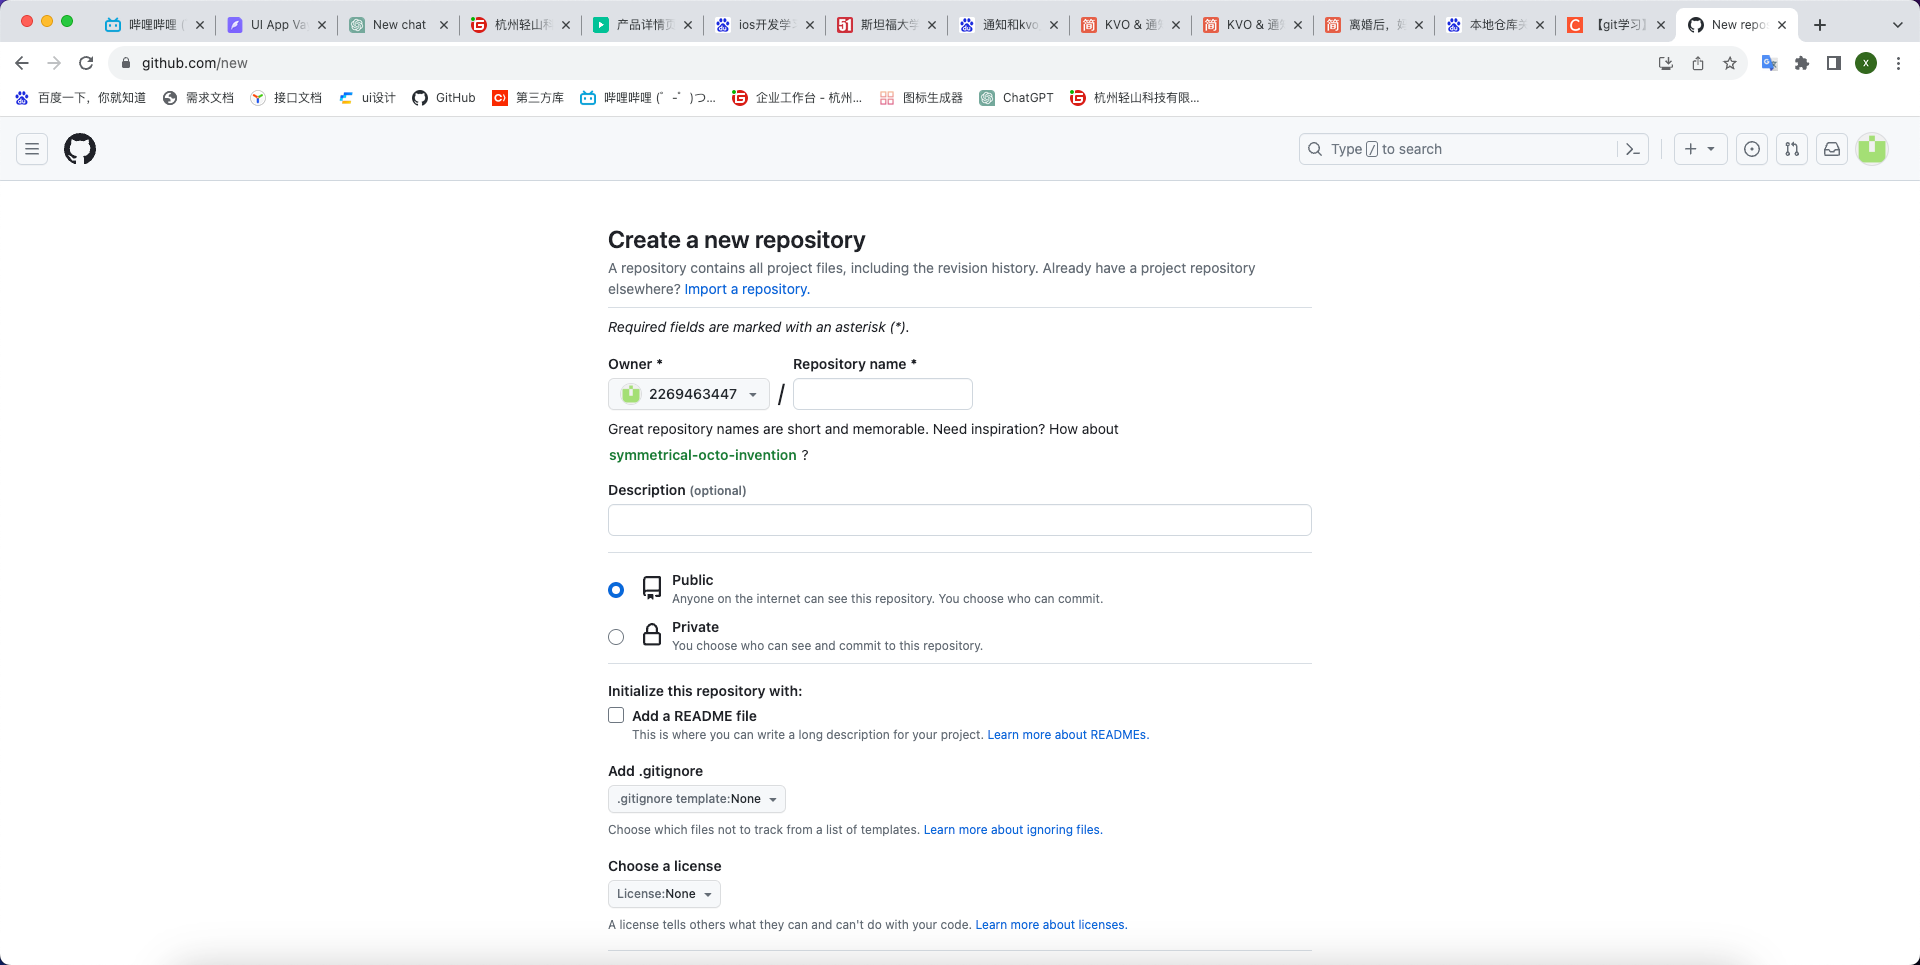
- 在远程创建仓库
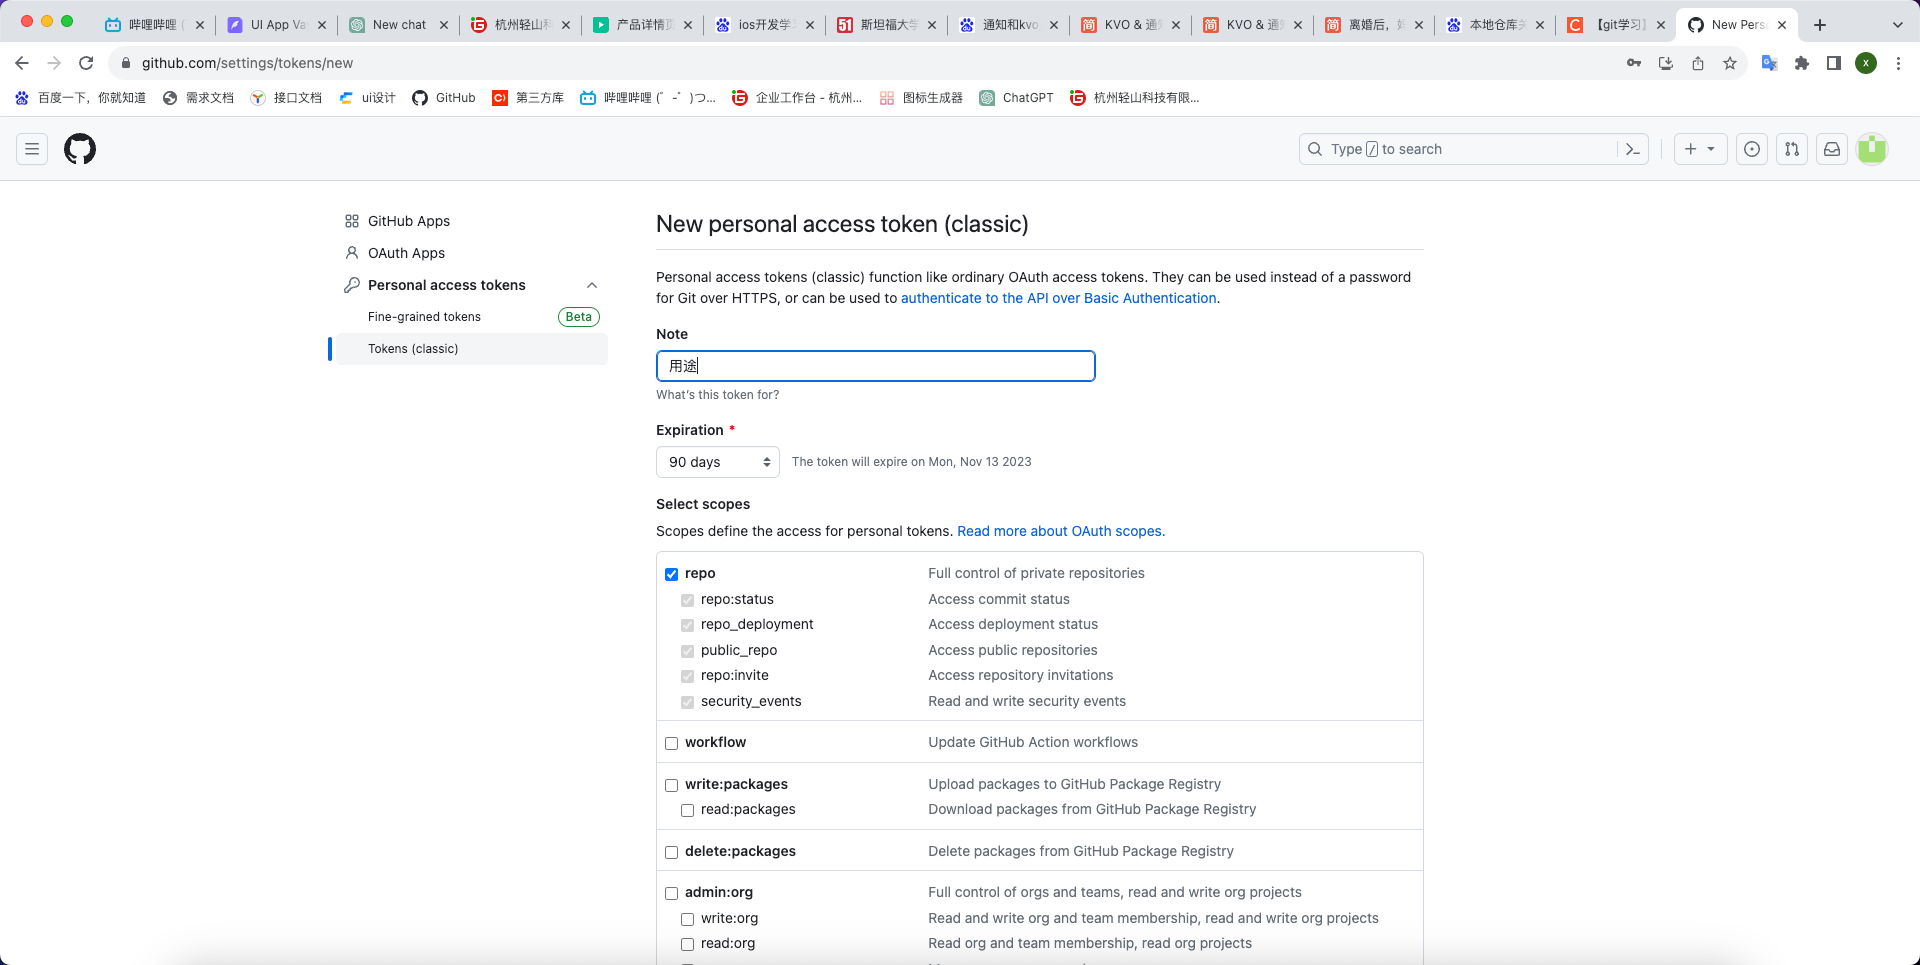
- 创建一个tokens
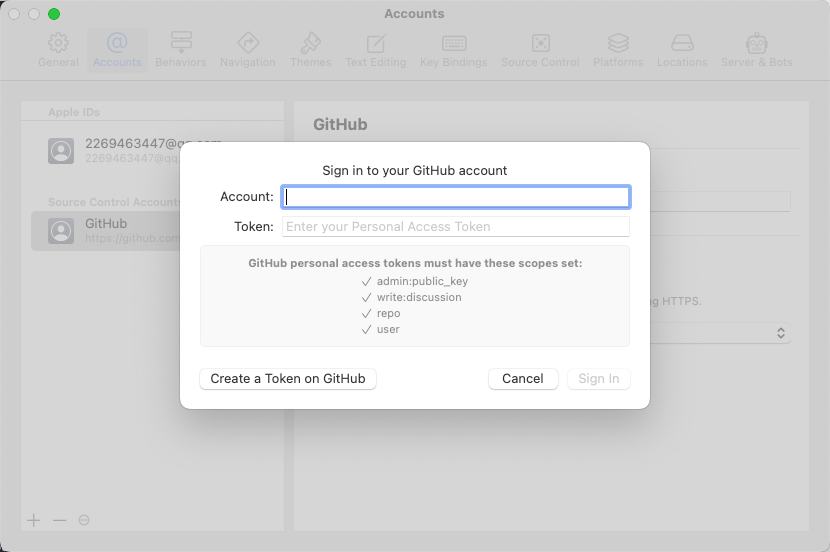
- xcode创建github账户
- 初始化本地git仓库
cd到本地仓库的文件目录下
git init
- 将本地仓库和远程仓库关联
git remote add origin 远程仓库链接地址
- 本地编辑代码后提交至远程分支
git push -u origin main
工作原理

git add //告诉Git,把文件添加到仓库
git commit //把文件提交到仓库
[外链图片转存失败,源站可能有防盗链机制,建议将图片保存下来直接上传(img-awlCRc9j-1692172949298)(./image/image-20230810112028931.png)]
-m后面输入的是本次提交的说明,可以输入任意内容,当然最好是有意义的,这样你就能从历史记录里方便地找到改动记录
git status //该命令可以让我们时刻掌握仓库当前的状态
git diff //查看具体修改了什么内容
git log //显示从最近到最远的提交日志
版本回退
首先,Git必须知道当前版本是哪个版本,在Git中,用HEAD表示当前版本,也就是最新的提交,上一个版本就是HEAD^,上上一个版本就是HEAD^^,当然往上100个版本写100个^比较容易数不过来,所以写成HEAD~100。
现在,我们要把当前版本回退到上一个版本,就可以使用git reset命令:
$ git reset --hard HEAD^
HEAD is now at e475afc add distributed
撤销回退
最新的那个版本已经看不到了,想再回去
找到那个回退前版本的commit id是1094adb...,于是就可以指定回到未来的某个版本:
$ git reset --hard 1094a
HEAD is now at 83b0afe append GPL
Git提供了一个命令git reflog用来记录你的每一次命令,通过这个命令可以查看每一次提交的commit id,只要知道commit id就可以回到某个版本
第三方库
use_frameworks!
platform :ios, '11.0'

target 'xxx' do

  pod 'Masonry' #自动布局
  pod 'MJExtension' #字典模型转换
  pod 'PromiseKit', '~> 1.7' #promise

  pod 'MBProgressHUD' #吐司
  pod 'MJRefresh' #下拉刷新组件
  pod 'MMPopupView' #可自定义的AlertView
  pod 'FDFullscreenPopGesture', :git => 'https://github.com/moliya/FDFullscreenPopGesture.git'
  pod 'EasyPlaceholderView/ObjC'

  pod 'EasyListView' #列表搭建
  pod 'KFEasyTimer' #简易倒计时
  pod 'IQKeyboardManager' #键盘管理库
  pod 'YTKNetwork' #网络请求库
  pod 'SDCycleScrollView' #轮播图
  pod 'SDWebImage' #图片缓存
  pod 'SJAttributesFactory' #富文本
  pod 'BRPickerView' #常用选择器,支持类型:日期、地址、自定义多级
  pod 'CYLTabBarController' #TabBar
  pod 'Godzippa', '~> 2.1.1'
  pod 'TTTAttributedLabel' #带链接文本

  # Debug
  pod 'FMDB', :configurations => ['Debug']
  pod 'GCDWebServer', :configurations => ['Debug']
  pod 'GCDWebServer/WebUploader', :configurations => ['Debug']
  pod 'GCDWebServer/WebDAV', :configurations => ['Debug']
  pod 'DoraemonKit', :configurations => ['Debug']
  pod 'DoraemonPlugins', :configurations => ['Debug']

end

# 解决Xcode 14的签名问题
post_install do |installer|
  installer.pods_project.targets.each do |target|
    # 针对Bundle类型的做强制不签名
    if target.respond_to?(:product_type) and target.product_type == "com.apple.product-type.bundle"
      target.build_configurations.each do |config|
        config.build_settings['CODE_SIGNING_ALLOWED'] = 'NO'
      end
    end
  end
end
oc中全局的头部文件
在此处配置
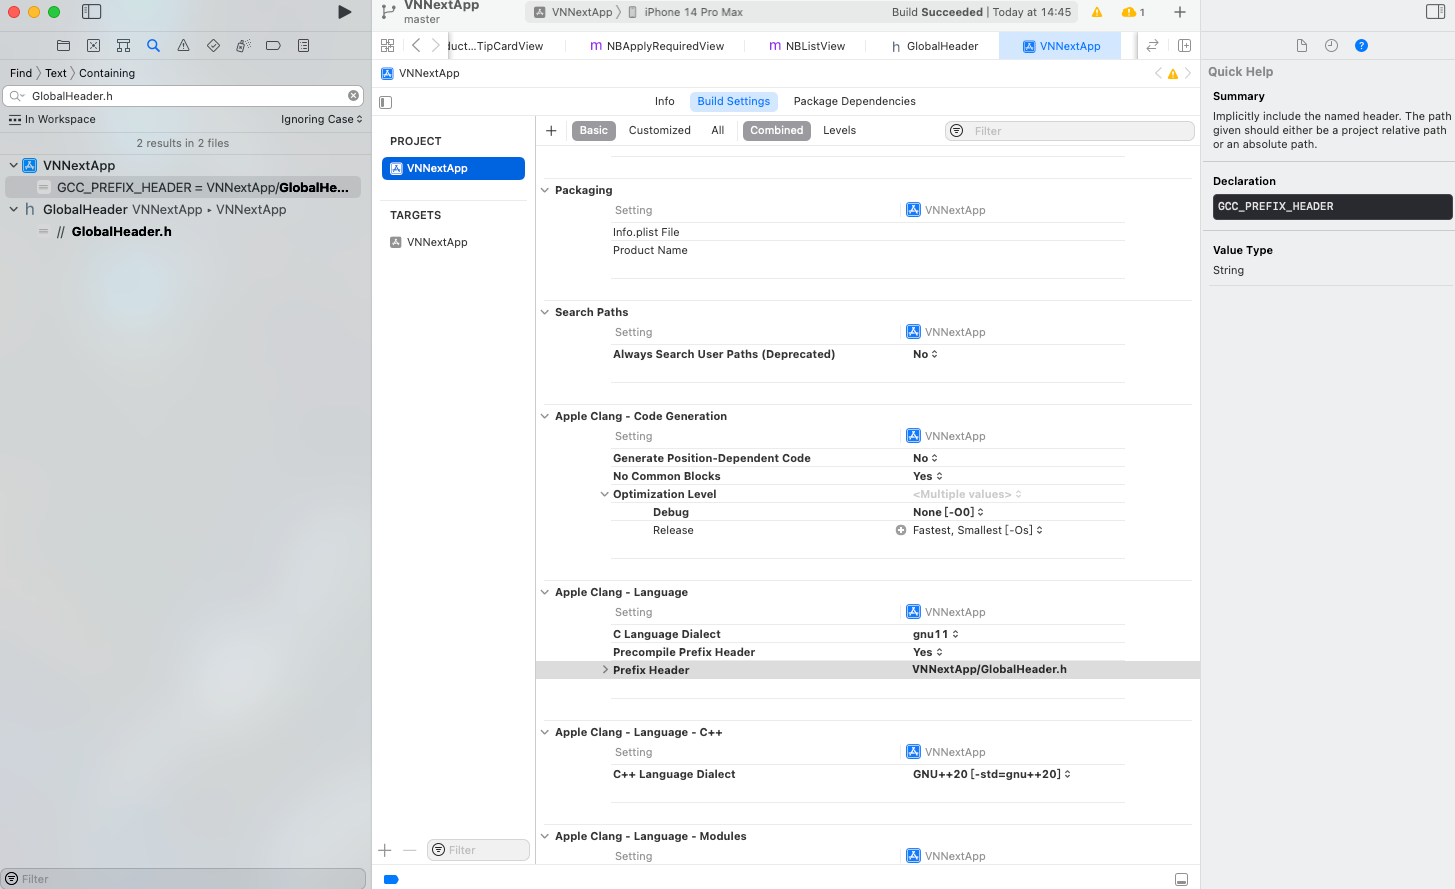
全局头部文件内容:
[外链图片转存失败,源站可能有防盗链机制,建议将图片保存下来直接上传(img-JHyqKvpW-1692172949298)(/Users/macmini/Desktop/实习笔记/image/image-20230803160246667.png)]
对颜色的处理
颜色转图片
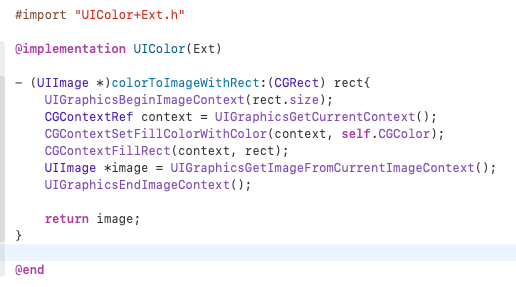
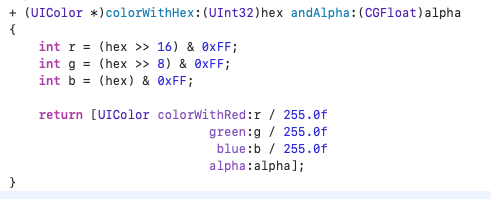
16进制的颜色处理
#import "UIColor+Ext.h"
@implementation UIColor (Hex)

- (UIImage *)colorToImageWithRect:(CGRect) rect{
  UIGraphicsBeginImageContext(rect.size);
  CGContextRef context = UIGraphicsGetCurrentContext();
  CGContextSetFillColorWithColor(context, self.CGColor);
  CGContextFillRect(context, rect);
  UIImage *image = UIGraphicsGetImageFromCurrentImageContext();
  UIGraphicsEndImageContext();
  return image;
}

+ (UIColor *)colorWithHex:(UInt32)hex andAlpha:(CGFloat)alpha
{
    int r = (hex >> 16) & 0xFF;
    int g = (hex >> 8) & 0xFF;
    int b = (hex) & 0xFF;
    return [UIColor colorWithRed:r / 255.0f
                           green:g / 255.0f
                            blue:b / 255.0f
                           alpha:alpha];
}

@end


  //使用:
  view.backgroundColor = [UIColor colorWithHex:0xB8B8B8 andAlpha:1];
网络请求
二次封装
创建数据模型
写一个模型类 对应数据类型来接网络请求回来的内容
数据和模型直接的转换
第三方库 MJExtension
使用:

有多种情况:

加载占位动画
第三方库“MBProgressHUD”
带文本的加载符方法
+ (void)showHUDwithText:(NSString *)text{
    dispatch_async(dispatch_get_main_queue(), ^{
           UIWindow *window = [[[UIApplication sharedApplication] delegate] window];
           MBProgressHUD *hud = [MBProgressHUD showHUDAddedTo:window animated:YES];
           hud.mode = MBProgressHUDModeText;
           hud.label.text = text;
      			//1.5秒后隐藏
           [hud hideAnimated:YES afterDelay:1.5];
       });
}
加载和隐藏
//加载
+ (void)showLoadingHUD{
    dispatch_async(dispatch_get_main_queue(), ^{
           UIWindow *window = [[[UIApplication sharedApplication] delegate] window];
           [MBProgressHUD showHUDAddedTo:window animated:YES];
       });
}

//隐藏
+ (void)hideHUD{
    dispatch_async(dispatch_get_main_queue(), ^{
           UIWindow *window = [[[UIApplication sharedApplication] delegate] window];
           [MBProgressHUD hideHUDForView:window animated:YES];
       });
}
自动布局
第三方库"Masonry"

UIScrollView相关
顶部刷新
RefreshHeader.m文件://RefreshHeader继承自MJRefreshNormalHeader
#import "MJRefreshHeaderFooter.h"

@implementation RefreshHeader

- (void)prepare {
    [super prepare];

    self.stateLabel.textColor = [UIColor colorWithRed:0xbb/255.0 green:0xbb/255.0 blue:0xbb/255.0 alpha:1.0];
    self.stateLabel.font = [UIFont systemFontOfSize:14.0 weight:UIFontWeightLight];
    self.lastUpdatedTimeLabel.hidden = YES;
    self.ignoredScrollViewContentInsetTop = -5;
    self.automaticallyChangeAlpha = YES;
}

@end
使用:
  //给scrollView添加顶部下拉刷新控件
  //loadData是重新加载数据的方法
  self.scrollView.mj_header = [RefreshHeader headerWithRefreshingTarget:self refreshingAction:@selector(loadData)];
第三方库“EasyListView”
-
创建要加入scrollview的视图(不要设置宽度约束;但要给定高度约束,不然不会显示)
-
往列表中添加子视图
UIView *view = [[UIView alloc] init];
[scrollView easy_appendView:view];
.identifier(@"myView")//给加入的view添加标识符(可用于指定位置插入一个新的视图)
.insets(UIEdgeInsetsMake(10, 16, 0, 16))//上左下右的空隙
- 插入视图(在前:before;在后:after)
[scrollView easy_insertView:[[UITextField alloc] init] after:@"myView"];
- 删除视图
//删除@"myView"标识的视图
scrollView.easy.deleteView(@"myView", completion: nil)
//删除所有子视图
scrollView.easy.deleteAll()
自定义的NavigationBar
- .h文件
#import <UIKit/UIKit.h>

NS_ASSUME_NONNULL_BEGIN

@interface NBBaseNavigationBar : UIView
@property(nonatomic,strong)NSString* title;
@property(nonatomic,strong)UIButton* backButton;
@end

NS_ASSUME_NONNULL_END
- .m文件
#import "NBBaseNavigationBar.h"
@interface NBBaseNavigationBar ()
@property(nonatomic,strong)UILabel* titleLabel;
@end

@implementation NBBaseNavigationBar

- (instancetype)init{
    self = [super initWithFrame:CGRectMake(0, 0, kScreenWidth, kStatusBarHeight + 44)];
    if (self) {
        [self setUI];
    }
    return self;
}

- (void)setUI{

    self.titleLabel = [[UILabel alloc]init];
    self.backButton = [[UIButton alloc]init];

    [self.titleLabel setFont: [UIFont systemFontOfSize:19]];
    [self.backButton setImage:[UIImage imageNamed:@"icon_hardware_keyboard_arrow_left_24px"] forState:UIControlStateNormal];
    self.backButton.contentMode = UIViewContentModeScaleAspectFit;

    [self addSubview:self.titleLabel];
    [self addSubview:self.backButton];


    [self.backButton mas_makeConstraints:^(MASConstraintMaker *make) {
        make.width.equalTo(@50);
        make.height.equalTo(@44);
        make.left.bottom.equalTo(self);
    }];
    [self.titleLabel mas_makeConstraints:^(MASConstraintMaker *make) {
        make.height.equalTo(@44);
        make.centerX.equalTo(self);
        make.bottom.equalTo(self);
    }];
}

- (void)setTitle:(NSString *)title{
    _title = title;
    [self.titleLabel setText:title];
}

@end
自定义的TabBarController
用纯代码完成视图:
- 在AppDelegate中指定根视图
swift版:
import UIKit
@main
class AppDelegate: UIResponder, UIApplicationDelegate {

    var window: UIWindow?

    func application(_ application: UIApplication, didFinishLaunchingWithOptions launchOptions: [UIApplication.LaunchOptionsKey: Any]?) -> Bool {

        self.window = UIWindow(frame: UIScreen.main.bounds)
        self.window?.rootViewController = TabBarController()
        self.window?.makeKeyAndVisible()

        return true
    }

}
oc版本:
- (BOOL)application:(UIApplication *)application didFinishLaunchingWithOptions:(NSDictionary *)launchOptions {

    self.window = [[UIWindow alloc]init];

    NBTabBarController* tabbarVC = [[NBTabBarController alloc]init];

    [self.window setRootViewController:tabbarVC];

    return YES;
}
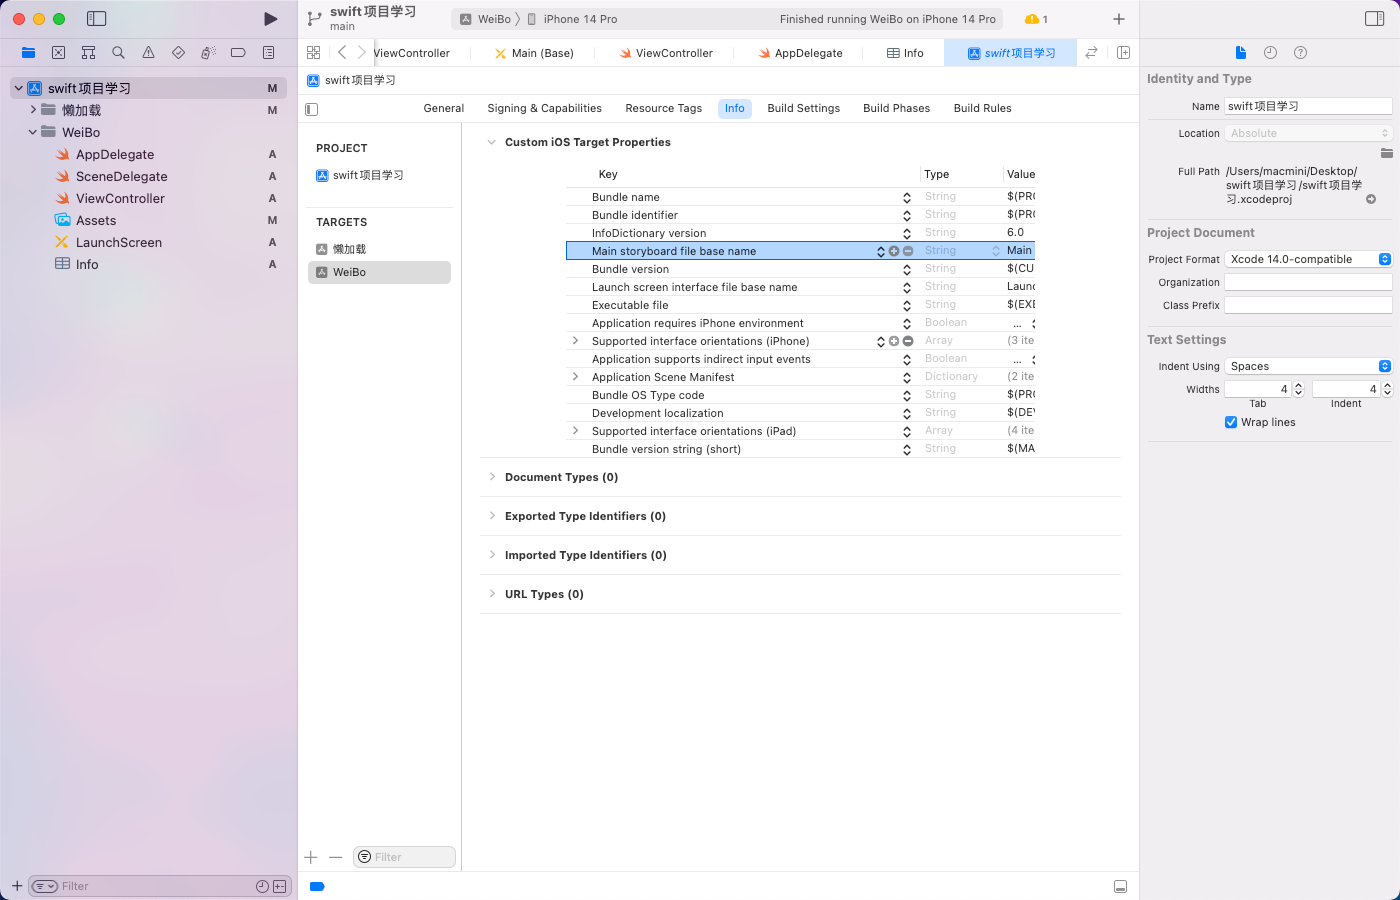
- 在info文件中改内容
[外链图片转存失败,源站可能有防盗链机制,建议将图片保存下来直接上传(img-qZoHlpHM-1692172949298)(./image/image-20230804095557400.png)]
第三方库”RAMAnimatedTabBarController“
swift版本:
import UIKit
import RAMAnimatedTabBarController

class TabBarController: RAMAnimatedTabBarController, UITabBarControllerDelegate {

    override func viewDidLoad() {
        self.tabBar.backgroundColor = #colorLiteral(red: 0.9669349747, green: 0.9669349747, blue: 0.9669349747, alpha: 1)
        commitInitView()
        addAllChildsControllors()
        super.viewDidLoad()
        self.delegate = self;
    }
}
extension TabBarController{
    fileprivate func addAllChildsControllors() {
        //首页
        addOneChildVC(childVC: HomeViewController(), title: "首页", image: UIImage(systemName: "homekit"), selecteImage: UIImage(systemName: "homekit"))
        //地图
        addOneChildVC(childVC: MapViewController(), title: "地图", image: UIImage(systemName: "location.square"), selecteImage: UIImage(systemName: "location.square"))
        //我的
        addOneChildVC(childVC: MineViewController(), title: "我的", image: UIImage(systemName: "person"), selecteImage: UIImage(systemName: "person"))


    }

    //添加一个控制器
    private func addOneChildVC(childVC: UIViewController, title: String?, image: UIImage?, selecteImage: UIImage?) {

        //1.添加子控制器
        let navVC = UINavigationController(rootViewController: childVC)
        addChild(navVC)
        //2.添加标题
        let item = RAMAnimatedTabBarItem(title: title, image: image, selectedImage: selecteImage)
      	//添加动画
        item.animation = RAMBounceAnimation()
        item.textColor = .gray
        item.iconColor = .gray
        navVC.tabBarItem = item


    }
    func commitInitView() {
        view.backgroundColor = .white
//        tabBar.isTranslucent = false
//        tabBar.barTintColor = .white
//        tabBar.tintColor = .blue
//        tabBar.unselectedItemTintColor = .gray
    }
}
第三方库”CYLTabBarController“
oc版本:
self.delegate = self;
//正常状态下字体颜色
NSDictionary *normalTextAttributes = @{
        NSForegroundColorAttributeName: [UIColor colorWithRed:1.0 green:1.0 blue:1.0 alpha:1.0]
    };
//选中状态下字体颜色
NSDictionary *selectedTextAttributes = @{
        NSForegroundColorAttributeName: [UIColor colorWithRed:1.0 green:1.0 blue:0.274 alpha:1.0]
    };

// 设置未选中及选中文字的颜色
UITabBarItemAppearance *layoutAppearance = [[UITabBarItemAppearance alloc] init];
[layoutAppearance.normal setTitleTextAttributes:normalTextAttributes];
[layoutAppearance.selected setTitleTextAttributes:selectedTextAttributes];

UITabBarAppearance *appearance = [[UITabBarAppearance alloc] init];
[appearance configureWithOpaqueBackground];


//两个数组里分别放了item和各自的视图控制器
NSMutableArray<NSDictionary *> *itemAttributes = [NSMutableArray array];
NSMutableArray<UIViewController *> *viewControllers = [NSMutableArray array];

//分别给两个数组里添加内容
[itemAttributes addObject:@{
        CYLTabBarItemTitle: @"标题",
        CYLTabBarItemImage: @"为被选中时的图标",
        CYLTabBarItemSelectedImage: @"被选中时的图标"
}];
[viewControllers addObject:[[UINavigationController alloc] initWithRootViewController:[[HomePageController alloc] init]]];


//添加动画

- (void)tabBarController:(UITabBarController *)tabBarController didSelectControl:(UIControl *)control{
    if ([control isKindOfClass:NSClassFromString(@"UITabBarButton")]) {
        for (UIView *subView in control.subviews) {
            if ([subView isKindOfClass:NSClassFromString(@"UITabBarSwappableImageView")]) {
                UIView *animationView = subView;
                // 为其他按钮添加「缩放动画」
                [self addScaleAnimationOnView:animationView repeatCount:1];
            }
        }
    }
}
    // 缩放动画
- (void)addScaleAnimationOnView:(UIView *)animationView repeatCount:(float)repeatCount {
        //需要实现的帧动画,这里根据需求自定义
        CAKeyframeAnimation *animation = [CAKeyframeAnimation animation];
        animation.keyPath = @"transform.scale";
         animation.values = @[@1.0,@1.3,@0.9,@1.15,@0.95,@1.02,@1.0];
        animation.duration = 0.5;
        animation.repeatCount = repeatCount;
        animation.calculationMode = kCAAnimationCubic;
        [animationView.layer addAnimation:animation forKey:nil];
}
键盘管理器
第三方库“IQKeyboardManager”
使用:
[IQKeyboardManager.sharedManager setEnable:YES];
[IQKeyboardManager.sharedManager setToolbarDoneBarButtonItemText:@"完成"];
IQKeyboardManager.shared.enable = true
IQKeyboardManager.shared.toolbarDoneBarButtonItemText = "完成"
效果:

图片压缩
#import "UIImage+Ext.h"

@implementation UIImage (Ext)
+ (NSData *)reSizeImageDataWithImage:(UIImage *)sourceImage maxImageSize:(CGFloat)maxImageSize maxSizeWithKB:(CGFloat)maxSize {
    if (maxSize <= 0.0) maxSize = 1024.0;
    if (maxImageSize <= 0.0) maxImageSize = 1024.0;

    //先调整分辨率
    CGSize newSize = CGSizeMake(sourceImage.size.width, sourceImage.size.height);

    CGFloat tempHeight = newSize.height / maxImageSize;
    CGFloat tempWidth = newSize.width / maxImageSize;

    if (tempWidth > 1.0 && tempWidth > tempHeight) {
        newSize = CGSizeMake(sourceImage.size.width / tempWidth, sourceImage.size.height / tempWidth);
    }
    else if (tempHeight > 1.0 && tempWidth < tempHeight){
        newSize = CGSizeMake(sourceImage.size.width / tempHeight, sourceImage.size.height / tempHeight);
    }

    UIGraphicsBeginImageContext(newSize);
    [sourceImage drawInRect:CGRectMake(0,0,newSize.width,newSize.height)];
    UIImage *newImage = UIGraphicsGetImageFromCurrentImageContext();
    UIGraphicsEndImageContext();

    //调整大小
    NSData *imageData = UIImageJPEGRepresentation(newImage,1.0);
    CGFloat sizeOriginKB = imageData.length / 1024.0;

    CGFloat resizeRate = 0.9;
    while (sizeOriginKB > maxSize && resizeRate > 0.1) {
        imageData = UIImageJPEGRepresentation(newImage,resizeRate);
        sizeOriginKB = imageData.length / 1024.0;
        resizeRate -= 0.1;
    }

    return imageData;
}

@end
使用:
NSData *data = [FileManager reSizeImageDataWithImage:image maxImageSize:2048 maxSizeWithKB:512];
多线程
GCD
- 1 串行队列,同步执行 不开新线程,任务是按顺序执行
-(void) demo1{
    dispatch_queue_t queue = dispatch_queue_create("串行对列", DISPATCH_QUEUE_SERIAL);
    for(int i=0;i<10;i++){
        dispatch_sync(queue, ^{
            NSLog(@"Thread:%d %@",i,[NSThread currentThread]);
        });
    }
}

- 2 串行队列,异步执行 开启新线程(1个),任务是有序执行
-(void) demo2{
    dispatch_queue_t queue = dispatch_queue_create("并行对列", DISPATCH_QUEUE_SERIAL);
    for(int i=0;i<10;i++){
        dispatch_async(queue, ^{
            NSLog(@"Thread:%d %@",i,[NSThread currentThread]);
        });
    }
}

- 3 并行队列,同步执行 ==>等同于串行队列,同步执行(不开新线程,任务是按顺序执行)
-(void) demo3{
    dispatch_queue_t queue = dispatch_queue_create("串行对列", DISPATCH_QUEUE_CONCURRENT);
    for(int i=0;i<10;i++){
        dispatch_sync(queue, ^{
            NSLog(@"Thread:%d %@",i,[NSThread currentThread]);
        });
    }
}
- 4 并行队列,异步执行 开启多个线程,任务无序执行
-(void) demo4{
    dispatch_queue_t queue = dispatch_queue_create("串行对列", DISPATCH_QUEUE_CONCURRENT);
    for(int i=0;i<10;i++){
        dispatch_async(queue, ^{
            NSLog(@"Thread:%d %@",i,[NSThread currentThread]);
        });
    }
}

- 5 主队列,异步执行 不开线程,同步执行
-(void) demo5{
    dispatch_queue_t queue = dispatch_get_main_queue();
    for(int i=0;i<10;i++){
        dispatch_async(queue, ^{
            NSLog(@"Thread:%d %@",i,[NSThread currentThread]);
        });
    }
}
结果与串行对列同步执行相同
- 6 主队列,同步执行 死锁
-(void) demo6{
    dispatch_queue_t queue = dispatch_get_main_queue();
    for(int i=0;i<10;i++){
        dispatch_sync(queue, ^{
            NSLog(@"Thread:%d %@",i,[NSThread currentThread]);
        });
    }
}
会导致程序崩溃
- 7 解决死锁问题
-(void) demo7{
    NSLog(@"开始");
    //异步开启新的线程(这里用到了全局对列,本质就是并行对列)
    dispatch_async(dispatch_get_global_queue(0, 0), ^{
        for(int i=0;i<10;i++){
            dispatch_sync(dispatch_get_main_queue(), ^{
                NSLog(@"Thread:%d %@",i,[NSThread currentThread]);
            });
        }
    });
    NSLog(@"结束");
    //现输出开始,再输出结束,然后再执行任务
}

单例模式
static id _instance = nil;  //定义static全局变量

@implementation Singleton

+ (id) shareInstance {
	// 先判断_instance是否为空
    if (_instance == nil) {
    	// 为空则初始化
        _instance = [[self alloc] init];
    }
    // 返回实例
    return _instance;
}

@end
-
使用dispatch_once
上面方法在单线程下可以保证单例只被初始化一次;但是多线程的出现,使得在极端条件下,单例也可能返回了不同的对象。如在单例初始化完成前,多个进程同时访问单例,那么这些进程可能都获得了不同的单例对象。
苹果提供了 dispatch_once(dispatch_once_t *predicate,dispatch_block_t block);函数来避免这个问题,该函数保证相关的块必定会执行,且执行一次。此操作完全是线程安全的。
static id _instance = nil;  //定义static全局变量

@implementation Singleton

+ (id) shareInstance {
    // static修饰标记变量
    static dispatch_once_t onceToken;
    dispatch_once(&onceToken, ^{
        _instance = [[self alloc] init];
    });
    return _instance;
}

@end
- 对单例模式的完善
程序仍然可以使用[[Singleton alloc] init]来创建新对象
Singleton* p1 = [Singleton shareInstance];
Singleton* p2 = [[Singleton alloc] init];
这就违背了单例对象的原则
- 重写alloc方法
static id _instance = nil;  //定义static全局变量

@implementation Singleton

+ (id) shareInstance {
    return [[self alloc] init];
}
//重写alloc方法
+ (id) allocWithZone:(struct _NSZone *)zone {
    static dispatch_once_t onceToken;
    dispatch_once(&onceToken, ^{
        _instance = [super allocWithZone:zone];
    });
    return _instance;
}

@end
原文链接:https://blog.csdn.net/m0_63852285/article/details/125258752
懒加载
OC的懒加载
在oc中懒加载就是重写属性的getter方法,当第一次访问在getter方法里判断属性的值是否为空值,是空则进行初始化,然后返回。
@interface MyClass : NSObject

@property (nonatomic, strong) NSString *lazyProperty;

@end

#import "MyClass.h"

@implementation MyClass

- (NSString *)lazyProperty {
    if (!_lazyProperty) {
        _lazyProperty = @"Default Value"; // 在此进行初始化
    }
    return _lazyProperty;
}

@end
这样,在第一次访问 lazyProperty 时,才会执行初始化操作。这有助于避免在对象创建时立即分配资源,而是在需要时才进行初始化。
swift的懒加载
在swift中懒加载的本质是闭包,第一次访问屈性肘,会执行后面的闭包代码,将闭包的结果保存在 person 属性中下次再访问,不会再执行闭包!
lazy var lazyProperty: String = {
        // 在此进行初始化
				return "Default Value"
}()
通知和KVO机制
通知
- 在 Objective-C 中,通知(NSNotification)是一种用于在不同对象之间传递信息的机制。通知的实现原理基于观察者模式(Observer Pattern)。
// 发送通知
NSDictionary *userInfo = @{@"key": @"value"};
NSNotification *notification = [NSNotification notificationWithName:@"MyNotification" object:nil userInfo:userInfo];
[[NSNotificationCenter defaultCenter] postNotification:notification];

// 观察者注册
[[NSNotificationCenter defaultCenter] addObserver:self selector:@selector(handleNotification:) name:@"MyNotification" object:nil];

// 观察者方法实现
- (void)handleNotification:(NSNotification *)notification {
    NSDictionary *userInfo = notification.userInfo;
    NSString *value = userInfo[@"key"];
    NSLog(@"Received notification with value: %@", value);
}

// 观察者取消注册
[[NSNotificationCenter defaultCenter] removeObserver:self name:@"MyNotification" object:nil];
- 通知在 Objective-C 中可以用于实现松耦合的对象间通信,但滥用通知可能会导致代码变得复杂和难以维护。
KVO机制
- KVO(Key-Value Observing)是一种在 Objective-C 中实现观察者模式的机制,用于监听对象属性的变化。通过 KVO,一个对象可以注册对另一个对象的某个属性进行观察,当该属性发生变化时,观察者会收到通知并执行相应的方法。
//调用的方法是同一个,根据keyPath值进行判断做不同的任务!!!!!
//增加观察者
[self.textField addObserver:self forKeyPath:@"text" options:NSKeyValueObservingOptionNew context:nil];

//观察者实现监听方法
- (void)observeValueForKeyPath:(NSString *)keyPath ofObject:(id)object change:(NSDictionary<NSKeyValueChangeKey,id> *)change context:(void *)context
{
  if ([keyPath isEqualToString:@"text"]) {
  NSLog(@"文本框的内容发生改变,%@", self.textField.text);
  }
}

//调用执行方法
  [self.textField setValue:@"123" forKeyPath:@"text"]; // 文本框里面也赋值

  self.textField.text = @"asd"; // 也是可以调用的

//kvo的移除观察者
- (void)dealloc
{
  [self.inputTextField removeObserver:self forKeyPath:@"text"];
}
两者区别
KVO:提供一种机制,当指定的被观察的对象的属性被修改后,KVO会自动通知响应的观察者(KVC - 键值编码 是KVO的基础)
通知:是一种广播机制,在实践发生的时候,通过通知中心对象能够为所有关心这个事件发生的对象发送消息。
两者都是观察者模式,不同在于:
KVO 是被观察者直接发送消息给观察者,是对象间的直接交互
通知 则是两者都和通知中心对象交互,对象之间不知道彼此




 381
381

 被折叠的 条评论
为什么被折叠?


