


一.在JS中获取HTML元素
1.document.getElementById():通过标签中的id属性
<html lang="en">
<head>
    <meta charset="UTF-8">
    <title>Title</title>
    <style>
     //style 样式
        div{
            width: 100px;
            height: 50px;
            background:red;
            display: inline-block;
        }
    </style>
</head>
<body>
<div id="d1" ></div>
<div id="d2" ></div>
<div id="d3"></div>
<br>//跨行
<button onclick="fn1()">id)更改颜色</button>
<script>

    function fn1() {
        //直接使用id
        //d1.style.background="blue"
        //Element 元素(标签)
        var d=document.getElementById("d1")
        d.style.background="yellow"
    }
//两种方法效果是一样的,但是直接使用id的方法在一些低版本浏览器中不能使用,
//必须使用第二种方法

</script>
</body>
</html>
2.document.getElementsByTagName():通过标签名
<html lang="en">
<head>
    <meta charset="UTF-8">
    <title>Title</title>
    <style>
        div{
            width: 100px;
            height: 50px;
            background:red;
            display: inline-block;
        }
    </style>
</head>
<body>
<div></div>//块状标签
<div></div>
<div></div>
<br>
<button onclick="fn1()">标签更改颜色</button>
<script>

    function fn1() {
        //Element 元素(标签)
        //标签选择器 会拿出多个元素
        var ds=document.getElementsByTagName("div")
        //数组中放的是不是标签?
        //遍历数组
        /**for循环遍历
         for(var i=0;i<ds.length;i++){
            ds[i].style.background="pink"
         }
         **/
        //foreach 遍历
        for(var i of ds){
            //i就是每一个元素
            i.style.background="Purple"
        }
    }

</script>
</body>
</html>
3.document.getElementsByClassName():通过标签中的class属性
<html lang="en">
<head>
    <meta charset="UTF-8">
    <title>Title</title>
    <style>
        div{
            width: 100px;
            height: 50px;
            background:red;
            display: inline-block;
        }
    </style>
</head>
<body>
<div class="a"></div>
<div class="a"></div>
<div ></div>
<button onclick="fn1()">更改颜色</button>
<script>

    function fn1() {
        //Element 元素(标签)
        //类选择器 会拿出多个元素
        var ds = document.getElementsByClassName("a")
        for(var i of ds){
            i.style.background="yellow"
        }
    }

</script>
</body>
</html>
4.document.getElementsByName():通过标签中的name属性
使用方法与第三种一样,只要将class改为name
二.HTML元素常用事件

//举例,首先写一个输入框
//再写获得和失去焦点的事件
<input type="text" onfocus="" onblur="">
//运行后点击输入框就可以打字了,输入框就获得焦点事件
//点击输入框以外的区域,输入框不能打字了,它就失去了焦点
这些常用事件的使用方法与点击事件的使用方法一样
三.HTML元素常用属性

第一和第二种属性我在已发表的JavaScript进阶中详细的讲解过了,第三种属性valuey一般用来获取输入框的值,第四种只在单选和多选中有效,第五种我在前面的代码中有写。
看到这,我们可以写一个例题,假设有30个输入框,点击按钮,输入框获得值,再点击另一个按钮输入框的值全部更改,输入框获得焦点时清空,失去焦点输入框显示一个值
<html>
<head>
    <meta charset="UTF-8">
    <title>Title</title>
</head>
<body>
<input type="text"><input type="text"><input type="text"><input type="text"><input type="text"><input type="text"><input
        type="text"><input type="text"><input type="text"><input type="text"><input type="text"><input
        type="text"><input type="text"><input type="text"><input type="text"><input type="text"><input
        type="text"><input type="text"><input type="text"><input type="text"><input type="text"><input
        type="text"><input type="text"><input type="text"><input type="text"><input type="text"><input
        type="text"><input type="text"><input type="text"><input type="text">
<button onclick="fn1('你好')">赋值</button>
<button onclick="fn1('呵呵')">更改</button>
<script>

    function fn1(a) {
        //1.拿到所有的输入框
        var is=document.getElementsByTagName("input")
        //2.更改值
        for(var i of is){
            i.value=a
        }
    }

    //找到页面中所有的输入框
    //给所有的输入框赋值(失去焦点事件,获得焦点事件)
    (()=>{
        var is=document.getElementsByTagName("input")
        //只要碰到foreach循环 不能用var
        //使用let(定义局部变量)
        for(let i of is){
            //给元素的获得焦点事件赋值
            i.onfocus=()=>{
                i.value=""
            }
            //给元素的失去焦点事件赋值
            i.onblur=()=>{
                i.value="啊?"
            }
        }
    })();

</script>
</body>
</html>
在这个题目中foreach循环不能用var,应为使用var来定义会出现bug,不管你点击哪一个输入框,只有最后一个输入框的值会被清除,如图:

四.控制元素的显示

我们通过写一个例题了解

<html>
<head>
    <meta charset="UTF-8">
    <title>Title</title>
    <style>
        div{
            width: 100px;
            height: 100px;
            background: red;
        }
    </style>
</head>
<body>
<div id="d1"></div>
<button onclick="fn1()">点我隐藏</button>
<button onclick="fn2()">点我隐藏</button>
<hr>
<ul>
    <li><i onclick="fn3('u1')">家电</i>
        <ul id="u1">
            <li>萍乡</li>
            <li>袭击及</li>
            <li>点至</li>
        </ul>
    </li>
    <li><span onclick="fn3('u2')">水果</span>
        <ul id="u2">
            <li>冰果</li>
            <li>记挂</li>
            <li>弄罗</li>
        </ul>
    </li>
</ul>
<script>

    function fn1() {
        // document.getElementById()
        //如果显示 那么隐藏
        //如果隐藏 那么显示
        if(d1.style.display==="none"){
            d1.style.display="block"
        }else{
            d1.style.display="none"
        }
    }

    function fn2() {
        // document.getElementById()
        //如果显示 那么隐藏
        //如果隐藏 那么显示
        if(d1.style.opacity==0){
            d1.style.opacity=1
        }else{
            d1.style.opacity=0
        }
    }

</script>
</body>
</html>
两种隐藏的区别:
未隐藏:

隐藏(函数fn1(),左):
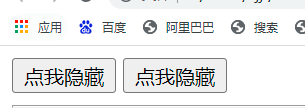
隐藏(函数fn2(),右):


 271
271


 被折叠的 条评论
为什么被折叠?
被折叠的 条评论
为什么被折叠?
 到【灌水乐园】发言


