


 本文介绍了大一学生在学习前端开发时制作的两个CSS3动画:边框旋转和小球移动。边框动画利用Grid布局、伪元素和动画关键帧实现不同颜色边框的旋转效果;移动小球则通过绝对定位、圆形边框和旋转动画让小球围绕盒模型边缘转动。这两个实例展示了CSS3在创建动态视觉效果方面的强大能力。
个人名片:
😊作者简介:一名大一在校生,web前端开发专业
🤡 个人主页:几何小超
🐼座右铭:懒惰受到的惩罚不仅仅是自己的失败,还有别人的成功。
🎅**学习目标: 坚持每一次的学习打卡,学好前端目录
1.边框动画
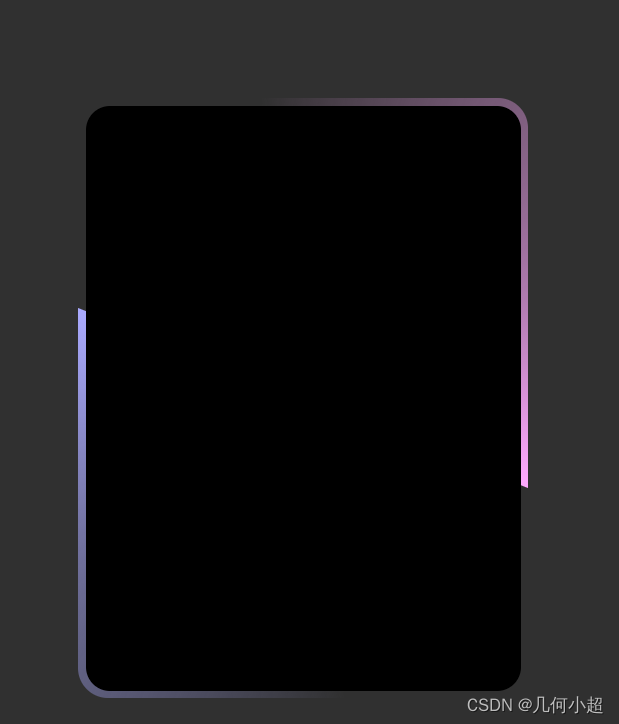
成果效果是这样子,接下来让我们一起来试试看吧
首先HTML架构先写一个div起名id选择器和类选择器都可以
那么我这里就写一个id选择器吧
<div id="box">
<span>
</span>
</div>
样式写好之后就可以开搭建我们的样式表了
我们可以先给整个屏幕设置一个背景,然后清除他的内外边距,然后我们可以使用grid布局
什么是grid的布局呢
Grid布局是CSS3中的一种新的布局方式,它可以让开发者按照行和列的方式来创建网格状的布局。
相对于传统的布局方式(如Flexbox、float等),Grid布局拥有更强大且灵活的功能,不仅能够指定每个单元格大小、位置,还能够针对整行/列进行操作。其主要优点包括:
1. 网格情况下有更好的对齐方式,包括水平和垂直方向上都可以实现对齐。
2. 在复杂布局之间切换时更容易实现。
3. 使用 Grid 布局系统我们能写出更少、更简洁、可读性更高的CSS代码。
使用Grid布局,通常需要在容器元素上设置`display: grid;`,然后通过`grid-template-rows/grid-template-columns`属性来定义行列数和每个单元格大小;再通过`grid-template-areas`属性指定每个单元格应该占据哪些行列组成;最后使用`grid-row/grid-column`属性来控制子元素在网格中的位置。
这是grid布局的常见属性标签
-
容器元素:设置
display: grid;后即可变成网格容器,里面的子元素将根据网格布局排列。 -
网格线:指定每行/列的位置。可以通过设置
grid-template-rows/grid-template-columns属性来定义行列数和每个单元格大小,也可以通过grid-template-areas属性指定每个单元格应该占据哪些行列组成。 -
子元素:使用
grid-row/grid-column属性来控制子元素在网格中的位置。
我们这里使用place-items:center,place-items: center是一种CSS Grid布局属性,用于居中网格容器内的子元素(grid items),包括水平和垂直方向,然后设置一个最小的视口高度为100vh
display: grid;
place-items: center;
min-height: 100vh;
第二部来设置我们的box
#box{
position: relative;
width: 300px;
height: 400px;
border-radius: 20px;
display: grid;
place-items: center;
overflow: hidden;
}
这样我们就设置好了这个盒子模型,接下来设置两条边框,我们这里使用两个伪元素来写
#box::before{
content: "";
position: absolute;
width: 500px;
height: 500px;
background-image: conic-gradient(transparent,transparent,transparent,#ffaaff);
animation: rotate 4s linear infinite;
}
#box::after{
content: "";
position: absolute;
width: 500px;
height: 500px;
background-image: conic-
gradient(transparent,transparent,transparent,#aaaaff);
animation: rotate 4s linear infinite;
animation-delay: -2s;
}
设置三条边为透明一边加上颜色就实现了两个边框拥有不同的颜色效果
然后还需要给我们的span元素来设置一个样式
实现这两条边框
#box span{
position: absolute;
inset: 5px;
border-radius: 16px;
background-color: #000000;
z-index: 2;
}
z-index是CSS中的一个属性,用于设置元素的堆叠顺序(stacking order)。当元素重叠时,z-index属性可以指定哪个元素应该在上面显示,以及哪个元素应该在下面隐藏。具体来说,z-index属性定义了一个层级,值越大的元素会出现在更上层。
但是呢运行出来没有显示出来效果因为我们没有加动画
这个边框的动画是这样
@keyframes rotate{
from{
transform: rotate(0deg);
}
to{
transform:rotate(360deg) ;
}
}
这个意思是旋转360deg是顺时针来旋转一周,然后给我们做动画加上动画
animation: rotate 4s linear infinite;
这里提供源码
<!DOCTYPE html>
<html>
<head>
<meta charset="utf-8" />
<title></title>
<style type="text/css">
body{
background-color: #303030;
padding: 0;
margin: 0;
display: grid;
place-items: center;
min-height: 100vh;
}
#box{
position: relative;
width: 300px;
height: 400px;
border-radius: 20px;
display: grid;
place-items: center;
overflow: hidden;
}
#box::before{
content: "";
position: absolute;
width: 500px;
height: 500px;
background-image: conic-gradient(transparent,transparent,transparent,#ffaaff);
animation: rotate 4s linear infinite;
}
#box::after{
content: "";
position: absolute;
width: 500px;
height: 500px;
background-image: conic-gradient(transparent,transparent,transparent,#aaaaff);
animation: rotate 4s linear infinite;
animation-delay: -2s;
}
#box span{
position: absolute;
inset: 5px;
border-radius: 16px;
background-color: #000000;
z-index: 2;
}
@keyframes rotate{
from{
transform: rotate(0deg);
}
to{
transform:rotate(360deg) ;
}
}
</style>
</head>
<body>
<div id="box">
<span>
</span>
</div>
</body>
</html>
2.是移动的小球动画
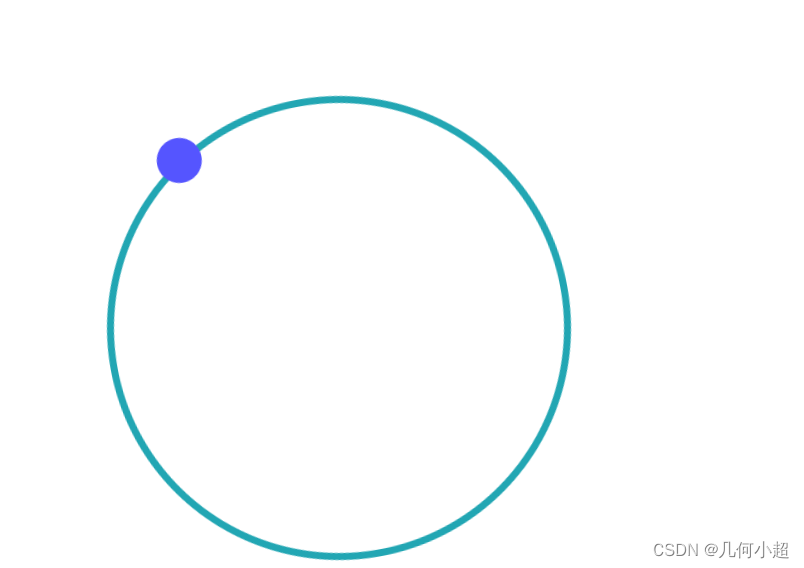
这个圆圈会围绕四周旋转
具体如何做我们试一下就知道了
第一步还是搭好框架
<div class="box"></div>
这里写一个就行,如果你想,你可以多写几个
这里来写我们样式,老规矩清除默认边距
*{
margin: 0 auto;
padding: 0;
}
然后再来设置我们box的盒子
.box{
position: relative;
width: 300px;
height: 300px;
border: 5px solid #22a6b3;
margin-top: 200px;
border-radius: 50%;
background:transparent;
animation: move 3s infinite;
}
给一个相对定位,设置宽高,加5px边框,调整一下上边距,颜色改成透明的,提前先加好动画,因为这也是一个动画的作品
然后我们来设置我们的一个小球,这里可以不需要用两个div,用伪类选择器就够
.box::before{
content: '';
position: absolute;
left: 51px;
top: 5px;
width: 30px;
height: 30px;
border-radius: 50%;
background-color: #5555ff;
}
最后就是动画和上个一样用rotate旋转360deg
@keyframes move{
from{
rotate: 0deg;
}
to{
rotate: 360deg;
}
}
最后给我们box加上动画就可以运行了,接下来源码在这,有兴趣小伙伴可以开动思维来创作自己喜欢的css动画哦
<!DOCTYPE html>
<html>
<head>
<meta charset="utf-8" />
<title></title>
<style type="text/css">
*{
margin: 0 auto;
padding: 0;
}
.box{
position: relative;
width: 300px;
height: 300px;
border: 5px solid #22a6b3;
margin-top: 200px;
border-radius: 50%;
background:transparent;
animation: move 3s infinite;
}
.box::before{
content: '';
position: absolute;
left: 51px;
top: 5px;
width: 30px;
height: 30px;
border-radius: 50%;
background-color: #5555ff;
}
@keyframes move{
from{
rotate: 0deg;
}
to{
rotate: 360deg;
}
}
</style>
</head>
<body>
<div class="box"></div>
<div class="box"></div>
<div class="box"></div>
</body>
</html>


 1166
1166

 被折叠的 条评论
为什么被折叠?
被折叠的 条评论
为什么被折叠?
 到【灌水乐园】发言


