


实验内容
编写iam.c和whoami.c
iam.c
#define __LIBRARY__
#include <unistd.h>

// 定义系统调用 iam,参数为字符串 name
_syscall1(int, iam, const char*, name);

int main(int argc, char **argv) {
    int wlen = 0;

    // 检查命令行参数数量
    if (argc < 2) {
        printf("Not enough arguments!\n");
        return -2;
    }

    // 调用系统调用 iam,传递参数 argv[1](字符串 name)
    wlen = iam(argv[1]);

    return wlen;
}
whoami.c
#define __LIBRARY__
#include <unistd.h>

// 定义系统调用 whoami,参数为字符串 name 和无符号整数 size
_syscall2(int, whoami, char*, name, unsigned int, size);

int main() {
    char s[30];
    int rlen = 0;

    // 调用系统调用 whoami,传递参数 s(字符串 name)和 30(无符号整数 size)
    rlen = whoami(s, 30);

    // 打印结果
    printf("%s\n", s);

    return rlen;
}
在内核的 include/unistd.h 添加系统调用号
#define __NR_whoami 72
#define __NR_iam    73
修改系统调用表和调用总数
# offsets within sigaction
sa_handler = 0
sa_mask = 4
sa_flags = 8
sa_restorer = 12

nr_system_calls = 74
编写who.c
who.c
#define __LIBRARY__
#include <asm/segment.h>
#include <unistd.h>
#include <errno.h>
#include <string.h>

char msg[24];  // 存储用户输入的字符串,长度为24

// 实现系统调用 iam,用于将用户空间的字符串 name 复制到内核空间的 msg 中
int sys_iam(const char *name) {
    int i;

    char tmp[30];
    for (i = 0; i < 30; i++) {
        tmp[i] = get_fs_byte(name + i);
        if (tmp[i] == '\0') break;  // 遇到字符串结束符则跳出循环
    }

    i = 0;
    while (i < 30 && tmp[i] != '\0') i++;  // 计算字符串长度
    int len = i;

    if (len > 23) {
        // 如果字符串过长,返回错误码
        return -(EINVAL);
    }

    // 将用户空间的字符串复制到内核空间的 msg 中
    strcpy(msg, tmp);
    return i;
}

// 实现系统调用 whoami,用于将内核空间的 msg 复制到用户空间的 name 中
int sys_whoami(char *name, unsigned int size) {
    int len = 0;

    // 计算 msg 的长度
    for (; msg[len] != '\0'; len++);

    if (len > size) {
        // 如果用户提供的缓冲区过小,返回错误码
        return -(EINVAL);
    }

    int i = 0;

    // 将内核空间的 msg 复制到用户空间的 name 中
    for (i = 0; i < size; i++) {
        put_fs_byte(msg[i], name + i);
        if (msg[i] == '\0') break;  // 遇到字符串结束符则跳出循环
    }

    return i;
}
修改Makefile 文件
编译运行
./iam bds
./whoami

程序测试
将iam.c和whoami.c分别编译成iam和whoami。然后将testlab2.sh和testlab2.c(位于/home/teacher目录下)拷贝到虚拟机目录oslab/hdc/usr/root。拷贝完成后,需要进行卸载挂载操作,并启动Bochs:
sudo umount hdc
./run
在Bochs中执行以下命令:
gcc -o testlab2 testlab2.c sync
./testlab2
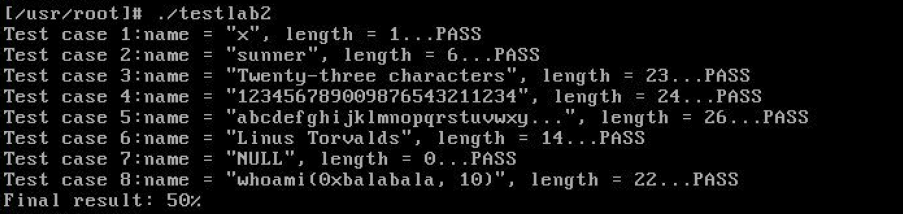
执行结果如图所示。接着执行testlab2.sh脚本,使用以下命令为脚本增加执行权限:
chmod +x testlab2.sh
然后运行:
./testlab2.sh
Q1:Linux 0.11 的系统调用参数限制和扩大限制的描述:
在 Linux 0.11 中,系统调用最多能传递3个参数。这是因为在系统调用的宏定义_syscall3(type,name,atype,a,btype,b,ctype,c)中可以看到,Linux 0.11 的系统调用通过寄存器ebx、ecx、edx传递参数,最多支持3个参数。
为了扩大参数传递的限制,可以采取以下方法:
- 使用结构体: 将多个参数封装到一个结构体中,然后将结构体的指针传递给系统调用。这样可以通过一个参数传递更多的信息。
- 使用参数数组: 将参数保存在数组中,然后将数组的地址传递给系统调用。系统调用可以根据需要访问数组中的元素。
Q2:向 Linux 0.11 添加系统调用 foo() 的步骤:
-
在
include/unistd.h中:- 添加系统调用号,例如:
#define __NR_foo 224,确保没有重复的号码。
- 添加系统调用号,例如:
-
在
kernel/system_call.s中:- 修改总调用数,即在文件中加入相应的宏定义,例如:
#define NR_syscalls 225,确保包括了新添加的系统调用。
- 修改总调用数,即在文件中加入相应的宏定义,例如:
-
在
include/linux/sys.h中:- 添加系统调用的声明,例如:
asmlinkage int sys_foo(void);
- 添加系统调用的声明,例如:
-
在
kernel/Makefile中:- 添加对新系统调用的编译规则,确保在
syscall_table.o中包含了新系统调用的地址。
- 添加对新系统调用的编译规则,确保在
-
在内核文件中实现新系统调用,例如:
kernel/foo.c。- 编写系统调用的具体实现,例如:
asmlinkage int sys_foo(void) { /* 实现代码 */ }。
- 编写系统调用的具体实现,例如:
-
重新编译系统:
- 运行
make all重新编译内核,确保包含了新的系统调用。 - 使用
gcc编译用户态程序,确保调用了新添加的系统调用,例如:gcc -o test_program test_program.c -D__NR_foo=224。
- 运行


 402
402


 被折叠的 条评论
为什么被折叠?
被折叠的 条评论
为什么被折叠?
 到【灌水乐园】发言


