


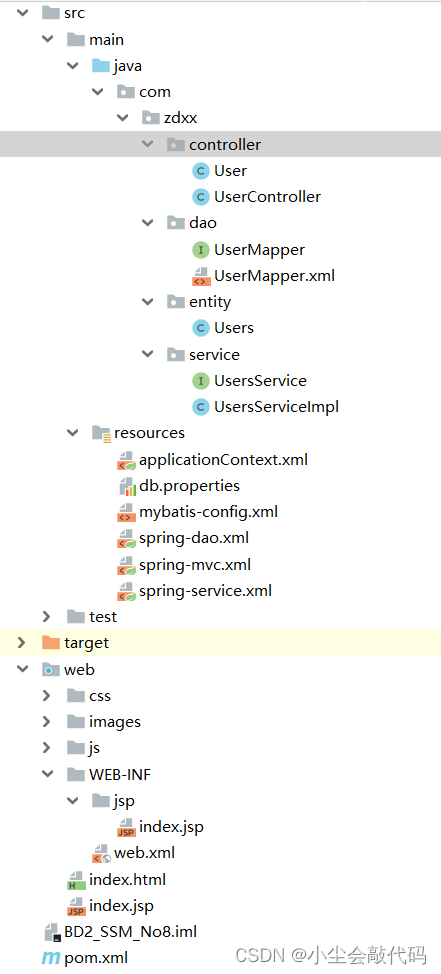
目录结构
第一步:引入相关依赖
pom.xml:
依赖:
 <!--Junit-->
        <dependency>
            <groupId>junit</groupId>
            <artifactId>junit</artifactId>
            <version>4.12</version>
        </dependency>
        <!--数据库驱动-->
        <dependency>
            <groupId>mysql</groupId>
            <artifactId>mysql-connector-java</artifactId>
            <version>8.0.28</version>
        </dependency>
        <!-- 数据库连接池 -->
        <dependency>
            <groupId>com.mchange</groupId>
            <artifactId>c3p0</artifactId>
            <version>0.9.5.2</version>
        </dependency>

        <!--Servlet - JSP -->
        <dependency>
            <groupId>javax.servlet</groupId>
            <artifactId>servlet-api</artifactId>
            <version>2.5</version>
        </dependency>
        <dependency>
            <groupId>javax.servlet.jsp</groupId>
            <artifactId>jsp-api</artifactId>
            <version>2.2</version>
        </dependency>
        <dependency>
            <groupId>javax.servlet</groupId>
            <artifactId>jstl</artifactId>
            <version>1.2</version>
        </dependency>

        <!--Mybatis-->
        <dependency>
            <groupId>org.mybatis</groupId>
            <artifactId>mybatis</artifactId>
            <version>3.5.2</version>
        </dependency>
        <dependency>
            <groupId>org.mybatis</groupId>
            <artifactId>mybatis-spring</artifactId>
            <version>2.0.2</version>
        </dependency>

        <!--Spring-->
        <dependency>
            <groupId>org.springframework</groupId>
            <artifactId>spring-webmvc</artifactId>
            <version>5.1.9.RELEASE</version>
        </dependency>

        <dependency>
            <groupId>org.springframework</groupId>
            <artifactId>spring-web</artifactId>
            <version>5.1.9.RELEASE</version>
        </dependency>

        <dependency>
            <groupId>org.springframework</groupId>
            <artifactId>spring-jdbc</artifactId>
            <version>5.1.9.RELEASE</version>
        </dependency>

        <!-- https://mvnrepository.com/artifact/org.projectlombok/lombok -->
        <dependency>
            <groupId>org.projectlombok</groupId>
            <artifactId>lombok</artifactId>
            <version>1.18.8</version>
        </dependency>
资源过滤:
<build>
        <resources>
            <resource>
                <directory>src/main/java</directory>
                <includes>
                    <include>**/*.properties</include>
                    <include>**/*.xml</include>
                </includes>
                <filtering>false</filtering>
            </resource>
            <resource>
                <directory>src/main/resources</directory>
                <includes>
                    <include>**/*.properties</include>
                    <include>**/*.xml</include>
                </includes>
                <filtering>false</filtering>
            </resource>
        </resources>
        <finalName>MavenSSM</finalName>
        <pluginManagement><!-- lock down plugins versions to avoid using Maven defaults (may be moved to parent pom) -->
            <plugins>
                <plugin>
                    <artifactId>maven-clean-plugin</artifactId>
                    <version>3.1.0</version>
                </plugin>
                <!-- see http://maven.apache.org/ref/current/maven-core/default-bindings.html#Plugin_bindings_for_war_packaging -->
                <plugin>
                    <artifactId>maven-resources-plugin</artifactId>
                    <version>3.0.2</version>
                </plugin>
                <plugin>
                    <artifactId>maven-compiler-plugin</artifactId>
                    <version>3.8.0</version>
                </plugin>
                <plugin>
                    <artifactId>maven-surefire-plugin</artifactId>
                    <version>2.22.1</version>
                </plugin>
                <plugin>
                    <artifactId>maven-war-plugin</artifactId>
                    <version>3.2.2</version>
                </plugin>
                <plugin>
                    <artifactId>maven-install-plugin</artifactId>
                    <version>2.5.2</version>
                </plugin>
                <plugin>
                    <artifactId>maven-deploy-plugin</artifactId>
                    <version>2.8.2</version>
                </plugin>
            </plugins>
        </pluginManagement>
    </build>
第二步:配置Spring
spring-dao.xml
<?xml version="1.0" encoding="UTF-8"?>
<beans xmlns="http://www.springframework.org/schema/beans"
       xmlns:xsi="http://www.w3.org/2001/XMLSchema-instance"
       xmlns:context="http://www.springframework.org/schema/context"
       xsi:schemaLocation="http://www.springframework.org/schema/beans
       http://www.springframework.org/schema/beans/spring-beans.xsd
       http://www.springframework.org/schema/context
       https://www.springframework.org/schema/context/spring-context.xsd">

    <!-- 配置整合mybatis -->
    <!-- 1.关联数据库文件 -->
    <context:property-placeholder location="classpath:db.properties"/>

    <!-- 2.数据库连接池 -->
    <!--数据库连接池
        dbcp 半自动化操作 不能自动连接
        c3p0 自动化操作(自动的加载配置文件 并且设置到对象里面)
    -->
    <bean id="dataSource" class="com.mchange.v2.c3p0.ComboPooledDataSource">
        <!-- 配置连接池属性 -->
        <property name="driverClass" value="${jdbc.driver}"/>
        <property name="jdbcUrl" value="${jdbc.url}"/>
        <property name="user" value="${jdbc.username}"/>
        <property name="password" value="${jdbc.password}"/>

        <!-- c3p0连接池的私有属性 -->
        <property name="maxPoolSize" value="30"/>
        <property name="minPoolSize" value="10"/>
        <!-- 关闭连接后不自动commit -->
        <property name="autoCommitOnClose" value="false"/>
        <!-- 获取连接超时时间 -->
        <property name="checkoutTimeout" value="10000"/>
        <!-- 当获取连接失败重试次数 -->
        <property name="acquireRetryAttempts" value="2"/>
    </bean>

    <!-- 3.配置SqlSessionFactory对象 -->
    <bean id="sqlSessionFactory" class="org.mybatis.spring.SqlSessionFactoryBean">
        <!-- 注入数据库连接池 -->
        <property name="dataSource" ref="dataSource"/>
        <!-- 配置MyBaties全局配置文件:mybatis-config.xml -->
        <property name="configLocation" value="classpath:mybatis-config.xml"/>
    </bean>

    <!-- 4.配置扫描Dao接口包,动态实现Dao接口注入到spring容器中 -->
    <!--解释 :https://www.cnblogs.com/jpfss/p/7799806.html-->
    <bean class="org.mybatis.spring.mapper.MapperScannerConfigurer">
        <!-- 注入sqlSessionFactory -->
        <property name="sqlSessionFactoryBeanName" value="sqlSessionFactory"/>
        <!-- 给出需要扫描Dao接口包 -->
        <property name="basePackage" value="com.zdxx.dao"/>
    </bean>

</beans>
spring- service.xml
<?xml version="1.0" encoding="UTF-8"?>
<beans xmlns="http://www.springframework.org/schema/beans"
       xmlns:xsi="http://www.w3.org/2001/XMLSchema-instance"
       xmlns:context="http://www.springframework.org/schema/context"
       xsi:schemaLocation="http://www.springframework.org/schema/beans
   http://www.springframework.org/schema/beans/spring-beans.xsd
   http://www.springframework.org/schema/context
   http://www.springframework.org/schema/context/spring-context.xsd">

    <!-- 扫描service相关的bean -->
    <context:component-scan base-package="com.zdxx.service" />

    <!--UsersServiceImpl注入到IOC容器中-->
    <bean id="UsersServiceImpl" class="com.zdxx.service.UsersServiceImpl">
        <!--要先有setter方法-->
        <!--<property name="UsersMapper" ref="UsersMapper"/>-->
    </bean>

    <!-- 配置事务管理器 -->
    <bean id="transactionManager" class="org.springframework.jdbc.datasource.DataSourceTransactionManager">
        <!-- 注入数据库连接池 -->
        <property name="dataSource" ref="dataSource" />
    </bean>

</beans>
第三步:配置MyBatis
mybatis-config.xml
<?xml version="1.0" encoding="UTF-8" ?>
<!DOCTYPE configuration
        PUBLIC "-//mybatis.org//DTD Config 3.0//EN"
        "http://mybatis.org/dtd/mybatis-3-config.dtd">
<configuration>
    <typeAliases>
        <package name="com.zdxx.entity"/>
    </typeAliases>
    <mappers>
        <mapper resource="com/zdxx/dao/UserMapper.xml"/>
    </mappers>
</configuration>
db.properties(用来存放数据库的连接基本信息,方便spring整合)
jdbc.driver=com.mysql.cj.jdbc.Driver
jdbc.url=jdbc:mysql:///eternal_library?useSSL=true&useUnicode=true&characterEncoding=utf8
jdbc.username=root
jdbc.password=123456
第四步:配置Spring MVC
spring-mvc.xml
<?xml version="1.0" encoding="UTF-8"?>
<beans xmlns="http://www.springframework.org/schema/beans"
       xmlns:xsi="http://www.w3.org/2001/XMLSchema-instance"
       xmlns:context="http://www.springframework.org/schema/context"
       xmlns:mvc="http://www.springframework.org/schema/mvc"
       xsi:schemaLocation="http://www.springframework.org/schema/beans
   http://www.springframework.org/schema/beans/spring-beans.xsd
   http://www.springframework.org/schema/context
   http://www.springframework.org/schema/context/spring-context.xsd
   http://www.springframework.org/schema/mvc
   https://www.springframework.org/schema/mvc/spring-mvc.xsd">

    <!-- 配置SpringMVC -->
    <!-- 1.开启SpringMVC注解驱动 -->
    <mvc:annotation-driven />
    <!-- 2.静态资源默认servlet配置-->
    <mvc:default-servlet-handler/>

    <!-- 3.配置jsp 显示ViewResolver视图解析器 -->
    <bean class="org.springframework.web.servlet.view.InternalResourceViewResolver">
        <property name="viewClass" value="org.springframework.web.servlet.view.JstlView" />
        <property name="prefix" value="/WEB-INF/jsp/" />
        <property name="suffix" value=".jsp" />
    </bean>

    <!-- 4.扫描web相关的bean -->
    <context:component-scan base-package="com.zdxx.controller" />

</beans>
第五步:编写Dao层
使用MyBatis 提供的API 和 SQL 语句,编写数据访问层的代码
UserMapper(这是一个接口)
package com.zdxx.dao;

import com.zdxx.entity.Users;
import org.omg.CORBA.INTERNAL;

public interface UserMapper {
    //添加一个用户
    int addUser(Users users);

    //登录用户
    int checkUser(String name, String password);
}
UserMapper.xml
<?xml version="1.0" encoding="UTF-8" ?>
<!DOCTYPE mapper
        PUBLIC "-//mybatis.org//DTD Mapper 3.0//EN"
        "http://mybatis.org/dtd/mybatis-3-mapper.dtd">
<mapper namespace="com.zdxx.dao.UserMapper">
    <insert id="addUser" parameterType="Users">
        insert into eternal_library.user (name, password)
        values (#{name},#{password});
    </insert>

    <select id="checkUser" resultType="Integer" >
        select count(*) from eternal_library.user
        where name = #{arg0} and password = #{arg1};
    </select>
</mapper>
第六步:编写Service层
编写业务层逻辑处理代码,调用Dao层的方法获取数据
UsersService(接口)
package com.zdxx.service;

import com.zdxx.entity.Users;

public interface UsersService {
    //添加一个用户
    int addUser(Users users);
    //登录用户
    int checkUser(String name, String password);
}
UsersServiceImpl(实现类)
package com.zdxx.service;

import com.zdxx.dao.UserMapper;
import com.zdxx.entity.Users;
import org.springframework.stereotype.Service;

import javax.annotation.Resource;

@Service("UsersServiceImpl")
public class UsersServiceImpl  implements UsersService {
    @Resource
    UserMapper userMapeer;

    @Override
    public int addUser(Users users) {
        return userMapeer.addUser(users);
    }

    @Override
    public int checkUser(String name, String password) {
        return userMapeer.checkUser(name,password);
    }
}
第七步:编写Controller层
编辑控制器的代码,处理用户请求和响应,调用Service层的方法返回结果
User
package com.zdxx.controller;

import com.zdxx.entity.Users;
import com.zdxx.service.UsersServiceImpl;
import org.springframework.stereotype.Controller;
import org.springframework.ui.Model;
import org.springframework.web.bind.annotation.RequestMapping;


import javax.annotation.Resource;

@Controller
@RequestMapping("/User")
public class User {

    @Resource(name = "UsersServiceImpl")
    UsersServiceImpl usersService;

    @RequestMapping("/verifyUser")//Verify ---验证注册
    public String verifyUser(Users users, Model model){


        int i=usersService.addUser(users);
        System.out.println("检查i的值"+i);

        if (i>0){
            model.addAttribute("name",users.getName());
            return "index";
        }else {
            return "404";
        }
    }
    @RequestMapping("/checkUser")
    public String checkUser(String name, String password, Model model){

        int i=usersService.checkUser(name,password);

        System.out.println("检查 i 的值"+i);
        if (i>0){
            model.addAttribute("name",name);
            return "index";
        }else {
            return "404";
        }
    }

}
第八步:配置web.xml
<?xml version="1.0" encoding="UTF-8"?>
<web-app xmlns="http://xmlns.jcp.org/xml/ns/javaee"
         xmlns:xsi="http://www.w3.org/2001/XMLSchema-instance"
         xsi:schemaLocation="http://xmlns.jcp.org/xml/ns/javaee http://xmlns.jcp.org/xml/ns/javaee/web-app_4_0.xsd"
         version="4.0">


<!--DispatcherServlet-->
<servlet>
    <servlet-name>DispatcherServlet</servlet-name>
    <servlet-class>org.springframework.web.servlet.DispatcherServlet</servlet-class>
    <init-param>
        <param-name>contextConfigLocation</param-name>
        <!--一定要注意:我们这里加载的是总的配置文件,之前被这里坑了!-->
        <param-value>classpath:applicationContext.xml</param-value>
    </init-param>
    <load-on-startup>1</load-on-startup>
</servlet>
<servlet-mapping>
    <servlet-name>DispatcherServlet</servlet-name>
    <url-pattern>/</url-pattern>
</servlet-mapping>

<!--encodingFilter-->
<filter>
    <filter-name>encodingFilter</filter-name>
    <filter-class>
        org.springframework.web.filter.CharacterEncodingFilter
    </filter-class>
    <init-param>
        <param-name>encoding</param-name>
        <param-value>utf-8</param-value>
    </init-param>
</filter>
<filter-mapping>
    <filter-name>encodingFilter</filter-name>
    <url-pattern>/*</url-pattern>
</filter-mapping>


<welcome-file-list>
    <welcome-file>index.html</welcome-file>
</welcome-file-list>

</web-app>
第九步:编写jsp页面
根据自身需求,自行编写即可
一些小的细节:
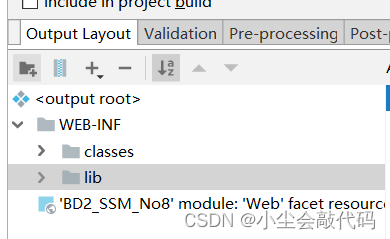
Artifacts工件也要有包,Tomcat跑不起来,多半是这个的问题


 306
306


 被折叠的 条评论
为什么被折叠?
被折叠的 条评论
为什么被折叠?
 到【灌水乐园】发言


