


1. Spring Security 简介
Spring Security 是一个高度可定制的身份验证和访问控制框架,它基于 Spring 框架,并可与 Spring 全家桶无缝集成。该框架可以精确控制用户对应用程序的访问,控制用户的角色和权限等。
Spring Security 最早是由 Ben Alex 开发,2004年时首次发布。它的前身是 Acegi Security Framework。
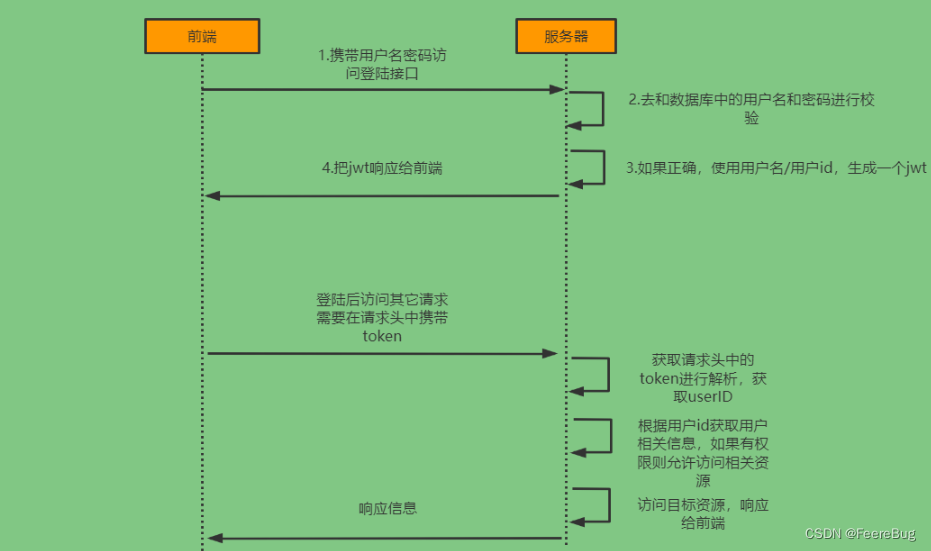
2. 认证
2.1 登陆校验流程
2.2 原理初探
想要知道如何实现自己的登陆流程就必须要先知道入门案例中SpringSecurity的流程。
2.2.1 SpringSecurity完整流程
SpringSecurity的原理其实就是一个过滤器链,内部包含了提供各种功能的过滤器。这里我们可以看看入门案例中的过滤器。
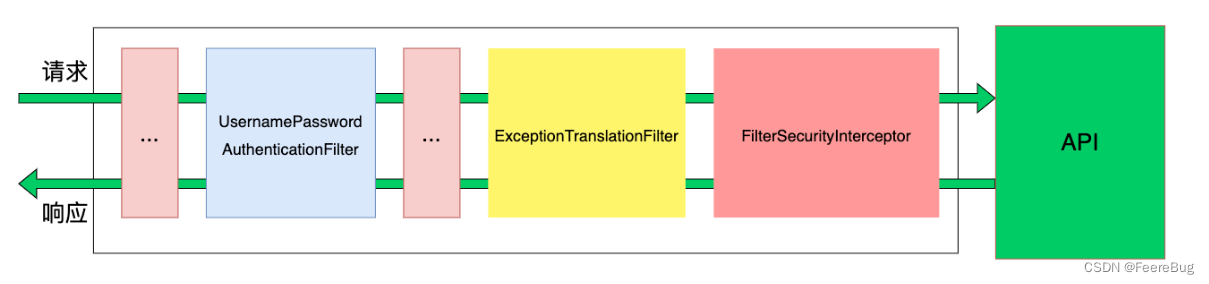
图中只展示了核心过滤器,其它的非核心过滤器并没有在图中展示。
- UsernamePasswordAuthenticationFilter:负责处理我们在登陆页面填写了用户名密码后的登陆请求。入门案例的认证工作主要有它负责。
- ExceptionTranslationFilter:处理过滤器链中抛出的任何AccessDeniedException和AuthenticationException。
- FilterSecurityInterceptor:负责权限校验的过滤器。
2.2.2 认证流程详解
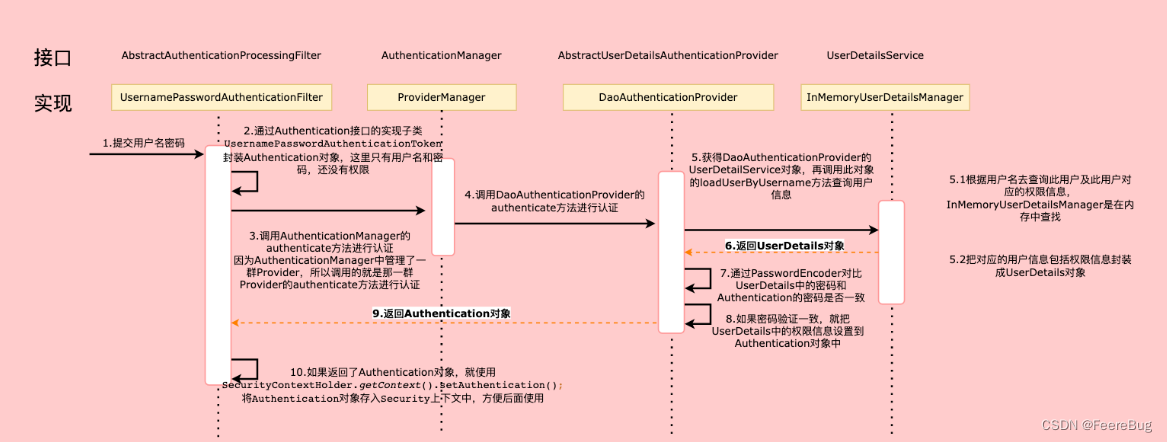
概念速查:
- Authentication接口: 它的实现类,表示当前访问系统的用户,封装了用户相关信息。
- AuthenticationManager接口:定义了认证Authentication的方法
- UserDetailsService接口:加载用户特定数据的核心接口。里面定义了一个根据用户名查询用户信息的方法。
- UserDetails接口:提供核心用户信息。通过UserDetailsService根据用户名获取处理的用户信息要封装成UserDetails对象返回。然后将这些信息封装到Authentication对象中。
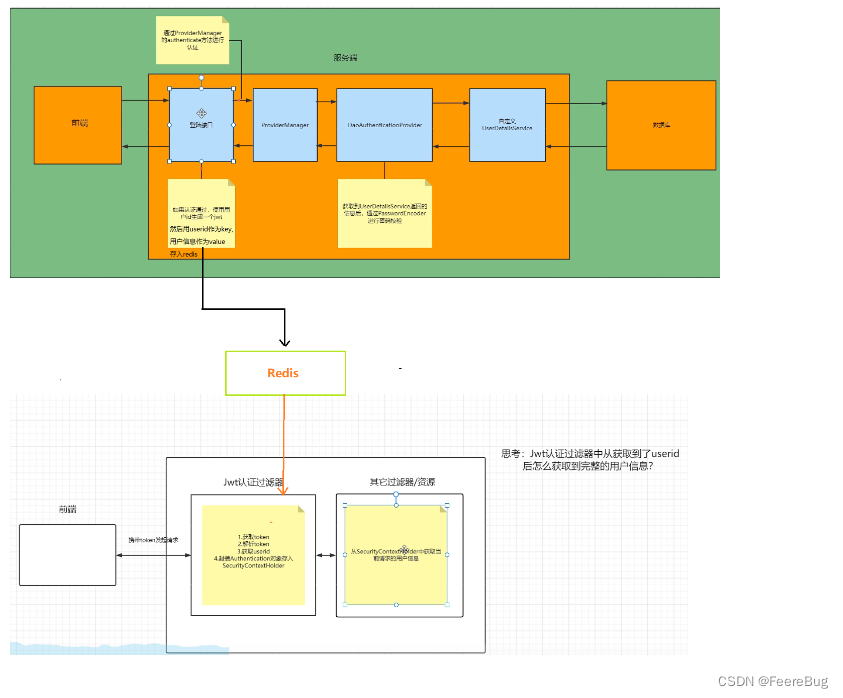
2.2.3登录实现
3. Spring Security 基础
Spring Security 的核心是基于配置的安全性提供方式。这意味着开发人员要使用适当的代码来定义安全性设置,并配置 Spring Security 提供的相关组件,例如过滤器链、认证管理器等。Spring Security 提供了一些高度可定制的内置类和接口,以帮助开发人员按需定制应用程序安全性需求。
下面是在 Spring Boot 中启用 Spring Security 的简单示例:
配置文件(application.yml)
spring:
  security:
    user:
      name: user
      password: password
依赖配置
<dependency>
    <groupId>org.springframework.boot</groupId>
    <artifactId>spring-boot-starter-security</artifactId>
</dependency>
Web Security 配置类
import org.springframework.context.annotation.Configuration;
import org.springframework.security.config.annotation.web.configuration.EnableWebSecurity;
import org.springframework.security.config.annotation.web.configuration.WebSecurityConfigurerAdapter;

@Configuration
@EnableWebSecurity
public class WebSecurityConfig extends WebSecurityConfigurerAdapter {
    @Override
    protected void configure(HttpSecurity http) throws Exception {
        http
            .authorizeRequests()
                .anyRequest().authenticated()
                .and()
            .formLogin()
                .and()
            .httpBasic();
    }
}
上述示例中,我们启用了 Spring Security,并对所有请求进行了基本的身份验证。如果访问应用程序时,未经身份验证,将会弹出一个默认的登录页面,并需要用户输入用户名和密码。
Spring Security 还提供了更多的配置选项,例如启用 CORS 支持、设置 CSRF 保护、配置 LDAP 连接、支持 OAuth 2.0 等。有关更多详细信息,请参阅官方文档。
4. Spring Security 实践
在实践中,Spring Security 通常与其他组件一起使用,例如 Spring MVC、Thymeleaf、JPA 等。下面是一个示例,展示如何创建一个基于 Spring MVC、Thymeleaf 和 Spring Security 的 Web 应用程序。
下面的示例功能很简单,仅包含一个页面,显示用户的消息。但是,访问该页面是需要登录的。
依赖配置
<dependency>
    <groupId>org.springframework.boot</groupId>
    <artifactId>spring-boot-starter-security</artifactId>
</dependency>

<dependency>
    <groupId>org.springframework.boot</groupId>
    <artifactId>spring-boot-starter-thymeleaf</artifactId>
</dependency>

<dependency>
    <groupId>org.springframework.boot</groupId>
    <artifactId>spring-boot-starter-web</artifactId>
</dependency>
页面模板(message.html)
<!DOCTYPE html>
<html xmlns:th="http://www.thymeleaf.org">
<head>
<title>Simple Thymeleaf Example</title>
</head>
<body>
<h1>Welcome, <span th:text="${name}"></span></h1>
<p><a href="/logout" th:href="@{/logout}">Logout</a></p>
</body>
</html>
控制器
import org.springframework.security.core.Authentication;
import org.springframework.security.core.userdetails.User;
import org.springframework.stereotype.Controller;
import org.springframework.ui.Model;
import org.springframework.web.bind.annotation.GetMapping;

@Controller
public class MessageController {
    @GetMapping("/message")
    public String getMessage(Authentication authentication, Model model) {
        String name = ((User)authentication.getPrincipal()).getUsername();
        model.addAttribute("name", name);
        return "message";
    }
}
Web Security 配置类
import org.springframework.security.config.annotation.web.builders.HttpSecurity;
import org.springframework.security.config.annotation.web.configuration.EnableWebSecurity;
import org.springframework.security.config.annotation.web.configuration.WebSecurityConfigurerAdapter;

@EnableWebSecurity
public class WebSecurityConfig extends WebSecurityConfigurerAdapter {
    @Override
    protected void configure(HttpSecurity http) throws Exception {
        http
            .authorizeRequests()
                .antMatchers("/", "/home").permitAll()
                .anyRequest().authenticated()
                .and()
            .formLogin()
                .loginPage("/login")
                .permitAll()
                .and()
            .logout()
                .permitAll();
    }
}
上述配置中,我们允许未经身份验证的用户访问应用程序的主页和首页。如果用户试图访问需要验证的资源,则会弹出一个默认的登录页面。如果用户未登录,则会重定向到自定义的登录页面:/login。
自定义登录页面
为了创建一个自定义的登录页面,我们需要在模板文件中创建一个类似于以下代码的表单:
<!DOCTYPE html>
<html xmlns:th="http://www.thymeleaf.org">
<head>
    <title>Login Page</title>
</head>
<body>
    <div th:if="${param.error}">
        Invalid username or password.
    </div>
    <div th:if="${param.logout}">
        You have been logged out.
    </div>
    <form th:action="@{/login}" method="post">
        <div>
            <label for="username">Username:</label>
            <input type="text" id="username" name="username" />
        </div>
        <div>
            <label for="password">Password:</label>
            <input type="password" id="password" name="password" />
        </div>
        <div>
            <button type="submit">Login</button>
        </div>
    </form>
</body>
</html>
在上述代码中,我们使用了 Thymeleaf 模板引擎来创建一个简单的登录表单。如果用户提供的凭据无效,则会显示错误消息。否则,用户将被成功重定向到之前尝试访问的受保护的资源。
安全注解
在 Spring Security 中,我们可以使用注解来标记需要进行身份验证或授权的方法。下面是一个示例:
import org.springframework.security.access.annotation.Secured;
import org.springframework.stereotype.Controller;
import org.springframework.web.bind.annotation.GetMapping;

@Controller
public class HomeController {
    @GetMapping("/home")
    @Secured("ROLE_USER")
    public String home() {
        return "home";
    }
}
在上述示例中,我们使用 @Secured 注解来标记 HomeController 中的 home 方法,以指示只允许拥有 ROLE_USER 权限的用户访问该页面。
小结
本文介绍了 Spring Security 的基础知识和实践方法。Spring Security 提供了丰富的功能和定制性,可以帮助您构建更加安全的应用程序。如果您想了解更多信息,请查看官方文档,里面提供了更多例子和配置选项。


 2489
2489


 被折叠的 条评论
为什么被折叠?
被折叠的 条评论
为什么被折叠?
 到【灌水乐园】发言


