


在 Spring Boot 中做权限管理,一般来说,主流的方案是 Spring Security ,但是,仅仅从技术角度来说,也可以使用 Shiro。
一般来说,Spring Security 和 Shiro 的比较如下:
- Spring Security 是一个重量级的安全管理框架;Shiro 则是一个轻量级的安全管理框架
- Spring Security 概念复杂,配置繁琐;Shiro 概念简单、配置简单
- Spring Security 功能强大;Shiro 功能简单
- ...
虽然 Shiro 功能简单,但是也能满足大部分的业务场景。所以在传统的 SSM 项目中,一般来说,可以整合 Shiro。
在 Spring Boot 中,由于 Spring Boot 官方提供了大量的非常方便的开箱即用的 Starter ,当然也提供了 Spring Security 的 Starter ,使得在 Spring Boot 中使用 Spring Security 变得更加容易,甚至只需要添加一个依赖就可以保护所有的接口,所以,如果是 Spring Boot 项目,一般选择 Spring Security 。
这只是一个建议的组合,单纯从技术上来说,无论怎么组合,都是没有问题的。
在 Spring Boot 中整合 Shiro ,有两种不同的方案:
- 第一种就是原封不动的,将 SSM 整合 Shiro 的配置用 Java 重写一遍。
- 第二种就是使用 Shiro 官方提供的一个 Starter 来配置,但是,这个 Starter 并没有简化多少配置。
原生的整合
- 创建项目
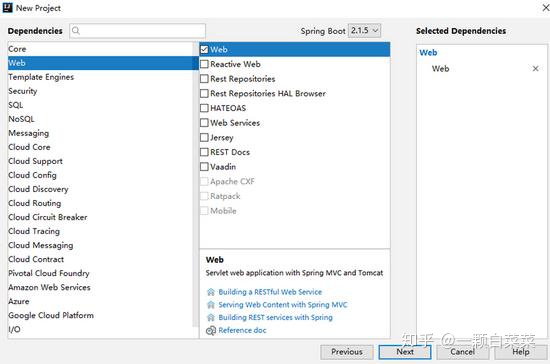
创建一个 Spring Boot 项目,只需要添加 Web 依赖即可:
项目创建成功后,加入 Shiro 相关的依赖,完整的 pom.xml 文件中的依赖如下:
<dependencies>
    <dependency>
        <groupId>org.springframework.boot</groupId>
        <artifactId>spring-boot-starter-web</artifactId>
    </dependency>
    <dependency>
        <groupId>org.apache.shiro</groupId>
        <artifactId>shiro-web</artifactId>
        <version>1.4.0</version>
    </dependency>
    <dependency>
        <groupId>org.apache.shiro</groupId>
        <artifactId>shiro-spring</artifactId>
        <version>1.4.0</version>
    </dependency>
</dependencies>
- 创建 Realm
接下来我们来自定义核心组件 Realm:
public class MyRealm extends AuthorizingRealm {
    @Override
    protected AuthorizationInfo doGetAuthorizationInfo(PrincipalCollection principals) {
        return null;
    }
    @Override
    protected AuthenticationInfo doGetAuthenticationInfo(AuthenticationToken token) throws AuthenticationException {
        String username = (String) token.getPrincipal();
        if (!"javaboy".equals(username)) {
            throw new UnknownAccountException("账户不存在!");
        }
        return new SimpleAuthenticationInfo(username, "123", getName());
    }
}
在 Realm 中实现简单的认证操作即可,不做授权,授权的具体写法和 SSM 中的 Shiro 一样,不赘述。这里的认证表示用户名必须是 javaboy ,用户密码必须是 123 ,满足这样的条件,就能登录成功!
- 配置 Shiro
接下来进行 Shiro 的配置:
@Configuration
public class ShiroConfig {
    @Bean
    MyRealm myRealm() {
        return new MyRealm();
    }

    @Bean
    SecurityManager securityManager() {
        DefaultWebSecurityManager manager = new DefaultWebSecurityManager();
        manager.setRealm(myRealm());
        return manager;
    }

    @Bean
    ShiroFilterFactoryBean shiroFilterFactoryBean() {
        ShiroFilterFactoryBean bean = new ShiroFilterFactoryBean();
        bean.setSecurityManager(securityManager());
        bean.setLoginUrl("/login");
        bean.setSuccessUrl("/index");
        bean.setUnauthorizedUrl("/unauthorizedurl");
        Map<String, String> map = new LinkedHashMap<>();
        map.put("/doLogin", "anon");
        map.put("/**", "authc");
        bean.setFilterChainDefinitionMap(map);
        return bean;
    }
}
在这里进行 Shiro 的配置主要配置 3 个 Bean :
- 首先需要提供一个 Realm 的实例。
- 需要配置一个 SecurityManager,在 SecurityManager 中配置 Realm。
- 配置一个 ShiroFilterFactoryBean ,在 ShiroFilterFactoryBean 中指定路径拦截规则等。
- 配置登录和测试接口。
其中,ShiroFilterFactoryBean 的配置稍微多一些,配置含义如下:
- setSecurityManager 表示指定 SecurityManager。
- setLoginUrl 表示指定登录页面。
- setSuccessUrl 表示指定登录成功页面。
- 接下来的 Map 中配置了路径拦截规则,注意,要有序。
这些东西都配置完成后,接下来配置登录 Controller:
@RestController
public class LoginController {
    @PostMapping("/doLogin")
    public void doLogin(String username, String password) {
        Subject subject = SecurityUtils.getSubject();
        try {
            subject.login(new UsernamePasswordToken(username, password));
            System.out.println("登录成功!");
        } catch (AuthenticationException e) {
            e.printStackTrace();
            System.out.println("登录失败!");
        }
    }
    @GetMapping("/hello")
    public String hello() {
        return "hello";
    }
    @GetMapping("/login")
    public String  login() {
        return "please login!";
    }
}
测试时,首先访问 /hello 接口,由于未登录,所以会自动跳转到 /login 接口:


 1451
1451


 被折叠的 条评论
为什么被折叠?
被折叠的 条评论
为什么被折叠?
 到【灌水乐园】发言


