


目录
9、SpringBootMyBatisApplication启动类
学习该项目时的一点心得:
在学习SpringBoot整合MyBatis时,网上的资料实在太多了,学得有点混乱。后来找到了一本书《SpringBoot企业级应用开发实战教程》张磊、宋洁、张建军著,里面的内容简洁明了,容易理解。然后跟着书敲出这个项目,以这个小项目为基点,再去对比其他的SpringBoot整合MyBatis的项目,有不同的地方就查资料,为什么不一样,尽力让项目变得更完美,在此过程中,也不断地确定了SpringBoot整合MyBatis时的核心要点是什么。
MyBatis
- MyBatis是一个支持普通SQL查询,存储过程和高级映射的优秀持久层框架
- MyBatis可以使用简单的XML或注解用于配置和原始映射,将接口和Java的POJO(Plain Old Java Objects,普通的传统的Java对象)映射成数据库中的记录
项目总结
工作流程
创建一个Spring Boot项目,并在pom.xml中添加必要的依赖
在application.properties文件中配置数据库的连接信息和MyBatis的相关配置信息。
创建一个实体类User,该实体类对应数据库中的t_user表的结构。
然后使用MyBatis的注解或者XML配置文件来定义数据库操作的接口和方法。
创建一个UserMapper接口,用于定义数据库操作的方法。在接口中定义了各种增删改查的方法。
创建一个UserMapper.xml文件,该文件对应UserMapper接口中定义的方法。在该文件中配置每个方法对应的SQL语句。
在 UserController 控制器中注入对应的数据库操作接口,并调用接口中的方法来实现相关的业务逻辑。
创建SpringBootMyBatisApplication类作为项目的启动类,
并在该类上添加@SpringBootApplication注解,表示这是一个Spring Boot项目。
添加@MapperScan,扫描接口类
整个过程中,Spring Boot会根据配置文件和注解来自动装配相应的Bean,并管理整个项目的生命周期。
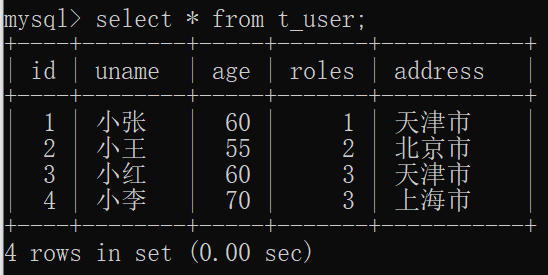
1、创建SQL表
- 表名和列名应使用反引号(`)而不是单引号(')
CREATE DATABASE userdb;USE userdb;DROP table IF EXISTS t_user;CREATE TABLE `t_user`(
`id` INT(11) NOT NULL AUTO_INCREMENT,
`uname` VARCHAR(20) NOT NULL,
`age` TINYINT(4) NOT NULL,
`roles` INT(11) NOT NULL,
`address` VARCHAR(255),
PRIMARY KEY (`id`)
);
INSERT INTO `t_user`(`id`,`uname`,`age`,`roles`,`address`)
VALUES (1,'小张',60,1,'天津市'),(2,'小王',55,2,'北京市'),(3,'小红',60,3,'天津市'),(4,'小李',70,3,'上海市');
打开MySQL,保持运行,不要关闭黑窗

2、新建一个SpringBoot项目
挑选技术支持:
- Lombok
- SpringWeb
- MySQL Driver
- MyBatis Framework

项目结构:

3、pom.xml添加依赖
- 注意版本号,我是从3.x降到2.x才跑通
<?xml version="1.0" encoding="UTF-8"?>
<project xmlns="http://maven.apache.org/POM/4.0.0" xmlns:xsi="http://www.w3.org/2001/XMLSchema-instance"
	xsi:schemaLocation="http://maven.apache.org/POM/4.0.0 https://maven.apache.org/xsd/maven-4.0.0.xsd">
	<modelVersion>4.0.0</modelVersion>
	<parent>
		<groupId>org.springframework.boot</groupId>
		<artifactId>spring-boot-starter-parent</artifactId>
		<version>2.3.12.RELEASE</version>
		<relativePath/> <!-- lookup parent from repository -->
	</parent>
	<groupId>com.study</groupId>
	<artifactId>springboot_mybatis</artifactId>
	<version>0.0.1-SNAPSHOT</version>
	<name>springboot_mybatis</name>
	<description>Demo project for Spring Boot</description>
	<properties>
		<java.version>8</java.version>
	</properties>
	<dependencies>
		<dependency>
			<groupId>org.springframework.boot</groupId>
			<artifactId>spring-boot-starter-web</artifactId>
		</dependency>

		<!--添加MyBatis依赖-->
		<dependency>
			<groupId>org.mybatis.spring.boot</groupId>
			<artifactId>mybatis-spring-boot-starter</artifactId>
			<version>2.2.2</version>
		</dependency>

		<!--添加MySQL依赖-->
		<dependency>
			<groupId>mysql</groupId>
			<artifactId>mysql-connector-java</artifactId>
		</dependency>
		<dependency>
			<groupId>org.projectlombok</groupId>
			<artifactId>lombok</artifactId>
			<optional>true</optional>
		</dependency>
		<dependency>
			<groupId>org.springframework.boot</groupId>
			<artifactId>spring-boot-starter-test</artifactId>
			<scope>test</scope>
		</dependency>
		<dependency>
			<groupId>org.mybatis.spring.boot</groupId>
			<artifactId>mybatis-spring-boot-starter-test</artifactId>
			<version>2.2.2</version>
			<scope>test</scope>
		</dependency>
	</dependencies>

	<build>
		<plugins>
			<plugin>
				<groupId>org.springframework.boot</groupId>
				<artifactId>spring-boot-maven-plugin</artifactId>
				<configuration>
					<excludes>
						<exclude>
							<groupId>org.projectlombok</groupId>
							<artifactId>lombok</artifactId>
						</exclude>
					</excludes>
				</configuration>
			</plugin>
		</plugins>
	</build>

</project>
4、application.properties配置文件
# userdb是使用的数据库名字
spring.datasource.url=jdbc:mysql://localhost:3306/userdb?serverTimezone=UTC
spring.datasource.username=root
spring.datasource.password=admin
spring.datasource.driver-class-name=com.mysql.cj.jdbc.Driver

# 添加mapper-locations路径,扫描*Mapper.xml文件,一般不用改,*Mapper是指命名以Mapper结尾的XML文件
mybatis.mapper-locations=classpath*:mapper/*Mapper.xml
5、User实体类
package com.study.springboot_mybatis.pojo;

import lombok.Data;

import java.io.Serializable;

@Data //添加lombok依赖,自动生成getter和setter
public class User implements Serializable {

    private Integer id;
    private String uname;
    private int age;
    private int roles;
    private String address;
}
6、UserMapper接口
package com.study.springboot_mybatis.mapper;

import com.study.springboot_mybatis.pojo.User;
import org.springframework.stereotype.Repository;

import java.util.List;

//通过在类上添加@Repository注解,Spring可以自动创建该类的实例,并将其注入到其他需要访问数据库或持久化的组件中。
@Repository
public interface UserMapper {

    List<User> selectUserList();
    User findById(int id);
    int save(User user);
    int update(User user);
    int delete(Integer id);
}
7、UserMapper.xml映射文件
- 接口类名称要和Mapper映射文件的名称一致
- 接口中的方法要和映射文件id值名称一致
<?xml version="1.0" encoding="UTF-8"?>
<!DOCTYPE mapper
        PUBLIC "-//mybatis.org//DTD Mapper 3.0//EN"
        "http://mybatis.org/dtd/mybatis-3-mapper.dtd" >
<mapper namespace="com.study.springboot_mybatis.mapper.UserMapper">
    <resultMap id="BaseResultMap" type="com.study.springboot_mybatis.pojo.User">
    <!--
    1.column 指定表字段名或其别名
    2.property 指定 javaBean 的属性名
    3.jdbcType 指定表字段类型
    4.javaType 指定类属性的java类型
    -->
        <result column="id" jdbcType="INTEGER" property="id" javaType="java.lang.Integer"/>
        <result column="uname" jdbcType="VARCHAR" property="uname" javaType="java.lang.String"/>
        <result column="age" jdbcType="INTEGER" property="age" javaType="java.lang.Integer"/>
        <result column="roles" jdbcType="INTEGER" property="id" javaType="java.lang.Integer"/>
        <result column="address" jdbcType="VARCHAR" property="address" javaType="java.lang.String"/>
    </resultMap>

    <!--useGeneratedKeys:是够获取自动增长的主键值。true表示获取
        keyProperty :指定将获取到的主键值封装到哪儿个属性里-->
    <insert id="save" parameterType="com.study.springboot_mybatis.pojo.User" useGeneratedKeys="true" keyProperty="id">
        insert into t_user
        <trim prefix="(" suffix=")" suffixOverrides=",">
            <if test="id != null">
                id,
            </if>
            <if test="uname != null">
                uname,
            </if>
            <if test="age != null">
                age,
            </if>
            <if test="roles != null">
                roles,
            </if>
            <if test="address != null">
                address,
            </if>
        </trim>
        <trim prefix="values (" suffix=")" suffixOverrides=",">
            <if test="id != null">
                <!--#{id} 是 MyBatis 的参数占位符,表示将会传入的参数中的 id 字段的值替换到此处。-->
                #{id,jdbcType=INTEGER},
            </if>
            <if test="uname != null">
                #{uname,jdbcType=VARCHAR},
            </if>
            <if test="age != null">
                #{age,jdbcType=INTEGER},
            </if>
            <if test="roles != null">
                #{roles,jdbcType=INTEGER},
            </if>
            <if test="address != null">
                #{address,jdbcType=VARCHAR},
            </if>
        </trim>
    </insert>
    <update id="update" parameterType="com.study.springboot_mybatis.pojo.User">
        update t_user
        <!--set 标签可以用于动态包含需要更新的列,忽略其它不更新的列
            下面是ID不变,其他信息动态更新,即通过ID找到要修改的用户-->
        <set>
            <!--<trim> 标签用于修剪 SQL 语句中不必要的部分。
            这里设置了 prefix、suffix 和 suffixOverrides 属性为空,
            表示不添加任何前缀和后缀,并且去除 SQL 语句末尾可能多余的逗号。
            根据条件使用了 <if> 标签来判断是否更新相应的列-->
            <trim prefix="" suffix="" suffixOverrides=",">
                <!--使用了 <if> 标签来判断是否更新相应的列。如果条件为真,则添加对应的更新语句-->
                <if test="uname != null">
                    uname = #{uname,jdbcType=VARCHAR},
                </if>
                <if test="age != null">
                    age = #{age},
                </if>
                <if test="roles != null">
                    roles = #{roles,jdbcType=INTEGER},
                </if>
                <if test="address != null">
                    address = #{address,jdbcType=VARCHAR},
                </if>
            </trim>
        </set>
        where id = #{id,jdbcType=BIGINT}
    </update>

    <delete id="delete" parameterType="java.lang.Integer">
        delete
        from t_user
        where id = #{id,jdbcType=INTEGER}
    </delete>

    <!--查询全部记录-->
    <select id="selectUserList" resultType="com.study.springboot_mybatis.pojo.User">
        select * from t_user;
    </select>

    <select id="findById" resultType="com.study.springboot_mybatis.pojo.User">
        select * from t_user where id = #{id};
    </select>
</mapper>
8、UserController控制器
- UserController是一个基于Spring Boot的RESTful风格的控制器类,用于处理用户相关的HTTP请求
ResponseEntity则是 Spring Framework 中用于表示 HTTP 响应的一个类,它包含了响应的状态码、头部信息和响应体等内容。在 Spring MVC 或 Spring Boot 中,我们通常会将处理方法的返回值包装为ResponseEntity对象,以便更加灵活地设置 HTTP 响应的各种属性。

package com.study.springboot_mybatis.controller;

import com.study.springboot_mybatis.mapper.UserMapper;
import com.study.springboot_mybatis.pojo.User;
import org.springframework.beans.factory.annotation.Autowired;
import org.springframework.http.HttpStatus;
import org.springframework.http.ResponseEntity;
import org.springframework.stereotype.Repository;
import org.springframework.web.bind.annotation.*;

import java.util.List;

@RestController
@RequestMapping("/user")
public class UserController {

    @Autowired
    UserMapper userMapper;

    @GetMapping("/findAll")
    ResponseEntity<List<User>> findAllUser(){
        List<User> list = userMapper.selectUserList();
        return ResponseEntity.status(HttpStatus.OK).body(list);
    }

    @GetMapping("/findById/{id}")
    ResponseEntity<User> findById(@PathVariable("id") Integer id){
        if(id==null || id<1){
            return ResponseEntity.status(HttpStatus.BAD_REQUEST).build();
        }
        User user = userMapper.findById(id);
        if(user == null){
            return ResponseEntity.status(HttpStatus.NOT_FOUND).build();
        }
        return ResponseEntity.status(HttpStatus.OK).body(user);
    }

    @PostMapping("/save")
    public ResponseEntity<String> save(@RequestBody User user){
        if(user==null){
            return ResponseEntity.status(HttpStatus.BAD_REQUEST).build();
        }
        Integer count = userMapper.save(user);
        if(count == null || count == 0){
            return ResponseEntity.status(HttpStatus.BAD_REQUEST).build();
        }
        if(count > 0){
            return ResponseEntity.status(HttpStatus.CREATED).body("添加新用户信息成功!");
        }else{
            return ResponseEntity.status(HttpStatus.BAD_REQUEST).body("添加新用户信息失败!");
        }
    }

    @PutMapping("/update")
    public ResponseEntity<String> update(@RequestBody User user){
        if(user==null){
            return ResponseEntity.status(HttpStatus.BAD_REQUEST).build();
        }
        Integer count = userMapper.update(user);
        if(count == null || count == 0){
            return ResponseEntity.status(HttpStatus.BAD_REQUEST).build();
        }
        if(count > 0){
            return ResponseEntity.status(HttpStatus.OK).body("修改用户信息成功!");
        }else{
            return ResponseEntity.status(HttpStatus.BAD_REQUEST).body("修改用户信息失败!");
        }
    }

    @DeleteMapping("/delete/{id}")
    ResponseEntity<String> delete(@PathVariable("id") Integer id){
        if(id == null || id < 1){
            return ResponseEntity.status(HttpStatus.BAD_REQUEST).build();
        }
        Integer count = userMapper.delete(id);
        if(count == null || count == 0){
            return ResponseEntity.status(HttpStatus.NOT_FOUND).build();
        }
        if(count > 0){
            return ResponseEntity.status(HttpStatus.OK).body("删除用户信息成功!");
        }else{
            return ResponseEntity.status(HttpStatus.BAD_REQUEST).body("删除用户信息失败!");
        }
    }


}
9、SpringBootMyBatisApplication启动类
package com.study.springboot_mybatis;

import org.mybatis.spring.annotation.MapperScan;
import org.springframework.boot.SpringApplication;
import org.springframework.boot.autoconfigure.SpringBootApplication;

@SpringBootApplication
//扫描basePackages下的mapper接口,并创建代理对象
@MapperScan(basePackages = {"com.study.springboot_mybatis.mapper"})
public class SpringbootMybatisApplication {

	public static void main(String[] args) {
		SpringApplication.run(SpringbootMybatisApplication.class, args);
	}

}
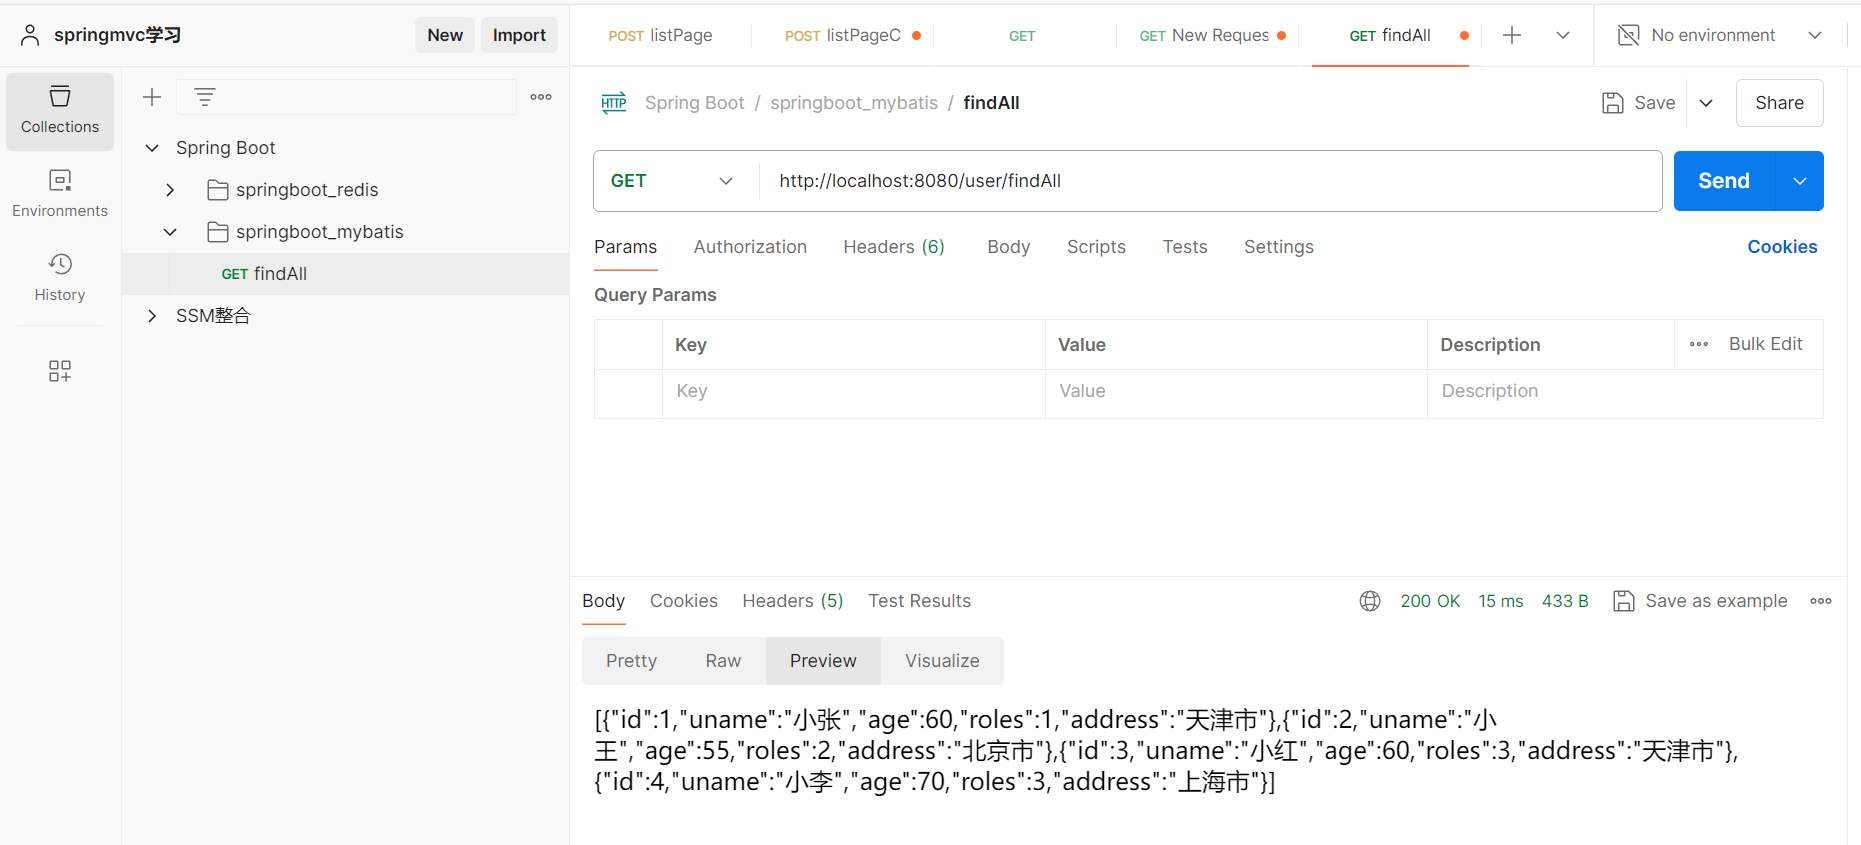
10、使用Postman进行测试
- 根据UserController类中的方法逐个进行测试
1、findAll():查找全部
2、findById:通过ID进行查找

3、save:添加新用户
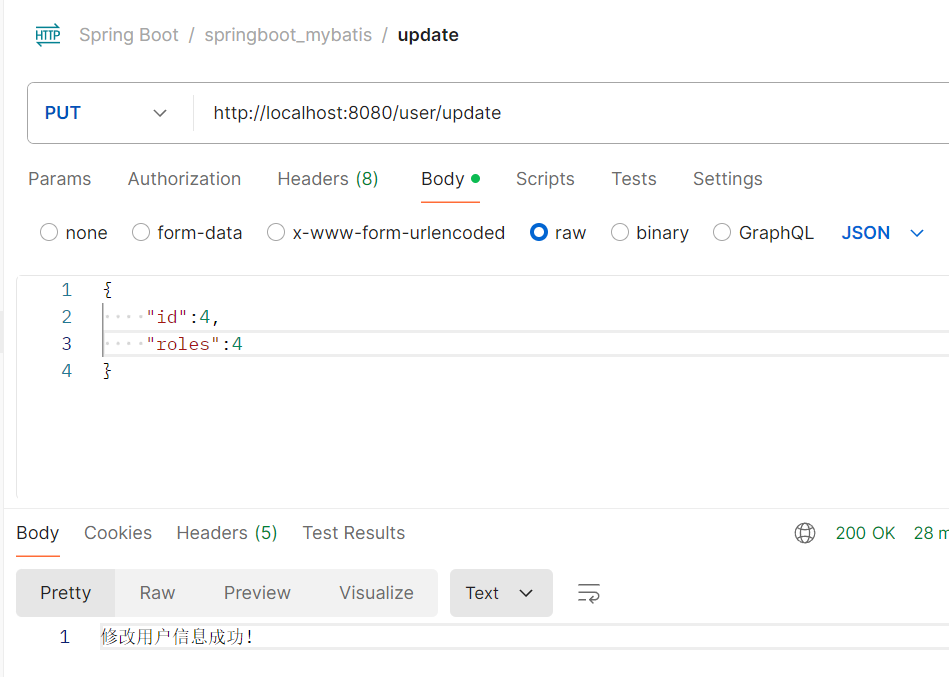
 4、update:修改用户信息
通过ID指定用户,修改任一信息,下列是修改 id=4 的用户的 roles 为4
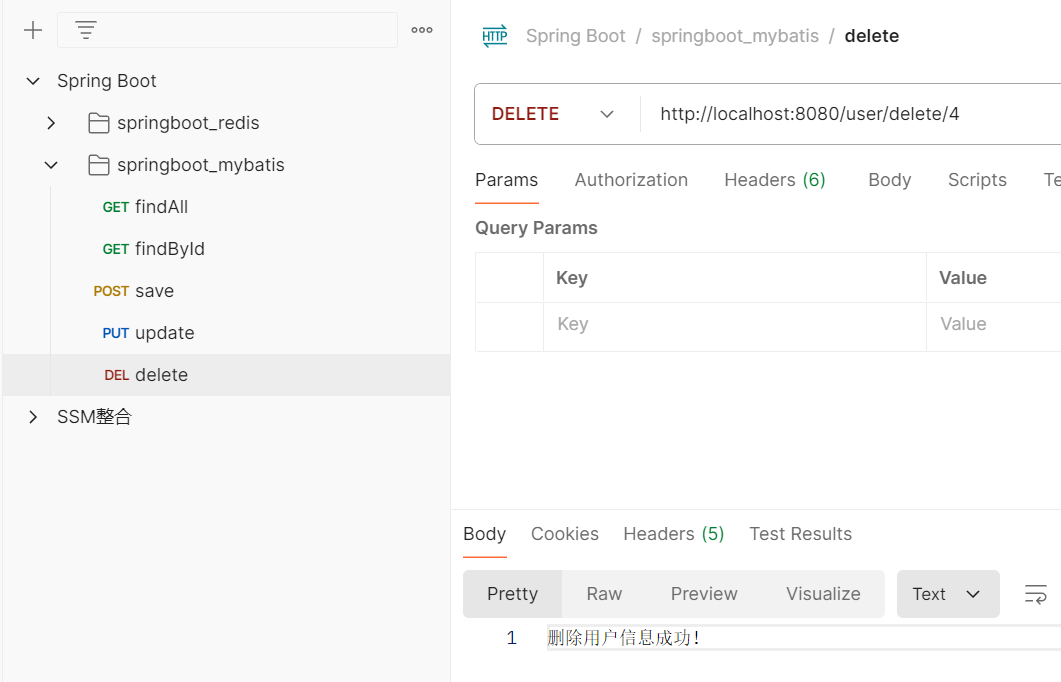
5、delete:删除用户


 1938
1938


 被折叠的 条评论
为什么被折叠?
被折叠的 条评论
为什么被折叠?
 到【灌水乐园】发言


