1.GET/POST请求
在很多场景中,我们的 服务器都 需要跟用户的浏览器打交道 ,如发送验证码,登录表提交。请求服务器数据一般使用GET请求,表单提交到服务器一般都使用POST请求。
1.1获取GET请求
由于GET请求直接被嵌入在路径中,URL是完整的请求路径,包括了?后面的部分,因此你可以手动分析后面的内容作为GET请求的参数
node.js中url模块中的parse函数提供了这个功能。
实例如下:
const http = require('http')
const url = require('url')
const util = require('util')
// 创建服务器
http.createServer(function(req, res) {
// 输出响应头
res.writeHead(200, { 'Content-Type': 'text/palin' });
res.end(util.inspect(url.parse(req.url, true)));
}).listen(8888)
console.log(`服务器一起动......访问:http://127.0.0.1:8888`);1.2获取POST请求内容
POST请求的内容全部的都在请求体中,http.ServerRequest并没有一个属性内容为请求体,原因是等待请求体传输可能是一件耗时的工作。 比如上传文件,而很多时候我们可能并不需要理会请求体的内容,恶意的POST请求会大大消耗服务器的资源,所以node.js默认是不会解析请求体的,当你需要的时候,需要手动来做。
实例如下:
const http = require('http')
const querystring = require('querystring');
//表单页面内容
var postHTML =
'<html><head><meta charset="utf-8"><title>编程师 Node.js</title></head>' +
'<body>' +
'<form method="post">' +
'姓名:<input name="name"><br>' +
'班级:<input name="class"><br>' +
'<input type="submit">' +
'</form>' +
'</body></html>';
http.createServer(function(req, res) {
// 定义了一个body变量,用来暂存请求体的信息
var body = '';
// 通过req的data事件监听函数,每当接收到请求体的数据,就累加到body变量中
req.on("data", function(turck) {
body += turck;
});
// 在end事件触发后,通过querystring.parse将post解析为真正的POST请求格式,然后向客户端返回
req.on("end", function() {
// 解析参数
body = querystring.parse(body);
// 设置响应头部信息及编码
res.writeHead(200, { "Content-Type": 'text/html;charset=utf-8' });
if (body.name && body.class) {
// 接收到POST数据,输出提交的数据
res.write(`姓名:${body.name}`);
res.write('<br>');
res.write(`班级: ${body.class}`);
} else {
// 未接收到POST数据,输出表单
res.write(postHTML);
}
res.end();
})
}).listen(8888);
console.log("http://127.0.0.1:8888");2.Web模块
2.1什么是Web服务器?
Web服务器一般指网站服务器,是指驻留于因特网上某种类型计算机的程序。
Web服务器的基本功能就是提供Web信息浏览服务。它只需支持HTTP协议、HTML文档格式及URL,与客户端的网络浏览器配合。
大多数Web服务器都支持服务端的脚本语言(Java、C#、php、 python)等,并通过脚本语言从数据库获取数据,将结果返回给客户端浏览器。
目前最主流的三个 Web服务器是Apache、Nginx、llS。
2.2Web应用架构
-
client-客户端,一般指浏览器,浏览器可以通过HTTP协议向服务器请求数据。
-
server-服务端,一般指Web服务器,可以接收客户端请求,并向客户端发送响应数据。
-
Business -业务层,通过Web服务器处理应用程序,如与数据库交互,逻辑运算,调用外部程序等。
-
Data-数据层,一般由数据库组成。
2.3使用NOde创建Web服务器
一下是演示一个最基本的HTTP服务器架构(使用8888端口),创建sever.js文件,代码如下所示:
// 使用NOde创建Web服务器
const http = require('http');
const url = require('url');
const fs = require('fs')
//创建服务器
http.createServer(function(request, response) {
// 解析请求,包括文件名
let pathname = url.parse(request.url).pathname;
if (!pathname || pathname == '/') {
pathname = '/index.html'
}
// 读取文件 index.html
fs.readFile(pathname.substr(1), function(err, data) {
if (err) {
response.writeHead(404, { "Content-Type": 'text/html' })
} else {
response.writeHead(200, { "Content-Type": 'text/html' })
response.write(data.toString())
}
response.end()
})
}).listen(8888)2.4使用Node创建Web客户端
使用Node创建Web客户端需要引入http模块,创建client.js文件,代码如下所示:
const http = require('http');
// 用于请求的选项
var options = {
host: 'localhost',
port: '8888',
path: '/index.html'
}
// 处理响应的回调函数
var callback = function(response) {
// 不断更新数据
// Data:当服务端接收到数据时触发
// End:数据接收完时触发
var body = '';
response.on('data', function(data) {
body += data;
})
response.on('end', function() {
// 数据接收完成
console.log(body);
})
}
// 向服务端发送请求
var requset = http.request(options, callback);
requset.end();3.NPM使用介绍
3.1什么是NPM?
NPM 是随同 NodeJS 一起安装的包管理工具,能解决 NodeJS 代码部署上的很多问题,常见的使用场景有以下几种:
-
允许用户从NPM服务器下载别人编写的第三方包到本地使用。
-
允许用户从NPM服务器下载并安装别人编写的命令行程序到本地使用。
-
允许用户将自己编写的包或命令行程序上传到NPM服务器供别人使用。
由于新版的NodeJS 已经集成了npm,所以之前npm 也一并安装好了。
如果你安装的是旧版本的npm,可以很容易的通过npm命令来升级,命令如下:
$ npm install npm -g
3.2安装模块
npm 安装 Node.js 模块语法格式如下:
$ npm install <Modulu Name>
4.Express框架
Express 是一个为 Node.js 设计的Web开发框架,它基于NodeJS平台。
4.1Express简介
Express是一个简洁而灵活的 node.js Web应用框架,提供了一系列强大特性帮助你创建各种Web应用,和丰富的HTTP 工具。
使用Express可以快速地搭建一个完整功能的网站。
Express框架核心特性包括:
-
可以设置中间件来响应HTTP请求。
-
定义了路由表用于执行不同的HTTP请求动作。
-
可以通过向模板传递参数来动态渲染HTML页面。
4.2安装Express
安装 Express 并将其保存到依赖列表中:
$ npm install express --save
以上命令会将Express框架安装在当期目录的 node_modules 目录中, node_modules目录下会自动创建 express 目录。
以下几个重要的模块是需要与express框架一起安装的:
-
body-parser - node.js中间件,用于处理JSON、Raw、Text和URL编码的数据。
-
cookie-parser-这就是一个解析Cookie的工具。通过req.cookies 可以取到传过来的cookie,并把它们转成对象。
-
multer - node.js中间件,用于处理enctype="multipart/form-data"(设置表单的MIME编码)的表单数据。
4.3第一个Express框架实例
接下来我们使用Express框架来输出"Hello World"。
以下实例中我们引入了express模块,并在客户端发起请求后,响应""Hello World"字符串。
创建express_demo.js文件,代码如下所示:
const express = require('express')
const app = express();
app.get('/', function(req, res) {
res.send("Hello World");
})
app.listen(8888)4.4请求和响应
Express应用使用回调函数的参数: request 和 response 对象来处理请求和响应的数据。
app.get('/',function(req,res){
//--
})
equest 和 response 对象的具体介绍:
Request对象-request对象表示HTTP请求,包含了请求查询字符串、参数、内容、HTTP头部等属性。常见属性有:
-
req.app:当callback为外部文件时,用req.app访问express的实例
-
req.baseUrl:获取路由当前安装的URL路径
-
req.body / req.cookies:获得「请求主体」/Cookies
-
req.fresh / req.stale:判断请求是否还「新鲜」
-
req.hostname / req.ip:获取主机名和IP地址
-
req.originalUrl:获取原始请求URL
-
req.params:获取路由的parameters
-
req.path:获取请求路径
-
req.protocol:获取协议类型
-
req.query:获取URL的查询参数串
-
req.route:获取当前匹配的路由
-
req.subdomains:获取子域名
-
req.accpets():检查请求的Accept头的请求类型
-
req.acceptsCharsets / req.acceptsEncodings / req.acceptsLanguages
4.5路由
我们已经了解了HTTP请求的基本应用,而路由决定了由谁(指定脚本)去响应客户端请求。
在HTTP请求中,我们可以通过路由提取出请求的URL 以及GET/POST参数。
接下来我们扩展Hello World,添加一些功能来处理更多类型的HTTP请求。
创建 express_demo2.js文件,代码如下所示:
const express = require('express')
const app = express();
// GET请求
app.get('/', function(req, res) {
console.log("主页GET请求");
res.send("Hello GET");
})
// POST请求
app.post('/', function(req, res) {
console.log("主页POST请求");
res.send("Hello POST");
})
// DELETE(del_user)请求
app.delete('/del_user', function(req, res) {
console.log("del_user响应DELETE请求");
res.send("Hello DELETE")
})
// PUT请求
app.put('/', function(req, res) {
console.log("updata响应PUT请求");
res.send("Hello PUT");
})
app.listen(8888)4.6静态文件
Express 提供了内置的中间件 express.static 来设置静态文件如:图片、CSS、JavaScript等。
你可以使用express.static 中间件来设置静态文件路径。例如,如果你将图片、CSS、JavaScript文件放在public目录下,你可以这么写:
app.use(express.static('public'));
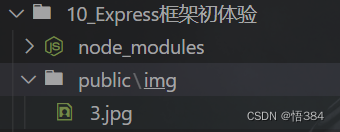
我们可以到 public/img目录下放些图片。

创建 express_demo3.js 文件,代码如下所示:
const express = require('express')
const app = express();
// 使用static中间键
app.use(express.static('public'))
// GET请求
app.get('/', function(req, res) {
console.log("主页GET请求");
res.send("Hello World");
})
app.listen(8888)
4.7GET方法
以下实例演示了在表单中通过GET方法提交两个参数,我们可以使用server.js文件内的process_get路由器来处理输入:
getname.html文件代码如下:
<html>
<body>
<form action="./porcess_get" method="GET">
First Name:<input type="text" name="first_name"> <br/>
Last Name:<input type="text" name="last_name"> <br/>
<input type="submit" value="submit">
</form>
</body>
</html>server_get.js文件代码如下:
const express = require('express')
const app = express();
// '/home'路由
app.get('/home', function(req, res) {
// 响应式html文件
console.log(__dirname);
res.sendFile(__dirname + "/getname.html")
})
app.get('/porcess_get', function(req, res) {
// 接收get请求提交的数据
let first_name = req.query.first_name;
let last_name = req.query.last_name;
res.writeHead(200, { 'Content-Type': 'text/plain;charset=utf-8' })
res.end(`姓名:${first_name}${last_name}`);
// let obj = {
// firstName: req.query.first_name,
// lastName: req.query.last_name
// }
// console.log(obj);
// console.log(JSON.stringify(obj));
// res.writeHead(200, { 'Content-Type': 'text/plain;charset=utf-8' })
// // 将对象序列化为字符串
// res.end(JSON.stringify(obj));
})
app.listen(8888);[备注]:此例中__dirname是node.js的一个全局变量,包含当前执行文件的目录的绝对路径。
4.8POST方法
以下实例演示了在表单中通过POST方法提交两个参数,我们可以使用server.js文件内的process_post路由器来处理输入:
postname.html文件代码如下:
<html>
<body>
<form action="./porcess_post" method="POST">
First Name:<input type="text" name="first_name"> <br/>
Last Name:<input type="text" name="last_name"><br/>
<input type="submit" value="submit">
</form>
</body>
</html>server_post.js 文件代码如下所示:
const express = require('express');
const app = express();
const bodyparser = require('body-parser');
const parser = bodyparser.urlencoded({ extended: false })
app.get('/demo', function(req, res) {
// 响应html文件
console.log(__dirname);
res.sendFile(__dirname + "/postname.html")
})
app.post('/porcess_post', parser, function(req, res) {
let obj = {
firstName: req.body.first_name,
lastName: req.body.last_name
}
res.writeHead(200, { 'Content-Type': 'text/plain;charset=utf-8' })
// 将对象序列化为字符串
res.end(JSON.stringify(obj))
})
app.listen(8888)4.9文件上传
以下我们创建一个用于上传文件的表单,使用POST方法,表单enctype属性设置为multipart/form-data。upload.htm1文件代码如下:
<html>
<head>文件上传表单</head>
</html>
<body>
<h3>文件上传:</h3>
选择一个文件:<br/>
<form action="./file_upload" method="POST" enctype="multipart/form-data">
<input type="file" name="image" size="50"><br/>
<input type="submit" value="上传文件">
</form>
</body>server_upload.js 文件代码如下所示:
const express = require('express');
const app = express();
const fs = require('fs');
const multer = require('multer');
// 使用static中间件,获取public文件夹
app.use(express.static('public'))
// 在public文件夹下,添加uploads文件夹
const upload = multer({ dest: 'public/uploads/' })
app.get('/upload', function(req, res) {
// 响应html文件
res.sendFile(__dirname + "/upload.html")
})
app.post('/file_upload', upload.single("image"), function(req, res) {
// res.send('ok')
// 获取到旧的文件名
let oldName = req.file.destination + req.file.filename;
// 替换成原来的文件名
let newName = req.file.destination + req.file.originalname;
fs.rename(oldName, newName, function(err) {
if (err) {
res.send("上传失败")
} else {
res.send("上传成功")
}
})
})
app.listen(8888)


 1万+
1万+


 被折叠的 条评论
为什么被折叠?


