


一、组件的介绍
1、组件的作用
- 整个项目都是由组件组成
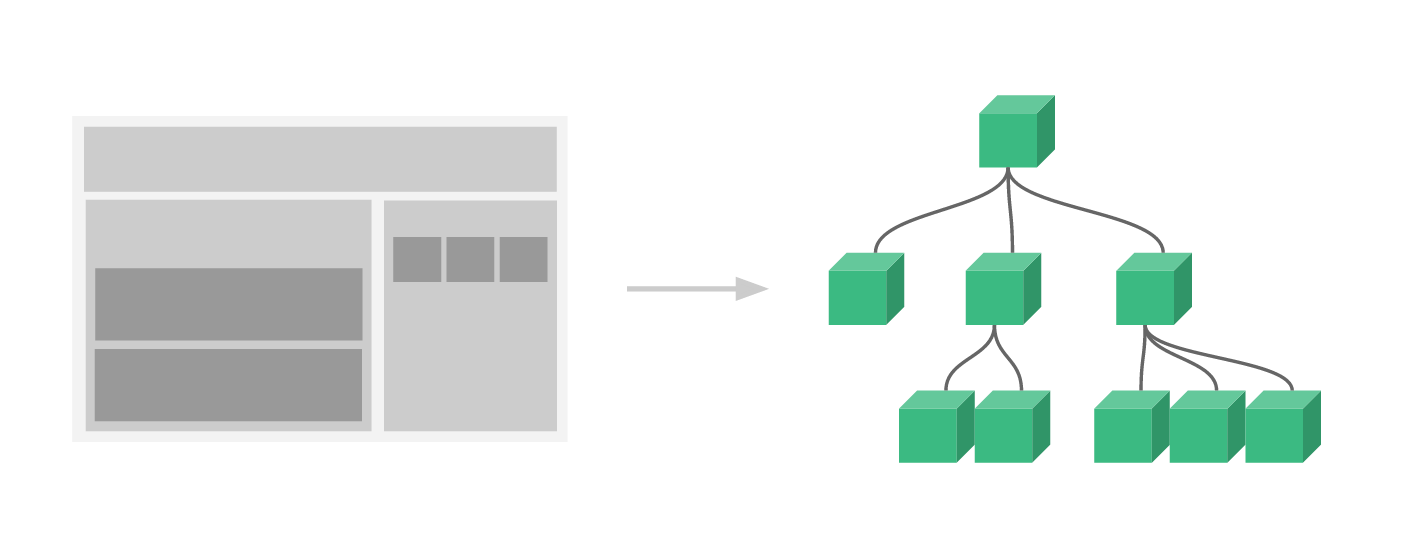
- 可以让代码复用:相似结构代码可以做成一个组件,直接进行调用就可以使用,提高代码复用性
- 可以让代码具有可维护性(只要改一处,整个引用的部分全部都变)
注意点:组件和模块区别
- 模块仅对逻辑进行复用
- 组件针对与结构、逻辑、样式进行复用的UI控件
2、组件分类
- 按作用范围分类
- 全局组件:项目中所有地方都可以的组件称为全局组件
- 局部组件(私有组件):仅有该组件才能使用的组件称为局部组件
- 按照用途来分
- 页面组件
- 自定义组件
3、局部组件
使用局部组件的具体步骤
-
第1步:在src下的components下创建一个单文件组件
单文件组件由三部分组成
template:页面的结构的script:该组件的逻辑代码style:该组件的样式的代码
<template>
    <div class="box">
        <h1>计数器</h1>
        <div>{{num}}</div>
        <div>
            <button @click="num++">+</button>
        </div>
    </div>
</template>

<script>
export default {
    data(){
        return{
            num:0
        }
    }
}
</script>

<style>

    box{
        width: 100px;
        height: 100px;
        border: 1px solid #ccc;
    }
</style>
- 第2步:通过ES6的import将自定义的组件引入进来
import HelloWorld from './components/HelloWorld.vue'
- 第3步:注册组件
export default {
  components:{
    HelloWorld
  }
}
- 第4步:在template模板中直接引用
 <HelloWorld></HelloWorld>
 <hello-world></hello-world>
注意:在template模板的地方如果要引入局部的自定义组件,可以使用短横线命名法或者使用驼峰式命名法均可
4、全局组件
定义全局组件的步骤
- 首先现在src/components下创建自定义组件
- 在main.js进行全局注册
import HelloWorld from '@/components/HelloWorld.vue'
/*
  全局注册的语法
  Vue.comoponent(参数1,参数2)
  参数1:组件的名称,这个名称可以在其他组件中直接进行调用
  参数2:导入的组件对象名称
*/
Vue.component('HelloWorld',HelloWorld)
- 在相应的组件中直接引入
<HelloWorld></HelloWorld>
5、父子组件
- 定义子组件MovieItem
<template>
    <div class="container-item">
        <div class="item-1">
            <img src="https://img9.doubanio.com/view/photo/s_ratio_poster/public/p2455050536.jpg" alt="">
        </div>
        <div class="item-2">
            <div>大话西游之大圣娶亲 西遊記大結局之仙履奇緣</div>
            <div></div>
        </div>
    </div>
</template>

<script>
export default {

}
</script>

<style lang="scss">
    .container-item{
        display: flex;
        flex-direction: column;
        width: 135px;
        height: 220px;
        border: 1px solid #000;
        border-radius: 15px;
        margin: 5px;
        .item-1{
            height: 177px;
            background-color: blue;
            overflow: hidden;
            img{
                width: 135px;
            }
        }
        .item-2{
            display: flex;
            flex-grow: 1;
            background-color: red;
        }
    }
</style>
- 定义MovieList组件
<template>
   <div class="container">
        <div class="title-container"></div>
        <div class="content-container">
            <movie-item></movie-item>
            <movie-item></movie-item>
            <movie-item></movie-item>
            <movie-item></movie-item>
            <movie-item></movie-item>
            <movie-item></movie-item>
            <movie-item></movie-item>
            <movie-item></movie-item>
        </div>
   </div>
</template>

<script>
import MovieItem from './MovieItem.vue'
export default {
    components:{
        MovieItem
    }
}
</script>

<style lang="scss">
    .container{
        display: flex;
        width: 617px;
        height: 500px;
        flex-direction: column;
        background-color: yellow;
        .title-container{
            display: flex;
            width: 100%;
            height: 40px;
            background-color: red;
        }
        .content-container{
            display: flex;
            flex-wrap: wrap;
            justify-content: center;
            width: 100%;
            flex-grow: 1;
            background: springgreen;
        }
    }
</style>

如上操作电影的列表项内容、图片、评分都是固定的,如果想要内容、图片、评分不一样,就应该学习组件的通信
三、组件通信
组件的通信方式很多,大致分成如下几种
- 父向子传值的方式:
props - 子组件向父组件通信:自定义事件
$emit - 兄弟组件的通信:
- 状态提升
- EventBus
- 订阅与
- 发布模式
- 跨级组件之间的通信:provider和inject
- 无关系组件之间通信:状态机(vuex,pinia)
1、父组件向子组件通信
一个组件的数据来自两个地方,一个地方是来自本组件内部(data),另一个来自组件外部(props),props用来接收该组件之外的数据(来自它的父组件)

1.1、父组件向子组件通信的步骤
- 首先在子组件中声明props选项,然后定义要传递的数据名称
export default {
    props:['title','imgurl']
}
- 其次在子组件的template部分,使用v-bind动态的接收属性,使用插值表达式动态的接收内容
<template>
    <div class="childBox">
        <h2>我是儿子</h2>
        <div>
            <div>{{title}}</div>
            <div>
                <img :src="imgurl">
            </div>
        </div>
    </div>
</template>
- 在父组件的template引入子组件的标签部分进行传值
<template>
  <div class="parentBox">
    <h1>我是父组件</h1>
    <child :title="title" :imgurl="imgurl"></child>
  </div>
</template>

<script>
import Child from './components/Child.vue'
export default {
  components: { Child },
  data(){
    return{
      title:'哈利·波特与魔法石 Harry Potter and the Sorcerer',
      imgurl:'https://img9.doubanio.com/view/photo/s_ratio_poster/public/p2614949805.jpg'
    }
  }
}
</script>

<style>
  .parentBox{
    width: 300px;
    height: 500px;
    background-color:tomato;
  }
</style>
1.2、props的验证器和默认值
子组件通过props来引入外部的数据,但是这是这些数据的类型和内容如果要加以限制,就需要使用都props的验证器
1)验证类型
Prop 的验证是指子组件可以对外部传递进来的数据的类型或内容设置验证规则。例如在子组件组中设置想要接收age数据的值是Number类型,如果接收到的不是Number类型,浏览器中就会抛出报错。
如果要设置验证,props属性的值需要切换为对象:
export default {
      props: {
          age: Number
    }
}
2)其他验证规则
除了定义简单的数据类型验证外,props 还支持其他的一些验证规则:
1)设置多个类型,例如 age 属性接收数字和字符串都可以:
export default {
      props: {
          age: [Number, String]
    }
}
2)必填属性,例如 age 属性必须传值:
export default {
      props: {
        age: {
            type: [Number, String],
            required: true
        }
    }
}
3)默认值,例如 age 属性如果没有传值,就使用默认值 18:
export default {
      props: {
        age: {
            type: [Number, String],
            default: 18
        }
    }
}
4)对象和数组类型的默认值,必须通过函数的返回值来设置:
export default {
      props: {
        friends: {
            type: Array,
            default: () => ['韩梅梅', '李华'], // 数组的默认值
            // 或
            type: Object,
            default: () => ({ name: '韩梅梅' })  // 对象的默认值
        }
    }
}
5)自定义验证规则,例如 age 接收的值必须在 18 到 25 的范围内:
export default {
      props: {
        age: {
            type: Number,
            validator: value => value >= 18 && value <= 25
        }
    }
}
注意:Prop 会在一个组件创建之前进行验证,所以组件的属性 (如data、computed等) 在default或validator函数中是不可用的。
2、子组件向父组件传值
子组件向父组件传值是一种逆向行为,通过$emit自定义事件的方式来进行传值,具体的步骤如下
- 子组件中触发相应事件,通过
$emit来自定义事件
methods:{
        sendMsgToParent(){
          //在这里调用vue中的$emit方法,完成自定义事件设置
         /*
            $emit方法用来自定义事件
            它由两个参数
            参数1:自定义事件的名称
            参数2:所要传递的数据
         */
          this.$emit('make',this.cmsg)
        }
  }
- 在父组件引用子组件的开始标签中调用这个自定义事件
<child @make="getMsgFromChild"></child>
- 在父组件的methods选项中定义方法用来实现父组件接收子组件的方法
methods:{
    //此处用于接收子函数的参数是$emit的第2个参数
    getMsgFromChild(val){
       console.log(val)
    }
}
- 将从子组件中接收的信息赋值给该组件的data选项中的数据
 data(){
    return{
      info:''
    }
  },
  methods:{
    //此处用于接收子函数的参数是$emit的第2个参数
    getMsgFromChild(val){
       this.info=val
    }
}
3、兄弟组件的通信
兄弟组件之间的通信可以采用三种方式
- 状态提升:首先把组件的数据通过子传父的方式传递给父组件,而后再将父组件接收到这个数据通过父传子的方式传递给另外兄弟组件
- 事件总线:
- 发布与订阅
1)通过eventBus进行兄弟组件传值
- 在src/utils文件夹下创建eventBus.js
//导入vue依赖包
import Vue from 'vue'
//实例化一个Vue对象并默认导出
export default new Vue()
- 在数据的发送方编写代码如下
import bus from '@/utils/eventBus'
export default {
    data(){
        return{
            msg:''
        }
    },
    methods:{
        sendMsgToBrother(){
           //调用vue实例中的$emit来完成发送信息
           bus.$emit('sharekey',this.msg)
        }
    }
}
说明:调用bus对象的$emit方法来完成发送信息
- 在数据的接收方,可以使用bus.$on方法来接收信息
import bus from '@/utils/eventBus'
export default {
    data(){
        return{
            fromBrotherMsg:''
        }
    },
    //调用组件创建完之后会被调用
    created(){
       bus.$on('sharekey',val=>{
        this.fromBrotherMsg=val
       })
    }
}
特别注意:我们在使用bus.$on接收信息的时候,它的第2个参数应该写成箭头函数(这里由于this指向的问题)
2) 发布与订阅方式
- 在终端上通过npm下载pubsub-js包
npm i pubsub-js
- 在信息发送方,通过pubsub对象中的publish方法来实现发送
import pubsub from 'pubsub-js'
export default {
    data(){
        return{
            msg:''
        }
    },
    methods:{
        sendMsgToBrother(){
          pubsub.publish('gileskey',this.msg)
        }
    }
}
- 在信息的接收方,使用pubsub.subscribe方法来接收信息
import pubsub from 'pubsub-js'
export default {
    data(){
        return{
            fromBrotherMsg:''
        }
    },
    created(){
       pubsub.subscribe('gileskey',(arg1,arg2)=>{
          this.fromBrotherMsg=arg2
       })
    }
}
4、跨级组件的传值
如果要进行跨级组件的通讯,可以考虑使用provider/inject选项来完成
App.vue组件
<template>
    <div class="box">
      <h1>祖父组件</h1>
      <child></child>
    </div>
</template>

<script>
import Child from '@/components/Child.vue'
export default {
  components:{
    Child
  },
  provide:{
    akey:'我是爷爷'
  }
}
Child.vue组件
<template>
    <div class="cbox">
        <h2>子组件</h2>
       <grand-son></grand-son>
    </div>
</template>

<script>
import GrandSon from '@/components/GrandSon.vue'
export default {
    components:{
        GrandSon
    }
}
</script>

<style>
    .cbox{
        width: 400px;
        height: 300px;
        background-color: springgreen;
    }
</style>
GrandSon.vue组件
<template>
    <div class="gcbox">
        <h3>孙子组件</h3>
        <div>{{akey}}</div>
        <grand-son-son></grand-son-son>
    </div>
</template>

<script>
import GrandSonSon from '@/components/GrandSonSon.vue'
export default {
    components:{
        GrandSonSon
    },
    inject:['akey']
}
</script>

<style>
    .gcbox{
        width: 300px;
        height: 200px;
        background-color: yellow;
    }
</style>
四、插槽
slot的官方定义是用于组件内容分发,简单通俗的解释就是在组件化开发中,虽然组件是一样的,但是在不同的使用场景,组件的某一部分需要有不同的内容显示。slot就好比组件开发时定义的一个参数,如果不传入值就当默认值使用,如果传入了新值,在组件调用时就会替换定义时的slot默认值。
slot分为三大类:
- 匿名slot
- 具名slot
- 作用域插槽
1、匿名插槽
匿名插槽是没有插槽称为匿名插槽
案例:编写一个模态框组件
<template>
<div class="box">
<div class="header">
<div class="close">×</div>
</div>
<div class="main">
<slot>暂无内容</slot>
</div>
</div>
</template>
<script>
export default {
}
</script>
<style lang="scss">
.box{
width: 325px;
border-radius: 5px;
border: 1px solid #000;
.header{
position: relative;
height: 40px;
background-color: #007CB7;
.close{
position:absolute;
right: 10px;
line-height: 40px;
color: white;
font-size: 32px;
}
}
.main{
padding: 10px;
text-align: center;
}
}
</style>
在页面组件调用的时候
<template>
    <div>
        <ModalDialog title="登录">
            <div>
              <div class="item">
                 <input type="text" placeholder="请输入手机号" class="input">
              </div>
              <div class="item">
                 <input type="text" placeholder="请输入密码" class="input">
              </div>
              <div class="item">
                  <button class="loginBtn">登录</button>
              </div>
            </div>
        </ModalDialog>

        <modal-dialog title="个人介绍">
            <img class="headImg" src="https://img0.baidu.com/it/u=3464224756,2566048582&fm=253&fmt=auto&app=138&f=JPEG?w=350&h=500" alt="">
        </modal-dialog>
    </div>
</template>

<script>
import ModalDialog from '@/components/ModalDialog.vue'
export default {
  components:{
    ModalDialog
  }
}
</script>

<style>
  .loginBtn{
    width: 250px;
    height: 37px;
    background-color:#007CB7;
    border: none;
    border-radius: 5px;
    text-align: center;
    line-height: 37px;
    color: white;
  }
  .item{
    line-height: 50px;
  }
  .input{
    width: 250px;
    height: 35px;
    border-radius: 5px;
  }
  .headImg{
    width: 300px;
  }
</style>
2、具名插槽
- 编写自定义组件使用
<slot>完成插槽的占位,由于有多个插槽,所以一定要在每个<slot>上添加name属性,使用name属性来为该插槽取名字
<template>
   <div class="box">
      <div>
        <slot name="title">暂无标题</slot>
      </div>
      <div>
        <slot name="name">暂无名称</slot>
      </div>
      <div>
         <slot name="multipart">
            <img src="http://old.woniuxy.com/page/img/head_picture/0.jpg" style="width:30px;height:30px" alt="">
        </slot>
      </div>
      <div>
        <slot name="desc">暂无简介</slot>
      </div>
   </div>
</template>
- 页面组件中要引用组件,并且给相应插槽赋值,有如下规则
- 必须使用
<template> - 使用v-slot:插槽名称或者使用
#插槽名称可以在调用组件的时候将内容传递给组件的内容slot占位部分
- 必须使用
<template>
  <div class="container">
    <card>
       <template v-slot:title>蜗牛学苑</template>
       <template v-slot:name>马宇航</template>
       <template v-slot:multipart>
          <img style="width:30px" src="http://old.woniuxy.com/page/image/userIcon/teacherIcon/mayuhang.jpg">
       </template>
       <template v-slot:desc>
          6年项目研发经验及管理经验,PMP证书持有者
       </template>
    </card>
    <card>
       <template #title>🐌蜗牛学苑</template>
       <template #name>徐海东</template>
    </card>
  </div>
</template>
3、作用域插槽
所谓的作用域插槽是带数据插槽,将子组件的数据传递给父组件,然后父组件得到这个数据后展示不同的效果,我们将这种称为作用域插槽
<template>
   <div class="cbox">
        <div class="header">
            <span>{{title}}</span>
        </div>
        <div class="main">
            <ul>
                <li v-for="(item,index) in items" :key="index">
                   <slot :item="item">{{item.name}}</slot>
                </li>
            </ul>
        </div>
   </div>
</template>

<script>
export default {
    props:['title','items']
}
</script>

<style lang="scss">
    .cbox{
        display: flex;
        flex-direction: column;
        width: 215px;
        height: 300px;
        border: 1px solid #ccc;
        border-radius: 5px;
        .header{
            display: flex;
            align-items: center;
            margin-left: 5px;
            font-size: 18px;
            font-weight: bold;
            height: 35px;
            border-bottom: 1px dashed #ccc;
        }
        li{
            line-height: 32px;
        }
        .main{
            flex-grow: 1;
        }
    }
</style>
App.vue
<template>
    <div style="display:flex">
       <MyList title="Shape" :items="shapes"></MyList>
       <MyList title="Color" :items="colors">
          <template slot-scope="scope">
            <div class="item">
               <div class="bock" :style="`background:${scope.item.hex}`"></div>
               <div>{{scope.item.name}}</div>
            </div>
          </template>
       </MyList>
    </div>
</template>

<script>
import MyList from '@/components/MyList.vue'
export default {
  components: { MyList},
  data(){
    return{
      shapes: [
        { name: "Square", sides: 4 },
        { name: "Hexagon", sides: 6 },
        { name: "Triangle", sides: 3 },
      ],
      colors: [
        { name: "Yellow", hex: "#F4D03F" },
        { name: "Green", hex: "#229954" },
        { name: "Purple", hex: "#9B59B6" },
      ]
    }
  }
}
</script>

<style>
  .item{
    display: flex;
  }
  .bock{
    width: 40px;
    height: 20px;
    border: 1px solid #000;
  }
</style>
五、组件的生命周期【面试题重点】
1、什么是生命周期
所谓的生命周期是指该组件对象从开始创建到销毁回收的整个全过程
2、生命周期函数
在生命周期中被自定执行的函数我们称为生命周期函数,也成为钩子函数
3、vue2中生命周期的函数
整个组件从开始到销毁要经过生命周期的阶段,每到一个阶段,相对应的函数就会被执行
| 生命周期 | 含义 |
|---|---|
| beforeCreate | 在组件创建之前被调用 |
| created | 在组件创建之后被调用 |
| beforeMount | 模板编译、挂载之前被调用 |
| mounted | 模板编译、挂载之后被调用 |
| beforeUpdate | 组件更新之前被调用 |
| updated | 组件更新之后被调用 |
| beforeDestory | 在组件销毁之前被调用 |
| destoryed | 在组件销毁之后被调用 |
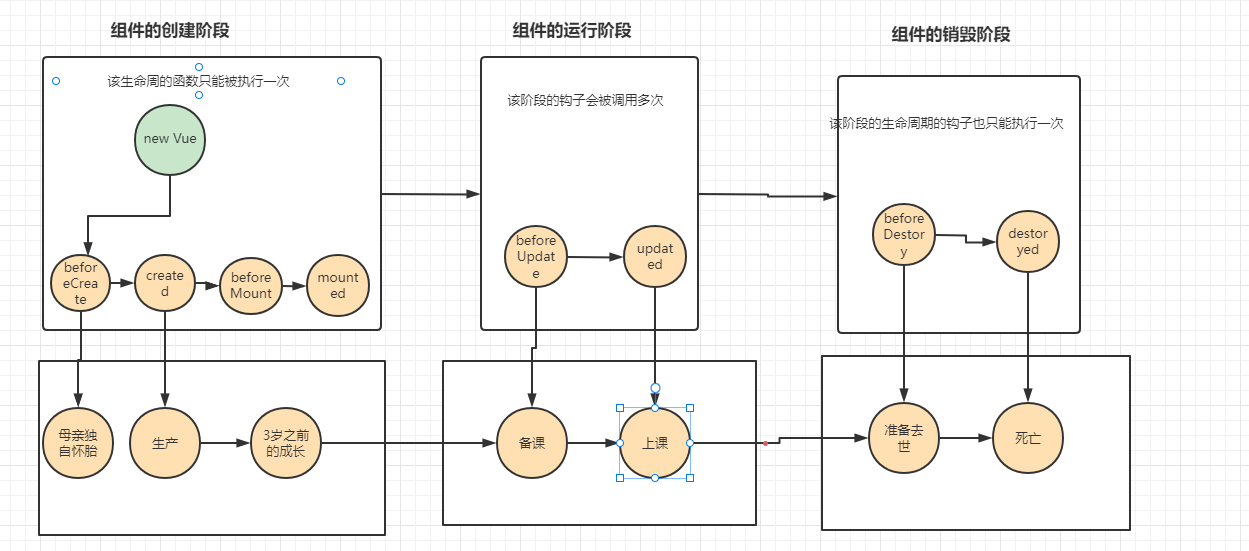
4、生命周期的阶段
我们将这个生命周期的阶段划分为三个阶段
5、生命周期图示【理解】
第1个阶段:组件创建阶段
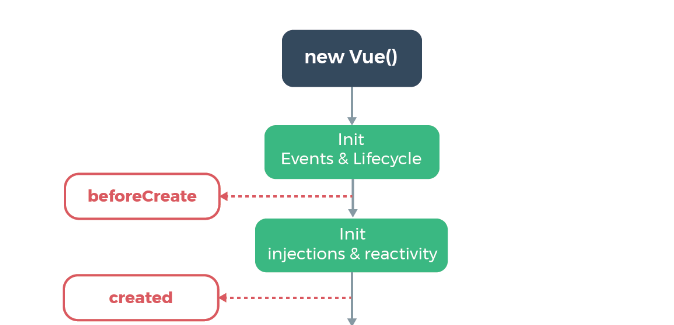
- new Vue():创建组件的实例对象
- Init Events&Lifecycle:初始化事件和生命周期函数
- beforeCreate:组件中的props/data/methods这些尚未创建,都处于不可以用的状态,在实际的开发过程中几乎没有用处
- Init injections & reactivity:组件props/data/methods才开始初始化这些选项
- created:组件中的props/data/methods这些数据已经初始化成功了,但是这里不能放问页面的DOM元素,因为此时模板还没有被编译创建出来
   beforeCreate(){
     console.group('----1、beforeCreate--------');
     console.log('data',this.num);  //undefined
     console.log('methods',this.fn); //undefined
     console.log('props',this.ptitle);//undefined
     console.groupEnd()
   },
  created(){
    console.group('----2、created--------');
    console.log('data',this.num);//可以访问数据为0
    console.log('methods',this.fn);  //也可以访问
    console.log('props',this.ptitle); //也可以访问
    console.log('dom元素', this.$refs.titleDom); //不能访问,这里的数据为undefined,因为模板没有创建
    console.groupEnd()
  },
总结:在实际开发过程中beforeCreate几乎不用,created使用的比较多,一边情况在这里完成网络请求,和后端交互、完成一些初始化的操作,创建定时器等功能更
向后端发送网络请求的技术有三种
- Ajax方式:这种方式存在弊端就是
- fetch方式:这种实际上对Ajax的封装,比Ajax要强
- axios方式:目前使用的最多的一种
案例1:使用原生ajax获取网络数据
步骤如下
第1步:在src/utils目录下创建request.js文件,该文件用于封装ajax请求
//使用具名导出ajax函数
export function ajax(method,url){
  return new Promise((resolve,reject)=>{
     //创建XMLHttpRequest对象
     let xhr=new XMLHttpRequest()
     //初始化XMLHttpRequest对象
     xhr.open(method,url,true)
     //如果是GET请求发送信息
     xhr.send()
     //设置回调函数
     xhr.onreadystatechange=function(){
        //判断状态码必须是4的时候并且响应码必须是200的时候返回数据
        if(xhr.readyState==4){
            if(xhr.status==200){
              //获取服务端发送回来的数据
              resolve(xhr.responseText)
            }else{
              reject('network failure')
            }
        }
     }
  })
}
第2步:在组件中引入的created函数中调用获取网络数据
import {ajax} from '@/utils/request'
export default {
    data(){
        return{
            list:[]
        }
    },
    methods:{
       async getOperas(){
            //使用async/await
            let response=await ajax('GET','https://www.fastmock.site/mock/4441a79ad5f884f83b784cf4c588bdb6/movies/getAllOperas')
            this.list=JSON.parse(response).operas;
        }
    },
     created(){
       //使用then方式获取promies成功后的数据
    //    ajax('GET','https://www.fastmock.site/mock/4441a79ad5f884f83b784cf4c588bdb6/movies/getAllOperas').then(response=>{
    //        //将返回回来的数据由JSON转成js对象
    //        let result=JSON.parse(response)
    //        console.log(result.operas);
    //        //将获取的数据赋值给data的list数据
    //        this.list=result.operas
    //    })
        this.getOperas()
    }
}
第3步:在template模板中渲染
<template>
    <div>
        <h1>获取所有的电影院信息</h1>
        <ul>
            <li v-for="item in list" :key="item.id">{{item.name}}</li>
        </ul>
    </div>
</template>
第2个阶段:编译HTML模板并渲染到浏览器中

- 这个过程的主要工作可以理解为将data中数据读到内存中,再填充到template之后进行编译,这个编译过程由
vue-template-compiler这个依赖包来完成编译的 - beforeMount:将内存中编译好的HTML结构然后渲染到浏览器中,此时浏览器还没有中还没有当前DOM结构,在这钩子函数中直接操作DOM
- create vm.$el and replace "el" with it:用内存中编译好的HTML结构,替换掉el属性指定的DOM元素
- mounted:已经把内存中的HTML结构成功的渲染到了浏览器之中,此时你可以直接在这个钩子函数中去操作DOM元素了
第3阶段:组件更新阶段
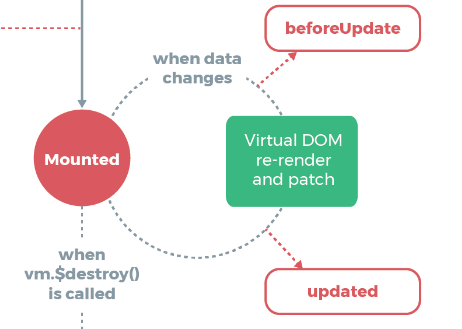
- 当数据变化变化的时就会触发beforeUpdate,这个时候data数据是会变化的,但是页面还没有渲染
- Virtual DOM re-render and patch:根据最新的数据,重新渲染组件的DOM结构
- updated:已经是最新的数据,完成了组件DOM结构的重新渲染
第4阶段:组件销毁阶段

beforeDestory:这个生命周期函数,是组件即将销毁,此时尚未销毁组件,组件还能正常运行,一般在这个函数会完成资源的释放操作
Teardown watcher... 销毁当前组件的侦听器、子组件、事件监听
destoryed:组件已经被销毁,此组件在浏览器中的DOM已经被完全移除
案例:停止定时器操作
 created(){
    //定义一个间隔定时器,每隔1秒钟进行加1操作
    this.times=setInterval(() => {
      console.log('num',this.num);
      this.increment()
    }, 1000);
 }
 beforeDestroy(){
    console.log('---7、beforeDestroy-------------');
    //调用销毁定时器的方法
    clearInterval(this.times)
  },
六、动态组件【了解】
1、概念
动态组件是指动态的切换组件的
2、语法
<component :is="加载的组件名称"></component>
3、keep-alive
默认情况下,切换动态组件的时,无法保存组件的状态的,此时可以使用使用keep-alive来实现缓存组件中的状态,从而保存切换时组件状态的

使用动态组件的时候当切换到Second组件的时候,首先先执行beforeCreate、created、beforeMount之后会把First组件进行销毁会调用First组件的beforeDestory和destoryed方法,所以第一个组件的状态就不会被保存
4、keep-alive的相关的生命周期
在vue2的生命周期中有8个常用方法,但是如果使用了keep-alive后,还有两个相关的生命周期的钩子函数
- deactivated:当组件被缓存的时候,会调用该生命周期的函数
- activated:当组件被激活的时候,会自动触发组件的该函数

注意:当进入到第2个组件的时候,首先执行beforeCreate、created、beforeMount,此时将第一个组件的数据缓存起来,然后在调用第2个组件的mounted函数和activated函数,后续再次切换的时候就只会执行和keep-alive相关的的激活和缓存方法。
5、include和exclude属性
如果在动态组件的外面使用keep-alive将动态组件包起来,那么动态组件引入的组件都会被缓存,要么不使用keep-alive包裹就不会缓存任何数据,在实际开发中到底是缓存数据好还是不缓存数据好。
如果在一个动态组件中,需要缓某个组件可以使用include属性,将需要缓存的组件写入,如果需要缓存多个,之间使用逗号(,)隔开
 <keep-alive include="First,Third">
      <component :is="componentName"></component>
 </keep-alive>
如果在一个动态组件中,不需要缓某个组件可以使用exclude属性,将需要缓存的组件写入,如果需要缓存多个,之间使用逗号(,)隔开
 <keep-alive exclude="Third,First">
      <component :is="componentName"></component>
    </keep-alive>
七、异步组件
1、为什么使用异步组件
之前如果要使用一个组件必须要先使用import XX from '组件路径'的方式导入组件,然后通过components中注册这个组件,但是这种导入导入组件的方式相当于页面一加载,将所有的组件全部导入,然后再注册,这样对于性能来讲负担很重,那么如何能解决这个问题,可以使用import()或者require函数的方式导入组件,再使用的时候才导入它,这样性能就有一个大幅度的提升
2、异步组件的好处
可以避免页面一加载时就去加载全部的组件,从而导致页面访问时间变长的问题,使用异步组件后,只有当需要某个组件的时候才会去加载需要的组件。
<template>
   <div>
        <h1>异步组件的演示案例</h1>
        <button @click="handleclick">按钮</button>
        <div v-if="show">
            <AsyncList></AsyncList>
        </div>
   </div>
</template>

<script>
import LoadingComponent from '@/components/LoadingComponent.vue'
import ErrorComponent from '@/components/ErrorComponent.vue'
//定义了一个关于异步组件的对象
const AsyncList=()=>{
    return{
      //component:要加载的组件,组件使用异步方式加载
      component:import('@/components/MyList.vue'),
      //加载中显示的组件
      loading:LoadingComponent,
      //在指定的毫秒数内没有加载进来则进入该组件
      error:ErrorComponent,
      //延时毫秒数
      delay:200,
      //超时时间毫秒数
      timeout:21500,
    }
}
export default {
    components:{
       AsyncList
    },
    data(){
        return{
            show:false
        }
    },
    methods:{
        handleclick(){
            this.show=!this.show
        }
    }
}
</script>


 1092
1092


 被折叠的 条评论
为什么被折叠?
被折叠的 条评论
为什么被折叠?
 到【灌水乐园】发言


