


目录
1. 前言
在开发中,对于 LayoutInflater 的 inflate() 方法,它的作用是把 xml 布局转换为对应的 View 对象,我们几乎天天在用。但是,对于 inflate() 方法的参数,是比较令人迷惑的。即便是看了文档的解释,依然不能解开迷惑。
或许,每次使用只能采取试验的办法,也不会非常影响开发;或许,记住在具体场景该怎么传递具体的参数,而不明所以。
我们不应该忽略细节:
public View inflate(@LayoutRes int resource, @Nullable ViewGroup root, boolean attachToRoot)
ViewGroup root参数的作用是什么,为什么有时候可以传null,有时候却不可以?boolean attachToRoot参数什么时候传true,什么时候传false?为什么有时候传递true会崩溃?- 为什么有的时候 xml 中根节点设置的布局参数却不生效?
这篇文章主要是说明 inflate() 方法参数的含义,以及在具体场景的使用。
2. 正文
2.1 inflate() 方法分析
在 LayoutInflater 类中,有几个重载的 inflate() 方法:
public View inflate(@LayoutRes int resource, @Nullable ViewGroup root)
public View inflate(@LayoutRes int resource, @Nullable ViewGroup root, boolean attachToRoot)
public View inflate(XmlPullParser parser, @Nullable ViewGroup root)
public View inflate(XmlPullParser parser, @Nullable ViewGroup root, boolean attachToRoot)
大家在实际开发中,使用比较多的应该是前两个。
它们的调用关系(箭头指向表示调用方向)如下:

从图中可以看出前三个最终调用的都是最后一个:
public View inflate(XmlPullParser parser, @Nullable ViewGroup root, boolean attachToRoot)
那么现在,我们集中精力去看最后一个方法。把最后一个方法搞清楚就可以了,就可以搞懂另外三个了。
这个方法中的第一个参数 XmlPullParser parser,查看源码,可以看到:
final Resources res = getContext().getResources();
XmlResourceParser parser = res.getLayout(resource);
是由 xml 转换而来的,用来对 xml 进行解析的一个类。
好了,我们已经了解了第一个参数的含义,就是传递要转换的 xml 布局过来。
接着看后面的两个参数:@Nullable ViewGroup root 和 boolean attachToRoot。需要注意的是 ViewGroup root 前面有一个注解 @Nullable,表示 ViewGroup root 这个参数可以为 null。
这两个参数的取值组合有几种呢?4 种。
| 取值组合 | ViewGroup root | boolean attachToRoot |
|---|---|---|
| 第一组 | notNull | false |
| 第二组 | notNull | true |
| 第三组 | null | false |
| 第四组 | null | true |
不同的取值组合,对于最后的返回值 View 有什么影响呢?
到这里,我们需要去查看一下 inflate(XmlPullParser parser, @Nullable ViewGroup root, boolean attachToRoot) 方法的源码:
public View inflate(XmlPullParser parser, @Nullable ViewGroup root, boolean attachToRoot) {
    synchronized (mConstructorArgs) {
        final Context inflaterContext = mContext;
        final AttributeSet attrs = Xml.asAttributeSet(parser);
        View result = root;
        advanceToRootNode(parser);
        // 获取根节点的名字,比如 LinearLayout, FrameLayout 等。
        final String name = parser.getName();
        if (TAG_MERGE.equals(name)) {
        	// 根节点的名字是 merge
            if (root == null || !attachToRoot) {
                throw new InflateException("<merge /> can be used only with a valid "
                        + "ViewGroup root and attachToRoot=true");
            }
            rInflate(parser, root, inflaterContext, attrs, false);
        } else {
            // Temp is the root view that was found in the xml
            // 获取 xml 布局的根 View 对象,比如 LinearLayout 对象,FrameLayout 对象等。
            final View temp = createViewFromTag(root, name, inflaterContext, attrs);
            ViewGroup.LayoutParams params = null;
            if (root != null) {
                // Create layout params that match root, if supplied
                params = root.generateLayoutParams(attrs);
                if (!attachToRoot) {
                    // Set the layout params for temp if we are not
                    // attaching. (If we are, we use addView, below)
                    temp.setLayoutParams(params);
                }
            }
            // Inflate all children under temp against its context.
            rInflateChildren(parser, temp, attrs, true);
            // We are supposed to attach all the views we found (int temp)
            // to root. Do that now.
            if (root != null && attachToRoot) {
                root.addView(temp, params);
            }
            // Decide whether to return the root that was passed in or the
            // top view found in xml.
            if (root == null || !attachToRoot) {
                result = temp;
            }
        }
        return result;
    }
}
我们先不考虑根节点为 merge 的情况,因为这是比较特殊的根节点。先按照一般的情况来分析,有助于解决普遍的问题。
2.1.1 根节点不是 merge 时,第一组取值情况分析
| 根节点是否是 merge | 取值组合 | ViewGroup root | boolean attachToRoot |
|---|---|---|---|
| 否 | 第一组 | notNull | false |
在第 5 行 View result = root; 把 root 的值赋值给 View result,那么有 result 的值是 notNull。
在第 21 行 if (root != null) 的判断语句判断为 true,能进入 if 语句。
在第 23 行 params = root.generateLayoutParams(attrs);,通过 root 来获取根节点的布局参数 ViewGroup.LayoutParams 对象,也就是说,把 xml 中的根节点的 layout_ 开头的属性,如layout_width 和 layout_height 对应的值转为布局参数对象中的字段值,如width 和 height 值。对应的源码在 ViewGroup 中如下:
public LayoutParams generateLayoutParams(AttributeSet attrs) {
    return new LayoutParams(getContext(), attrs);
}
public LayoutParams(Context c, AttributeSet attrs) {
    TypedArray a = c.obtainStyledAttributes(attrs, R.styleable.ViewGroup_Layout);
    setBaseAttributes(a,
            R.styleable.ViewGroup_Layout_layout_width,
            R.styleable.ViewGroup_Layout_layout_height);
    a.recycle();
}
这个方法被 ViewGroup 的子类重写后,会解析 xml 中更多的布局参数,例如在 LinearLayout 中重写后,还会解析 layout_weight 和 layout_gravity 参数。
在第 24 行 if (!attachToRoot) 判断,因为这里的 attachToRoot 取值为 false,所以判断为 true,进入 if 分支,到达第 27 行 temp.setLayoutParams(params);,把布局参数设置给了根节点控件对象。
在第 34 行 if (root != null && attachToRoot) 判断,由于 attachToRoot 为 false,所以判断为 false,不会进入 if 语句,也就是说不会把根节点控件对象以及布局参数设置给 root。
在第 39 行 if (root == null || !attachToRoot) 判断,由于 attachToRoot 为 false,所以判断为 true,进入 if 语句,到达第 40 行 result = temp;,也就是把根节点控件对象赋值给了 result 变量。
在第 43 行,return result; ,返回的就是根节点对象。
总结一下:
| 根节点是否是 merge | 取值组合 | ViewGroup root | boolean attachToRoot | 返回值 |
|---|---|---|---|---|
| 否 | 第一组 | notNull | false | 返回的是 xml 布局的根节点 View 对象,并且对象上拥有根节点上的布局参数。 |
2.1.2 根节点不是 merge 时,第二组取值情况分析
| 根节点是否是 merge | 取值组合 | ViewGroup root | boolean attachToRoot |
|---|---|---|---|
| 否 | 第二组 | notNull | true |
我们直接从第 24 行开始,因为之前的代码流程和第一组取值情况是一模一样的。
在第 24 行,if (!attachToRoot) 判断,由于 attachToRoot 的取值为 true,所以判断为 false,不会进入 if 分支,也就是说不会把布局参数设置给了根节点控件对象。
在第 34 行 if (root != null && attachToRoot) 判断,由于 root 不为 null 并且 attachToRoot 为 true,所以判断为 true,会进入 if 语句,第 35 行:root.addView(temp, params);,也就是说会把根节点控件对象以及布局参数设置给 root。
在第 39 行 if (root == null || !attachToRoot) 判断,因为 root 不为 null 且 attachToRoot 不为 false,所以判断为 false,不会进入此分支。
在第 43 行 return result;,result 是在第 5 行被赋值为 root,没有被重新赋值,所以返回的是 root。
小结一下:
| 根节点是否是 merge | 取值组合 | ViewGroup root | boolean attachToRoot | 返回值 |
|---|---|---|---|---|
| 否 | 第二组 | notNull | true | 返回的是添加了根节点 View 对象以及布局参数的 root 对象 |
2.1.3 根节点不是 merge 时,第三组取值情况分析
| 根节点是否是 merge | 取值组合 | ViewGroup root | boolean attachToRoot |
|---|---|---|---|
| 否 | 第三组 | null | false |
在第 5 行 View result = root; 把 root 的值赋值给 View result,那么有 result 的值是 null。
在第 21 行 if (root != null) 判断,因为 root 为 null,所以判断为 false,不会进入 if 分支,也就是说 ViewGroup.LayoutParams params 的值仍然是 null,没有发生变化。
在第 34 行 if (root != null && attachToRoot) 判断,因为 root 为 null,所以判断为 false,不会进入 if 分支,也就是说,不会把根节点控件对象以及布局参数设置给 root。
在第 39 行 if (root == null || !attachToRoot) 判断,因为 root 为 null,所以判断为 true,进入 if 分支,到达第 40 行,result = temp;,把根节点控件对象 temp 赋值给了 View result 变量。
在第 43 行 return result;,返回的是谁呢?返回的是没有布局参数的根节点控件对象。
小结一下:
| 根节点是否是 merge | 取值组合 | ViewGroup root | boolean attachToRoot | 返回值 |
|---|---|---|---|---|
| 否 | 第三组 | null | false | 返回的是没有布局参数信息的根节点 View 对象 |
2.1.4 根节点不是 merge 时,第四组取值情况分析
| 根节点是否是 merge | 取值组合 | ViewGroup root | boolean attachToRoot |
|---|---|---|---|
| 否 | 第四组 | null | true |
我们直接从第 34 行开始,因为之前的代码流程和第三组是一模一样的。
在第 34 行,if (root != null && attachToRoot) 判断,因为 root 为 null,所以判断为 false,不会进入 if 分支,也就是说,不会把根节点控件对象以及布局参数设置给 root。
在第 39 行 if (root == null || !attachToRoot) 判断,因为 root 为 null,所以判断为 true,进入 if 分支,到达第 40 行,result = temp;,把根节点控件对象 temp 赋值给了 View result 变量。
在第 43 行 return result;,返回的是谁呢?返回的是没有布局参数的根节点控件对象。
第四组取值情况和第三组的返回值是一样的。
2.1.5 根节点为 merge 时情况分析
在第 9 行 if (TAG_MERGE.equals(name)) 判断,是 merge 根节点,进入 if 分支;
在第 11 行 if (root == null || !attachToRoot) 判断,若 root 为 null,或者 attachToRoot 为 false,判断都会成立,进入 if 语句后抛出异常。
throw new InflateException("<merge /> can be used only with a valid "
        + "ViewGroup root and attachToRoot=true");
这就是提醒我们,当根节点是 merge 时,root 必须不为 null 而且 attachToRoot 必须为 true。
在第 43 行 return result;,而 result 在第 5 行 View result = root; 被赋值为 root。
总结一下取值情况:
| 根节点是否是 merge | 取值组合 | ViewGroup root | boolean attachToRoot | 返回值 |
|---|---|---|---|---|
| 否 | 第一组 | notNull | false | 返回的是 xml 布局的根节点 View 对象,并且对象上拥有根节点上的布局参数。 |
| 否 | 第二组 | notNull | true | 返回的是添加了根节点 View 对象以及布局参数的 root 对象。 |
| 否 | 第三组 | null | false | 返回的是没有布局参数信息的根节点 View 对象。 |
| 否 | 第四组 | null | true | 返回的是没有布局参数信息的根节点 View 对象。 |
| 是 | notNull(必须) | true(必须) | 返回的是 root 对象。 |
2.2 实际应用
2.2.1 自定义控件填充布局
需要填充的布局 custom_view_layout.xml如下:
<?xml version="1.0" encoding="utf-8"?>
<LinearLayout xmlns:android="http://schemas.android.com/apk/res/android"
    xmlns:app="http://schemas.android.com/apk/res-auto"
    android:orientation="horizontal" android:layout_width="match_parent"
    android:layout_height="wrap_content">

    <ImageView
        android:layout_margin="16dp"
        android:id="@+id/icon"
        android:layout_gravity="center_vertical"
        app:srcCompat="@mipmap/ic_launcher"
        android:layout_width="wrap_content"
        android:layout_height="wrap_content" />

    <TextView
        android:id="@+id/title"
        android:text="标题"
        android:textColor="@android:color/black"
        android:textSize="16sp"
        android:layout_gravity="center_vertical"
        android:layout_width="wrap_content"
        android:layout_height="wrap_content" />

    <View
        android:layout_weight="1"
        android:layout_width="0dp"
        android:layout_height="0dp" />
    <Switch
        android:layout_marginEnd="16dp"
        android:layout_gravity="center_vertical|end"
        android:layout_width="wrap_content"
        android:layout_height="wrap_content" />
</LinearLayout>
CustomView 类如下:
public class CustomView extends LinearLayout {
    public CustomView(Context context, @Nullable AttributeSet attrs) {
        super(context, attrs);
        inflate(context, R.layout.custom_view_layout, this);
    }
}
这里的 inflate() 方法是 View 类的静态方法:
public static View inflate(Context context, @LayoutRes int resource, ViewGroup root) {
    LayoutInflater factory = LayoutInflater.from(context);
    return factory.inflate(resource, root);
}
内部调用的是 LayoutInflater 的第一个 inflate() 方法:
public View inflate(@LayoutRes int resource, @Nullable ViewGroup root) {
    return inflate(resource, root, root != null);
}
ViewGroup root 不为 null 且 boolean attachToRoot 为 true,根节点不是 merge 标签,所以对应的是表格里的第二组情况,返回的是添加了根节点 View 对象以及布局参数的 root 对象,也就是说根节点 View 对象已经添加进入了 root 对象里面。
这里,我们使用 Android Studio 的 Layout Inspector 工具(在 Tools -> Layout Inspector 开启)来查看一下布局:

可以看到出现了重复布局。我们知道,merge 标签可以用于优化重复布局。
现在我们修改布局文件为 custom_merge_view_layout.xml:
<?xml version="1.0" encoding="utf-8"?>
<merge xmlns:android="http://schemas.android.com/apk/res/android"
    xmlns:app="http://schemas.android.com/apk/res-auto">

    <ImageView
        android:layout_margin="16dp"
        android:id="@+id/icon"
        android:layout_gravity="center_vertical"
        app:srcCompat="@mipmap/ic_launcher"
        android:layout_width="wrap_content"
        android:layout_height="wrap_content" />

    <TextView
        android:id="@+id/title"
        android:text="标题"
        android:textColor="@android:color/black"
        android:textSize="16sp"
        android:layout_gravity="center_vertical"
        android:layout_width="wrap_content"
        android:layout_height="wrap_content" />

    <View
        android:layout_weight="1"
        android:layout_width="0dp"
        android:layout_height="0dp" />
    <Switch
        android:layout_marginEnd="16dp"
        android:layout_gravity="center_vertical|end"
        android:layout_width="wrap_content"
        android:layout_height="wrap_content" />
</merge>
代码中填充修改后的布局:
public class CustomMergeView extends LinearLayout {
    public CustomMergeView(Context context, @Nullable AttributeSet attrs) {
        super(context, attrs);
        inflate(context, R.layout.custom_merge_view_layout, this);
    }
}
再次使用布局查看器查看布局:

可以看到使用 merge 标签消除了重复布局。
2.2.2 Fragment 填充布局
新建一个 FragmentInflateActivity.java 文件:
public class FragmentInflateActivity extends AppCompatActivity {

    @Override
    protected void onCreate(Bundle savedInstanceState) {
        super.onCreate(savedInstanceState);
        setContentView(R.layout.fragment_inflate_activity);
        getSupportFragmentManager().beginTransaction()
                .add(R.id.fl_container, MyFragment.newInstance())
                .commit();
    }
    public static void start(Context context) {
        Intent starter = new Intent(context, FragmentInflateActivity.class);
        context.startActivity(starter);
    }
}
对应的 fragment_inflate_activity.xml:
<?xml version="1.0" encoding="utf-8"?>
<FrameLayout xmlns:android="http://schemas.android.com/apk/res/android"
    android:background="@android:color/holo_purple"
    android:id="@+id/fl_container"
    android:padding="8dp"
    android:layout_width="match_parent"
    android:layout_height="match_parent" />
MyFragment.java 如下:
public class MyFragment extends Fragment {
    private static final String TAG = "MyFragment";
    @Nullable
    @Override
    public View onCreateView(@NonNull LayoutInflater inflater, @Nullable ViewGroup container,
                             @Nullable Bundle savedInstanceState) {
        Log.d(TAG, "onCreateView: container=" + container);
         return inflater.inflate(R.layout.my_fragment, container, false);
    }

    public static MyFragment newInstance() {
        Bundle args = new Bundle();
        MyFragment fragment = new MyFragment();
        fragment.setArguments(args);
        return fragment;
    }
}
my_fragment.xml 如下:
<?xml version="1.0" encoding="utf-8"?>
<LinearLayout xmlns:android="http://schemas.android.com/apk/res/android"
    android:layout_width="match_parent"
    android:layout_height="200dp"
    android:gravity="center"
    android:background="@android:color/holo_green_light"
    android:orientation="vertical">

    <TextView
        android:layout_width="wrap_content"
        android:layout_height="wrap_content"
        android:text="MyFragment"
        android:textAllCaps="false"
        android:textSize="24sp" />
</LinearLayout>
运行后效果:
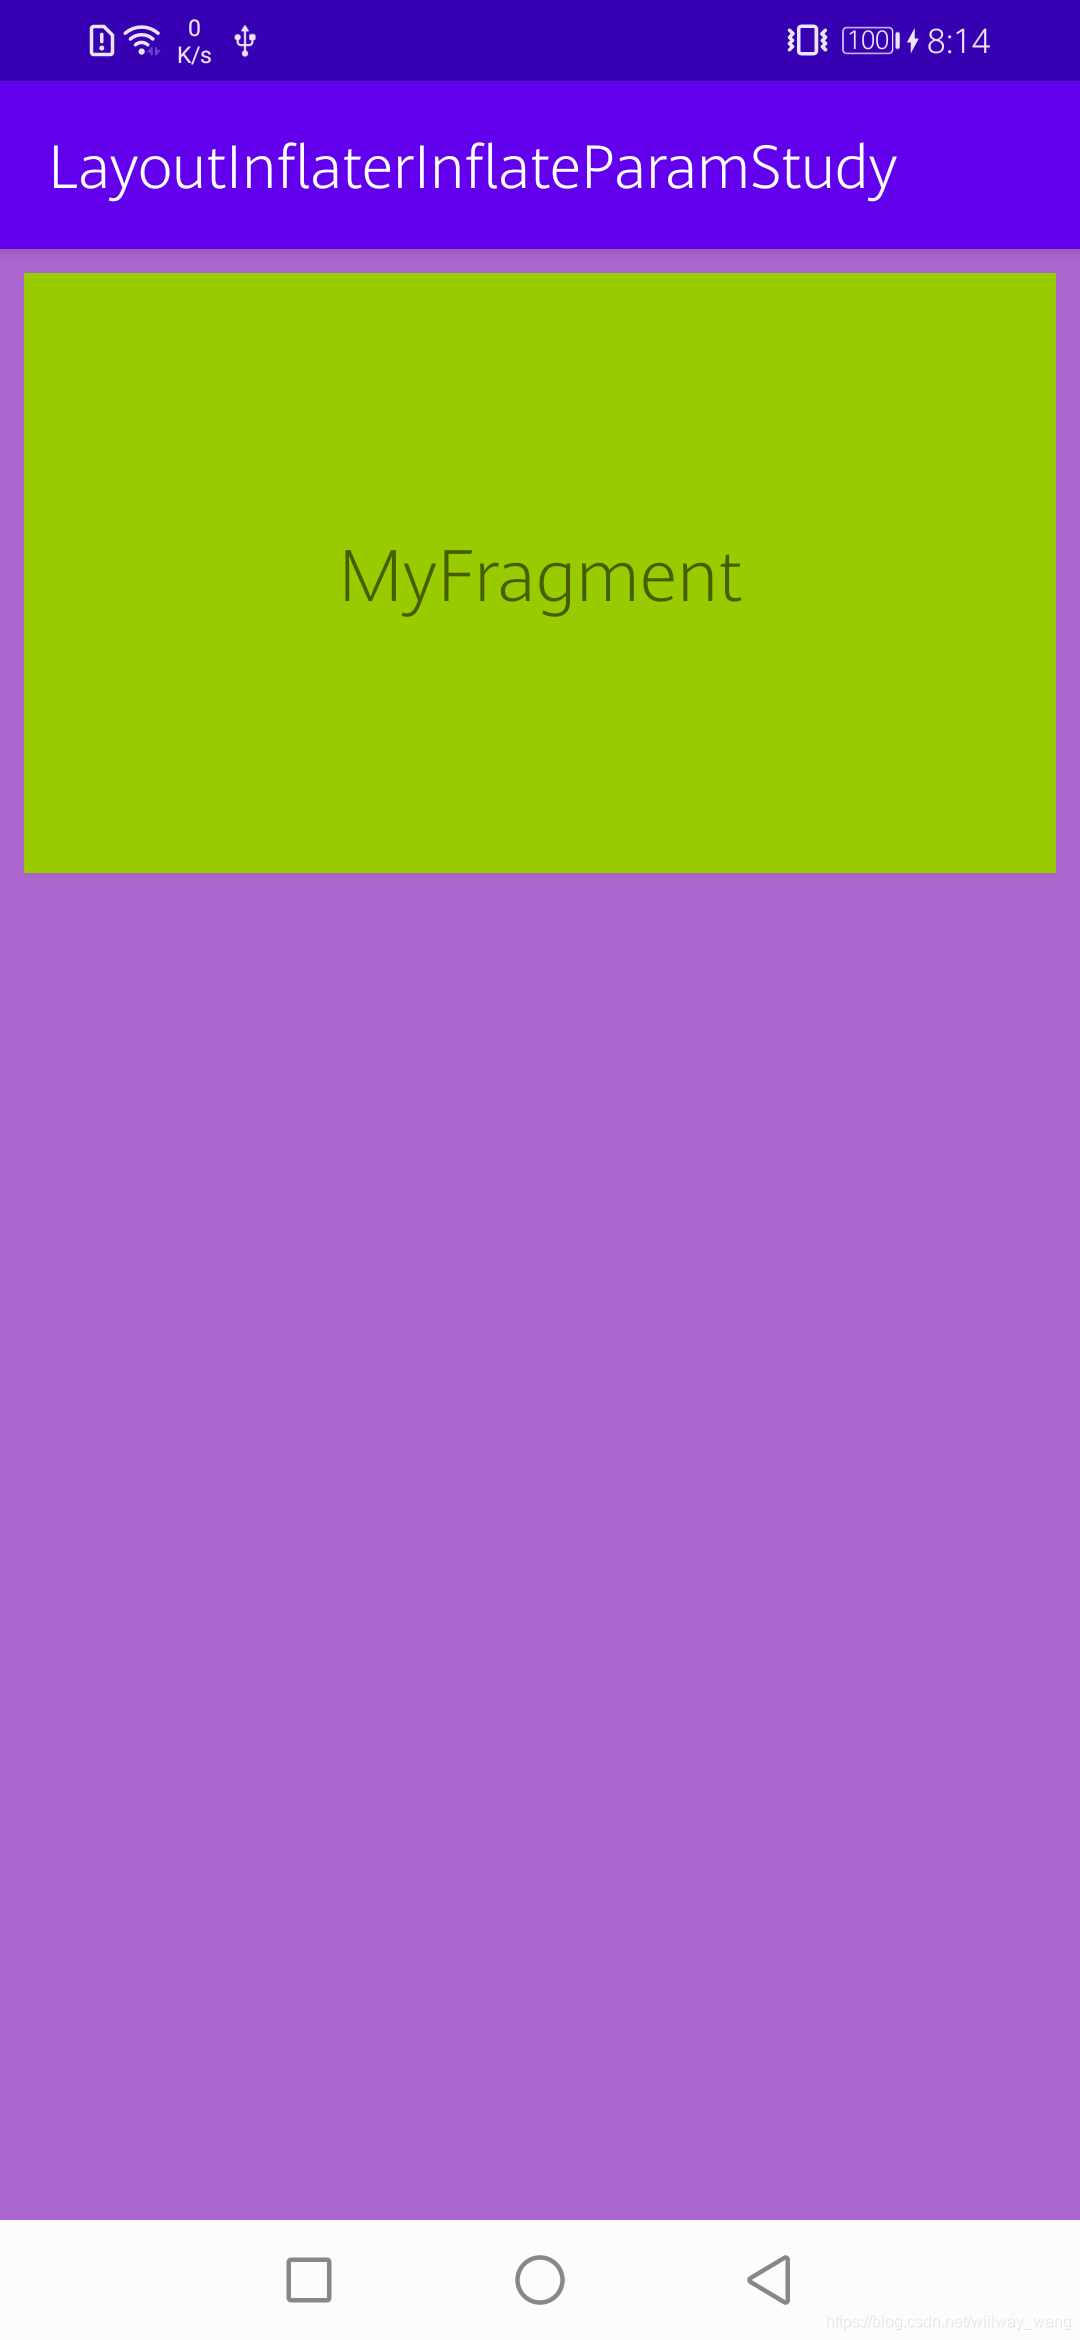
注意看到在 onCreateView() 方法中打印的一行日志:
D/MyFragment: onCreateView: container=android.widget.FrameLayout{d613ebe V.E...... ......ID 0,0-0,0 #7f07005c app:id/fl_container}
打印信息显示 container 是一个 FrameLayout,它的 id 是 R.id.fl_container,这说明:在 LayoutInflater 的 inflate(int resource, ViewGroup root, boolean attachToRoot) 方法中的第二个参数对应的就是 FragmentInflateActivity 布局中的 FrameLayout。
这里的填充方式对应的是第二组的情况,返回的是 xml 布局的根节点 View 对象,并且对象上拥有根节点上的布局参数。
如果把 onCreateView 中的 inflate 方法的第三个参数 attachToRoot 改为 true 会怎么样?
return inflater.inflate(R.layout.my_fragment, container, true);
运行后会崩溃:
E/AndroidRuntime: FATAL EXCEPTION: main
    Process: com.example.layoutinflaterinflateparamstudy, PID: 23076
    java.lang.IllegalStateException: The specified child already has a parent. You must call removeView() on the child's parent first.
        at android.view.ViewGroup.addViewInner(ViewGroup.java:5168)
        at android.view.ViewGroup.addView(ViewGroup.java:4997)
        at android.view.ViewGroup.addView(ViewGroup.java:4937)
        at android.view.ViewGroup.addView(ViewGroup.java:4910)
        at androidx.fragment.app.FragmentManagerImpl.moveToState(FragmentManagerImpl.java:887)
为什么会崩溃呢?我们具体来看一看:
inflater.inflate(R.layout.my_fragment, container, true); 对应的是第一组取值情况,返回的是添加了根节点 View 对象以及布局参数的 root 对象。也就是说返回的填充了根节点对象的 container,就是 id 为 R.id.fl_container 的 FrameLayout 对象。
实际上,FragmentManager 会负责把 onCreateView() 方法返回的 View 对象加入到 id 为 R.id.fl_container 的 FrameLayout 对象里面。
而我们这里返回的是 id 为 R.id.fl_container 的 FrameLayout 对象,它自然是有一个 parent 的,再把它添加给自己,就报错了:The specified child already has a parent. You must call removeView() on the child’s parent first. 在 Android 中,一个 View 只能有一个 parent。
如果我们把 onCreateView() 方法中的 inflate() 方法改成对应第三组情况,会是什么效果:
return inflater.inflate(R.layout.my_fragment, null, false);
细心查看的话,在 null 的地方有黄色的警告信息:
Avoid passing null as the view root (needed to resolve layout parameters on the inflated layout's root element)
运行后的效果:
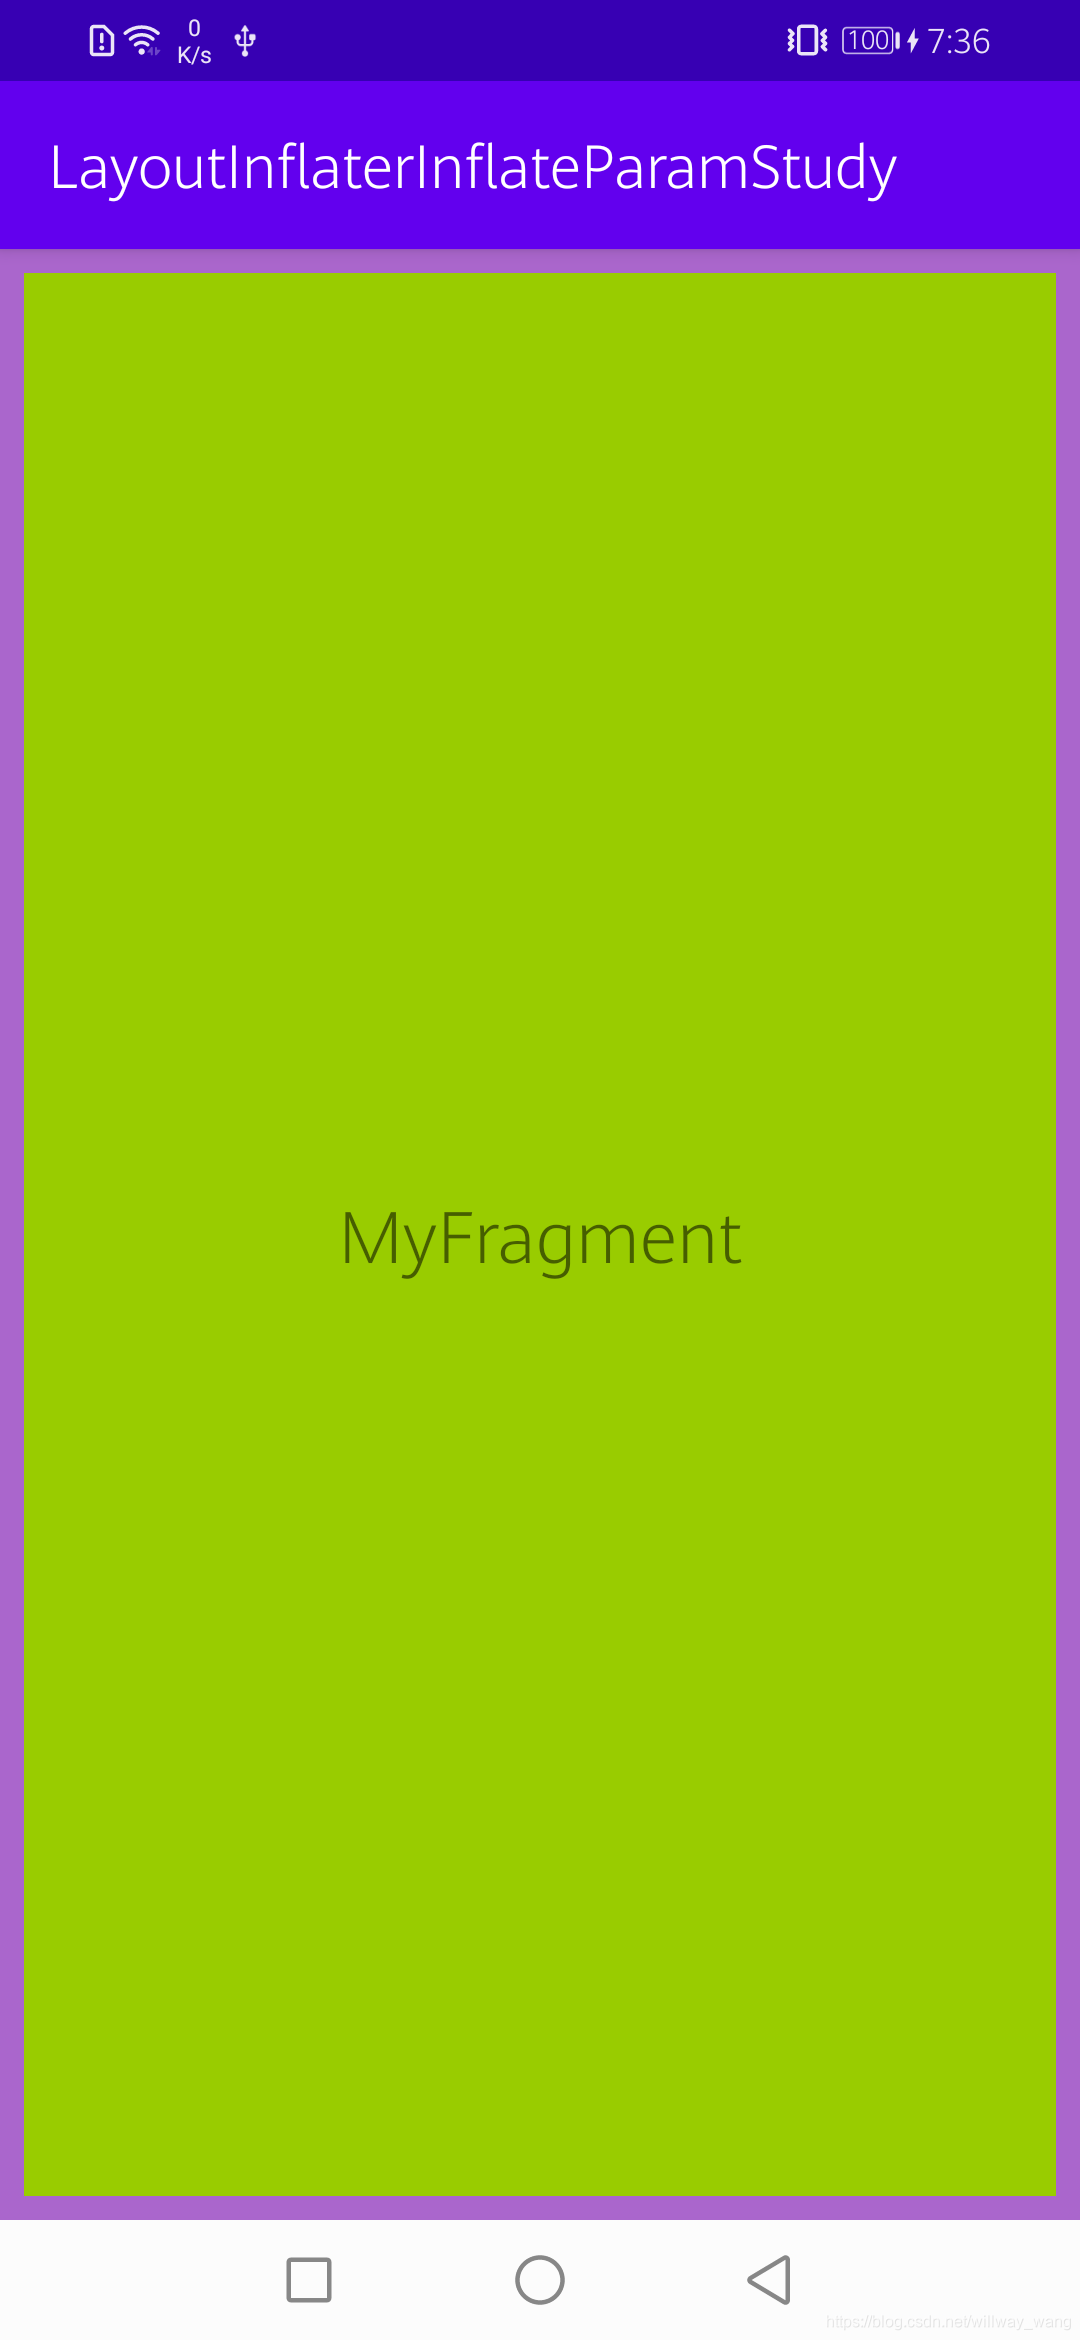
我们确实设置在 my_fragment.xml 中的根节点 LinearLayout 设置了高度为 200dp,为什么没有生效呢?
因为第三组情况,返回的是没有布局参数信息的根节点 View 对象,也就是说我们这里设置的高度为 200dp 的布局参数信息是没有设置给填充完毕的根节点 View 对象的。这也是会报出黄色警告信息的原因。
既然没有布局参数,为什么填充完毕后根节点 View 对象的宽高会充满屏幕呢?
这是因为在ViewGroup类的 addView() 方法中,
public void addView(View child, int index) {
    if (child == null) {
        throw new IllegalArgumentException("Cannot add a null child view to a ViewGroup");
    }
    LayoutParams params = child.getLayoutParams();
    if (params == null) {
        params = generateDefaultLayoutParams();
        if (params == null) {
            throw new IllegalArgumentException("generateDefaultLayoutParams() cannot return null");
        }
    }
    addView(child, index, params);
}
在第 6 行,发现子 View 的布局参数 params 为 null,就会走第 7 行,由 generateDefaultLayoutParams() 生成默认的布局参数;而这里我们的 ViewGroup 其实是 FrameLayout,FrameLayout 重写了 generateDefaultLayoutParams() 方法如下:
protected LayoutParams generateDefaultLayoutParams() {
    return new LayoutParams(LayoutParams.MATCH_PARENT, LayoutParams.MATCH_PARENT);
}
2.2.3 RecyclerView 条目填充布局
这部分不进行详细介绍了,和 Fragment 填充布局很类似。下面只进行一下要点说明。
在 RecyclerView 的适配器的 onCreateViewHolder() 方法中:
public ViewHolder onCreateViewHolder(@NonNull ViewGroup parent, int viewType) {
    Log.d(TAG, "onCreateViewHolder: parent=" + parent);
    View view = layoutInflater.inflate(R.layout.recycle_item, parent, false);
    return new ViewHolder(view);
}
打印信息如下:
onCreateViewHolder: parent=androidx.recyclerview.widget.RecyclerView{2e97f7b VFED..... .F....ID 0,0-1440,2048 #7f070081 app:id/recycler_view}
打印信息说明:ViewGroup parent 就是 RecyclerView 对象。
如果把 inflate() 方法的第三个参数 attachToRoot 改为 true,程序会崩溃:
E/AndroidRuntime: FATAL EXCEPTION: main
    Process: com.example.layoutinflaterinflateparamstudy, PID: 26322
    java.lang.IllegalStateException: ViewHolder views must not be attached when created. Ensure that you are not passing 'true' to the attachToRoot parameter of LayoutInflater.inflate(..., boolean attachToRoot)
        at androidx.recyclerview.widget.RecyclerView$Adapter.createViewHolder(RecyclerView.java:7080)
        at androidx.recyclerview.widget.RecyclerView$Recycler.tryGetViewHolderForPositionByDeadline(RecyclerView.java:6235)
        at androidx.recyclerview.widget.RecyclerView$Recycler.getViewForPosition(RecyclerView.java:6118)
        at androidx.recyclerview.widget.RecyclerView$Recycler.getViewForPosition(RecyclerView.java:6114)
        at androidx.recyclerview.widget.LinearLayoutManager$LayoutState.next(LinearLayoutManager.java:2303)
        at androidx.recyclerview.widget.LinearLayoutManager.layoutChunk(LinearLayoutManager.java:1627)
        at androidx.recyclerview.widget.LinearLayoutManager.fill(LinearLayoutManager.java:1587)
        at androidx.recyclerview.widget.LinearLayoutManager.onLayoutChildren(LinearLayoutManager.java:665)
        at androidx.recyclerview.widget.RecyclerView.dispatchLayoutStep2(RecyclerView.java:4134)
        at androidx.recyclerview.widget.RecyclerView.dispatchLayout(RecyclerView.java:3851)
        at androidx.recyclerview.widget.RecyclerView.onLayout(RecyclerView.java:4404)
实际上,什么时候把子 View 添加到 RecyclerView 中,是由 RecyclerView 来负责的,开发者只需要创建出子 View 交给 RecyclerView 即可。
2.2.4 AlertDialog 填充自定义布局
之前的例子中,inflate() 方法的第二个参数 ViewGroup parent 传递为 null,会产生布局参数丢失的问题。
不过,在 AlertDialog 的自定义布局中,确实没有 ViewParent 的存在,这时不得不传递为 null。
View view = LayoutInflater.from(MainActivity.this).inflate(R.layout.dialog, null);
AlertDialog alertDialog = new AlertDialog.Builder(MainActivity.this)
        .setTitle("AlertDialog")
        .setView(view)
        .create();
alertDialog.show();
这时对应的是第三组情况,返回的是没有布局参数信息的根节点 View 对象,也就是说,在 R.layout.dialog 中根节点的布局参数信息都是丢失。AlertDialog 会负责创建布局参数信息。
3. 最后
这篇文章仔细地分析了 inflate() 方法的各种参数情况,以及以实例方式演示了各种传参情况。希望能够帮助到大家。
代码已经上传到Github地址。


 1万+
1万+

 被折叠的 条评论
为什么被折叠?
被折叠的 条评论
为什么被折叠?
 到【灌水乐园】发言


