


Spring MVC入门
MVC的核心思想是业务数据抽取同业务数据呈现相分离。
Spring MVC基本概念
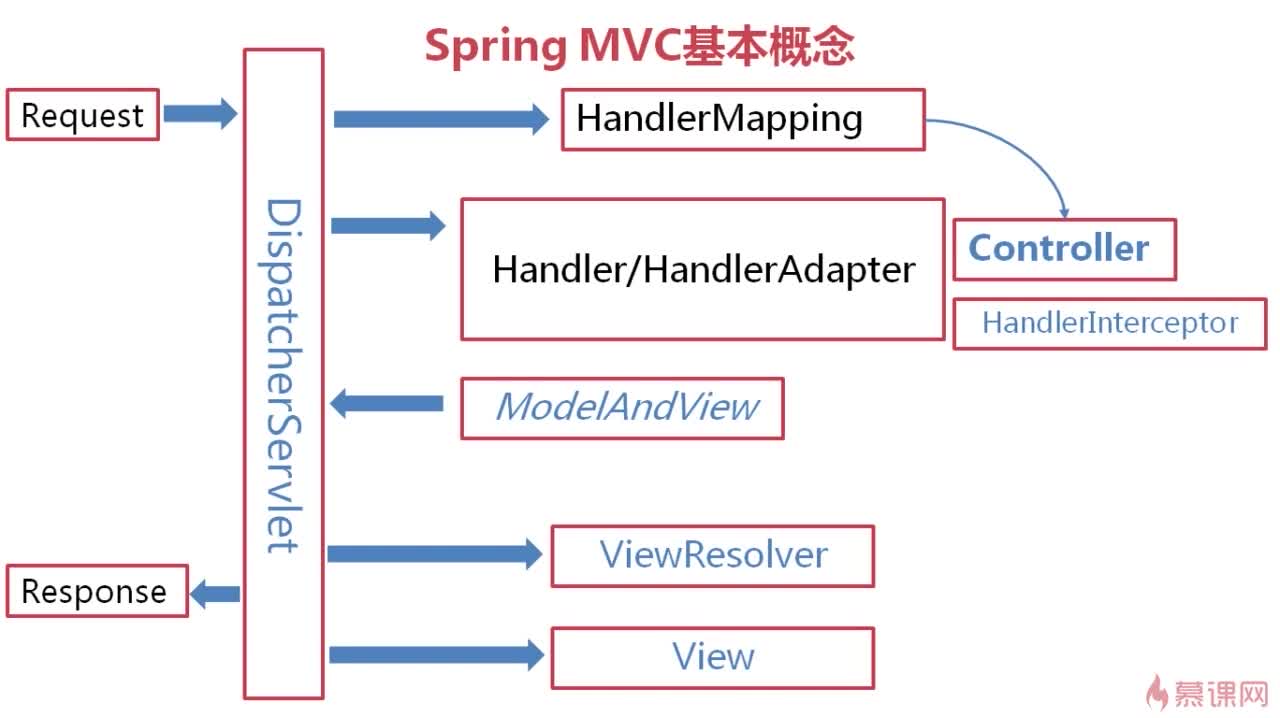
DispatcherServelet是前端控制器
HandlerAdapter相当于controller,DispatcherServelet调用各种HandlerAdapter来实现任务分发给相关的业务逻辑
HandlerInterceptor是一个接口,可以用来在Handler调用之前,之后,以及view呈现后可以做很多事情
HandlerMapping是负责确定DispatcherServelet与controller之间映射的类,告诉DispatcherServelet,在请求到来后,由哪个controller来响应这个请求
DispatcherServelet
要使用SpringMVC,必须在web.xml中配置DispatcherServelet类

DispatcherServlet的核心本质:是一个Servlet
init方法在整个系统启动时运行,且只运行一次
service方法在系统运行的过程中处于侦听模式,侦听并处理所有的Web请求
请参考第三章 DispatcherServlet详解 ——跟开涛学SpringMVC
DispatcherServlet主要用作职责调度工作,本身主要用于控制流程,主要职责如下:
1、文件上传解析,如果请求类型是multipart将通过MultipartResolver进行文件上传解析;
2、通过HandlerMapping,将请求映射到处理器(返回一个HandlerExecutionChain,它包括一个处理器、多个HandlerInterceptor拦截器);
3、通过HandlerAdapter支持多种类型的处理器(HandlerExecutionChain中的处理器);
4、通过ViewResolver解析逻辑视图名到具体视图实现;
5、本地化解析;
6、渲染具体的视图等;
7、如果执行过程中遇到异常将交给HandlerExceptionResolver来解析。
DispatcherServlet也可以配置自己的初始化参数,覆盖默认配置:
摘自Spring Reference
| 参数 | 描述 |
|---|---|
| contextClass | 实现WebApplicationContext接口的类,当前的servlet用它来创建上下文。如果这个参数没有指定, 默认使用XmlWebApplicationContext。 |
| contextConfigLocation | 传给上下文实例(由contextClass指定)的字符串,用来指定上下文的位置。这个字符串可以被分成多个字符串(使用逗号作为分隔符) 来支持多个上下文(在多上下文的情况下,如果同一个bean被定义两次,后面一个优先)。 |
| namespace | WebApplicationContext命名空间。默认值是[server-name]-servlet。 |
在Eclipse中创建Java Web项目
通过Maven方式
请参考How to Create Dynamic Web Project using Maven in Eclipse?
主要步骤
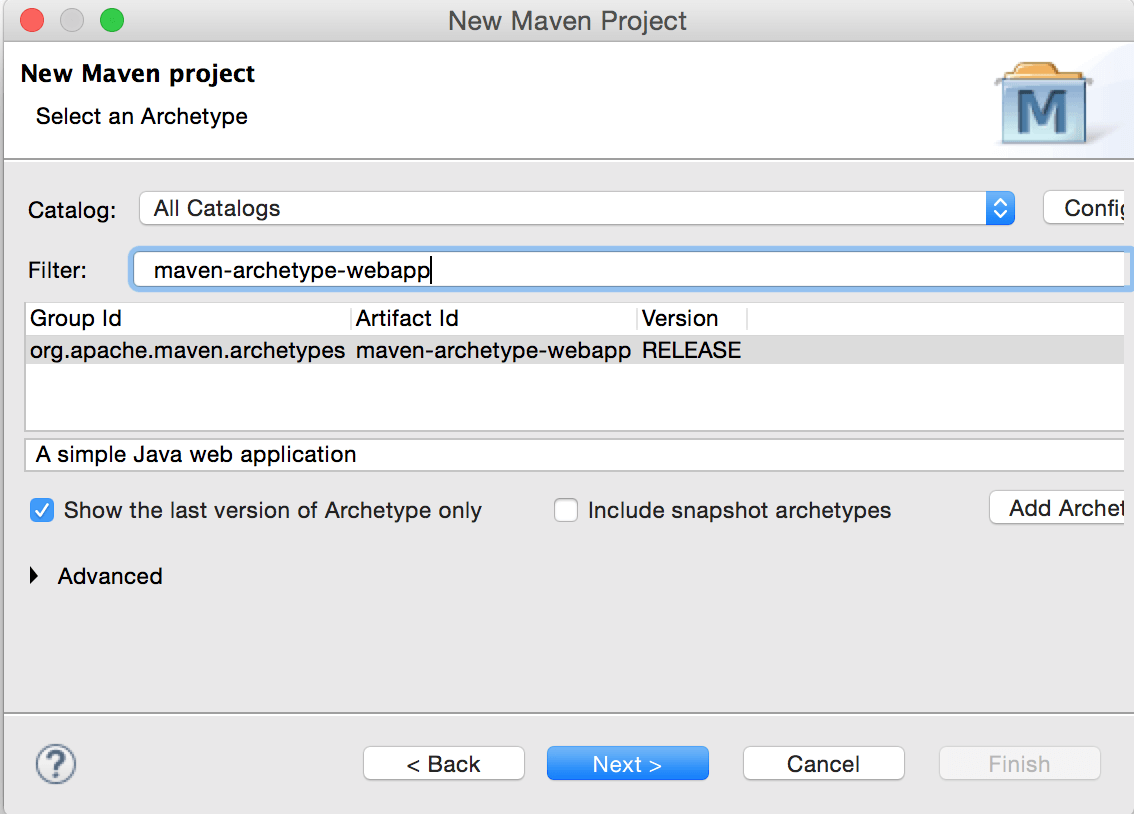
选择maven archetype为maven-archetype-webapp
过程中出现的问题
- 提示在main文件夹下缺少java文件夹 -> 创建java文件夹
- 提示
The superclass “javax.servlet.http.HttpServlet” was not found on the Java Build Path-> 请参考stackoverflow - 提示
<path>/target/m2e-wtp/web-resources/META-INF/MANIFEST.MF (No such file or directory)-> 请参考stackoverflow,取消勾选Maven Archiver generates files under the build directory
在pom.xml中配置依赖
在web.xml中配置spring mvc
<!DOCTYPE web-app PUBLIC
 "-//Sun Microsystems, Inc.//DTD Web Application 2.3//EN"
 "http://java.sun.com/dtd/web-app_2_3.dtd" >

<web-app>
  <display-name>Archetype Created Web Application</display-name>


    <servlet>
        <servlet-name>mvc-dispatcher</servlet-name>
        <servlet-class> org.springframework.web.servlet.DispatcherServlet</servlet-class>
        <!-- DispatcherServlet对应的上下文配置, 默认为/WEB-INF/$servlet-name$-servlet.xml
         -->
        <init-param>
          <param-name>contextConfigLocation</param-name>
          <param-value>/WEB-INF/configs/spring/mvc-dispatcher-servlet.xml</param-value>
        </init-param>
        <load-on-startup>1</load-on-startup>
    </servlet>
    <servlet-mapping>
        <servlet-name>mvc-dispatcher</servlet-name>
        <!-- mvc-dispatcher拦截所有的请求-->
        <url-pattern>/</url-pattern>
    </servlet-mapping>
</web-app>
在运行第一个Spring MVC项目中遇到的问题
提示threw exception [Handler processing failed; nested exception is java.lang.NoClassDefFoundError: javax/servlet/jsp/jstl/core/Config] with root cause
-> 在pom.xml中添加jstl依赖
    <!-- https://mvnrepository.com/artifact/jstl/jstl -->
    <dependency>
        <groupId>jstl</groupId>
        <artifactId>jstl</artifactId>
        <version>1.2</version>
    </dependency>
提示java.lang.ClassNotFoundException: org.springframework.web.servlet.DispatcherServlet
-> 请参考java.lang.ClassNotFoundException: org.springframework.web.servlet.DispatcherServlet,要把Maven Dependency添加到Deployment Assembly中
- right click on your project and choose properties.
- click on Deployment Assembly.
- click add
- click on “Java Build Path Entries”
- select Maven Dependencies”
- click Finish.
配置文件
org.springframework.web.context.ContextLoaderListener的作用
在web.xml的配置中有如下的配置:
  <listener>
        <listener-class>
            org.springframework.web.context.ContextLoaderListener
        </listener-class>
  </listener>
ContextLoaderListener的作用就是启动Web容器时,自动装配ApplicationContext的配置信息。因为它实现了ServletContextListener这个接口,在web.xml配置这个监听器,启动容器时,就会默认执行它实现的方法。
如果在web.xml中不写任何参数配置信息,默认的路径是/WEB-INF/applicationContext.xml,在WEB-INF目录下创建的xml文件的名称必须是applicationContext.xml;
如果是要自定义文件名可以在web.xml里加入contextConfigLocation这个context参数:
  <context-param>
        <param-name>contextConfigLocation</param-name>
        <param-value>/WEB-INF/configs/spring/applicationContext*.xml</param-value>
  </context-param>
请参考<context-param>与<init-param>的区别与作用
1. 启动一个WEB项目的时候,容器(如:Tomcat)会去读它的配置文件web.xml.读两个节点: `<listener></listener>` 和 <`context-param></context-param>`
2.紧接着,容器创建一个ServletContext(上下文),这个WEB项目所有部分都将共享这个上下文.
3.容器将`<context-param></context-param>`转化为键值对,并交给ServletContext.
4.容器创建`<listener></listener>`中的类实例,即创建监听.
5.在监听中会有contextInitialized(ServletContextEvent args)初始化方法,在这个方法中获得ServletContext = ServletContextEvent.getServletContext();
配置DispatcherServlet
如下配置DispatcherServlet
<servlet>
    <servlet-name>mvc-dispatcher</servlet-name>
    <servlet-class> org.springframework.web.servlet.DispatcherServlet</servlet-class>
    <!-- DispatcherServlet对应的上下文配置, 默认为/WEB-INF/$servlet-name$-servlet.xml
     -->
    <init-param>
      <param-name>contextConfigLocation</param-name>
      <param-value>/WEB-INF/configs/spring/mvc-dispatcher-servlet.xml</param-value>
    </init-param>
    <load-on-startup>1</load-on-startup>
</servlet>
<servlet-mapping>
    <servlet-name>mvc-dispatcher</servlet-name>
    <!-- mvc-dispatcher拦截所有的请求-->
    <url-pattern>/</url-pattern>
</servlet-mapping>
关于DispatcherServlet请参考
配置说明
Spring MVC的上下文层级关系
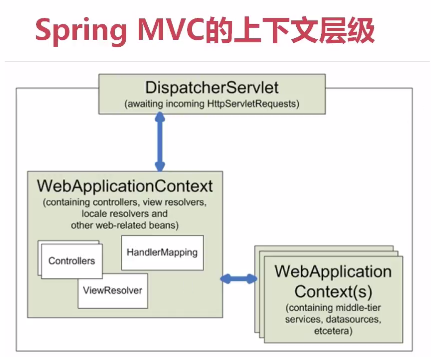
右下角的 WebApplicationContext可能有多个,就是ContextLoaderListener加载的形成的上下文。它提供了一些公共的组件,一些服务,比如Service层,DAO层等。这些服务被整个应用所共享的。
web.xml
web.xml中配置了spring 和 spring mvc的相关内容,具体的解释见注释:
<?xml version="1.0" encoding="UTF-8"?>
<web-app xmlns:xsi="http://www.w3.org/2001/XMLSchema-instance"
    xmlns="http://xmlns.jcp.org/xml/ns/javaee"
    xsi:schemaLocation="http://xmlns.jcp.org/xml/ns/javaee http://xmlns.jcp.org/xml/ns/javaee/web-app_3_1.xsd"
    id="WebApp_ID" version="3.1">

    <display-name>Spring MVC Start</display-name>
    <!-- Spring应用上下文, 理解层次化的ApplicationContext -->
    <context-param>
        <param-name>contextConfigLocation</param-name>
        <param-value>/WEB-INF/configs/spring/applicationContext*.xml</param-value>
    </context-param>

    <listener>
        <listener-class>org.springframework.web.context.ContextLoaderListener</listener-class>
    </listener>

    <!-- DispatcherServlet, Spring MVC的核心 -->
    <servlet>
        <servlet-name>mvc-dispatcher</servlet-name>
        <servlet-class>org.springframework.web.servlet.DispatcherServlet</servlet-class>
        <!-- DispatcherServlet对应的上下文配置, 默认为/WEB-INF/$servlet-name$-servlet.xml
         -->
        <init-param>
            <param-name>contextConfigLocation</param-name>
            <param-value>/WEB-INF/configs/spring/mvc-dispatcher-servlet.xml</param-value>
        </init-param>
        <load-on-startup>1</load-on-startup>
    </servlet>
    <servlet-mapping>
        <servlet-name>mvc-dispatcher</servlet-name>
        <!-- mvc-dispatcher拦截所有的请求-->
        <url-pattern>/</url-pattern>
    </servlet-mapping>

</web-app>
spring配置文件
见applicationContext.xml内容
<?xml version="1.0" encoding="UTF-8"?>
<beans xmlns="http://www.springframework.org/schema/beans"
    xmlns:xsi="http://www.w3.org/2001/XMLSchema-instance" xmlns:context="http://www.springframework.org/schema/context"
    xmlns:mvc="http://www.springframework.org/schema/mvc"
    xsi:schemaLocation="
        http://www.springframework.org/schema/beans
        http://www.springframework.org/schema/beans/spring-beans.xsd
        http://www.springframework.org/schema/context
        http://www.springframework.org/schema/context/spring-context.xsd
        http://www.springframework.org/schema/mvc
        http://www.springframework.org/schema/mvc/spring-mvc.xsd">

    <!-- 应用中通用组件bean的管理 -->

    <context:annotation-config />

    <!-- 不需要管理Controller了 -->
    <context:component-scan base-package="com.imooc.mvcdemo">
        <context:exclude-filter type="annotation"
            expression="org.springframework.stereotype.Controller" />
    </context:component-scan>


</beans>
spring mvc配置文件
mvc-dispatcher-servlet.xml如下:
<?xml version="1.0" encoding="UTF-8"?>
<beans xmlns="http://www.springframework.org/schema/beans"
    xmlns:xsi="http://www.w3.org/2001/XMLSchema-instance" xmlns:mvc="http://www.springframework.org/schema/mvc"
    xmlns:context="http://www.springframework.org/schema/context"
    xsi:schemaLocation="http://www.springframework.org/schema/mvc http://www.springframework.org/schema/mvc/spring-mvc-4.3.xsd
        http://www.springframework.org/schema/beans http://www.springframework.org/schema/beans/spring-beans.xsd
        http://www.springframework.org/schema/context http://www.springframework.org/schema/context/spring-context-4.3.xsd">

    <!-- 告诉Spring我们打算使用基于注解的自动装配 -->
    <!-- 启动Spring基于annotation的DI,使用户可以在Spring MVC中使用Spring的强大功能,激活@Required @Autowired JSR 250's等标注 -->
    <context:annotation-config />

    <!-- DispatcherServlet上下文, 只管理@Controller类型的bean, 忽略其他型的bean, 如@Service -->
    <!-- 只搜索@Controller 标注的类 不搜索其他标注的类 -->
    <context:component-scan base-package="com.imooc.mvcdemo">
        <context:include-filter type="annotation"
            expression="org.springframework.stereotype.Controller" />
    </context:component-scan>

    <!-- HandlerMapping, 无需配置, Spring MVC可以默认启动。 DefaultAnnotationHandlerMapping
        annotation-driven HandlerMapping -->
    <!-- 扩充了注解驱动,可以将请求参数绑定到控制器参数 -->
    <!-- 注解驱动的spring mvc -->
    <mvc:annotation-driven />

    <!-- 静态资源处理, css, js, imgs -->
    <mvc:resources mapping="/resources/**" location="/resources/" />

    <!-- 配置ViewResolver。 可以用多个ViewResolver。 使用order属性排序。 InternalResourceViewResolver放在最后。 -->
    <!-- 解析视图 -->
    <bean
        class="org.springframework.web.servlet.view.InternalResourceViewResolver">
        <!-- 使用JSTL标签 -->
        <property name="viewClass"
            value="org.springframework.web.servlet.view.JstlView" />
        <!-- 前缀 -->
        <property name="prefix" value="/WEB-INF/jsps/" />
        <!-- 后缀 -->
        <property name="suffix" value=".jsp" />
    </bean>


</beans>
Controller
有如下所示的CourseController.java Controller
package com.imooc.mvcdemo.controller;

import org.slf4j.Logger;
import org.slf4j.LoggerFactory;
import org.springframework.beans.factory.annotation.Autowired;
import org.springframework.stereotype.Controller;
import org.springframework.ui.Model;
import org.springframework.web.bind.annotation.RequestMapping;
import org.springframework.web.bind.annotation.RequestMethod;

import com.imooc.mvcdemo.model.Course;
import com.imooc.mvcdemo.service.CourseService;

/*
 * 课程控制器
 */

@Controller
@RequestMapping("/courses")
public class CourseController {

    private static Logger log = LoggerFactory.getLogger(CourseController.class);

    private CourseService courseService;
    @Autowired
    public void setCourseService(CourseService courseService) {
        this.courseService = courseService;
    }

    //本方法处理 /courses/view 仅处理get请求
    @RequestMapping(value="/view", method=RequestMethod.GET)
    public String viewCourse(Integer courseId, Model model) {
        Course course = courseService.getCourseById(courseId);
        model.addAttribute(course);
        return "course_overview";
    }

}
@RequestMapping("/courses")可以拦截到/courses/**
@RequestMapping(value="/view", method=RequestMethod.GET)表示的处理/courses/view类型的请求,并且只处理get请求。
这种/courses/view?courseId=1带有请求参数的,该如何处理?
例如请求的时候带有一个courseId,这是该怎么做呢?
使用@RequestParam("courseId")如下
//本方法处理 /courses/view 仅处理get请求
@RequestMapping(value="/view", method=RequestMethod.GET)
public String viewCourse(@RequestParam("courseId") Integer courseId, Model model) {
    System.out.println(courseId);
    log.debug("in viewCourse, courseId = {}", courseId);
    Course course = courseService.getCourseById(courseId);
    model.addAttribute(course);
    return "course_overview";
}
支持Restful风格的url
处理的请求url大概如下:/courses/view2/345, 要获取到参数345
// /courses/view2/{courseId}
@RequestMapping(value="/view2/{courseId}", method=RequestMethod.GET)
public String viewCourse2(@PathVariable("courseId") Integer courseId, Map<String, Object> model) {
    System.out.println("course2: "+courseId);
    Course course = courseService.getCourseById(courseId);
    model.put("course", course);
    return "course_overview";
}
在spring mvc中使用HttpRequest对象
处理形式为/courses/view3/courseId=456的url
@RequestMapping("view3")
public String viewCourse3(HttpServletRequest request) {
    Integer courseId = Integer.valueOf(request.getParameter("courseId"));

    System.out.println("course3: " + courseId);

    Course course = courseService.getCourseById(courseId);
    request.setAttribute("course", course);
    return "course_overview";
}
Binding
将请求中的字段按照名字匹配的原则填入模型对象
例如将添加课程表单与Course模型对应起来
跳转到edit页面http://localhost:8080/spring-mvc-start/courses/admin?add
@RequestMapping(value="/admin", method=RequestMethod.GET, params="add")
public String createCourse() {
    return "course_admin/edit";
}
course_admin/edit表示的course_admin文件下的edit.jsp
保存Course的方法,如下:
/*
 * 保存课程
 */
@RequestMapping(value="/save", method=RequestMethod.POST)
public String doSave(Course course) {

    System.out.println(course.toString());

    //在此进行业务操作,比如数据库持久化
    course.setCourseId(123);
    //请求重定向
    return "redirect:view2/"+course.getCourseId();
}
"redirect:view2/"+course.getCourseId()表示的重定向
http://localhost:8080/spring-mvc-start/courses/save保存后跳转到http://localhost:8080/spring-mvc-start/courses/view2/123
@ModelAttribute 也能使用同样的功能
public String doSave(@ModelAttribute Course course)FileUpload–单文件上传
首先在DispatcherServlet相关的配置文件中配置,加入如下的配置:
<!--200*1024*1024即200M resolveLazily属性启用是为了推迟文件解析,以便捕获文件大小异常 -->
<bean id="multipartResolver"
    class="org.springframework.web.multipart.commons.CommonsMultipartResolver">
    <property name="maxUploadSize" value="209715200" />
    <property name="defaultEncoding" value="UTF-8" />
    <property name="resolveLazily" value="true" />
</bean>
依赖的是commons-fileuplaod包,所以要引入这个包。
在pom.xml中加入依赖:
<!-- https://mvnrepository.com/artifact/commons-fileupload/commons-fileupload -->
<dependency>
    <groupId>commons-fileupload</groupId>
    <artifactId>commons-fileupload</artifactId>
    <version>1.3.2</version>
</dependency>
在Controller中添加方法,跳转到上传文件的页面:
@RequestMapping(value="/upload", method=RequestMethod.GET)
public String showUploadPage() {
    return "course_admin/file";
}
http://localhost:8080/spring-mvc-start/courses/upload跳转
上传页面的HTML代码如下:
<form method="post" action="<%=request.getContextPath()%>/courses/doUpload" enctype="multipart/form-data">
<input type="file" name="file"/>
<input type="submit"/>
</form>
上传文件的方法:
@RequestMapping(value="/doUpload", method=RequestMethod.POST)
public String doUpload(@RequestParam("file") MultipartFile file) throws IOException {

    if(!file.isEmpty()){
        System.out.println("处理文件......" +file.getOriginalFilename());
        FileUtils.copyInputStreamToFile(file.getInputStream(), new File("/Users/Miller/Pictures/upload", System.currentTimeMillis()+file.getOriginalFilename()));

    }

    return "success";
}


 4532
4532

 被折叠的 条评论
为什么被折叠?
被折叠的 条评论
为什么被折叠?
 到【灌水乐园】发言


