


1.说明
1.1 参考资料
- 1.https://www.rfc-editor.org/rfc/rfc1155.txt
- 2.
libnl资料: https://www.infradead.org/~tgr/libnl/ - 3.
enterprise id: https://www.iana.org/assignments/enterprise-numbers/ - 4.
tutorials,教程资料: http://www.net-snmp.org/wiki/index.php/Tutorials - 5.源码下的
FAQ文档,即net-snmp\FAQ,要仔细浏览一下。 - 6.很重要的
MIB文件:doc\rfc\snmpV1\rfc1155.txt - 7.
ASN.1语法: https://www.itu.int/en/ITU-T/asn1/Pages/introduction.aspx
简单一点,SNMP需要理解:
- SNMP Manager
– Queries SNMP agents and gathers information from devices throughout the network.(客户端) - SNMP Agent
– A program inside SNMP-enabled devices that collects performance data from the MIB when a request is made by the manager.(服务端运行的程序) - MIBS
– Database of managed objects organized hierarchically that have OIDs. - OIDS
既然是服务器客户端模型,那么net-snmp提供了几个程序,简单理解即:
Get   --- 客户端获取服务端数据
GetNext  --- 客户端获取服务端下一个OID数据
Set  --- 客户端设置服务端感兴趣的数据
Trap  --- 服务端向客户端发送数据
1.2 代码
1.3 应用场景
对于snmp本身的功能来讲,实际上使用它的功能包含2个:
- 1.轮询(
Polling): 管理工作站定期向代理发送GET请求,以获取设备状态信息。 - 2.
TRAP:当代理检测到特定事件或错误时,向管理工作站发送TRAP消息
BMC也需要围绕这2大需求来实现功能。
2.源码编译安装与使用
2.1 源码编译安装
参考文件:net-snmp/INSTALL
首先需要安装依赖的文件:
# sudo apt install libperl-dev
# sudo apt install libnl-3-dev libnl-route-3-dev
- 1.配置
使用命令:
./configure
配置后,提示如下信息,供选择:
Starting with Net-SNMP 5.0, you can choose the default version of
the SNMP protocol to use when no version is given explicitly on the
command line, or via an 'snmp.conf' file.  In the past this was set to
SNMPv1, but you can use this to switch to SNMPv3 if desired.  SNMPv3
will provide a more secure management environment (and thus you're
encouraged to switch to SNMPv3), but may break existing scripts that
rely on the old behaviour.  (Though such scripts will probably need to
be changed to use the '-c' community flag anyway, as the SNMPv1
command line usage has changed as well.).
   At this prompt you can select "1", "2" (for SNMPv2c), or "3" as
the default version for the command tools (snmpget, ...) to use.  This
can always be overridden at runtime using the -v flag to the tools, or
by using the "defVersion" token in your snmp.conf file.
   Providing the --with-default-snmp-version="x" parameter to ./configure
will avoid this prompt.

Default version of SNMP to use (3): 1
setting Default version of SNMP to use to...  1
checking System Contact Information...
- 编译
使用命令make执行编译操作。
如果编译报错:
mibgroup/if-mib/data_access/interface_linux.c:27:2: error: #error libnl-3 is required. Please install the libnl-3 and libnl-route-3 development packages and remove --without-nl from the configure options if necessary.
   27 | #error libnl-3 is required. Please install the libnl-3 and libnl-route-3 development packages and remove --without-nl from the configure options if necessary.
      |  ^~~~~
mibgroup/if-mib/data_access/interface_linux.c:29:10: fatal error: netlink/cache.h: No such file or directory
   29 | #include <netlink/cache.h>
      |          ^~~~~~~~~~~~~~~~~
compilation terminated.
make[1]: *** [Makefile:100: mibgroup/if-mib/data_access/interface_linux.lo] Error 1
解决办法:
- 1.可以查看如下文件是否存在
ls /usr/include/libnl3/netlink/cache.h
- 2.在文件:
agent\mibgroup\Makefile中添加内容:
CFLAGS += -I/usr/include/libnl3/
- 3.注意查看文件:
include\net-snmp\net-snmp-config.h,如果是undef,可手动修改:
#define HAVE_LIBNL3 1
如果前面编译仍然报错,可以无脑重新./configure再来一遍。
- 4.安装
使用如下命令安装:
# sudo make install
查看最终生成的文件安装路径如下:
libtool: install: /usr/bin/install -c mib2c.made /usr/local/bin/mib2c
libtool: install: /usr/bin/install -c snmpcheck.made /usr/local/bin/snmpcheck
libtool: install: /usr/bin/install -c snmpconf.made /usr/local/bin/snmpconf
libtool: install: /usr/bin/install -c -m 644 ./mib2c.conf /usr/local/share/snmp/mib2c.conf
libtool: install: /usr/bin/install -c -m 644 ./IP-MIB.txt /usr/local/share/snmp/mibs/IP-MIB.txt
Libraries have been installed in:
   /usr/local/lib
creating directory /usr/local/include/net-snmp
- 5.运行
注意,如果运行报错:
# sudo snmpd
snmpd: error while loading shared libraries: libnetsnmpagent.so.45: cannot open shared object file: No such file or directory
可以运行命令:
# sudo ldconfig
可以参考如下文档来运行:
* README.snmpv3
* README.systemd
* README.solaris
* README.Panasonic_AM3X.txt
1.生成snmpd.conf配置文件
使用如下命令产生snmpd.conf文件:
$ pwd
/usr/local/bin
# sudo snmpconf
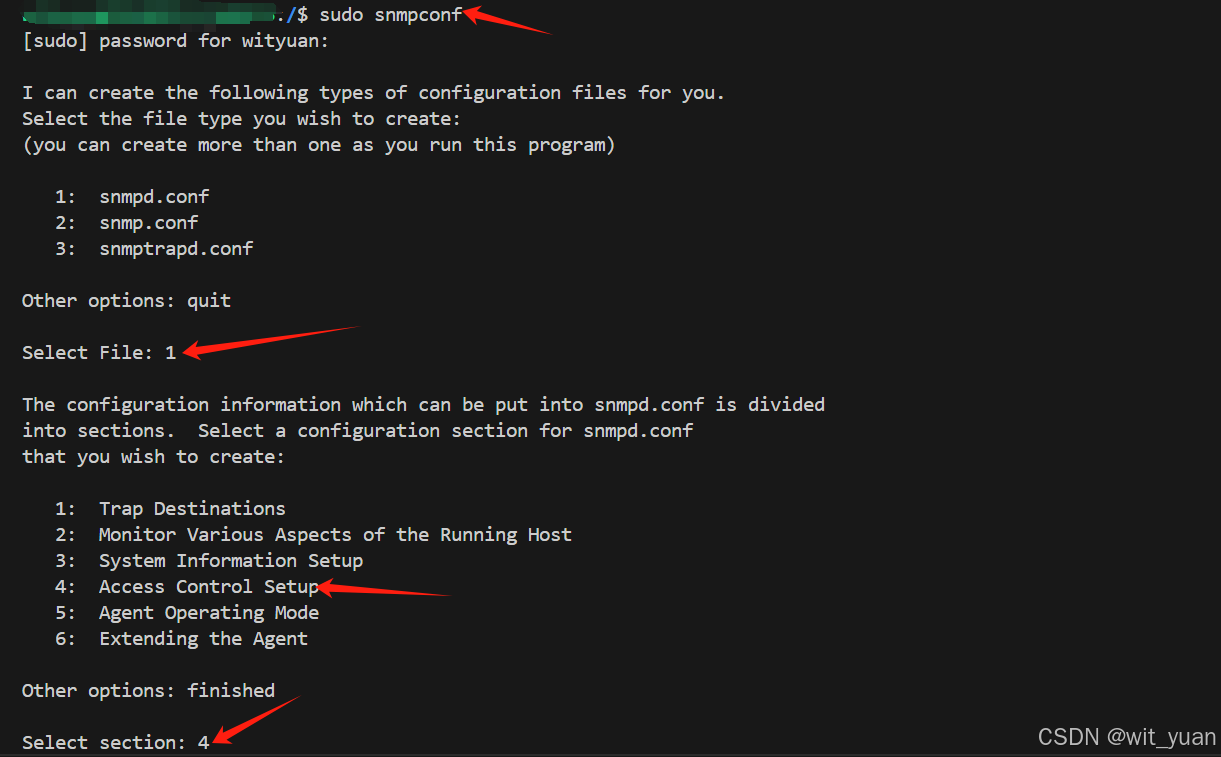
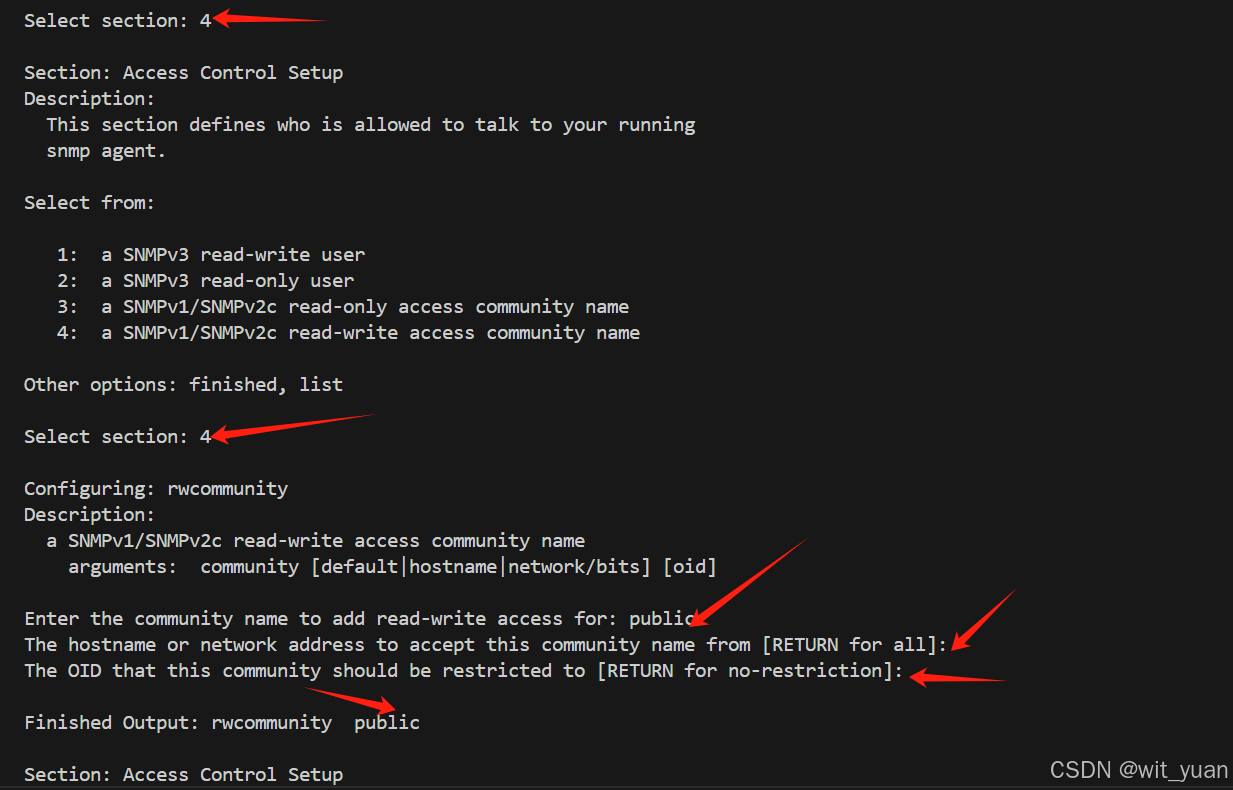
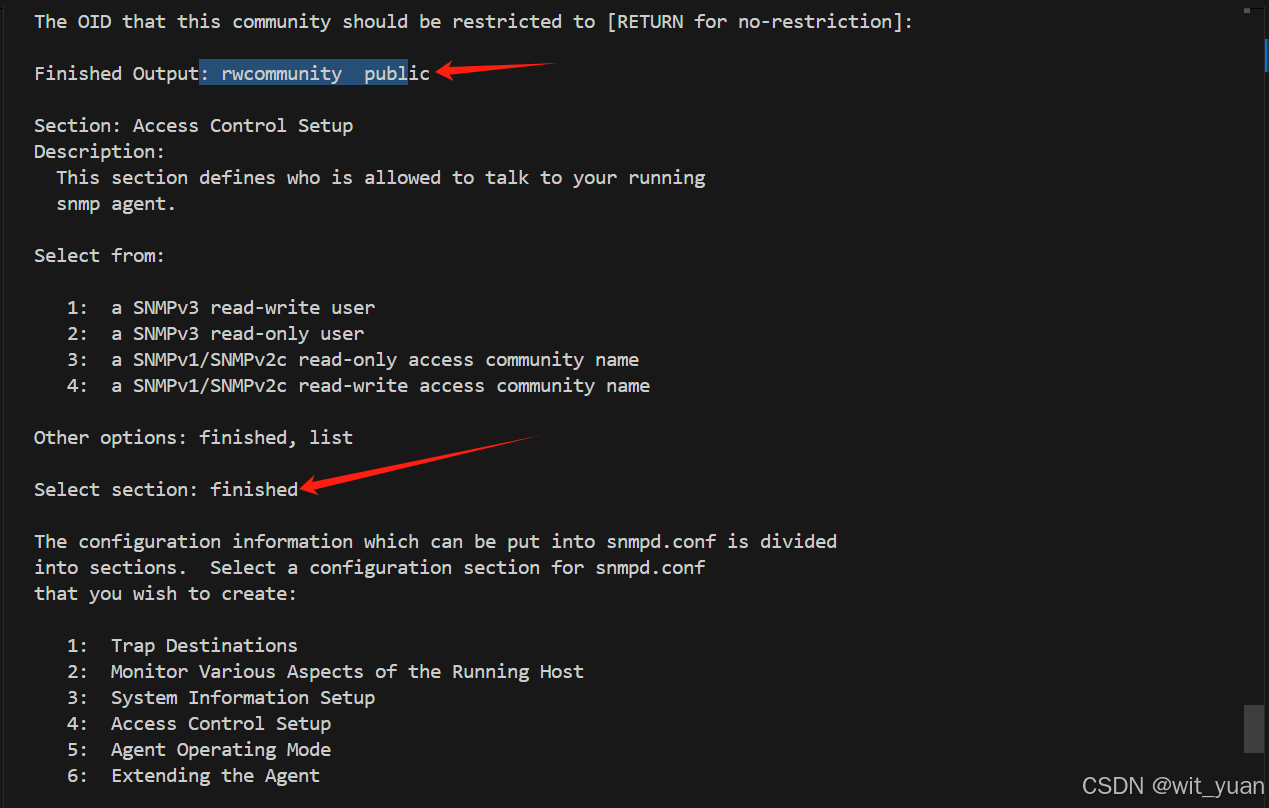
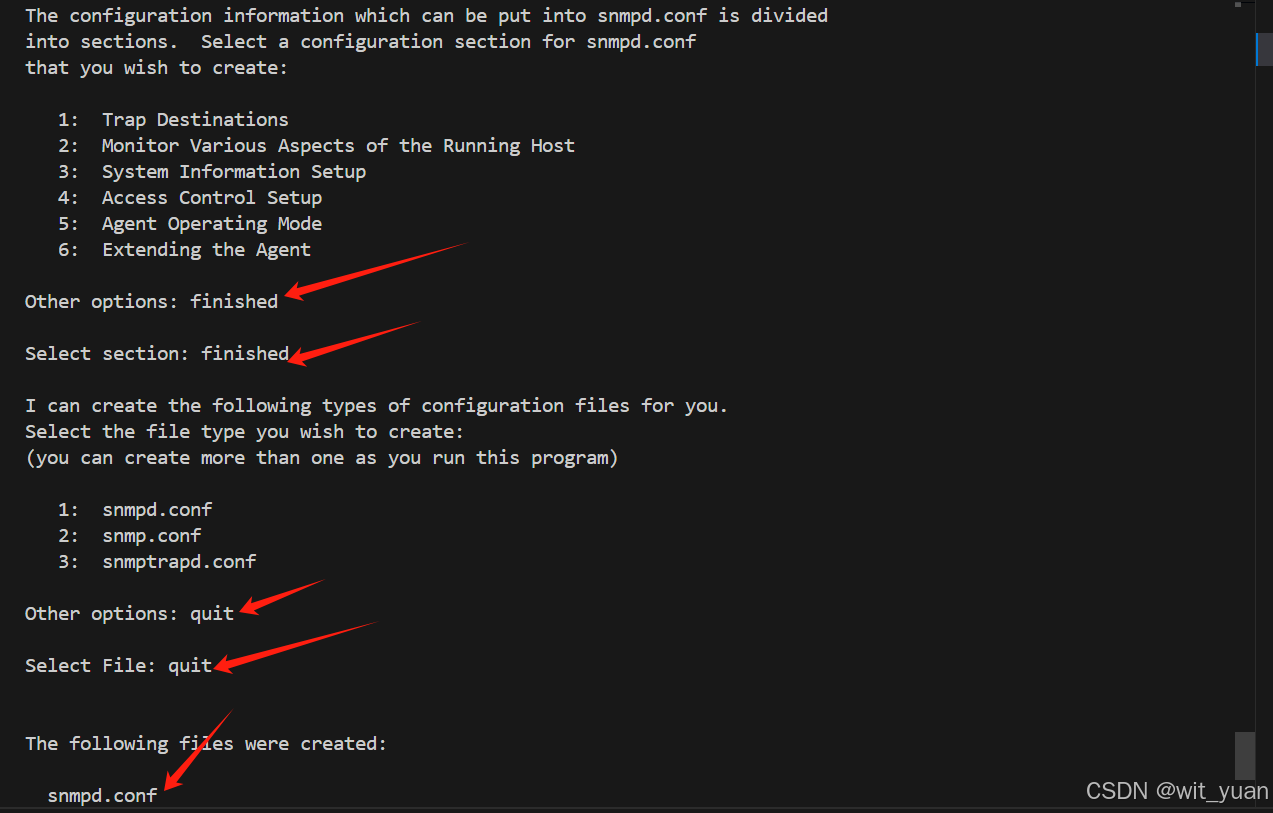
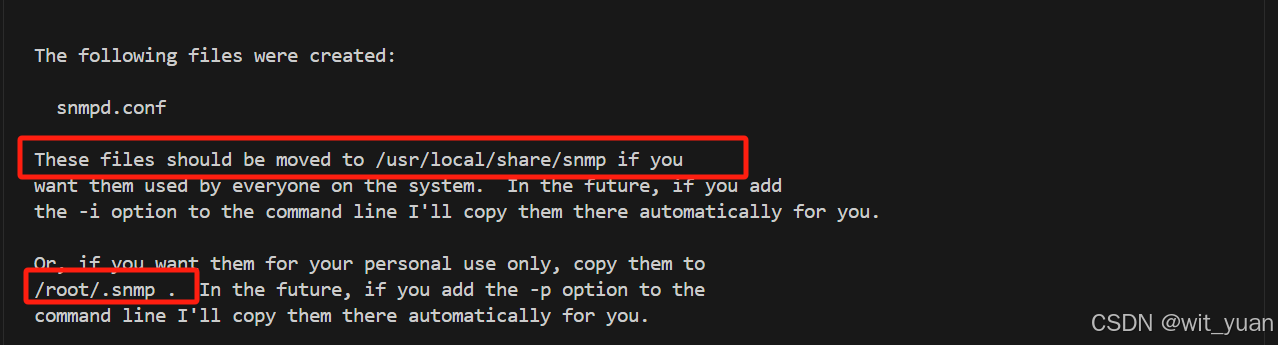
根据提示的建议,将当前目录下产生的文件:snmpd.conf文件拷贝到目录:/usr/local/share/snmp中。
# sudo cp snmpd.conf /usr/local/share/snmp/
执行程序:
# sudo snmpd -c /usr/local/share/snmp/snmpd.conf

使用如下命令测试环境是否搭建好:
# $ snmpwalk -v 2c -c public localhost system

3.mib文件
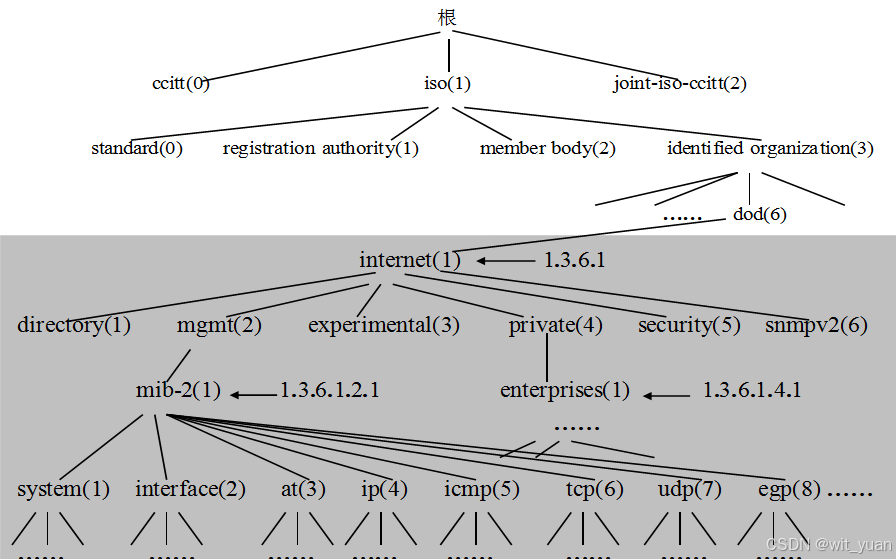
首先,贴一张整个的mib树形结构出来,有一个只管的认识。
3.1 mib文件分析
3.1.1 mib标准文档
一个很重要的mib标准文件是doc\rfc\snmpV1\rfc1155.txt。相对应的,查看文档:
mibs\RFC1155-SMI.txt与mibs\SNMPv2-SMI.txt,基本上知道这几点:
Objects in the MIB are defined using Abstract Syntax Notation One (ASN.1)- 自定义
mib文件需要引入该文档的标准内容,因为该文档描述了root信息,具体参考mibs\RFC1155-SMI.txt - 自定义
mib文件应该继承iso.org.dod,来源:mibs\SNMPv2-SMI.txt
其余的mib文件可以在mibs目录大致浏览一遍。
3.1.2 mib文件怎么写
mib文件是什么
其实通俗来讲,就是一个定制规则的文件,按照这个规则,服务器程序才能解析。简单来说,客户端发送一段oid代码.1.3.6.4,对于服务端怎么解析?那只能在服务器端也定义好这个文件,客户端发其他的oid,服务器不识别就行了。mib怎么写
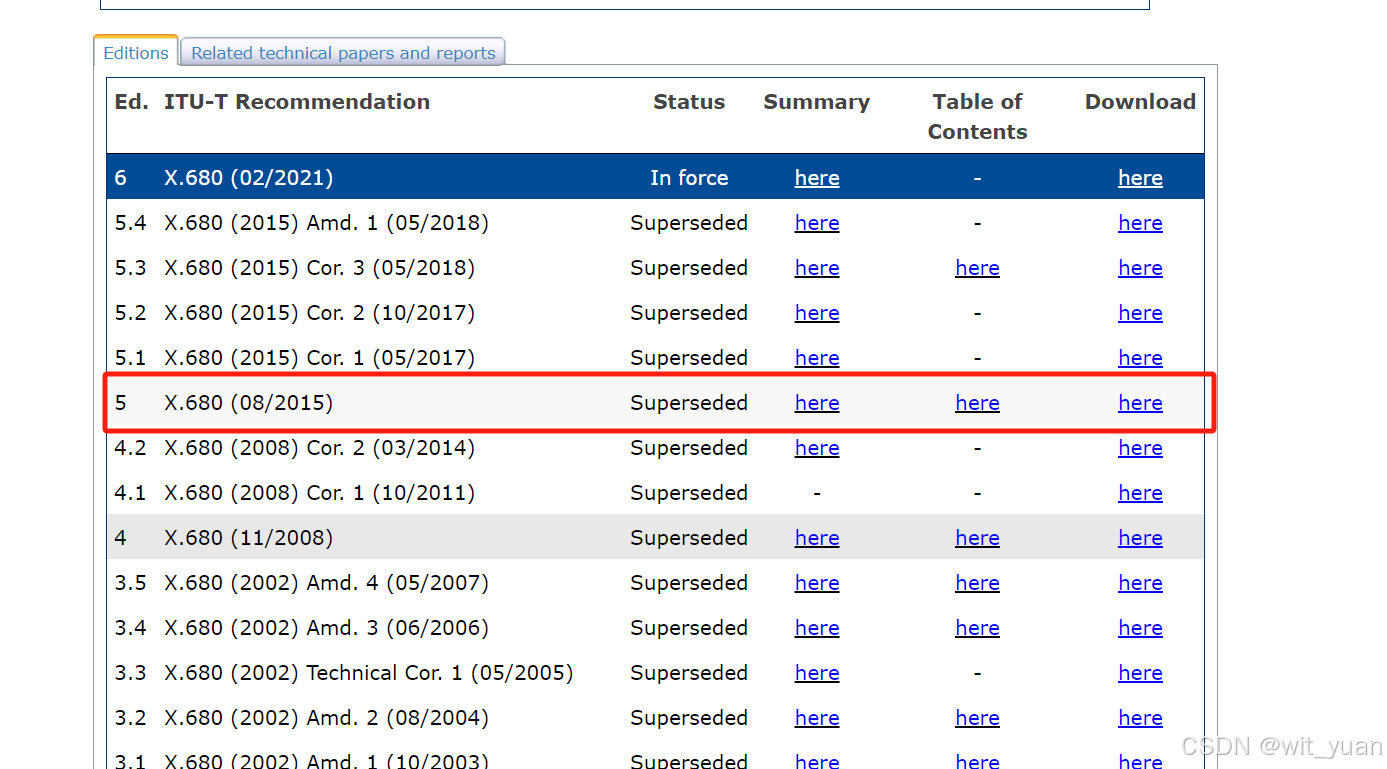
mib怎么写,需要查看mib的语法规则。即asn.1语法规则。那么参考链接:https://www.itu.int/en/ITU-T/asn1/Pages/introduction.aspx中的https://www.itu.int/itu-t/recommendations/rec.aspx?rec=x.680:
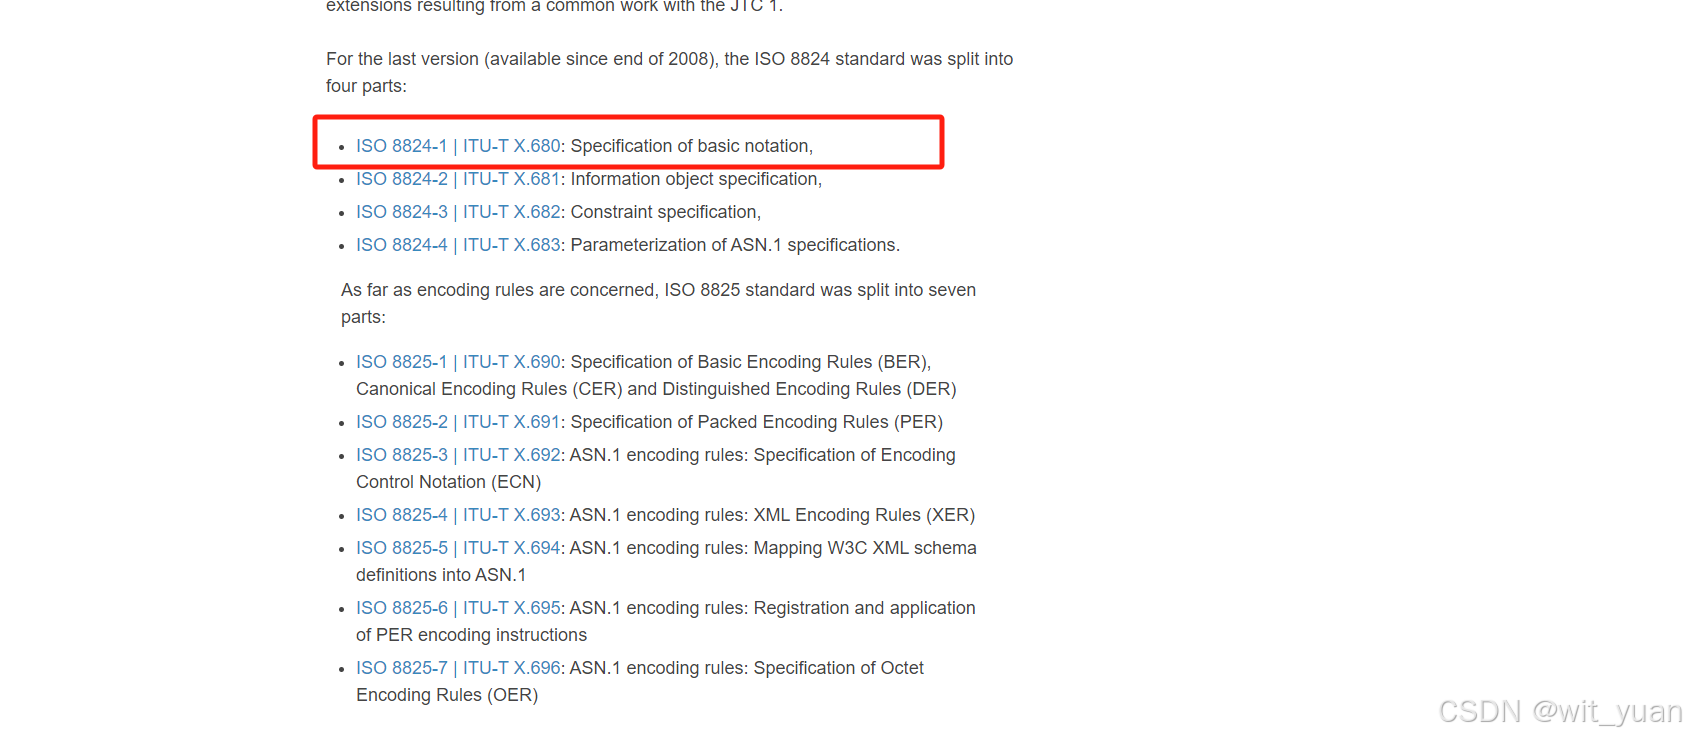
注意,选择x.680(08/2015)文档下载:
简单看一个文件,以便知道怎么看(读)mib文件:
在mibs\LM-SENSORS-MIB.txt下有这样一个文件,内容如:
IMPORTS
    MODULE-IDENTITY, OBJECT-TYPE, Integer32, Gauge32
        FROM SNMPv2-SMI
    DisplayString
        FROM SNMPv2-TC
    ucdExperimental
        FROM UCD-SNMP-MIB;

lmSensorsMIB MODULE-IDENTITY
    LAST-UPDATED "200011050000Z"
    ORGANIZATION "AdamsNames Ltd"
    CONTACT-INFO
        "Primary Contact: M J Oldfield
         email:     m@mail.tc"
    DESCRIPTION
        "This MIB module defines objects for lm_sensor derived data."
    REVISION     "200011050000Z"
    DESCRIPTION
        "Derived from DISKIO-MIB ex UCD."
    ::= { lmSensors 1 }

lmSensors      OBJECT IDENTIFIER ::= { ucdExperimental 16 }

lmTempSensorsTable OBJECT-TYPE
    SYNTAX      SEQUENCE OF LMTempSensorsEntry
    MAX-ACCESS  not-accessible
    STATUS      current
    DESCRIPTION
        "Table of temperature sensors and their values."
    ::= { lmSensors 2 }
这个文件引入了: ucdExperimental FROM UCD-SNMP-MIB; 需要接着看文件:mibs\UCD-SNMP-MIB.txt,内容:
ucdavis MODULE-IDENTITY
    LAST-UPDATED "202008210000Z"
    ORGANIZATION "University of California, Davis"
    CONTACT-INFO
	"This mib is no longer being maintained by the University of
	 California and is now in life-support-mode and being
	 maintained by the net-snmp project.  The best place to write
	 for public questions about the net-snmp-coders mailing list
	 at net-snmp-coders@lists.sourceforge.net.

         postal:   Wes Hardaker
                   P.O. Box 382
                   Davis CA  95617

         email:    net-snmp-coders@lists.sourceforge.net
        "
    DESCRIPTION
	"This file defines the private UCD SNMP MIB extensions."

    REVISION     "202008210000Z"
    DESCRIPTION
	"Add new memSysAvail object"

    REVISION     "201606100000Z"
    DESCRIPTION
	"New 64-bit memory objects"

    REVISION     "201407310000Z"
    DESCRIPTION
	"New object for number of CPUs as counted by the agent"

    REVISION	 "201105140000Z"
    DESCRIPTION
	"New objects for monitoring CPU Steal, Guest and Nice values"

    REVISION	 "200901190000Z"
    DESCRIPTION
	"New 64-bit objects for monitoring large disk usage"

    REVISION	 "200611220000Z"
    DESCRIPTION
	"Clarify behaviour of objects in the memory & systemStats groups
         (including updated versions of malnamed mem*Text objects).
         Define suitable TCs to describe error reporting/fix behaviour."

    REVISION	 "200404070000Z"
    DESCRIPTION
	"Added ssCpuRawSoftIRQ for Linux (2.6) and forgotten raw swap counters."

    REVISION	 "200209050000Z"
    DESCRIPTION
	"Deprecate the non-raw objects."

    REVISION	 "200109200000Z"
    DESCRIPTION
	"Group to monitor log files"

    REVISION	 "200101170000Z"
    DESCRIPTION
	"Added raw CPU and IO counters."

    REVISION	 "9912090000Z"
    DESCRIPTION
	"SMIv2 version converted from older MIB definitions."
    ::= { enterprises 2021 }

ucdExperimental       OBJECT IDENTIFIER ::= { ucdavis 13 }
另外,这个文件描述了OBJECT-TYPE, NOTIFICATION-TYPE, MODULE-IDENTITY,Integer32, Opaque, enterprises, Counter32, Unsigned32 FROM SNMPv2-SMI,因此,继续找文件mibs\SNMPv2-SMI.txt,看到内容:
org            OBJECT IDENTIFIER ::= { iso 3 }  --  "iso" = 1
dod            OBJECT IDENTIFIER ::= { org 6 }
internet       OBJECT IDENTIFIER ::= { dod 1 }
private        OBJECT IDENTIFIER ::= { internet 4 }
enterprises    OBJECT IDENTIFIER ::= { private 1 }
从这里可以看出,这个文件如果是定义enterprises的OID,是少不了要IMPORT到自己的mib文件中的。
那么可以做如下解析:
org 为 .1.3
dod 为 .1.3.6
internet 为 .1.3.6.1
private 为 .1.3.6.1.4
enterprises 为 .1.3.6.1.4.1
ucdavis 为 .1.3.6.1.4.1.2021
ucdExperimental 为 .1.3.6.1.4.1.2021.13
lmSensors 为 .1.3.6.1.4.1.2021.13.16
lmTempSensorsTable 为 .1.3.6.1.4.1.2021.13.16.2
另外,可以看到iso只有注释标识其值为1,实际怎么做到的呢? 这个后续可以查阅net-snmp代码。
实际上,如果是初学者,可以使用如下命令验证OID,例如:
# snmptranslate -On WITYUAN-MIB:wityuanNode //WITYUAN-MIB mib文件,wityuanNode节点名
再例如enterprises的OID:
# snmptranslate -On SNMPv2-SMI:enterprise

3.2 写一个mib文档,测试语法
写一个简单的mib文件,命名为:WITYUAN-MIB.txt,如下所示:
WITYUAN-MIB DEFINITIONS ::= BEGIN

IMPORTS
    MODULE-IDENTITY, OBJECT-TYPE, NOTIFICATION-TYPE,
    enterprises,OBJECT-TYPE,TimeTicks, Counter32, snmpModules, mib-2
        FROM SNMPv2-SMI
    DisplayString, TestAndIncr, TimeStamp

        FROM SNMPv2-TC
    MODULE-COMPLIANCE, OBJECT-GROUP, NOTIFICATION-GROUP
        FROM SNMPv2-CONF;

	WITYUANModule MODULE-IDENTITY
		LAST-UPDATED "202410192008Z"
		ORGANIZATION
			"none."
		CONTACT-INFO
			"Contact-info. wit wow!!"
		DESCRIPTION
			"Description."
		::= { enterprises 60000 }

	wityuanObj OBJECT IDENTIFIER::={WITYUANModule 1}

	wityuanNode OBJECT-TYPE
		SYNTAX      DisplayString
		ACCESS      read-write
		STATUS      current
		DESCRIPTION "wityuan node"
		::={wityuanObj 1}

END
目前的mibs文件都在/usr/local/share/snmp/mibs/目录下,故将本文件也拷贝到该目录下:
# sudo cp WITYUAN-MIB.txt /usr/local/share/snmp/mibs/
验证文件是否正确:
# snmptranslate -Tp -IR WITYUAN-MIB::WITYUANModule
+--WITYUANModule(60000)
   |
   +--wityuanObj(1)
      |
      +-- -RW- String    wityuanNode(1)
               Textual Convention: DisplayString
               Size: 0..255
3.3 mib集成到源码net-snmp测试功能开发
本节代码参考: mib2c工具产生文件: https://gitee.com/wit_yuan/net-snmp/tree/test_snmpget/mib2c_generate_files.
修改的内容,参考patch: https://gitee.com/wit_yuan/net-snmp/blob/test_snmpget/modified.patch
文档参考官方链接: http://www.net-snmp.org/tutorial/tutorial-5/toolkit/
写mib文件一个方面是客户端不需要使用不人性化的OID字段访问服务器,另一个方面是集成到服务器中开发自己的功能。
基于以上的文件:WITYUAN-MIB.txt,使用如下命令生成.c代码和.h文件:
# mib2c mib2c.scalar.conf WITYUAN-MIB::WITYUANModule
交互信息如下:
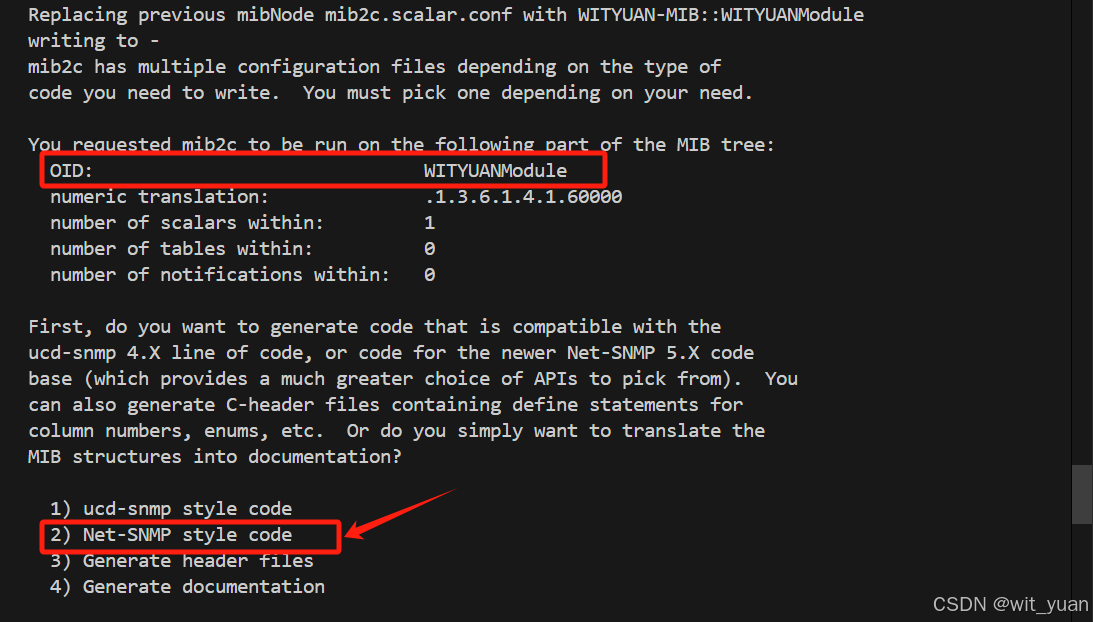
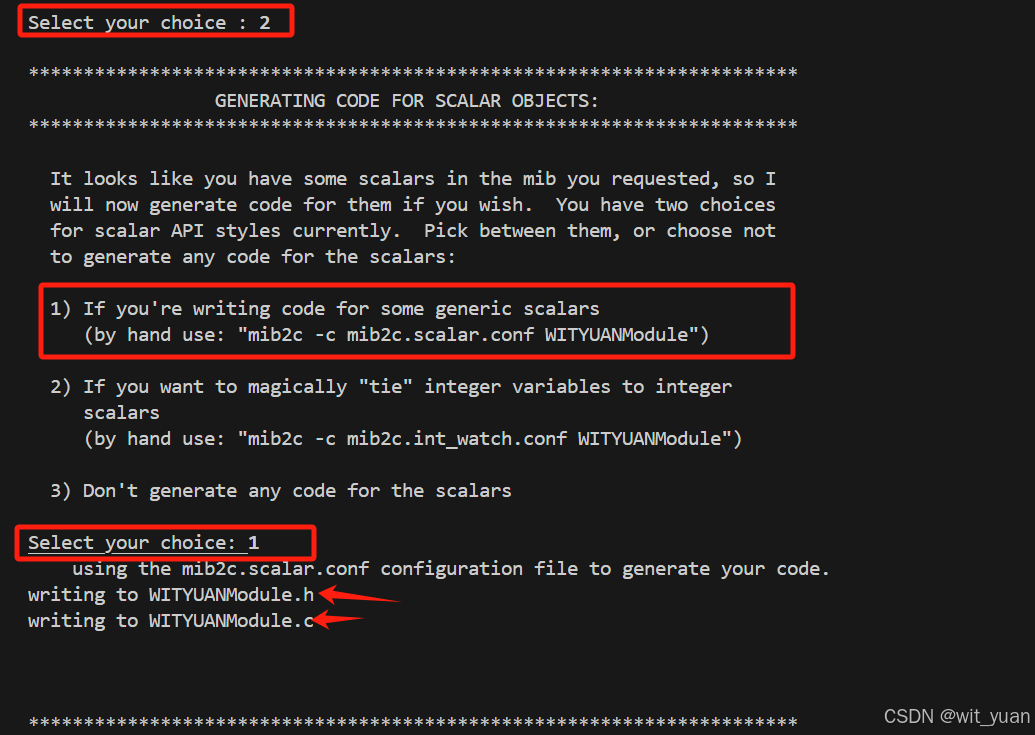
生成以上文件后,要拷贝到目录agent/mibgroup中:
# cp WITYUANModule.* ../agent/mibgroup/
然后需要编译net-snmp代码,采用如下命令:
# ./configure --with-mib-modules="WITYUANModule"
# make
# sudo make install
可以直接使用如下命令获取字符串数据:
# snmpget -v 2c -c public localhost .1.3.6.1.4.1.60000.1.1.0
返回数据:

如果需要修改为自己预定的字符串,可以使用如下命令,要先设置:
# snmpset -v 2c -c public localhost 1.3.6.1.4.1.60000.1.1.0 s "hello world"
然后使用snmpget获取是否正确设置了字符串:
# snmpget -v 2c -c public localhost .1.3.6.1.4.1.60000.1.1.0

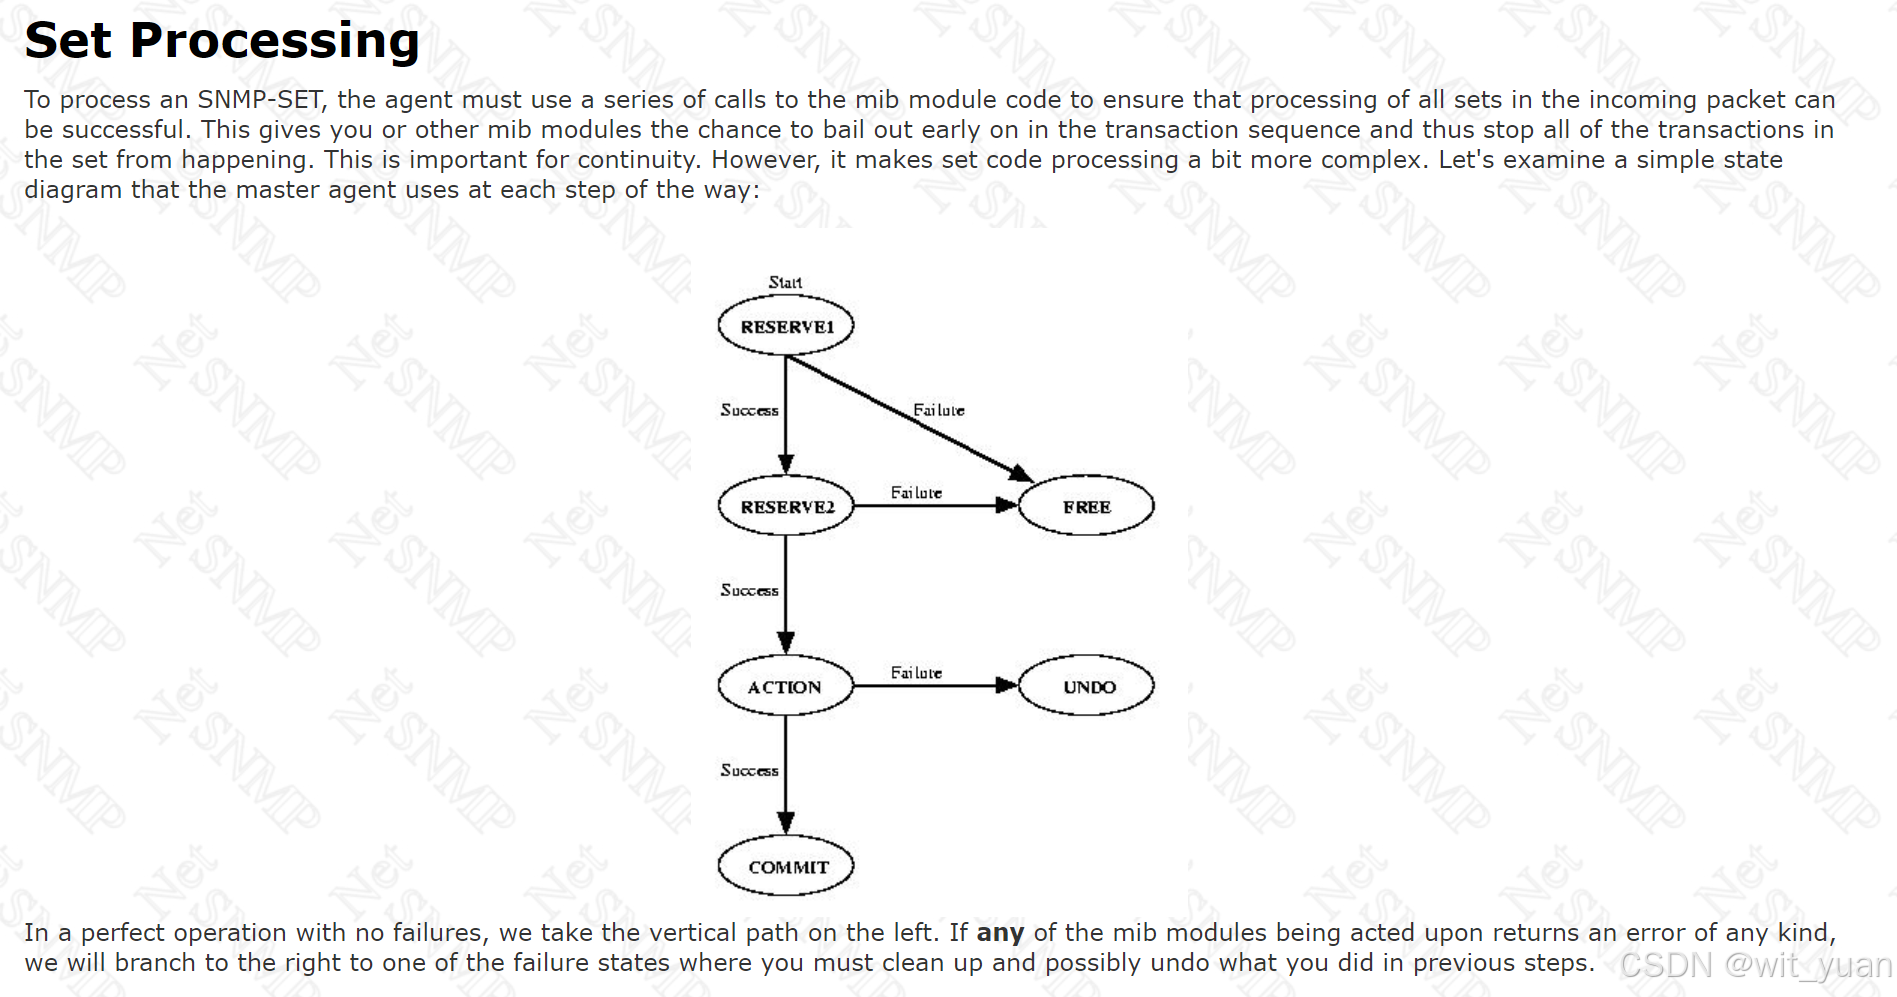
- 备注1:
snmpset的代码流程参考:
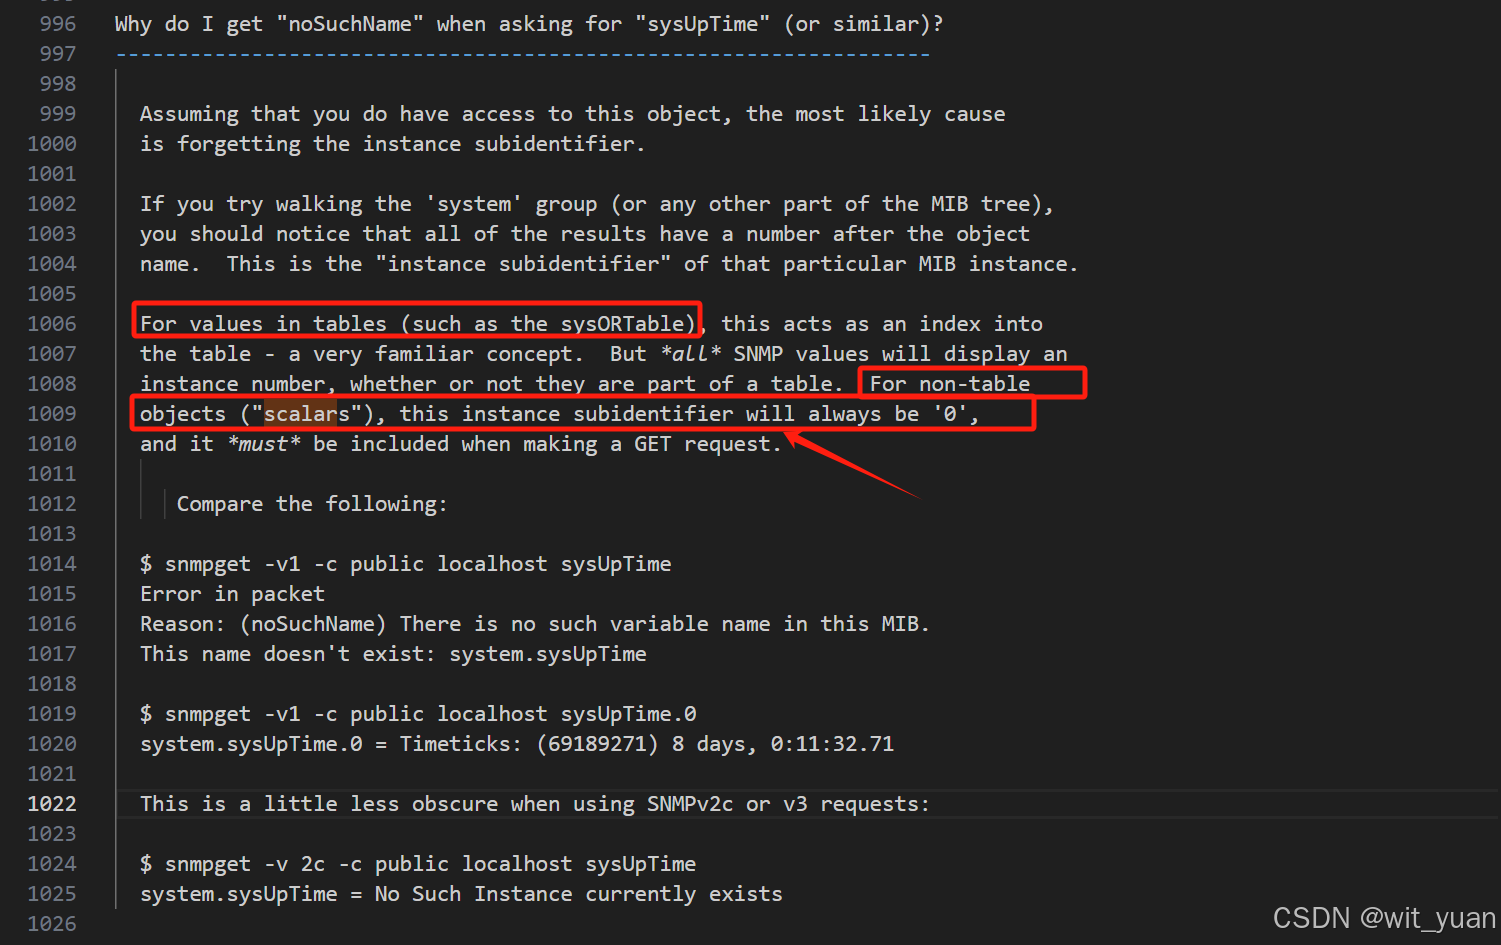
- 备注2:为什么最后的节点需要加一个.0?
参考net-snmp源码的FAQ文档:
3.4 使用subagent开发自己的代理程序
参考: http://www.net-snmp.org/wiki/index.php/TUT:Writing_a_Subagent
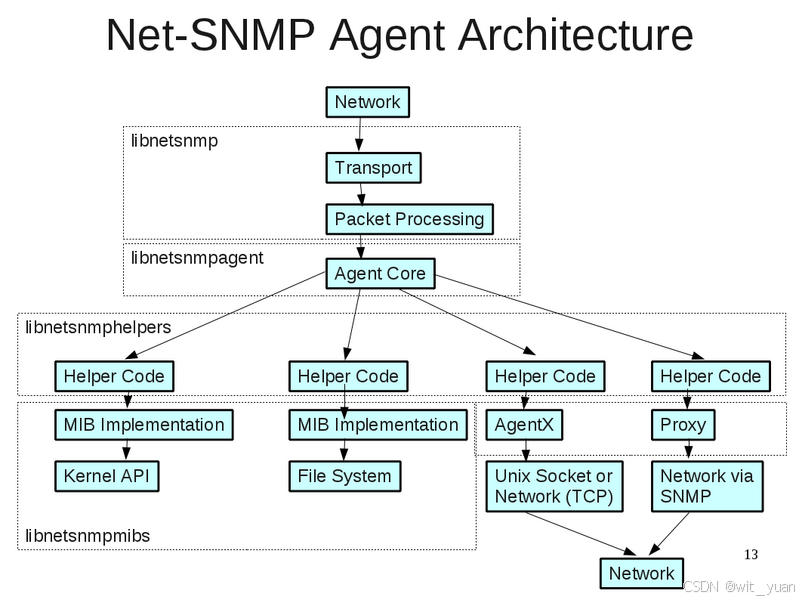
agent架构如下图所示:
使用前面的WITYUANModule.c文件,使用如下命令:
# net-snmp-config --compile-subagent WITYUAN_subagent WITYUANModule.c
- 备注,可以使用命令行
--norm阻止删除中间文件,如:
# net-snmp-config --compile-subagent --norm WITYUAN_subagent WITYUANModule.c
编译结果:


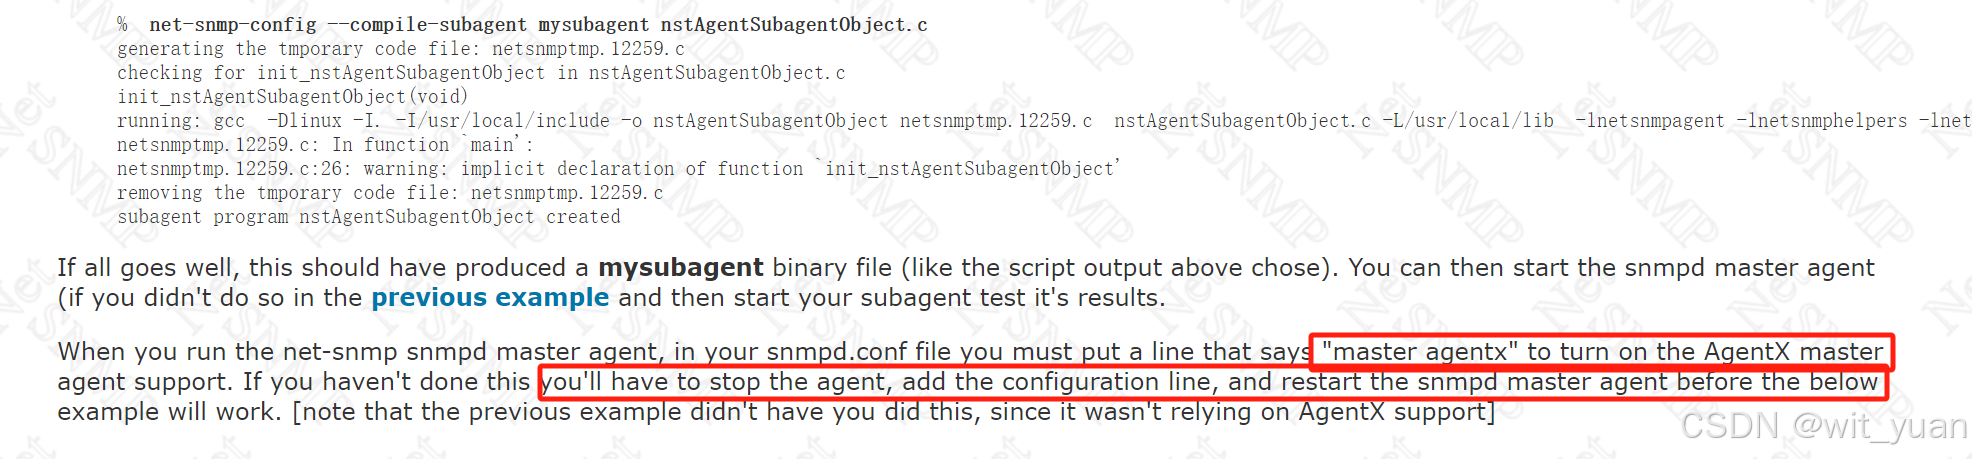
接下来需要在文件:snmpd.conf中添加如下内容并重启snmpd.
...
master agentx
...
启动agent程序:
# sudo ./mibs/WITYUAN_subagent
注意以root启动agent程序,否则可能会报错。

接着还是如前面的测试命令测试snmpset和snmpget:
# snmpget -v 2c -c public localhost .1.3.6.1.4.1.60000.1.1.0
与:
# snmpset -v 2c -c public localhost 1.3.6.1.4.1.60000.1.1.0 s "hello world"
3.5 使用dlmod开发自己的agent程序
这一节参考:http://www.net-snmp.org/wiki/index.php/TUT:Writing_a_Dynamically_Loadable_Object
还是前面的.c文件,使用命令:
# gcc `net-snmp-config --cflags` -fPIC -shared -g -O0 -o WITYUANModule.so WITYUANModule.c `net-snmp-config --libs`
将文件编译成so库。
然后需要将库路径在snmpd.conf中引入:
# sudo vi /usr/local/share/snmp/snmpd.conf
...
#master agentx
dlmod WITYUANModule /mnt/e/sourcecode/net-snmp/mibs/WITYUANModule.so
...
接着可以重启snmpd服务:
# sudo snmpd -c /usr/local/share/snmp/snmpd.conf
接着还是如前面的测试命令测试snmpset和snmpget:
# snmpget -v 2c -c public localhost .1.3.6.1.4.1.60000.1.1.0
与:
# snmpset -v 2c -c public localhost 1.3.6.1.4.1.60000.1.1.0 s "hello world"
4.SNMPTrap
参考链接:
- http://www.net-snmp.org/wiki/index.php/TUT:Configuring_snmptrapd
- http://www.net-snmp.org/wiki/index.php/TUT:snmptrap
这对于发送BMC的传感器告警数据比较有用。
4.1 配置文件
需要修改配置文件:/usr/local/share/snmp/snmptrapd.conf
# sudo vi /usr/local/share/snmp/snmptrapd.conf
...
authCommunity log,execute,net public
...
作为一个简单例子,服务器启动程序:
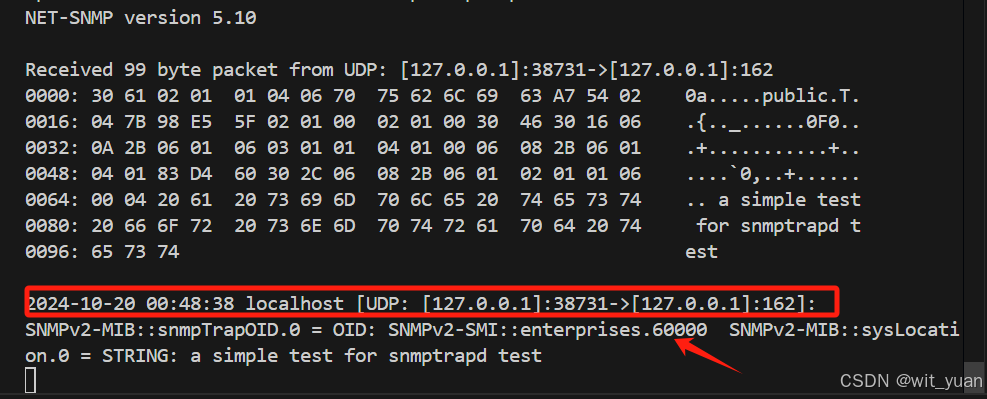
# sudo snmptrapd -C -c /usr/local/share/snmp/snmptrapd.conf -df -Lo
然后客户端执行如下命令:
# sudo snmptrap -v 2c -c public localhost "test hostname" 1.3.6.1.4.1.60000 SNMPv2-MIB::sysLocation.0 s "a simple test for snmptrapd test"
最终服务端打印信息如下所示:
5.BMC交叉编译
做一份参考编译例子:
./configure CC=$CROSS_COMPILE"gcc" \
--build=i686-linux --host=arm-linux-gnueabihf --target=arm-linux-gnueabihf \
--with-cflags="xx" \    // include 目录
--with-ldflags="xx" \  //lib目录
--with-persistent-directory=/var/lib/snmp \
--enable-shared \
--enable-ipv6 \
--with-logfile=none \
--without-rpm \
--with-libwrap \
--without-dmalloc \
--without-efence \
--without-rsaref \
--with-sys-contact=root \
--with-sys-location=Unknown \
--with-out-mib-modules= \
--enable-mfd-rewrites \
--with-mnttab=/etc/mtab \
--with-mibdirs=/home/xxx/Desktop/.snmp/mibs:/usr/share/snmp/mibs:/usr/share/snmp/mibs/iana:/usr/share/snmp/mibs/ietf:/usr/share/mibs/site:/usr/share/snmp/mibs:/usr/share/mibs/iana:/usr/share/mibs/ietf:/usr/share/mibs/netsnmp \
--disable-embedded-perl \
--disable-perl-cc-checks \
--disable-manuals \
--with-defaults


 1264
1264

 被折叠的 条评论
为什么被折叠?
被折叠的 条评论
为什么被折叠?
 到【灌水乐园】发言


