iOS10本地通知的探索
2016WWDC会上,苹果在iOS10中更新了新的通知框架(UserNotifications.framework、UserNotificationsUI.framework),今天就去探索一下,尝尝鲜 。
。
 。
。
我的探索环境采用的是Xcode8.0Beta版本,语言是Swift3.0。我会通过以前通知的使用情况和iOS10中的做出对比来介绍。Swift3.0语法变化可以参考这篇文章
一、要使用通知,首先要注册通知
1、旧版本注册本地通知的方式
// 注册通知
let settings = UIUserNotificationSettings.init(types: [UIUserNotificationType.alert , UIUserNotificationType.sound , UIUserNotificationType.badge], categories: nil)
UIApplication.shared().registerUserNotificationSettings(settings)下面是UNNotificationSettings类额定义信息:
public class UNNotificationSettings : NSObject, NSCopying, NSSecureCoding {


    public var authorizationStatus: UNAuthorizationStatus { get }


    public var soundSetting: UNNotificationSetting { get }

    public var badgeSetting: UNNotificationSetting { get }

    public var alertSetting: UNNotificationSetting { get }


    public var notificationCenterSetting: UNNotificationSetting { get }

    public var lockScreenSetting: UNNotificationSetting { get }

    public var carPlaySetting: UNNotificationSetting { get }


    public var alertStyle: UNAlertStyle { get }
}
二、创建通知
1、旧版通知的创建方式 --> 在使用版本API的时候,Xcode会报警告,点击进去查看新的API是一种学习新技术的方式
// 创建通知
    private func createLocalNotification() {
        // 创建通知
        let local = UILocalNotification()
        // 设置一些参数
        local.alertBody = "alertBody"
        local.soundName = UILocalNotificationDefaultSoundName
        local.applicationIconBadgeNumber = 1
        // 设置3秒钟后通知
        local.fireDate = NSDate.init(timeIntervalSinceNow: 3) as Date
        local.userInfo = ["key": "value"]
        UIApplication.shared().scheduleLocalNotification(local)
}// UNNotificationContent 的子类 UNMutableNotificationContent
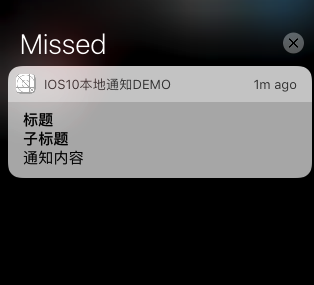
let content = UNMutableNotificationContent()
content.sound = UNNotificationSound.default()
content.badge = 10
content.body = "通知内容"
content.title = "标题"
content.subtitle = "子标题"
content.userInfo = ["key": "value"]
// 需要使用UNNotificationTrigger的子类UNTimeIntervalNotificationTrigger来实例化
let trigger = UNTimeIntervalNotificationTrigger.init(timeInterval: 3, repeats: false)
let request = UNNotificationRequest.init(identifier: "youIdentifier", content: content, trigger: trigger)
let center = UNUserNotificationCenter.current()
// 在代理里面接收通知信息
center.delegate = self
center.add(request, withCompletionHandler: nil)1、接收旧版本地通知的信息需要在UIApplicationDelegate的代理方法里面接收
func application(_ application: UIApplication, handleActionWithIdentifier identifier: String?, for notification: UILocalNotification, completionHandler: () -> Void) {
}extension ViewController: UNUserNotificationCenterDelegate {
func userNotificationCenter(_ center: UNUserNotificationCenter, didReceive response: UNNotificationResponse, withCompletionHandler completionHandler: () -> Void) {
let content = response.notification.request.content
print("userInfo = \(content.userInfo), subtitle = \(content.subtitle), title = \(content.title) ,body = \(content.body) ,badge = \(content.badge) ,sound = \(content.sound)")
}
func userNotificationCenter(_ center: UNUserNotificationCenter, willPresent notification: UNNotification, withCompletionHandler completionHandler: (UNNotificationPresentationOptions) -> Void) {
print("willPresent")
}
}通知的删除可以通过特定标识删除单个通知,也可以删除全部的通知
1、旧版通知的删除
// 删除通知
    private func deleteLocalNotification() {
        // 获取所有本地通知
        let localNotificationsArray = UIApplication.shared().scheduledLocalNotifications
        guard !localNotificationsArray!.isEmpty else {
            print("没有本地通知")
            return
        }
        // 获取本地通知并且删除
        for item in localNotificationsArray! {
            print("item =\(item)")
            // 移除单个通知,可以根据userinfo设置的标识删除指定通知
            UIApplication.shared().cancelLocalNotification(item)
        }
        // 删除所有本地通知
//        UIApplication.shared().cancelAllLocalNotifications()
}// 删除通知
private func deleteLocalNotification() {
let center = UNUserNotificationCenter.current()
// UNUserNotificationCenter getPendingNotificationRequestsWithCompletionHandler:
center.getPendingNotificationRequests { (requestArray :[UNNotificationRequest]) in
print("requestArray = \(requestArray)")
for item in requestArray {
// 根据identifiers移除指定通知
let identifiers = item.identifier
if identifiers == "youIdentifier" { // 跟创建的时候对应
center.removeDeliveredNotifications(withIdentifiers: [identifiers])
}
}
// 或者移除全部通知
center.removeAllPendingNotificationRequests()
}
}五、iOS10上面本地通知的展示效果


 548
548

 被折叠的 条评论
为什么被折叠?


