


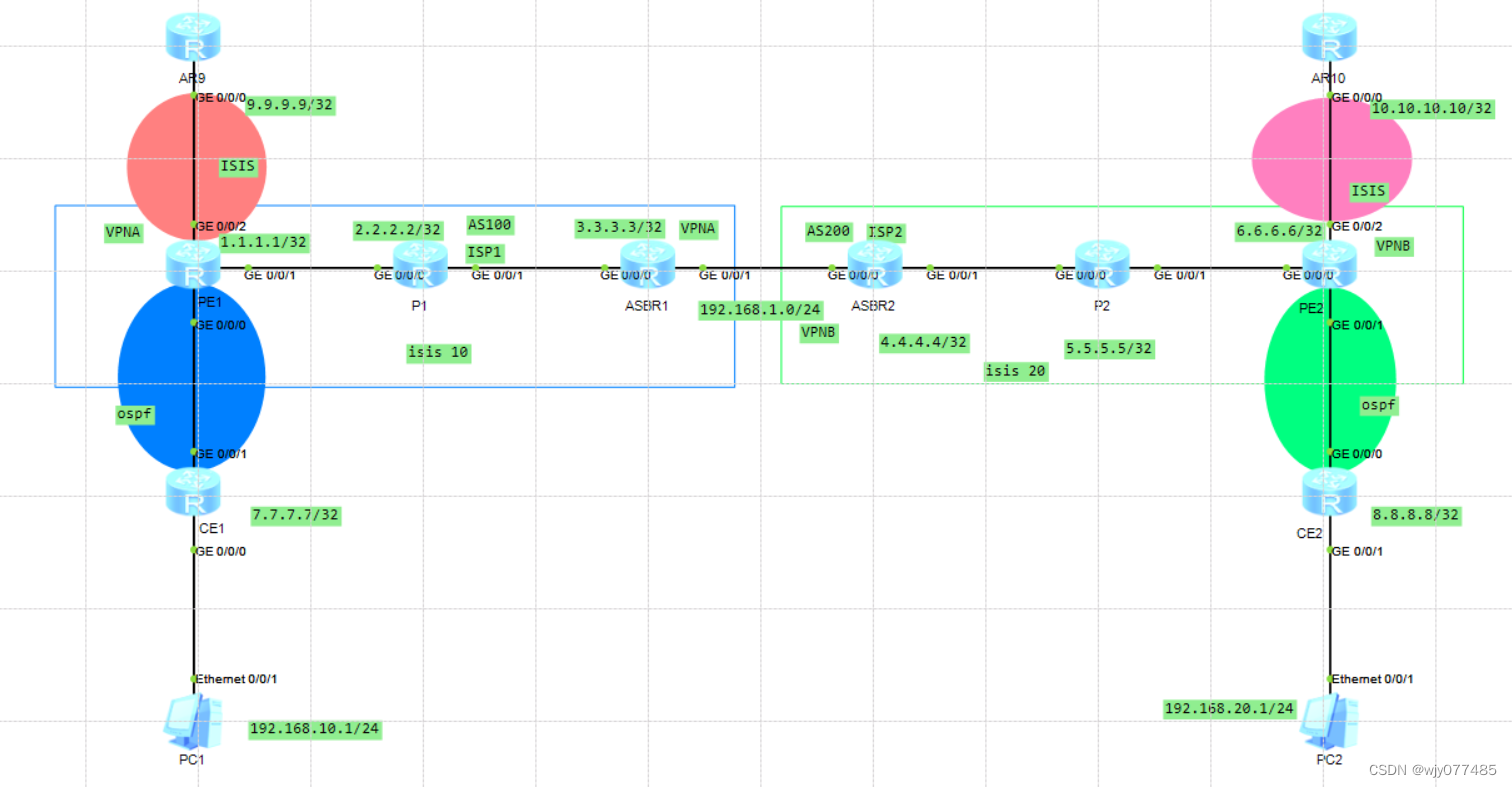
本实验主要是关于MPLS VPN(OptionA)的详细配置,拓扑图如下:
配置步骤:
1、AS内通过IGP互通,环回口能够互通
PE1配置:
#
isis 10
 network-entity 49.0001.0000.0000.0001.00
#
interface GigabitEthernet0/0/1
 ip address 10.1.12.1 255.255.255.0
 isis enable 10
#
interface LoopBack0
 ip address 1.1.1.1 255.255.255.255
 isis enable 10

P1配置:
#
isis 10
 network-entity 49.0001.0000.0000.0002.00
#
interface GigabitEthernet0/0/0
 ip address 10.1.12.2 255.255.255.0
 isis enable 10
#
interface GigabitEthernet0/0/1
 ip address 10.1.23.2 255.255.255.0
 isis enable 10
#
interface LoopBack0
 ip address 2.2.2.2 255.255.255.255
 isis enable 10

ASBR1配置:
#
isis 10
 network-entity 49.0001.0000.0000.0003.00
#
interface GigabitEthernet0/0/0
 ip address 10.1.23.3 255.255.255.0
 isis enable 10
#
interface LoopBack0
 ip address 3.3.3.3 255.255.255.255
 isis enable 10

ASBR2配置:
#
isis 20
 network-entity 49.0001.0000.0000.0004.00
#
interface GigabitEthernet0/0/1
 ip address 10.1.45.45 255.255.255.0
 isis enable 20
#
interface LoopBack0
 ip address 4.4.4.4 255.255.255.255
 isis enable 20

P2配置:
#
isis 20
 network-entity 49.0001.0000.0000.0005.00
#
interface GigabitEthernet0/0/0
 ip address 10.1.45.5 255.255.255.0
 isis enable 20
#
interface GigabitEthernet0/0/1
 ip address 10.1.56.5 255.255.255.0
 isis enable 20
#
interface LoopBack0
 ip address 5.5.5.5 255.255.255.255
 isis enable 20

PE2配置:
#
isis 20
 network-entity 49.0001.0000.0000.0006.00
#
interface GigabitEthernet0/0/0
 ip address 10.1.56.6 255.255.255.0
 isis enable 20
#
interface LoopBack0
 ip address 6.6.6.6 255.255.255.255
 isis enable 20
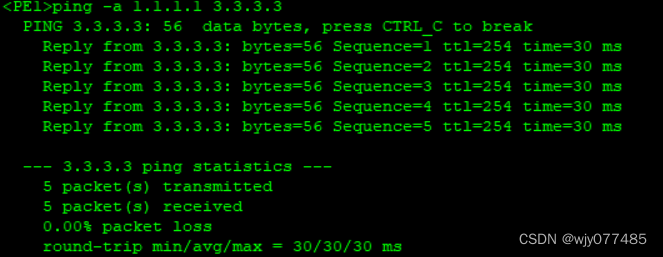
配置完成后可以实现PE1和ASBR1环回口通信,PE2与ASBR2环回口通信:

2、配置MPLS LSR-ID,全局开启MPLS、MPLS LDP,物理接口开启MPLS、MPLS LDP
PE1配置:
#
mpls lsr-id 1.1.1.1
mpls
#
mpls ldp
#
interface GigabitEthernet0/0/1
 ip address 10.1.12.1 255.255.255.0
 isis enable 10
 mpls
 mpls ldp

P1配置:
#
mpls lsr-id 2.2.2.2
mpls
#
mpls ldp
#
interface GigabitEthernet0/0/0
 ip address 10.1.12.2 255.255.255.0
 isis enable 10
 mpls
 mpls ldp
#
interface GigabitEthernet0/0/1
 ip address 10.1.23.2 255.255.255.0
 isis enable 10
 mpls
 mpls ldp

ASBR1配置:
#
mpls lsr-id 3.3.3.3
mpls
#
mpls ldp
#
interface GigabitEthernet0/0/0
 ip address 10.1.23.3 255.255.255.0
 isis enable 10
 mpls
 mpls ldp

ASBR2配置:
#
mpls lsr-id 4.4.4.4
mpls
#
mpls ldp
#
interface GigabitEthernet0/0/1
 ip address 10.1.45.45 255.255.255.0
 isis enable 20
 mpls
 mpls ldp

P2配置:
#
mpls lsr-id 5.5.5.5
mpls
#
mpls ldp
#
interface GigabitEthernet0/0/0
 ip address 10.1.45.5 255.255.255.0
 isis enable 20
 mpls
 mpls ldp
#
interface GigabitEthernet0/0/1
 ip address 10.1.56.5 255.255.255.0
 isis enable 20
 mpls
 mpls ldp

ASBR2配置:
#
mpls lsr-id 4.4.4.4
mpls
#
mpls ldp
#
interface GigabitEthernet0/0/1
 ip address 10.1.45.45 255.255.255.0
 isis enable 20
 mpls
 mpls ldp
此时建立起了MPLS LDP关系:
以PE1为例,其他路由器也都可以学习到

3、PE1与ASBR1建立MP-IBGP关系,PE2与ASBR2建立MP-IBGP关系
PE1配置:
#
bgp 100
 peer 3.3.3.3 as-number 100
 peer 3.3.3.3 connect-interface LoopBack0
#
 ipv4-family vpnv4
  peer 3.3.3.3 enable

ASBR1配置:
#
bgp 100
 peer 1.1.1.1 as-number 100
 peer 1.1.1.1 connect-interface LoopBack0
#
 ipv4-family vpnv4
  peer 1.1.1.1 enable

ASBR2配置:
#
bgp 200
 peer 6.6.6.6 as-number 200
 peer 6.6.6.6 connect-interface LoopBack0
 #
 ipv4-family vpnv4
  peer 6.6.6.6 enable

PE2配置:
#
bgp 200
 peer 4.4.4.4 as-number 200
 peer 4.4.4.4 connect-interface LoopBack0
#
 ipv4-family vpnv4
  peer 4.4.4.4 enable
查看BGP邻居关系建立情况:

4、PE1与ASBR1创建VPNA实例,接口绑定绑定VPNA实例,PE2与ASBR2创建VPNB实例,接口绑定绑定VPNB实例
PE1配置:
#
ip vpn-instance VPNA
 ipv4-family
  route-distinguisher 100:1
  vpn-target 100:1 export-extcommunity
  vpn-target 100:1 import-extcommunity

#
interface GigabitEthernet0/0/0
 ip binding vpn-instance VPNA
 ip address 10.1.17.1 255.255.255.0

ASBR1配置:
#
ip vpn-instance VPNA
 ipv4-family
  route-distinguisher 101:1
  vpn-target 100:1 export-extcommunity
  vpn-target 100:1 import-extcommunity
#
interface GigabitEthernet0/0/1
 ip binding vpn-instance VPNA
 ip address 192.168.1.1 255.255.255.0

ASBR2配置:
#
ip vpn-instance VPNB
 ipv4-family
  route-distinguisher 200:1
  vpn-target 100:1 export-extcommunity
  vpn-target 100:1 import-extcommunity
#
interface GigabitEthernet0/0/0
 ip binding vpn-instance VPNB
 ip address 192.168.1.2 255.255.255.0

PE2配置:
#
ip vpn-instance VPNB
 ipv4-family
  route-distinguisher 201:1
  vpn-target 100:1 export-extcommunity
  vpn-target 100:1 import-extcommunity
#
interface GigabitEthernet0/0/1
 ip binding vpn-instance VPNB
 ip address 10.1.68.6 255.255.255.0
#
interface GigabitEthernet0/0/2
 ip binding vpn-instance VPNB
 ip address 10.1.106.6 255.255.255.0
5、ASBR1与ASBR2在VPN实例里建立EBGP对等体(也可以使用IGP)
ASBR1配置:
#
bgp 100
ipv4-family vpn-instance VPNA
  peer 192.168.1.2 as-number 200

ASBR2配置:
#
bgp 200
ipv4-family vpn-instance VPNB
  peer 192.168.1.1 as-number 100
6、PE1与两个CE建立IGP关系;PE2与两个CE建立IGP关系,互相进行引入
CE1配置:
#
interface GigabitEthernet0/0/0
 ip address 192.168.10.254 255.255.255.0
 ospf enable 10 area 0.0.0.0
#
interface GigabitEthernet0/0/1
 ip address 10.1.17.7 255.255.255.0
 ospf enable 10 area 0.0.0.0
#
interface GigabitEthernet0/0/2
#
interface NULL0
#
interface LoopBack0
 ip address 7.7.7.7 255.255.255.255
 ospf enable 10 area 0.0.0.0
#
ospf 10
 area 0.0.0.0

CE2配置:
#
interface GigabitEthernet0/0/0
 ip address 10.1.68.8 255.255.255.0
 ospf enable 10 area 0.0.0.0
#
interface GigabitEthernet0/0/1
 ip address 192.168.20.254 255.255.255.0
 ospf enable 10 area 0.0.0.0
#
interface GigabitEthernet0/0/2
#
interface NULL0
#
interface LoopBack0
 ip address 8.8.8.8 255.255.255.255
 ospf enable 10 area 0.0.0.0
#
ospf 10
 area 0.0.0.0

AR9配置:
#
isis 100
 network-entity 49.0001.0000.0000.0009.00
#
firewall zone Local
 priority 15
#
interface GigabitEthernet0/0/0
 ip address 10.1.19.9 255.255.255.0
 isis enable 100
#
interface GigabitEthernet0/0/1
#
interface GigabitEthernet0/0/2
#
interface NULL0
#
interface LoopBack0
 ip address 9.9.9.9 255.255.255.255
 isis enable 100

AR10配置:
#
isis 200
 network-entity 49.0001.0000.0000.0010.00
#
firewall zone Local
 priority 15
#
interface GigabitEthernet0/0/0
 ip address 10.1.106.10 255.255.255.0
 isis enable 200
#
interface GigabitEthernet0/0/1
#
interface GigabitEthernet0/0/2
#
interface NULL0
#
interface LoopBack0
 ip address 10.10.10.10 255.255.255.255
 isis enable 200

PE1配置:
#
ospf 10 router-id 1.1.1.1 vpn-instance VPNA
 import-route bgp
 area 0.0.0.0
#
interface GigabitEthernet0/0/0
 ip binding vpn-instance VPNA
 ip address 10.1.17.1 255.255.255.0
 ospf enable 10 area 0.0.0.0
#
interface GigabitEthernet0/0/2
 ip binding vpn-instance VPNA
 ip address 10.1.19.1 255.255.255.0
 isis enable 100
#
bgp 100
ipv4-family vpn-instance VPNA
  import-route ospf 10
  import-route isis 100

PE2配置:
#
ospf 10 router-id 6.6.6.6 vpn-instance VPNB
 import-route bgp
 area 0.0.0.0
#
interface GigabitEthernet0/0/1
 ip binding vpn-instance VPNB
 ip address 10.1.68.6 255.255.255.0
 ospf enable 10 area 0.0.0.0
#
interface GigabitEthernet0/0/2
 ip binding vpn-instance VPNB
 ip address 10.1.106.6 255.255.255.0
 isis enable 200
#
bgp 200
ipv4-family vpn-instance VPNB
  import-route ospf 10
  import-route isis 200
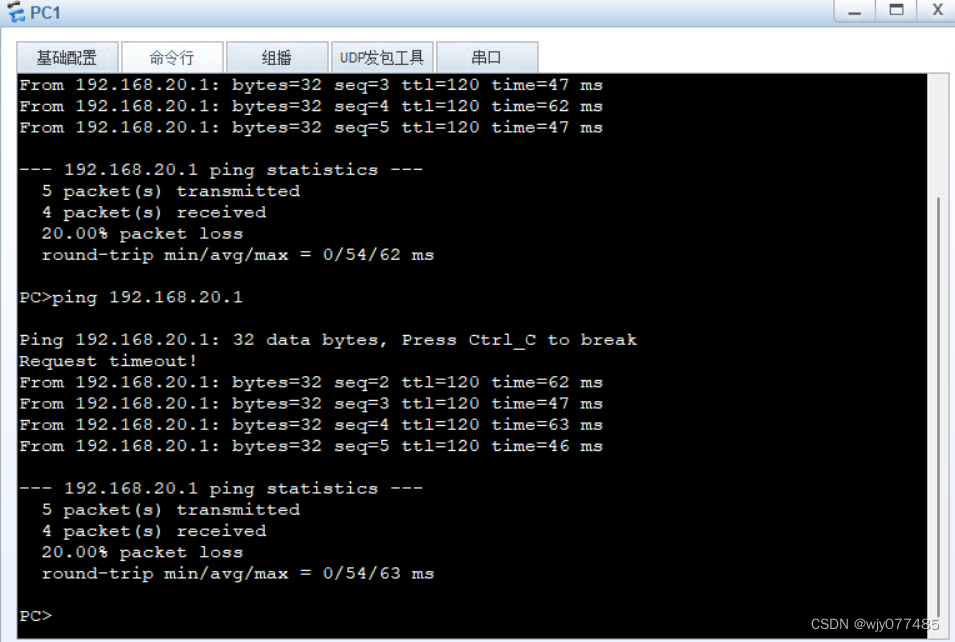
7、进行验证
PC1与PC2通信:
AR9和AR10环回口通信:


 724
724


 被折叠的 条评论
为什么被折叠?
被折叠的 条评论
为什么被折叠?
 到【灌水乐园】发言


