市面上有好多人写了如何搭建springmvc,但都是3.0版本的;有几篇文章写了4.0的搭建,但如果按照他们的方法搭建,最后结果还是蛮惨的.
这里搭建的环境主要特点是尽量使用注解配置,尽量不使用接口写dao层,尽量简单,尽量方便.
搭建完成后的效果是:springmvc+hibernate+事务管理+ehcache查询缓存+二级缓存+c3p0连接池,还是很适合日常开发的.
下面一步步来.
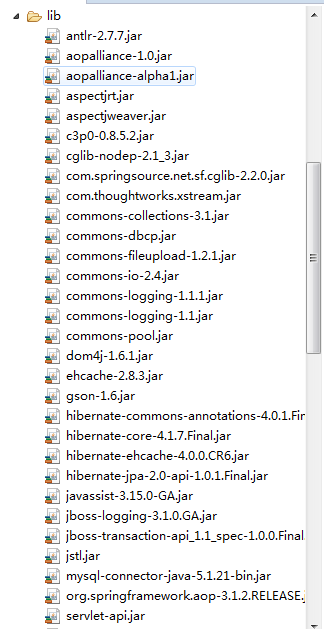
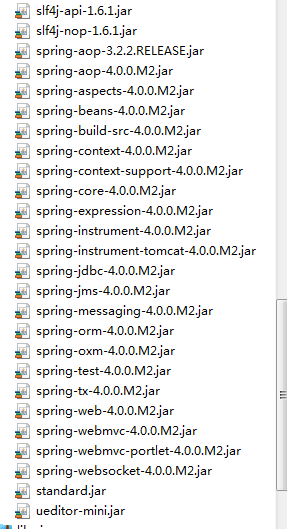
1.下载lib里的jar包:

2.web.xml文件的配置,以顺序显示(顺序也很重要,乱了也有可能出错)
<!-- 过滤乱码 -->
    <filter>
        <filter-name>encodingFilter</filter-name>
        <filter-class>org.springframework.web.filter.CharacterEncodingFilter</filter-class>
        <init-param>
            <param-name>encoding</param-name>
            <param-value>UTF-8</param-value>
        </init-param>
    </filter>
    <filter-mapping>
        <filter-name>encodingFilter</filter-name>
        <url-pattern>/*</url-pattern>
    </filter-mapping>
<!-- Spring的配置 -->
<servlet>
<servlet-name>spring</servlet-name>
<servlet-class>org.springframework.web.servlet.DispatcherServlet</servlet-class>
<init-param>
<param-name>contextConfigLocation</param-name>
<param-value>classpath:spring-mvc.xml</param-value>
</init-param>
<load-on-startup>1</load-on-startup>
</servlet>
<context-param>
<param-name>contextConfigLocation</param-name>
<param-value>classpath:beans.xml</param-value>
</context-param>
<servlet-mapping>
<servlet-name>spring</servlet-name>
<url-pattern>/</url-pattern>
</servlet-mapping>
<listener>
<listener-class>org.springframework.web.context.ContextLoaderListener</listener-class>
</listener>
<listener>
<listener-class>org.springframework.web.util.IntrospectorCleanupListener</listener-class>
</listener><!-- hibernate设置为lazy时延迟加载 -->
<filter>
<filter-name>openSessionInViewFilter</filter-name>
<filter-class>
org.springframework.orm.hibernate4.support.OpenSessionInViewFilter
</filter-class>
</filter>
<filter-mapping>
<filter-name>openSessionInViewFilter</filter-name>
<url-pattern>/*</url-pattern>
</filter-mapping>3.spring主体配置文件beans.xml,存放在src文件夹下:
<?xml version="1.0" encoding="UTF-8"?>
<beans xmlns="http://www.springframework.org/schema/beans"
xmlns:context="http://www.springframework.org/schema/context"
xmlns:aop="http://www.springframework.org/schema/aop" xmlns:tx="http://www.springframework.org/schema/tx"
xmlns:xsi="http://www.w3.org/2001/XMLSchema-instance"
xsi:schemaLocation="http://www.springframework.org/schema/beans
http://www.springframework.org/schema/beans/spring-beans-3.1.xsd
http://www.springframework.org/schema/context
http://www.springframework.org/schema/context/spring-context-3.1.xsd
http://www.springframework.org/schema/tx
http://www.springframework.org/schema/tx/spring-tx-3.1.xsd
http://www.springframework.org/schema/aop
http://www.springframework.org/schema/aop/spring-aop-3.1.xsd">
<context:annotation-config />
<!--配置带@的要扫描的包 -->
<context:component-scan base-package="service" />
<context:component-scan base-package="dao" />
<!-- 配置数据源 -->
<bean id="dataSource" class="com.mchange.v2.c3p0.ComboPooledDataSource"
destroy-method="close">
<property name="driverClass" value="com.mysql.jdbc.Driver" />
<property name="jdbcUrl"
value="jdbc:mysql://localhost:3306/tj?useUnicode=true&characterEncoding=utf-8" />
<property name="user" value="root" />
<property name="password" value="000000" />
<!--连接池中保留的最小连接数。 -->
<property name="minPoolSize" value="5" />
<!--连接池中保留的最大连接数。Default: 15 -->
<property name="maxPoolSize" value="30" />
<!--初始化时获取的连接数,取值应在minPoolSize与maxPoolSize之间。Default: 3 -->
<property name="initialPoolSize" value="10" />
<!--最大空闲时间,60秒内未使用则连接被丢弃。若为0则永不丢弃。Default: 0 -->
<property name="maxIdleTime" value="60" />
<!--当连接池中的连接耗尽的时候c3p0一次同时获取的连接数。Default: 3 -->
<property name="acquireIncrement" value="5" />
<!--JDBC的标准参数,用以控制数据源内加载的PreparedStatements数量。但由于预缓存的statements 属于单个connection而不是整个连接池。所以设置这个参数需要考虑到多方面的因素。
如果maxStatements与maxStatementsPerConnection均为0,则缓存被关闭。Default: 0 -->
<property name="maxStatements" value="0" />
<!--每60秒检查所有连接池中的空闲连接。Default: 0 -->
<property name="idleConnectionTestPeriod" value="60" />
<!--定义在从数据库获取新连接失败后重复尝试的次数。Default: 30 -->
<property name="acquireRetryAttempts" value="30" />
<!--获取连接失败将会引起所有等待连接池来获取连接的线程抛出异常。但是数据源仍有效 保留,并在下次调用getConnection()的时候继续尝试获取连接。如果设为true,那么在尝试
获取连接失败后该数据源将申明已断开并永久关闭。Default: false -->
<property name="breakAfterAcquireFailure" value="true" />
<!--因性能消耗大请只在需要的时候使用它。如果设为true那么在每个connection提交的 时候都将校验其有效性。建议使用idleConnectionTestPeriod或automaticTestTable
等方法来提升连接测试的性能。Default: false -->
<property name="testConnectionOnCheckout" value="false" />
</bean>
<!-- 配置sessionFactory -->
<bean id="sessionFactory"
class="org.springframework.orm.hibernate4.LocalSessionFactoryBean">
<property name="dataSource" ref="dataSource" />
<!-- 配置要扫描的文件 -->
<property name="packagesToScan">
<list>
<value>model</value>
</list>
</property>
<!-- 采用列表的方式列出所有的类 -->
<!-- <property name="annotatedClasses"> <list> <value>com.pdsu.edu.bean.User</value>
</list> </property> -->
<property name="hibernateProperties">
<props>
<prop key="hibernate.dialect">org.hibernate.dialect.MySQLDialect</prop>
<prop key="hibernate.show_sql">true</prop>
<prop key="hibernate.format_sql">false</prop>
<prop key="hibernate.hbm2ddl.auto">update</prop>
<prop key="hibernate.cache.use_query_cache">true</prop>
<prop key="hibernate.cache.use_second_level_cache">true</prop>
<prop key="hibernate.cache.provider_class">net.sf.ehcache.hibernate.EhCacheProvider</prop>
<prop key="hibernate.cache.region.factory_class">org.hibernate.cache.ehcache.EhCacheRegionFactory</prop>
<prop key="current_session_context_class">thread</prop>
<prop key="javax.persistence.validation.mode">none</prop>
</props>
</property>
</bean>
<!-- 配置事务管理器 -->
<bean id="transactionManager"
class="org.springframework.orm.hibernate4.HibernateTransactionManager">
<property name="sessionFactory" ref="sessionFactory" />
</bean>
<!-- 配置事务异常封装 -->
<bean id="persistenceExceptionTranslationPostProcessor"
class="org.springframework.dao.annotation.PersistenceExceptionTranslationPostProcessor" />
<tx:advice id="txAdvice" transaction-manager="transactionManager">
<tx:attributes>
<tx:method name="save*" propagation="REQUIRED" />
<tx:method name="add*" propagation="REQUIRED" />
<tx:method name="insert*" propagation="REQUIRED" />
<tx:method name="update*" propagation="REQUIRED" />
<tx:method name="modify*" propagation="REQUIRED" />
<tx:method name="exit*" propagation="REQUIRED" />
<tx:method name="delete*" propagation="REQUIRED" />
<tx:method name="remove*" propagation="REQUIRED" />
<tx:method name="del*" propagation="REQUIRED" />
<tx:method name="*" read-only="false" propagation="REQUIRED" />
</tx:attributes>
</tx:advice>
<aop:config expose-proxy="true">
<aop:pointcut expression="execution(* service..*.*(..))"
id="transactionAopConfig" />
<aop:advisor advice-ref="txAdvice" pointcut-ref="transactionAopConfig" />
</aop:config>
</beans>说真的,大家就不要自己去写这个文件了,直接复制过去改数据库链接地址就算了.自己瞎写反而容易出错
4.springmvc配置文件:(spring-mvc.xml,存放在src文件夹下)
<?xml version="1.0" encoding="UTF-8"?>
<beans xmlns="http://www.springframework.org/schema/beans"
    xmlns:xsi="http://www.w3.org/2001/XMLSchema-instance" xmlns:mvc="http://www.springframework.org/schema/mvc"
    xmlns:context="http://www.springframework.org/schema/context"
    xmlns:aop="http://www.springframework.org/schema/aop"
    xsi:schemaLocation="http://www.springframework.org/schema/beans http://www.springframework.org/schema/beans/spring-beans-3.0.xsd
        http://www.springframework.org/schema/context http://www.springframework.org/schema/context/spring-context-3.0.xsd
            http://www.springframework.org/schema/aop
        http://www.springframework.org/schema/aop/spring-aop-3.0.xsd
        http://www.springframework.org/schema/mvc http://www.springframework.org/schema/mvc/spring-mvc-3.0.xsd">

    <context:component-scan base-package="controller" />

    <mvc:annotation-driven />

    <bean id="viewResolver"
        class="org.springframework.web.servlet.view.InternalResourceViewResolver">
        <property name="viewClass"
            value="org.springframework.web.servlet.view.JstlView" />
        <property name="prefix" value="/WEB-INF/jsp/" />
        <property name="suffix" value=".jsp" />
    </bean>
    <!-- Spring mvc 拦截器 -->
    <!--权限控制
    <mvc:interceptors>
        <mvc:interceptor>
            <mvc:mapping path="/**" />
            <bean class="interceptor.LoginCheck"></bean>
        </mvc:interceptor>
    </mvc:interceptors>
     -->
<mvc:default-servlet-handler/>
    <!--文件上传 -->
    <bean id="multipartResolver"
        class="org.springframework.web.multipart.commons.CommonsMultipartResolver">
        <property name="maxUploadSize" value="1000000000" />
    </bean>

    <!-- 异常处理类 -->
    <bean id="exceptionResolver"
        class="org.springframework.web.servlet.handler.SimpleMappingExceptionResolver">
        <property name="defaultErrorView">
            <value>error</value>
        </property>
        <!-- 设置日志输出级别,不定义则默认不输出警告等错误日志信息 -->
        <property name="warnLogCategory" value="WARN"></property>
        <!-- 默认HTTP状态码 -->
        <property name="defaultStatusCode" value="500"></property>
    </bean>

</beans>
5.ehcache配置文件(ehcache.xml,存放在src文件夹下):
<?xml version="1.0" encoding="GB2312"?>
<!-- <?xml version="1.0" encoding="UTF-8"?> <ehcache name="ColorCache"> <defaultCache
    maxElementsInMemory="10000" eternal="false" timeToIdleSeconds="120" timeToLiveSeconds="120"
    overflowToDisk="true" diskPersistent="false" diskExpiryThreadIntervalSeconds="120"
    memoryStoreEvictionPolicy="LRU" /> <cache name="zxtcache" maxElementsInMemory="100"
    eternal="false" timeToIdleSeconds="999999999" timeToLiveSeconds="99999999"
    memoryStoreEvictionPolicy="LFU"> </cache> </ehcache> -->
<ehcache>
    <diskStore path="java.io.tmpdir/acb" />

    <!-- 二级缓存(不包括查询缓存)默认这个配置,即:没有为某个实体专门配置Cache时默认使用该配置 -->
    <defaultCache maxElementsInMemory="10000" eternal="false"
        timeToIdleSeconds="120" timeToLiveSeconds="120" overflowToDisk="true"
        diskPersistent="false" diskExpiryThreadIntervalSeconds="360"
        memoryStoreEvictionPolicy="LRU" />

    <!-- 自定义二级缓存, 需要在代码中使用Query.setCacheRegion("zsjQueryCache"); 或 HibernateTemplate.setQueryCacheRegion("zsjQueryCache"); -->
    <Cache name="zsjTowCache" maxElementsInMemory="10000" eternal="false"
        timeToIdleSeconds="0" timeToLiveSeconds="0" overflowToDisk="true"
        diskPersistent="false" diskExpiryThreadIntervalSeconds="120"
        memoryStoreEvictionPolicy="LRU" />

    <!-- 直接指定name为实体 包名称.类名称,这样实体就会直接使用这个策略,不用再实体中具体指定或 代码设置了 -->
    <Cache name="com.eloomobile.appstore.entity.AppGoodsReversions"
        maxElementsInMemory="10000" eternal="false" timeToIdleSeconds="0"
        timeToLiveSeconds="0" overflowToDisk="true" diskPersistent="false"
        diskExpiryThreadIntervalSeconds="120" memoryStoreEvictionPolicy="LRU" />


    <Cache name="com.eloomobile.appstore.entity.One"
        maxElementsInMemory="10000" eternal="false" timeToIdleSeconds="10"
        timeToLiveSeconds="10" overflowToDisk="true" diskPersistent="false"
        diskExpiryThreadIntervalSeconds="120" memoryStoreEvictionPolicy="LRU" />

    <Cache name="com.eloomobile.appstore.entity.Many"
        maxElementsInMemory="10000" eternal="false" timeToIdleSeconds="10"
        timeToLiveSeconds="10" overflowToDisk="true" diskPersistent="false"
        diskExpiryThreadIntervalSeconds="120" memoryStoreEvictionPolicy="LRU" />


    <Cache name="com.eloomobile.appstore.entity.demo.UserTo"
        maxElementsInMemory="10000" eternal="false" timeToIdleSeconds="0"
        timeToLiveSeconds="0" overflowToDisk="true" diskPersistent="false"
        diskExpiryThreadIntervalSeconds="120" memoryStoreEvictionPolicy="LRU" />


    <!-- 以下配置的都是查询缓冲 ,查询缓存(不包括二级缓存)默认这个配置,即:没有为某个实体专门配置Cache时默认使用该配置 -->
    <cache name="org.hibernate.cache.StandardQueryCache"
        maxElementsInMemory="500" eternal="false" timeToIdleSeconds="240"
        timeToLiveSeconds="240" overflowToDisk="true" />

    <!-- 用于保存查询最近查询的一系列表的时间戳 -->
    <cache name="org.hibernate.cache.UpdateTimestampsCache"
        maxElementsInMemory="5000" eternal="true" overflowToDisk="false" />

    <!-- 自定义查询缓存策略,需要在代码中使用Query.setCacheRegion("zsjQueryCache"); 或 HibernateTemplate.setQueryCacheRegion("zsjQueryCache"); -->
    <cache name="zsjQueryCache" maxElementsInMemory="50" eternal="false"
        timeToIdleSeconds="0" timeToLiveSeconds="0" overflowToDisk="false" />
</ehcache>
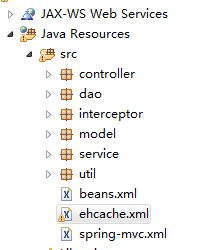
6.包结构:
7.mode层user类:
package model;

import javax.persistence.Entity;
import javax.persistence.GeneratedValue;
import javax.persistence.Id;
import javax.persistence.Table;
import javax.persistence.Version;

import org.hibernate.annotations.Cache;
import org.hibernate.annotations.CacheConcurrencyStrategy;

@Entity
@Cache(usage = CacheConcurrencyStrategy.READ_WRITE)
@Table(name = "b2c_user")
public class User {
    @Id
    @GeneratedValue
    private int id;

    private String name;
    private String pwd;
    private String cookie;

    @Version
    private int version;

    ....getter
    ....setter

}
8.dao这里要注意,不可以再使用hibernatetemplete了,hibernate4直接使用session操作数据库,所以要这样写:
@Resource
private SessionFactory sessionFactory;
public Session getSession() {
    return sessionFactory.getCurrentSession();
}
public int save(Object object) {
    return (Integer) getSession().save(object);
}
9.service层必须要写接口,否则事务管理无法运行.这可能是spingmvc的一个bug.
public interface UserService继承接口:
@Component
public class UserServiceImpl implements UserService
10.controller层:
@Controller
public class UserControl@Resource(name = "userService")
private UserServiceImpl userService;一定要对接口进行注入,否则不能使用事务管理.
@RequestMapping("/users/{page}")
    public String list(@PathVariable int page, HttpServletRequest request) {
        request.setAttribute("users", userService.getList(page, 20));
        request.setAttribute("count", userService.getListCount());
        request.setAttribute("page", page);
        throw new RuntimeException("测试出错");
//      return "user/list";
    }
11.jsp页面(jsp文件放在WEB-INF的jsp文件夹里):
<%@ page language="java" import="java.util.*" pageEncoding="utf-8"%>
<%
    String path = request.getContextPath();
    String basePath = request.getScheme() + "://"
            + request.getServerName()
            + path + "/";
    request.setAttribute("basePath", basePath);
%>
<%@taglib prefix="c" uri="http://java.sun.com/jsp/jstl/core"%>
<!DOCTYPE html PUBLIC "-//W3C//DTD HTML 4.01 Transitional//EN" "http://www.w3.org/TR/html4/loose.dtd">
<html>
<head>
<meta http-equiv="Content-Type" content="text/html; charset=UTF-8">
<base href="${basePath }"/>
<title>Insert title here</title>
</head>
<body>
    欢迎回来,${user.name }<hr/><!-- 读取session中的值 -->
    用户列表:<br/>

    <c:forEach items="${users }" var="u">
        id:${u.id} || 用户名:${u.name } || 密码:${u.pwd} || cookie:${u.cookie } || <a href="user/update/${u.id}">修改</a> || <a href="user/del/${u.id} }">删除</a><br/>
    </c:forEach>
    <hr/>
    <c:if test="${page-1>0}"><a href="users/${page-1}">上一页</a></c:if> ||
    <c:if test="${page<=(count/20+1) }"><a href="users/${page+1}">下一页</a></c:if>||<a href="user/add">添加</a>
    <hr/>
    <a href="user/login">登录</a>
</body>
</html>
到这里搭建就全部完成了


 本文介绍了如何使用注解配置,避免接口写DAO层,简化流程,以SpringMVC+Hibernate+事务管理+ Ehcache 查询缓存+二级缓存+C3P0连接池为基础,搭建一个适合日常开发的环境。详细步骤包括下载依赖库,配置web.xml,beans.xml,spring-mvc.xml,ehcache.xml,构建包结构,定义User类,使用Session操作数据库,编写Service层接口,Controller层处理,并在JSP页面展示。


 496
496

 被折叠的 条评论
为什么被折叠?


